
Popular categories
Looking for a yarn?


Comments / Questions (6)
![]() Florencia wrote:
Florencia wrote:
Hola! Buenos dias! Los últimos aumentos, no aclara si hay que tener en cuenta los marcadores. Yo interpreto que los aumento se realizan 1 punto en la delantera, 2 puntos en las mangas, 2 puntos en la espalda y un punto en la otra delantera. Siempre teniendo en cuenta los marcadores, se aumenta de un lado del marcador y del otro, es asi? Gracias 🙂
12.01.2026 - 15:14DROPS Design answered:
Hola Florencia, sí, aumentas a cada lado de los marcapuntos, para tener 2 aumentos en cada sección (y 1 en cada delantero).
18.03.2026 - 11:27
![]() Valeria wrote:
Valeria wrote:
Continua a non essere chiaro. Le istruzioni in italiano sono diverse da quelle in inglese. In quelle in italiano sembra esserci un refuso, potete chiarire quanti aumenti bisogna fare sul dietro per la taglia XL? Grazie
23.08.2025 - 15:03DROPS Design answered:
Buongiorno Valeria, grazie per la segnalazione, abbiamo corretto il testo nel punto indicato. Buon lavoro!
23.08.2025 - 17:02
![]() Valeria wrote:
Valeria wrote:
Salve, non ho capito la parte "DOPO IL 3°FERRO" del dietro. Ho finito i 30 ferri e ho 96 maglie sul ferro. Dopo il terzo ferro si richiede di fare altri aumenti per 16 ferri, come faccio quindi ad avere 68 maglie alla fine, cioè meno di quando inizio? Grazie
22.08.2025 - 12:44DROPS Design answered:
Buongiorno Valeria, dopo aver avviato le maglie, deve lavorare i primi 3 ferri del motivo, e poi ripetere il 2° e 3° ferro per il n° di volte indicato per la sua taglia, non deve lavorare tutto il motivo. Buon lavoro!
23.08.2025 - 14:10
![]() Leda Masi wrote:
Leda Masi wrote:
Ritiro la domanda stupida, ho capito. :-) grazie comunque Leda
14.04.2025 - 10:22
![]() Leda wrote:
Leda wrote:
Non mi è chiaro l'ultimo passaggio del corpo: lavorare A2 e allo stesso tempo aumentare in modo uniforme 10 maglie sulle maglie del motivo. Devo aumentare tra ogni ripetizione con un dritto? Grazie
10.04.2025 - 16:42DROPS Design answered:
Buonasera Leda, deve aumentare 20 maglie a intervalli regolari. Buon lavoro!
12.04.2025 - 17:41
![]() Nicole Vena wrote:
Nicole Vena wrote:
I'm confused on the 2nd set of increases for the body and sleeves. It never specifies when to slip the markers like it did previously. If we are knitting to 2 stitches before marker, increasing to right, knit 2, increase to left, the sleeve stitches will always be 26. Do we slip the marker then increase to left? Please specify how to slip the markers.
20.03.2025 - 00:42DROPS Design answered:
Dear Mrs Vena, you will now increase on each side of the knit 2 sts so that the number of stitches on body and sleeves will increase by 1 on each front piece and by 2 on sleeves and back piece. Happy knitting!
20.03.2025 - 10:16
|
|||||||||||||||||||
Bright Day Cardigan#brightdaycardigan |
|||||||||||||||||||
 |
 |
||||||||||||||||||
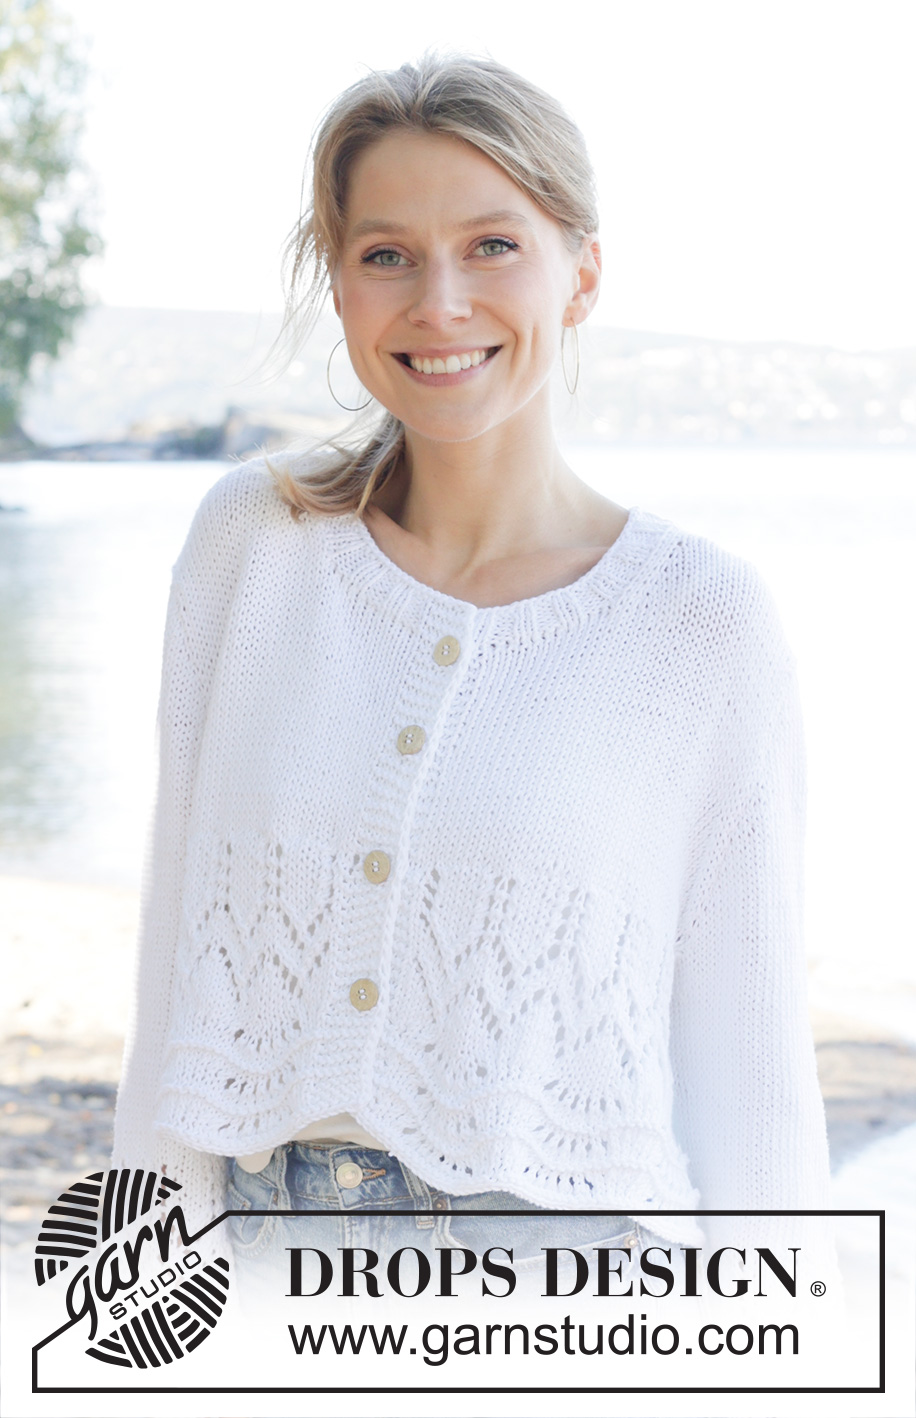
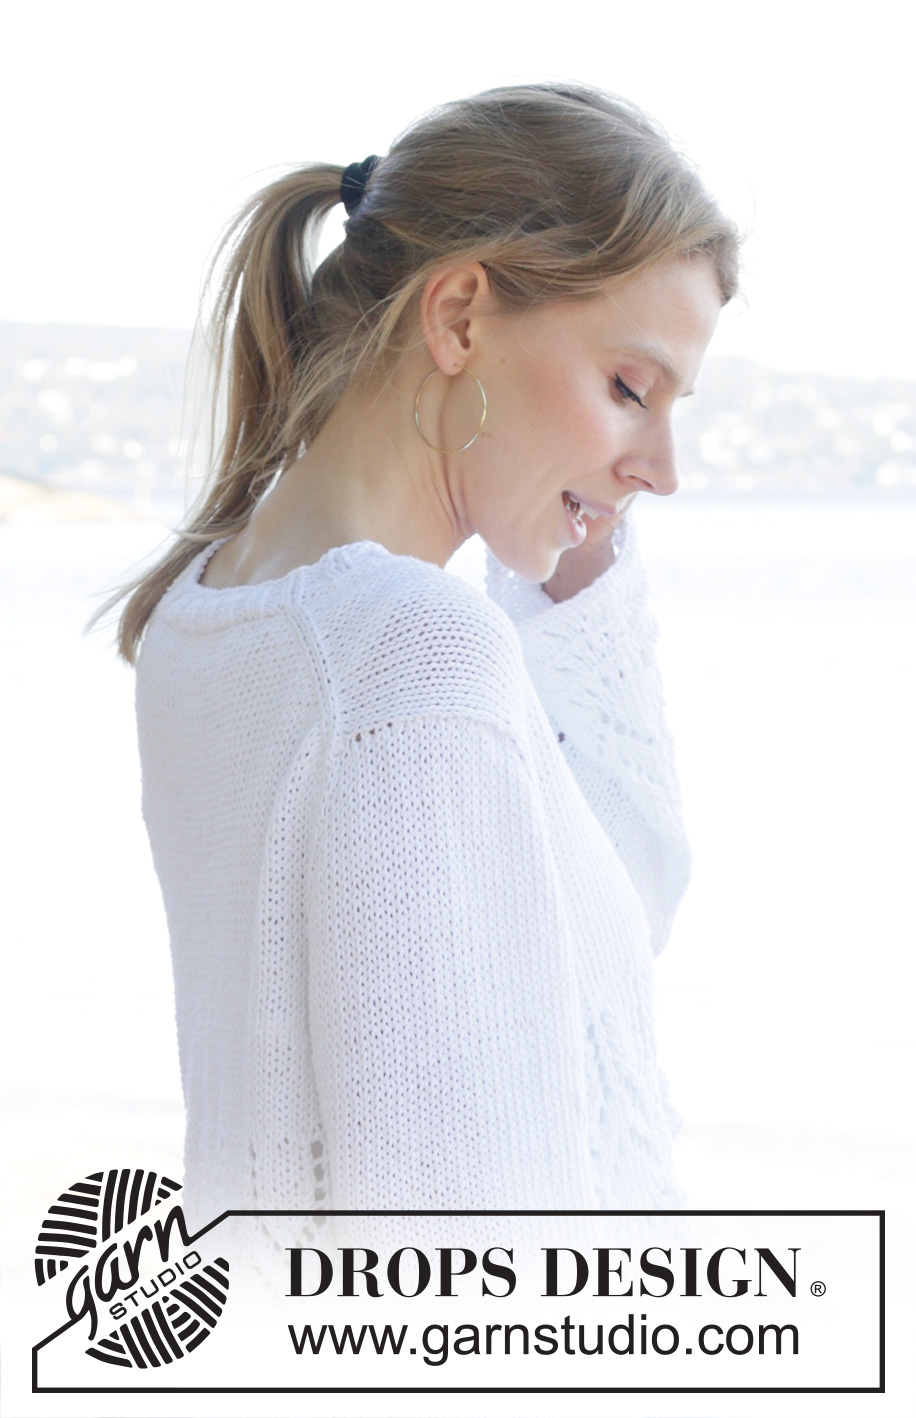
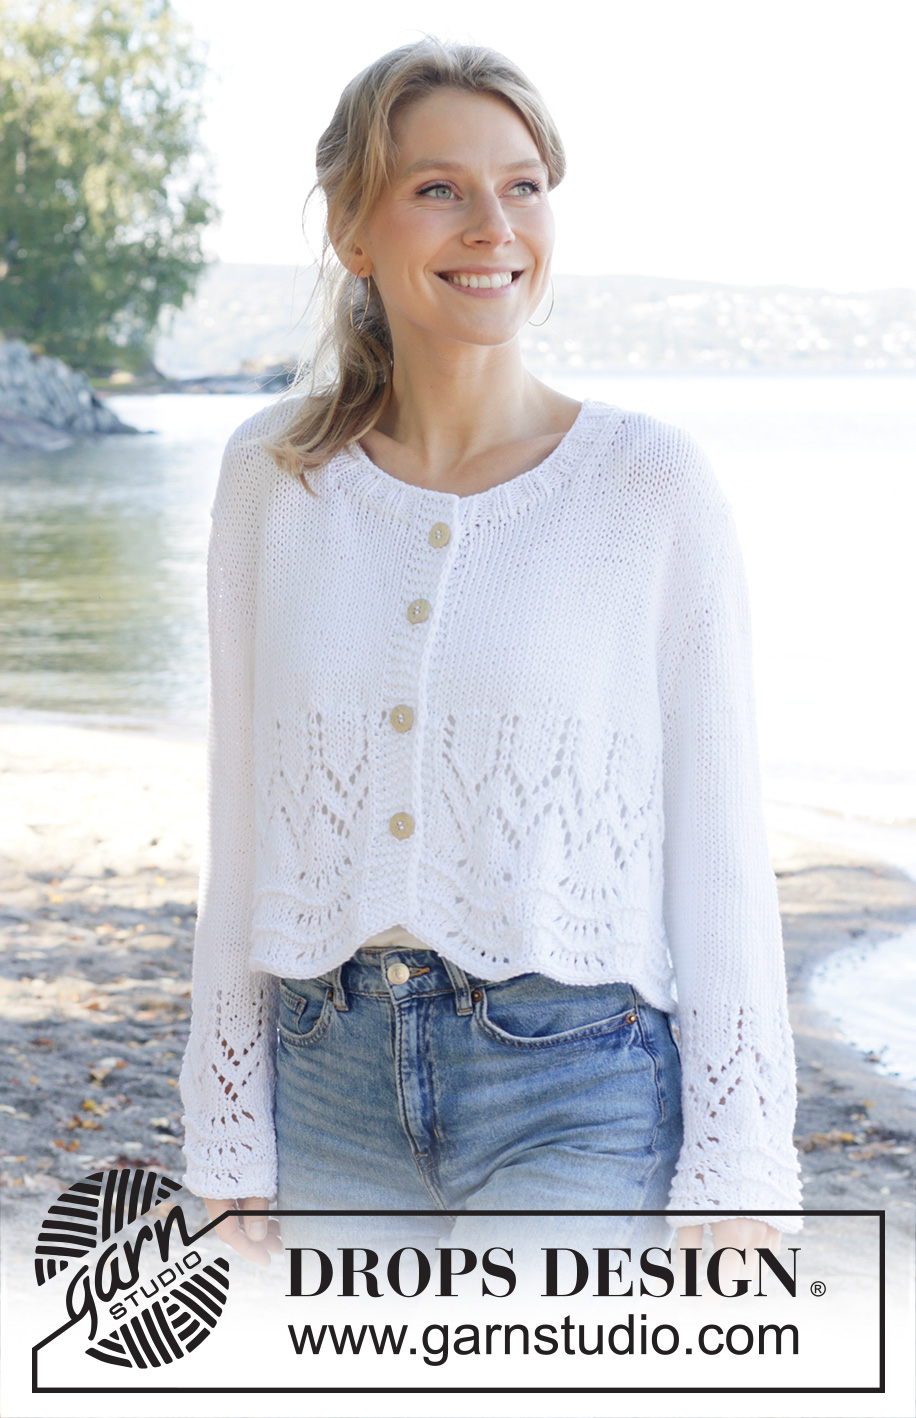
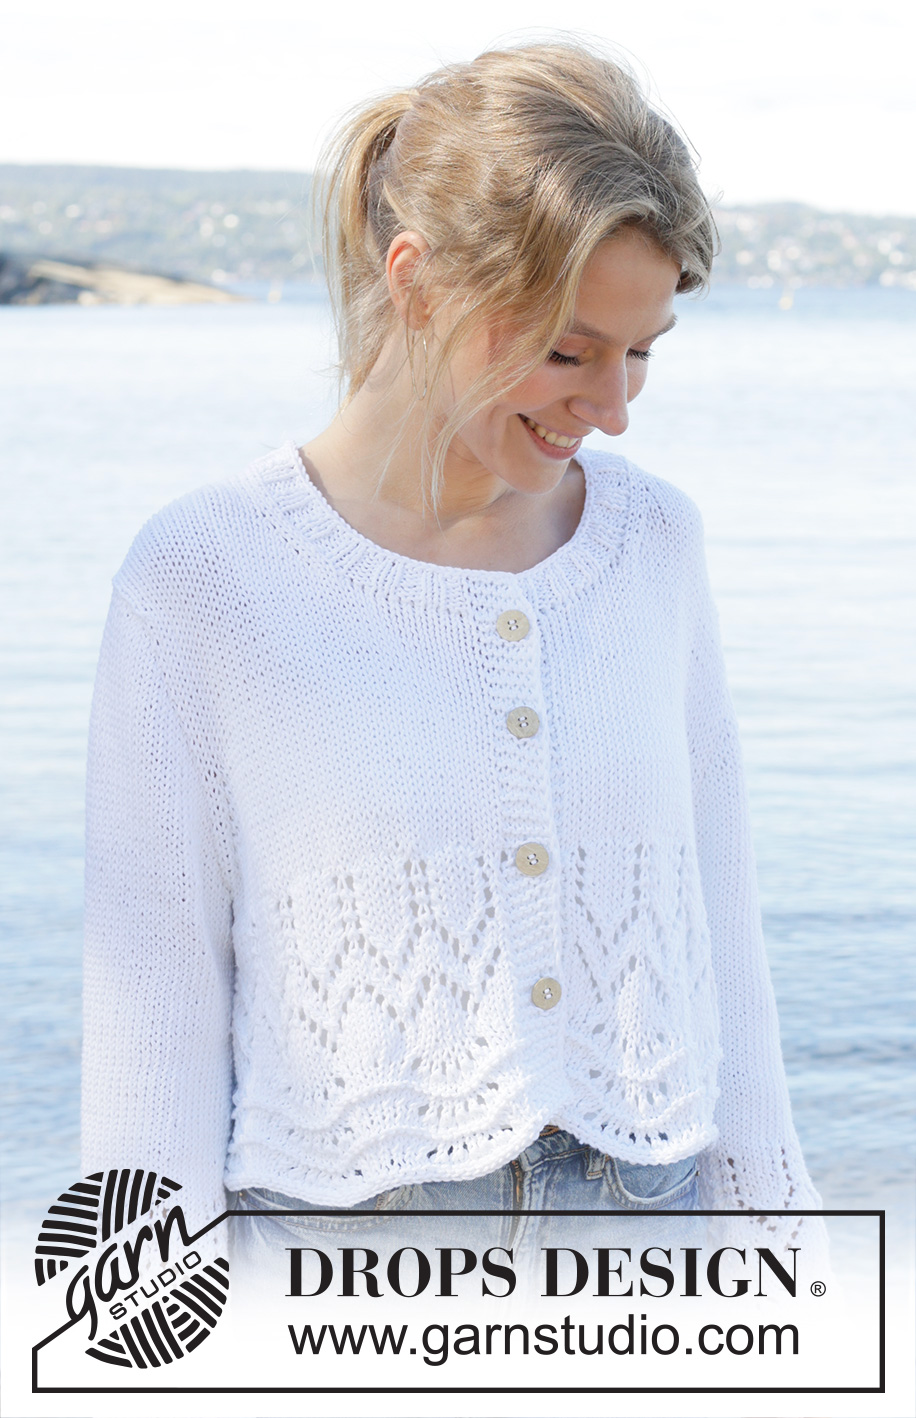
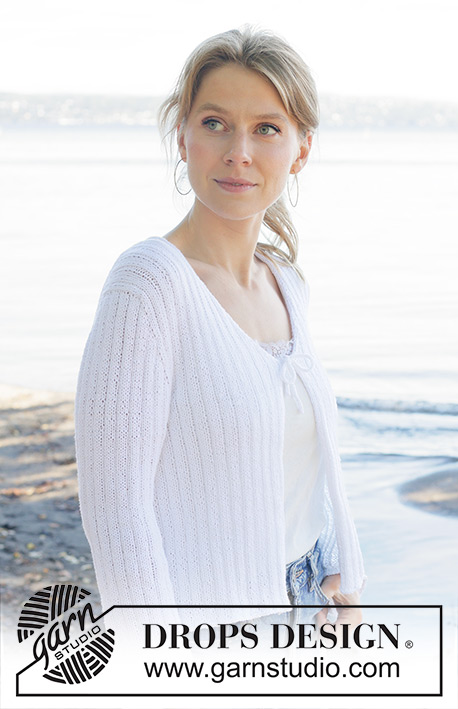
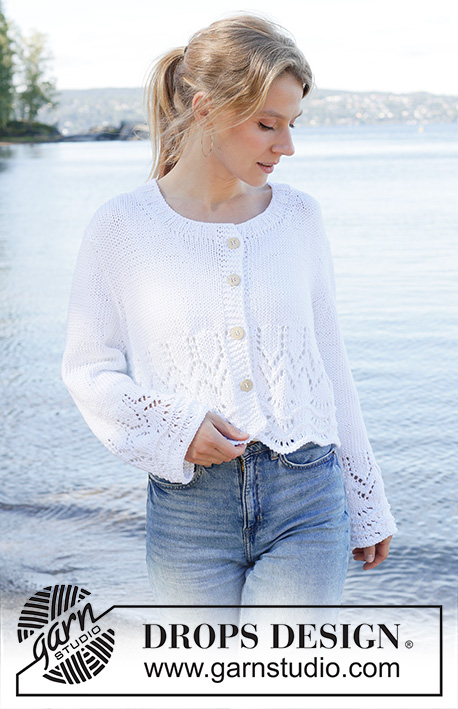
Knitted jacket in DROPS Paris. Piece is knitted top down with European yoke and lace pattern. Size: S - XXXL.
DROPS 257-16 |
|||||||||||||||||||
|
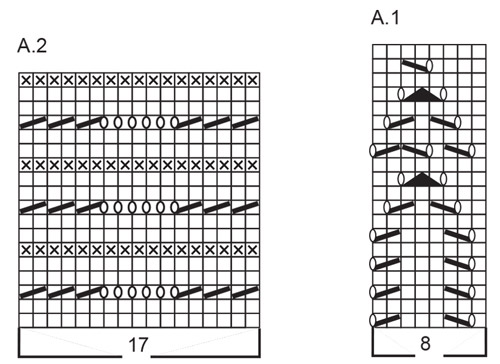
---------------------------------------------------------- EXPLANATION FOR THE PATTERN: ---------------------------------------------------------- GARTER STITCH (when working back and forth): Knit on all rows, i.e. knit from right side and knit from wrong side. 1 ridge vertically = knit 2 rows. INCREASE TIP-1: INCREASE 1 STITCH TOWARDS THE LEFT - from RIGHT SIDE: Use left needle to pick up yarn between 2 stitches from row below, pick up yarn from the front and knit in the stitch loop that is on the back of the needle. INCREASE 1 STITCH TOWARDS THE RIGHT - from RIGHT SIDE: Use left needle to pick up yarn between 2 stitches from row below, pick up yarn from the back and knit in the stitch loop that is on the front side of the needle. INCREASE TIP-2: INCREASE 1 STITCH TOWARDS THE RIGHT - from WRONG SIDE: Use left needle to pick up yarn between 2 stitches from row below, pick up yarn from the back and purl in the stitch loop that is on the front side of the needle. INCREASE 1 STITCH TOWARDS THE LEFT - from WRONG SIDE: Use left needle to pick up yarn between 2 stitches from row below, pick up yarn from the front and purl in the stitch loop that is on the back side of the needle. DECREASE TIP: Decrease 1 stitch on each side of marker thread as follows: Work until 3 stitches remain before marker thread and knit 2 together, knit 2 (marker thread is in the middle of these 2 stitches), slip 1 stitch knitwise, knit 1, pass slipped stitch over stitch worked (= 2 stitches decreased). BAND WITH I-CORD: BEGINNING OF ROW: Work band as follows: Slip 1 stitch purlwise with strand in front of piece, knit 1 and work 5 stitches in GARTER STITCH - read explanation above. END OF ROW: Work band as follows: Work until 7 stitches remain on row, work 5 stitches in garter stitch, slip 1 stitch purlwise with strand in front of piece, knit 1. Work the same way both from right side and wrong side. BUTTONHOLES: Decrease for buttonholes on right band (when garment is worn). Decrease from right side when 5 stitches remain on row as follows: ROW 1 (= right side): Make 1 yarn over, knit 2 together, knit 1, slip 1 stitch purlwise with strand in front of piece, knit 1. ROW 2 (= wrong side): Work band as before and knit yarn over to make a buttonhole. Decrease for first buttonhole on first row from right side after all stitches for neck have been cast on. Then decrease the next 3-3-3-3-4-4 buttonholes, approx. 8½-9-9-9-8-8½ cm = 3¼"-3½"-3½"-3½"-3⅛"-3¼" apart. SLEEVE TIP: When picking up stitches mid under sleeve, there will be a small hole in the transition between stitches on body and sleeves. The holes can be closed by picking up the strand between two stitches - work this strand twisted together with the first stitch between body and sleeve so that the holes closes. ---------------------------------------------------------- START THE PIECE HERE: ---------------------------------------------------------- JACKET - SHORT OVERVIEW OF THE PIECE: In this pattern needles of different length have been used, begin with fitting length for number of stitches and switch as needed. First work piece back and forth on circular needle. Begin by casting on stitches in the back of neck. Then work back piece downwards while AT THE SAME TIME increasing in each side of piece until number of stitches for shoulder width is reached. Back piece has a slight diagonal shoulder. Now put back piece aside and work the beginning of front pieces. Begin by picking up stitches along one shoulder from back piece, work and increase towards the neck. Repeat on the other shoulder. Now pick up stitches for sleeves along the sides on front pieces, and slip stitches from back piece back on needle. Work back and forth over all stitches. Increase stitches on yoke. Increase first stitches for sleeves only then increase stitches for both front pieces/back piece. Divide piece for body and sleeves. Work body downwards back and forth on circular needle with lace pattern while putting the sleeves aside. Then work sleeves downwards in the round on needle. Finish by picking up stitches around the neck and work a neck edge in the round. BACK PIECE: Work piece back and forth on circular needle. Cast on 30-32-34-36-36-40 stitches on circular needle size 5 MM = US 8 with DROPS Paris. ROW 1 (= wrong side): Purl all stitches. ROW 2 (= right side): Read INCREASE TIP-1 and knit 3, increase 1 stitch towards the left, knit until 3 stitches remain, increase 1 stitch towards the right, knit 3. ROW 3 (= wrong side): Read INCREASE TIP-2 and purl 3, increase 1 stitch towards the right, purl until 3 stitches remain, increase 1 stitch towards the left, purl 3. AFTER 3RD ROW: Work 2nd and 3rd ROW 8-8-8-8-9-9 times in total (= 16-16-16-16-18-18 rows have been worked), after increase there are = 62-64-66-68-72-76 stitches on needle. Cut the yarn, slip stitches on a thread or an stitch holder. RIGHT SHOULDER: Find right shoulder on back piece as follows: Place back piece flat with right side up, place back piece so that stitches on thread/stitch holder is towards you, right side of piece = right shoulder. Now pick up stitches along left diagonal shoulder on back piece - begin from right side at the shoulder and pick up stitches out towards the neck as follows: Pick up 1 stitch in every worked row inside outermost stitch = 16-16-16-16-18-18 stitches. All length measurements on front piece are done from pick-up edge. Work in stockinette stitch (work first row from wrong side). When piece measures 9 cm = 3½", increase stitches towards the neck as follows: ROW 1 (= right side): Work until 3 stitches remain, increase towards the right, knit 3 – remember INCREASE TIP-1. ROW 2 (= wrong side): Purl all stitches. Work 1st and 2nd ROW 2 times in total (= 4 rows have been worked) = 18-18-18-18-20-20 stitches. At the end of last row from wrong side, purl the last 2 stitches together = 17-17-17-17-19-19 stitches. Cut the yarn, slip stitches on a thread or stitch holder, now work left front piece along the left shoulder as explained below. LEFT SHOULDER: Now pick up stitches along left diagonal shoulder on back piece - begin from right side at the neck and pick up stitches out towards the armhole as follows: Pick up 1 stitch in every worked row inside outermost stitch = 16-16-16-16-18-18 stitches. All length measurements on front piece are done from pick up edge. Work in stockinette stitch (work first row from wrong side). When piece measures 9 cm = 3½", increase stitches towards the neck as follows: ROW 1 (= right side): Remember INCREASE TIP-1 and knit 3, increase 1 stitch towards the left, work the rest of row. ROW 2 (= wrong side): Purl all stitches. Work 1st and 2nd ROW 2 times in total (= 4 rows have been worked) = 18-18-18-18-20-20 stitches. At the beginning of last row from wrong side, purl the last 2 stitches twisted together = 17-17-17-17-19-19 stitches. Then slip front pieces and back piece together, and pick up stitches for sleeve as explained below. ROW 1 (= right side): Work from right side with stitches from left front piece: work 3 stitches, increase towards the left, knit the remaining stitches on left front piece, insert 1 marker here, pick up 20 stitches from the side of left front piece (= sleeve, stitches picked up inside outermost stitch), insert 1 marker, knit the first 2 stitches from back piece together (= 1 stitch decreased), knit until 2 stitches remain on back piece, slip 1 stitch of the needle, knit 1, pass slipped stitch over (= 1 stitch decreased), insert 1 marker, pick up 20 stitches along the side on right front piece (= sleeve, pick up stitches inside outermost stitch), insert 1 marker, slip stitches from right front piece back on left needle, work until 3 stitches remain, increase towards the right, work the last 3 stitches = 136-138-140-142-150-154 stitches. ROW 2 (= wrong side): Purl all stitches. ROW 3 (= right side): Work 3 stitches, increase towards the left, work until first marker, move marker on to right needle, increase towards the left, work 20 stitches, increase towards the right, move marker on to right needle, work until next marker, move marker on to right needle, increase towards the left, work 20 stitches, increase towards the right, move marker on to right needle, work until 3 stitches remain, increase towards the right, work 3 stitches = 142-144-146-148-156-160 stitches. ROW 4 (= wrong side): Purl, at the end of row cast on 18-19-20-21-21-23 new stitches = 160-163-166-169-177-183 stitches. ROW 5 (= right side): Work BAND WITH I-CORD - read explanation above, knit until first marker, move marker on to right needle, increase towards the left, work 22 stitches, increase towards the right, move marker on to right needle, work until next marker, move marker on to right needle, increase towards the left, work 22 stitches, increase towards the right, move marker on to right needle, work the rest of row. At the end of row cast on 18-19-20-21-21-23 new stitches = 182-186-190-194-202-210 stitches on needle. ROW 6 (= wrong side): Purl with band with I-cord in each side. ROW 7 (= right side): On this row begin decreases for BUTTONHOLES – read explanation above. Work band as before, knit until first marker, move marker on to right needle, increase towards the left, work 24 stitches, increase towards the right, move marker on to right needle, work until next marker, move marker on to right needle, increase towards the left, work 24 stitches, increase towards the right, move marker on to right needle, work until 7 stitches remain, work band as before. There are now 60-62-64-66-70-74 stitches on back piece, 37-38-39-40-42-44 stitches on each front piece and 26 stitches on each sleeve = 186-190-194-198-206-214 stitches on row. ROW 8 (= wrong side): Purl with band in each side. Then increase both on sleeves and on body, work next row as follows. ROW 1 (= right side): Work band and stockinette stitch until 2 stitches remain before marker, increase towards the right, work 2 stitches, increase towards the left, work over the 26 stitches on sleeve, increase towards the right, work 2 stitches, increase towards the left, work 56-58-60-62-66-70 stitches, increase towards the right, work 2 stitches, increase towards the left, work over the 26 stitches on sleeve, increase towards the right, work 2 stitches, increase towards the left, work until 7 stitches remain, work band (= 8 stitches increased, on each side of the 2 stitches in every transition between body and sleeve). ROW 2 (= wrong side): Purl with band in each side. Repeat these 2 rows until you have increased 10-12-13-15-17-18 times in total on body and sleeves. You have increased 13-15-16-18-20-21 times in total on sleeves = 266-286-298-318-342-358 stitches. Piece should now measure approx. 12-14-15-16-18-19 cm = 4¾"-5½"-6"-6¼"-7"-7½" on sleeve, when the sweater is folded double at the shoulder, it should measure approx. 18-20-21-22-24-25 cm = 7"-8"-8¼"-8¾"-9½"-9¾" from the top of shoulder. Now divide yoke for body and sleeves. DIVIDING FOR BODY AND SLEEVES: AT THE SAME TIME while working next row, divide yoke for body and sleeves as follows: work 47-50-52-55-59-62 stitches as before (= front piece), slip the next 46-50-52-56-60-62 stitches on a stitch holder for sleeve, cast on 8-10-12-14-16-18 new stitches on row (= in the side mid under sleeve), work 80-86-90-96-104-110 stitches in stockinette stitch (= back piece), slip the next 46-50-52-56-60-62 stitches on a stitch holder for sleeve, cast on 8-10-12-14-16-18 new stitches on row (= in the side mid under sleeve) and work the last 47-50-52-55-59-62 stitches on needle (= front piece). Finish body and sleeves separately. BODY: = 190-206-218-234-254-270 stitches. Work in stockinette stitch with band in each side as before for 5-5-6-7-7-8 cm = 2"-2"-2⅜"-2¾"-2¾"-3⅛", on last row increase 1-1-5-5-1-1 stitches evenly = 191-207-223-239-255-271 stitches. Then work as follows – from mid front: Band, A.1 until 8 stitches remain, knit 1 (so that pattern is the same in each side) and work band. When A.1 has been worked 1 time vertically, work bands as before and pattern A.2 - at the same time increase 10-11-12-13-14-15 stitches evenly over stitches in pattern. Work as follows: Band, A.2 until 7 stitches remain (remember to increase) and work band = 201-218-235-252-269-286 stitches. Finish A.2 and bind off. Jacket measures approx. 44-46-48-50-52-54 cm = 17¼"-18"-19"-19¾"-20½"-21¼" from the top of shoulder. SLEEVES: Slip 46-50-52-56-60-62 sleeve stitches from one thread on to circular needle size 5 MM = US 8 and pick in addition up 1 stitches in each of the 8-10-12-14-16-18 stitches cast under sleeve - read SLEEVE TIP = 54-60-64-70-76-80 stitches. Insert 1 marker thread in the middle of the 8-10-12-14-16-18 new stitches under sleeve - round begins at the marker thread. Work in stockinette stitch in the round on needle - AT THE SAME TIME when sleeve measures 3 cm = 1⅛" from division, decrease mid under sleeve – read DECREASE TIP and decrease as follows: Decrease 2 stitches every 8-6½-5½-3½-3-2½ cm = 3⅛"-2½"-2⅛"-1¼"-1⅛"-1" 2-4-5-8-10-11 times in total = 50-52-54-54-56-58 stitches. AT THE SAME TIME when piece measures 37-37-38-38-38-38 cm = 14½"-14½"-15"-15"-15"-15" from shoulder, work A.1 in the round over all stitches, NOTE! Because of the decreases A.1 does not fit under sleeve, place therefore 1 repetition of A.1 mid on top of sleeve and work stitches that do not fit a whole repetition in stockinette stitch. When A.1 has been worked, work A.2 over all stitches - NOTE! On first round adjust number of stitches to 51-51-51-51-68-68. Finish A.2 and bind off. Sleeve measures approx. 54-54-55-55-55-55 cm = 21¼"-21¼"-21⅝"-21⅝"-21⅝"-21⅝" from shoulder. NECK EDGE: Pick up approx. 88 to 120 stitches around the neck on needle 4 MM = US 6, number of stitches must be divisible by with 4. Work first row as follows from wrong side: 7 band stitches, * purl 2, knit 2 *, work from *-* until 9 stitches remain, purl 2 and 7 band stitches. Bind off when rib measures 3 cm = 1⅛". ASSEMBLY: Sew the buttons on to the left band. |
|||||||||||||||||||
Diagram explanations |
|||||||||||||||||||
|
|||||||||||||||||||
 |
|||||||||||||||||||
 |
|||||||||||||||||||
Have you finished this pattern?Tag your pictures with #dropspattern #brightdaycardigan or submit them to the #dropsfan gallery. Do you need help with this pattern?You'll find 30 tutorial videos, a Comments/Questions area and more by visiting the pattern on garnstudio.com. © 1982-2026 DROPS Design A/S. We reserve all rights. This document, including all its sub-sections, has copyrights. Read more about what you can do with our patterns at the bottom of each pattern on our site. |
|||||||||||||||||||


With over 40 years in knitting and crochet design, DROPS Design offers one of the most extensive collections of free patterns on the internet - translated to 17 languages. As of today we count 325 catalogs and 12298 patterns - 12288 of which are translated into English (US/in).
We work hard to bring you the best knitting and crochet have to offer, inspiration and advice as well as great quality yarns at incredible prices! Would you like to use our patterns for other than personal use? You can read what you are allowed to do in the Copyright text at the bottom of all our patterns. Happy crafting!
Post a comment to pattern DROPS 257-16
We would love to hear what you have to say about this pattern!
If you want to leave a question, please make sure you select the correct category in the form below, to speed up the answering process. Required fields are marked *.