
Popular categories
Looking for a yarn?


Comments / Questions (58)
![]() Thea wrote:
Thea wrote:
Ik begrijp niet wat bedoeld wordt met (= 8 steken gemeerderd op iedere meerdernaald)
25.09.2025 - 16:28
![]() Andrine wrote:
Andrine wrote:
Hva menes med at det skal strikkes 1 omgang med *dobbelt* perlestrikk? Betyr det at jeg skal strikke én runde med A1 mønster?
14.09.2025 - 13:01DROPS Design answered:
Hei Andrine, Ja, som du sier du strikker en omgang med A.1. Hilsen Drops Team.
15.09.2025 - 06:50
![]() Sophie wrote:
Sophie wrote:
Je ne suis pas certaine de comprendre pour les augmentations du raglan . Est-ce que je de rais avoir deux jetés de suite si c’est une avant et une après le marqueur? À tous les deux rangs c’est bien un rang avec les jetés, la suivante je la tricote, et ensuite un autre rang avec les jetés? Merci
11.09.2025 - 22:35DROPS Design answered:
Bonjour Sophie, vous avez un jete a 1 maille avant le fil marqueur et a 1 maille apres le fil marqueur, donc vous aurez toujours 2 mailles endroit entre ces jetes. Vous augmentez pour le raglan 27-29-32-36-37-40 fois au total tous les 2 tours, cela veut dire qu'au tour 1 vous faites les jetes, le tour suivant vous les tricotez comme dans la partie RAGLAN, etc. Pour vous aider tricoter les jetes, regardez la lecon DROPS ICI. Bon tricot!
12.09.2025 - 08:42
![]() Ester wrote:
Ester wrote:
Hoe meerder ik in raglan wanneer de steekmarkeerder TUSSEN twee steken zit? Ik heb enkel ervaring wanneer de markeerder IN een steek zit (en zo voor en na een omslag te maken)
02.09.2025 - 21:27DROPS Design answered:
Dag Esther,
In dit geval brei je aan elke kant van de markeerdraad telkens 1 tricotsteek. Je hebt dus steeds 2 tricotsteken op de raglanlijnen waartussen de markeerdraad zit. Je meerdert aan beide kanten van deze tricotsteken.
04.09.2025 - 21:47
![]() Suzanne wrote:
Suzanne wrote:
Il est magnifique. Très beau projet pour moi cet hiver. Merci.
02.09.2025 - 18:43
![]() Line wrote:
Line wrote:
Magnifique
02.09.2025 - 13:52
![]() Marleen wrote:
Marleen wrote:
Hallo, zou u mijn vraag nog willen beantwoorden? Met vriendelijke groeten Marleen
15.08.2025 - 10:44
![]() Agnieszka wrote:
Agnieszka wrote:
Czy możecie proszę poprawić wzór w opisie jak robić reglan? Jest źle opisany- nie jest wyjaśnione w którym miejscu dokładnie robić narzuty (narzut, oczko, znacznik, oczko, narzut). Dodatkowo czy pierwszy narzut należy zrobić "spod druta"? Tak wynika z filmiku, ale nie z opisu. Co drugi komentarz dotyczy tego problemu- warto skorygować wzór...
14.08.2025 - 10:42DROPS Design answered:
Witaj Agnieszko, dziękujemy za Twoją uwagę, przyjrzymy się temu i jeśli zajdzie potrzeba zostanie naniesiona stosowna korekta do wzoru. Pozdrawiamy!
14.08.2025 - 14:35
![]() Marleen wrote:
Marleen wrote:
Hallo, ik heb een vraag wanneer je een trui van boven naar beneden breit en je bent bij de boord aangekomen, klopt het dan wel dat je dan moet meerderen zoals in het patroon staat? Voor een boord zou je toch moeten minderen zodat hij strakker wordt dan de trui zelf en ook bij de armboorden
11.08.2025 - 08:47DROPS Design answered:
Dag Marleen,
Ja, het klopt in dit geval dat je moet meerderen vlak voordat je de boord breit. Dit is om te voorkomen dat de boord het werk samentrekt. Door het meerderen loopt het werk meer rechtdoor.
18.08.2025 - 20:42
![]() Anna wrote:
Anna wrote:
Hej, jag är förvirrad, delningen är väl där ärmen börjar stickas, om 35 cm är XL vad är då XXXL, enligt mönstret 31 cm men det kan väl inte stämma, då blir ärmen jättekort och S ska ärmen mäta 39 cm, jag förstår inte
12.06.2025 - 19:06DROPS Design answered:
Hei Anna. Det er kortere erm mål i de større størrelsene pga bredere skuldervidde og lengre ermetopp. Slik at det som står i oppskriften er riktig. Er du redd for at ermene skal bli for korte, kan du fint prøve genseren på og sjekke. mvh DROP Design
16.06.2025 - 09:35
|
|||||||
September Song#septembersongsweater |
|||||||
 |
 |
||||||
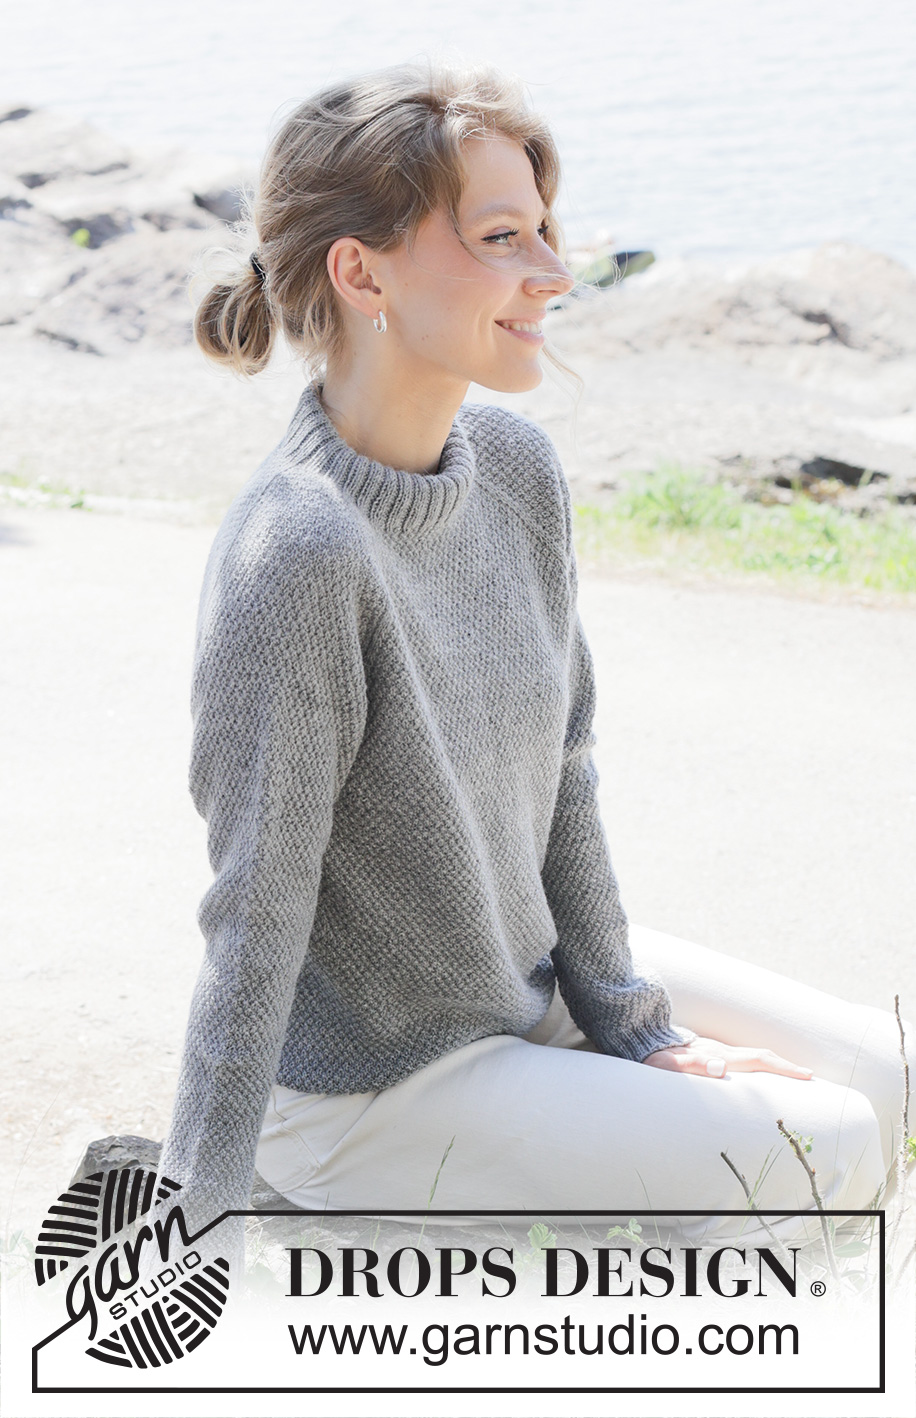
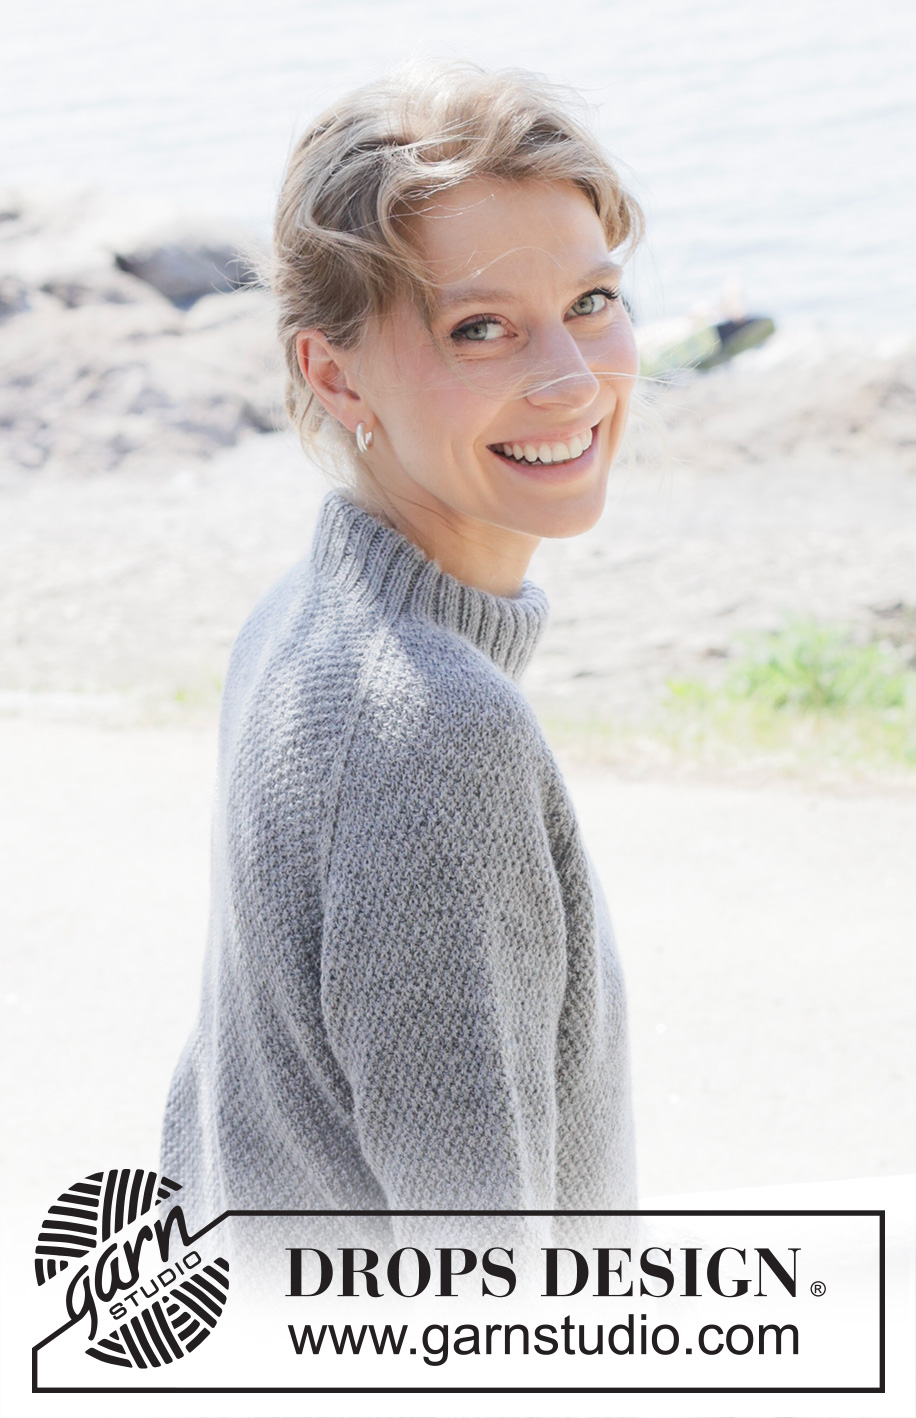
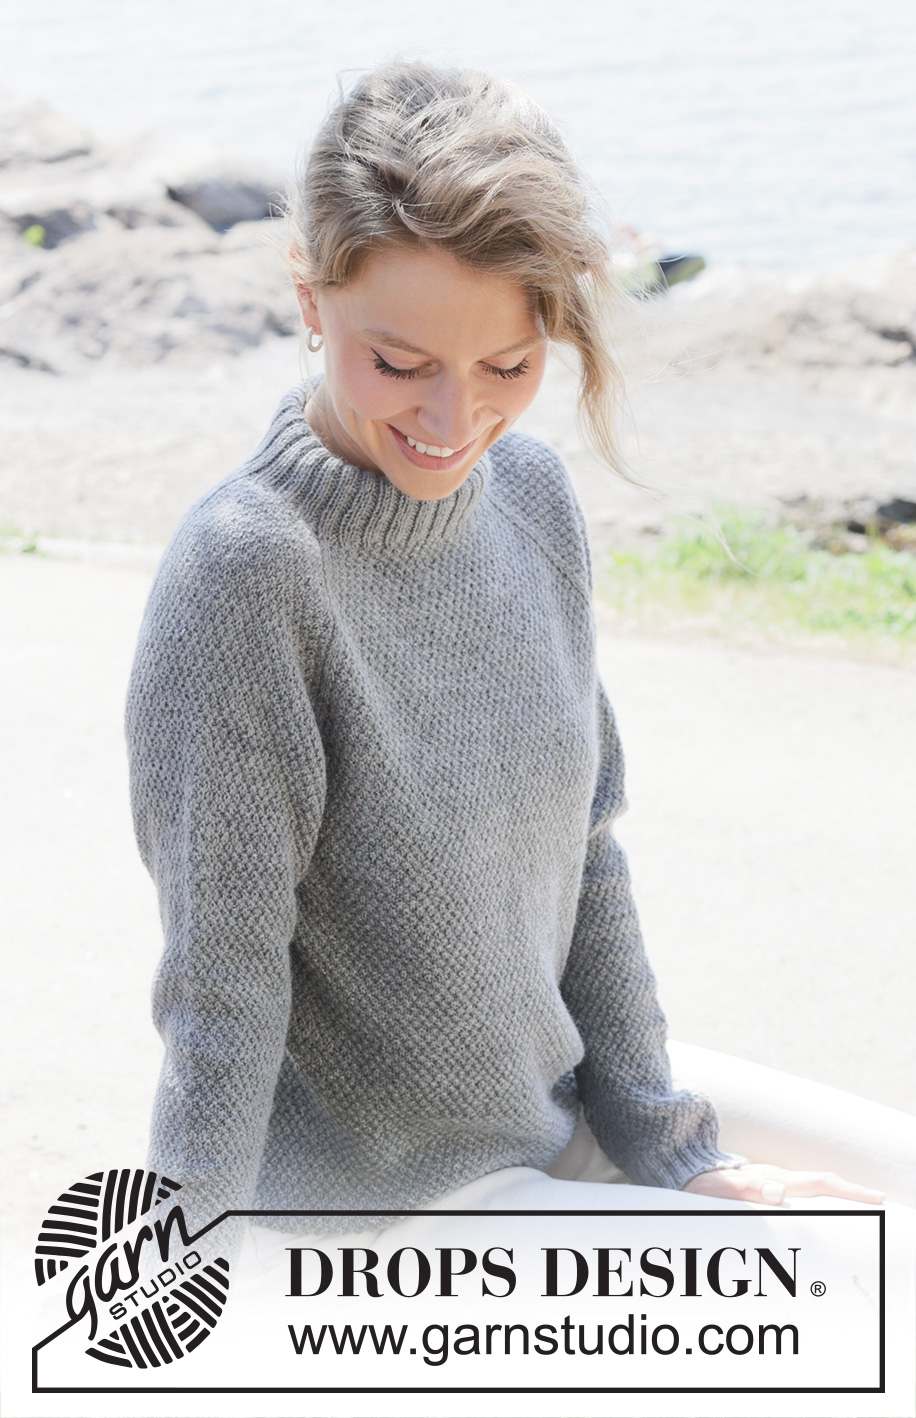
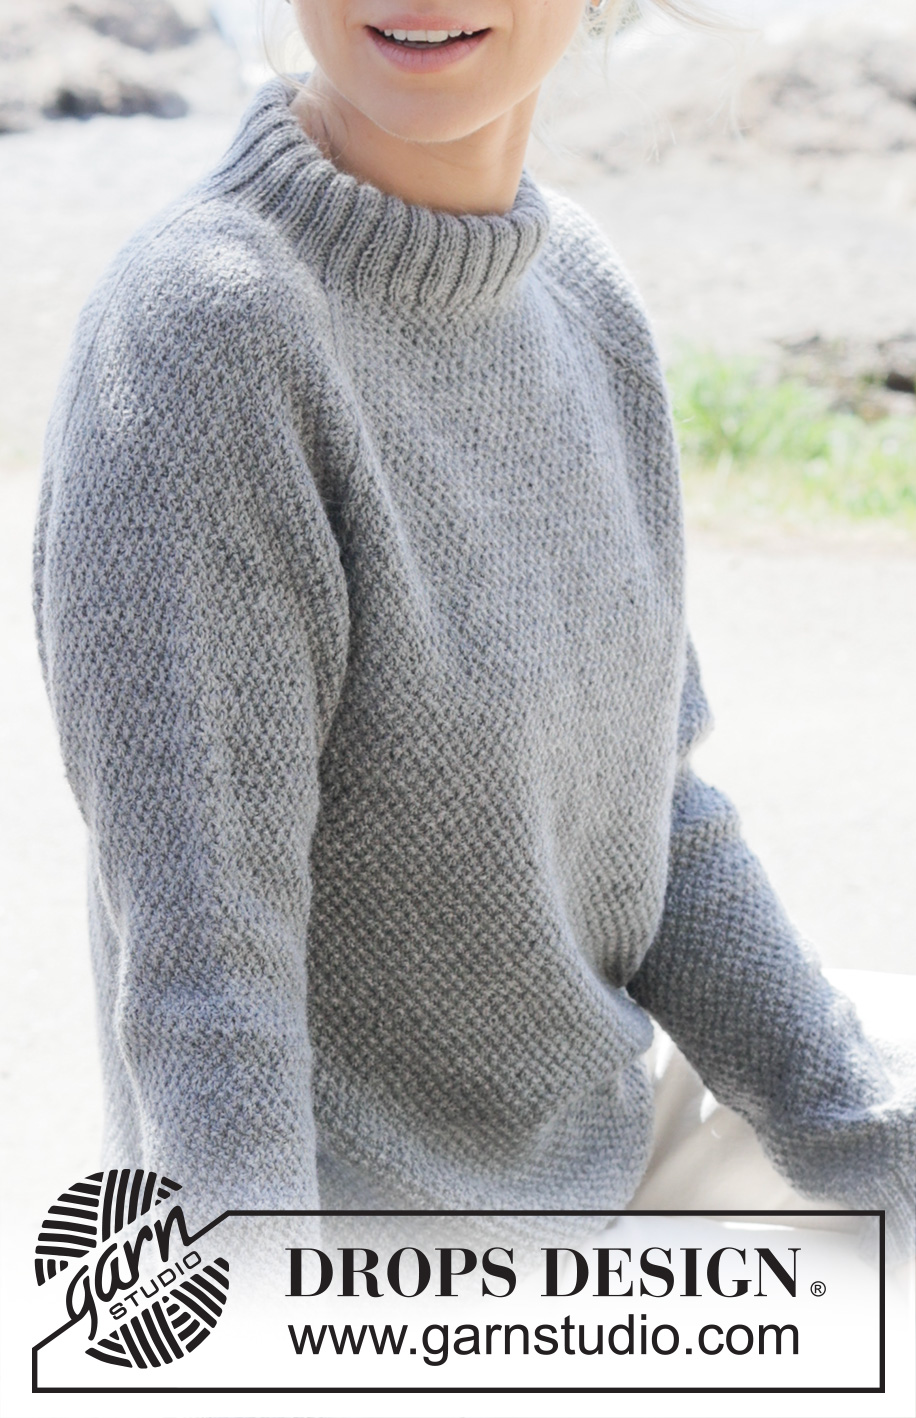
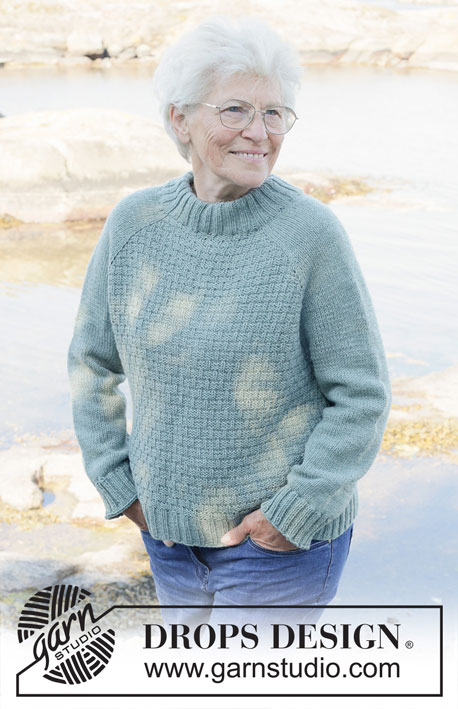
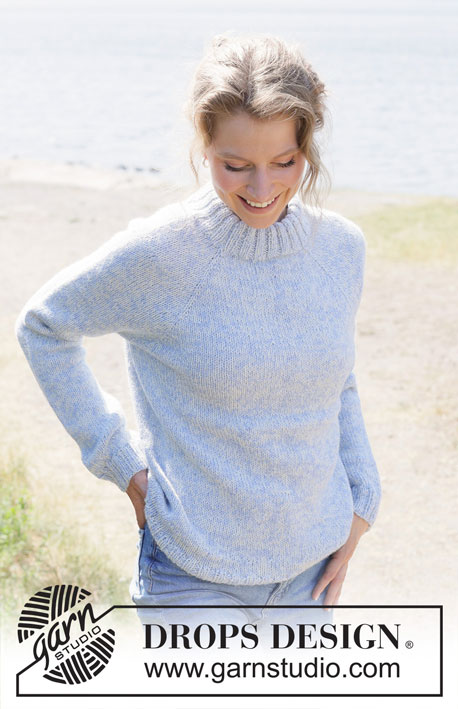
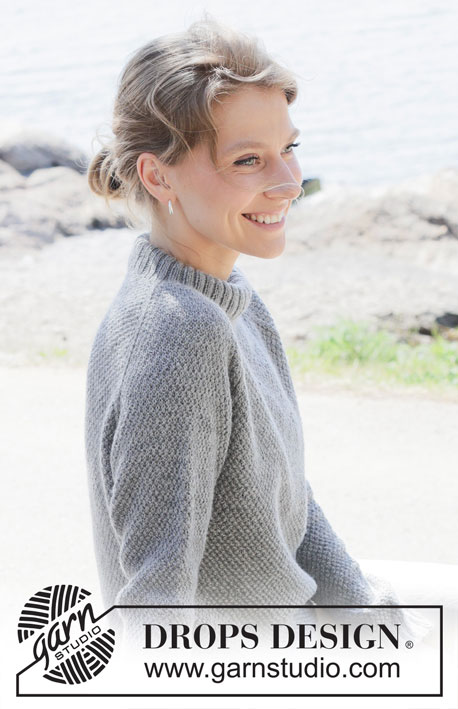
Knitted sweater in DROPS Nord or DROPS Flora. Piece is knitted top down with raglan, moss stitch and double neck edge. Size: S - XXXL
DROPS 252-21 |
|||||||
|
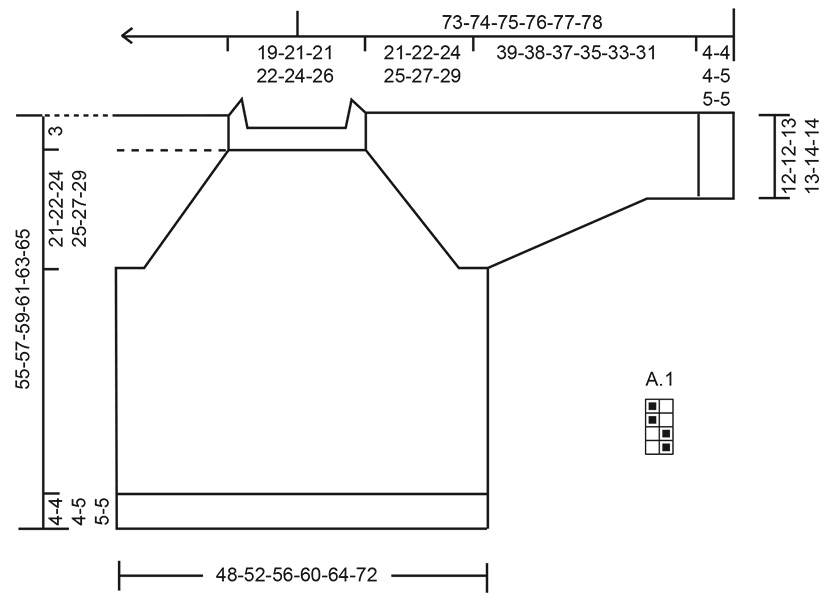
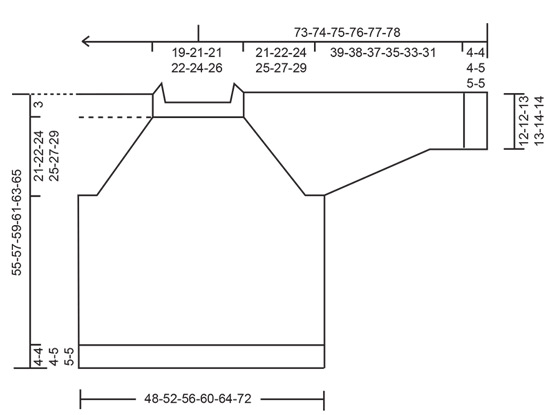
---------------------------------------------------------- EXPLANATION FOR THE PATTERN: ---------------------------------------------------------- PATTERN: See diagram A.1. RAGLAN: Increase 1 stitch by making 1 yarn over, on next round knit yarns over as explained below: BEFORE MARKER THREAD: Slip stitch off left needle and put it back on left needle but the opposite way (insert left needle in from behind when slipping it back on needle). Knit yarn overs in front loop of stitches to avoid holes. Then work the new stitches in pattern. AFTER MARKER THREAD: Knit yarn overs in back loop of stitches to avoid holes. Then work the new stitches in pattern. DECREASE TIP: Decrease 1 stitch on each side of stitch with marker as follows: Work until 2 stitches remain before stitch with marker, knit 2 together, knit 1 (= stitch with marker) slip 1 stitch knitwise, knit 1, pass slipped stitch over stitch worked (= 2 stitches decreased). Adjust the pattern after each decrease mid under sleeve. ---------------------------------------------------------- START THE PIECE HERE: ---------------------------------------------------------- SWEATER - SHORT OVERVIEW OF THE PIECE: In this pattern needles of different length have been used, begin with fitting length for number of stitches and switch as needed. Work neck edge and yoke in the round on circular needle from right shoulder back, and work top down. When yoke is done, divide piece for body and sleeves. Work body down wards in the round on circular needle while putting the sleeves aside. Then work sleeves downwards in the round on needle. Fold the neck edge double against the wrong side and fasten. NECK EDGE: Cast on 120-128-128-136-144-152 stitches on circular needle size 3.5 MM = US 4 with DROPS Nord or DROPS Flora. Switch to circular needle size 2.5 MM = US 1.5 (cast on on a larger needle to get an elastic cast-on edge). Work rib in the round as follows: Knit 1, * purl 2, knit 2 *, work from *-* until 3 stitches remain on round, finish with purl 2 and knit 1. Work until piece measures 9-9-9-11-11-11 cm = 3½"-3½"-3½"-4⅜"-4⅜"-4⅜". Later the neck edge is folded in towards wrong side and assembled to form a neck edge of approx. 4-4-4-5-5-5 cm = 1½"-1½"-1½"-2"-2"-2". Beginning of round is at right shoulder at the back. Insert 1 marker in piece after the first 38-40-40-42-44-46 stitches on round (= approx. mid front), measures piece from this marker. YOKE: Switch to circular needle size 3.5 MM = US 4. Insert 4 marker threads in piece without working the stitches, insert marker threads between 2 knitted stitches, and these stitches are called raglan stitches and worked in stockinette stitch. Insert 1st marker thread at beginning of round, count 16 stitches (= sleeve), insert 2nd marker thread before next stitch, count 44-48-48-52-56-60 stitches (= front piece), insert 3rd marker thread before next stitch, count 16 stitches (= sleeve), insert 4th marker thread before next stitch, 44-48-48-52-56-60 stitches remain after last marker thread (= back piece). Work 1 round in double moss stitch / A.1 (work raglan stitches on each side of marker thread in stockinette stitch) AT THE SAME TIME decrease 1 stitch on each sleeve, 1 stitch on front piece and 1 stitch on back piece (= 4 stitches decreased) = 116-124-124-132-140-148 stitches. Continue with A.1 in the round and increase for RAGLAN on each side of the 4 marker threads - read explanation above. Increase for raglan every other round 27-29-32-36-37-40 times in total = 332-356-380-420-436-468 stitches (= 8 stitches increased on every increase round). Remember to follow the knitting gauge! Increases for sleeve are now done, but continue to increase for raglan on front piece and back piece on every other round 4-4-5-3-4-5 more times = 348-372-400-432-452-488 stitches on needle (= 4 stitches increased on every increase round). Work without increasing until piece measures 21-22-24-25-27-29 cm = 8¼"-8¾"-9½"-9¾"-10⅝"-11⅜" from marker after neck edge. Now divide yoke for body and sleeves. DIVIDING FOR BODY AND SLEEVES: AT THE SAME as next round is worked divide yoke for body and sleeves as follows: Slip the first 69-73-79-87-89-95 stitches on a thread for sleeve, cast on 9-11-13-15-17-23 new stitches on needle (= in the side mid under sleeve), work 105-113-121-129-137-149 stitches as before (= front piece), slip the next 69-73-79-87-89-95 stitches on a thread for sleeve, cast on 9-11-13-15-17-23 new stitches on needle (= in the side mid under sleeve) and work the last 105-113-121-129-137-149 stitches in pattern as before (= back piece). Work body and sleeves separately. BODY: = 228-248-268-288-308-344 stitches. Begin round as before and adjust pattern over the new stitches cast on mid under sleeves. Work A.1 in the round over all stitches until piece measures 48-50-52-53-55-57 cm = 19"-19¾"-20½"-21"-21⅝"-22½" from marker mid front. Switch to circular needles size 2.5 MM = US 1.5, work rib (= knit 2/purl 2) while AT THE SAME TIME increasing 68-72-76-80-88-100 stitches evenly on 1st round = 296-320-344-368-396-444 stitches. When rib measures 4-4-4-5-5-5 cm = 1½"-1½"-1½"-2"-2"-2" bind off all stitches somewhat loosely. Sweater measures 52-54-56-58-60-62 cm = 20½"-21¼"-22"-22¾"-23⅝"-24⅜" from marker mid front and approx. 55-57-59-61-63-65 cm = 21⅝"-22½"-23¼"-24"-24¾"-25½" from the top of shoulder. SLEEVES: Slip 69-73-79-87-89-95 sleeve stitches from one thread on to circular needle size 3.5 MM = US 4 and pick in addition up 1 stitch in each of the 9-11-13-15-17-23 stitches cast on under sleeve = 78-84-92-102-106-118 stitches. Insert 1 marker in the middle of the 9-11-13-15-17-23 new stitches under sleeve - round begins in this stitch. Continue A.1 from yoke in the round on needle - AT THE SAME TIME when sleeve measures 2 cm = ¾" from division, decrease mid under sleeve – read DECREASE TIP and decrease as follows: Decrease 2 stitches every 4-3-2½-1½-1½-1 cm = 1½"-1⅛"-1"-½"-½"-⅜" 9-12-14-19-19-25 times in total = 60-60-64-64-68-68 stitches - remember to adjust pattern when decreasing under sleeve. Work until sleeve measures 39-38-37-35-33-31 cm = 15¼"-15"-14½"-13¾"-13"-12¼" from division. Switch to double pointed needles size 2.5 MM = US 1.5 and work rib (= knit 2/purl 2) while AT THE SAME TIME increasing 16-16-20-20-20-20 stitches evenly on 1st round = 76-76-84-84-88-88 stitches. When rib measures 4-4-4-5-5-5 cm = 1½"-1½"-1½"-2"-2"-2" bind off all stitches somewhat loosely. Sleeve measures approx. 43-42-41-40-38-36 cm = 17"-16½"-16⅛"-15¾"-15"-14¼" from division. ASSEMBLY: Fold rib at the top of neck down on inside of garment. Fasten rib to get a double neck edge. To avoid a tight neck edge that sticks out it is important to keep the seam elastic. |
|||||||
Diagram explanations |
|||||||
|
|||||||
 |
|||||||
 |
|||||||
Have you finished this pattern?Tag your pictures with #dropspattern #septembersongsweater or submit them to the #dropsfan gallery. Do you need help with this pattern?You'll find 25 tutorial videos, a Comments/Questions area and more by visiting the pattern on garnstudio.com. © 1982-2026 DROPS Design A/S. We reserve all rights. This document, including all its sub-sections, has copyrights. Read more about what you can do with our patterns at the bottom of each pattern on our site. |
|||||||


With over 40 years in knitting and crochet design, DROPS Design offers one of the most extensive collections of free patterns on the internet - translated to 17 languages. As of today we count 324 catalogs and 12290 patterns - 12280 of which are translated into English (US/in).
We work hard to bring you the best knitting and crochet have to offer, inspiration and advice as well as great quality yarns at incredible prices! Would you like to use our patterns for other than personal use? You can read what you are allowed to do in the Copyright text at the bottom of all our patterns. Happy crafting!
Post a comment to pattern DROPS 252-21
We would love to hear what you have to say about this pattern!
If you want to leave a question, please make sure you select the correct category in the form below, to speed up the answering process. Required fields are marked *.