Comments / Questions (134)
![]() Patricia wrote:
Patricia wrote:
I am sorry but I am still unclear. After I complete the 16 rows, do I start again from Row 1 A1 - 11 stitches, A2A -9 stitches, A2B - 8 stitches , A2C -10 stitches and carry on with the pattern to Row 16
15.02.2022 - 22:55DROPS Design answered:
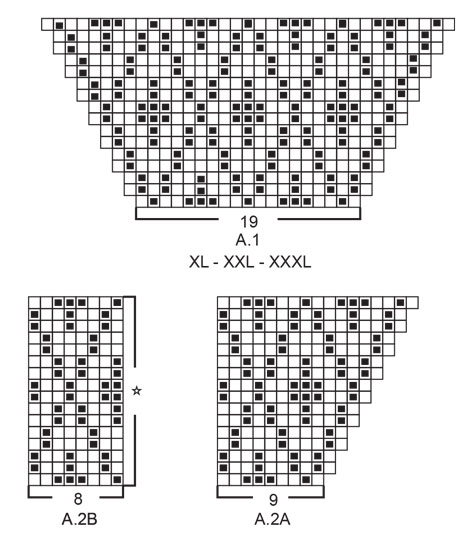
Dear Patricia, over the 27 sts in A.1 work: A.2A (= 9 sts), then A.2B (= 8 sts), and A.2C (= 10 sts) (= 9+8+10=27 sts). After A.2A to A.2C are done in height, start from the first round: A.2A + A.2B over previous A.2A and A.2B+A.2C over previous A.2C, this means you will have 2 more A.2B in width between A.2A and A.2C. Happy knitting!
16.02.2022 - 11:09
![]() Patricia Kurl wrote:
Patricia Kurl wrote:
I have worked the first 16 rows of the pattern , do I start at row 1 A 1 again but this is only 11 stitches. I am confused… please advise
15.02.2022 - 12:16DROPS Design answered:
Dear Mrs Kurl, just continue as before, this means work the new stitches increased as shown at the beginning of A.1 (on the right hand side), continue the diamond pattern as before and work the new stitches in A.1 as shown at the end of A.1 (on the left hand side). Happy knitting!
15.02.2022 - 16:54
![]() Birgitte wrote:
Birgitte wrote:
Hejsa Jeg kan ikke lige gennemskue, hvordan jeg får fortsat mønsteret, når jeg har sat ærmerne på tråd. Vil der ikke blive et "hak" under et af ærmerne, hvor mønsteret starter forfra, nu hvor man ikke længere tager ud til raglan og man derfor strikker i spiral, så at sige. Tak!
17.01.2022 - 22:19DROPS Design answered:
Hei Birgitte. Jo, det vil nok bli et lite "hak" i overgangen mellom omgangene under det ene ermet. mvh DROPS Design
18.01.2022 - 13:42
![]() Silvia wrote:
Silvia wrote:
Soooo, das Rumpfteils ist fertig.....Aber leider viel zu eng geworden, obwohl die Maschenprobe gepasst hat. Ich denke, durch das "Dauermuster" hat sich das Ganze doch sehr zusammen gezogen, obwohl ich darauf geachtet habe, schön locker zu stricken und auch die Fäden auf der Rückseite nicht stramm gespannt waren. Ja, auf ein Neues und hoffentlich klappts mit 5,5 er Nadeln besser. ;) Liebe Grüße Silvia
17.12.2021 - 11:50
![]() Silvia wrote:
Silvia wrote:
Hallo, Sie schreiben am Ende der Anleitung zur Passe, dass der Faden abgeschnitten werden soll und zu Beginn des Rumpfteils in der Mitte zwischen den 4 neu angeschlagenen M die Runde neu begonnen werden soll. Warum kann ich nach Fertigstellung der Passe nicht einfach weiterstricken? Herzliche Grüße Silvia
23.11.2021 - 19:48DROPS Design answered:
Liebe Silvia, beim Rumpfteil soll man das Muster über alle Maschen stricken, wenn man in der Mitte der neuen Maschen neu beginnt dann ist die Rundenwechsel in der Mitte der Seite anstatt am Ende Rückenteil. Viel Spaß beim stricken!
24.11.2021 - 07:40
![]() Pauliina wrote:
Pauliina wrote:
Hi! I finished the first 16 rows of the charts. Now I start to repeat from the first row. So do I knit A 1’s firts row and right after that start knitting first row of A.A2? Or do I repeat A1’s first row some time?
15.11.2021 - 10:36DROPS Design answered:
Dear Paulina, repeat diagrams A.1 and A.2 in height to continue the pattern as before. Continue increasing for raglan and work the raglan sts in pearl grey as before until you have worked the number of increases for your size. Happy knitting!
16.11.2021 - 08:07
![]() Mary wrote:
Mary wrote:
Ich kann die Anleitung leider nicht herunterladen. Bei anderen Vorlagen funktioniert es problemlos. Kann es sein, dass die Datei beschädigt ist?
29.10.2021 - 17:15DROPS Design answered:
Liebe Mary, unsere Anleitung können nur gedruckt werden, klicken Sie auf "Drucken/Anleitung" dann auf "Die Anleitung ausdrucken →" in das neue Fenster, dann sehen Sie die Einstellungen von Ihrem Drucker und hier können Sie als .PDF speichern/drucken. Viel Spaß beim stricken!
02.11.2021 - 13:31
![]() Charlotte wrote:
Charlotte wrote:
Når man skal tage ind på ærmerne ødelægger man jo mønstret ift rapportens brede, hvorledes skal indtagninger være ift mønstret, en på begge sider eller kun den ene side?
29.09.2021 - 12:50DROPS Design answered:
Hej Charlotte. Du ska felle 1 maska på var sida av merketråden. Mönstret kommer inte stämma mitt under ärmen när du feller masker. Mvh DROPS Design
29.09.2021 - 13:47
![]() Margareta wrote:
Margareta wrote:
Hei! Skal nakkeforhøyningen strikkes uten mønster, dvs kun i perlegrå?
28.08.2021 - 20:38DROPS Design answered:
Hei Margareta. Ja, strikkes i perlegrå. mvh DROPS design
30.08.2021 - 13:25
![]() Tamar Slag wrote:
Tamar Slag wrote:
Hoeveel wol moet ik bestellen voor maat 's? Trui en muts?
29.04.2021 - 19:57DROPS Design answered:
Dag Tamar,
Bovenaan bij de materialen staat aangegeven hoeveel je voor de hele set moet bestellen. Voor maat S is dat 400 gram parelgrijs en 300 gram grijsblauw (1 bol weegt 50 gram)
04.05.2021 - 20:11
Fjord Mosaic#fjordmosaicsweater |
||||||||||
 |
 |
|||||||||
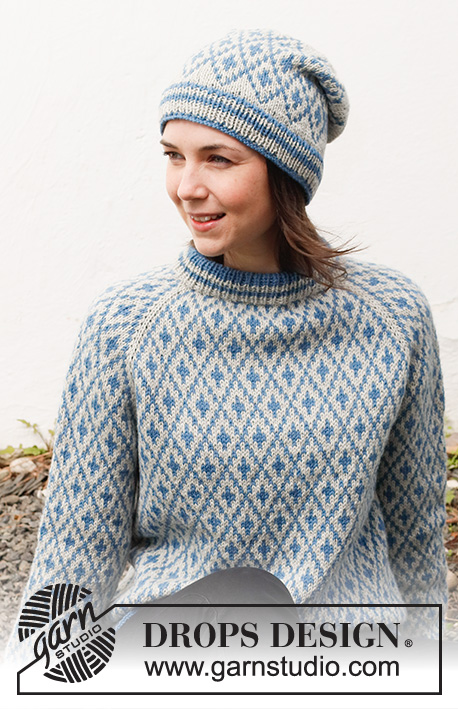
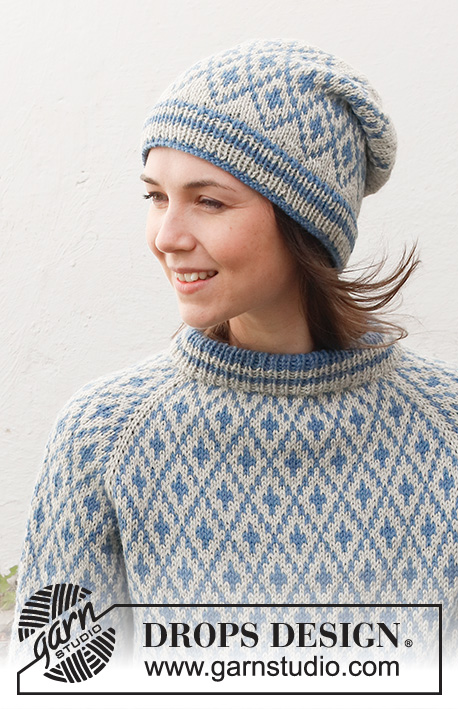
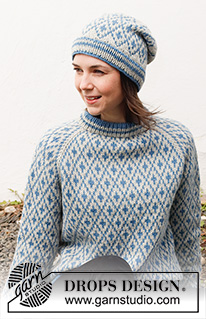
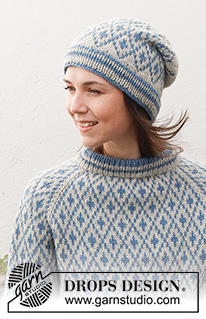
Knitted jumper and hat in DROPS Lima. Jumper is knitted top down with double neck edge, raglan and Nordic pattern. Hat is knitted with Nordic pattern. Size: S - XXXL
DROPS 216-28 |
||||||||||
|
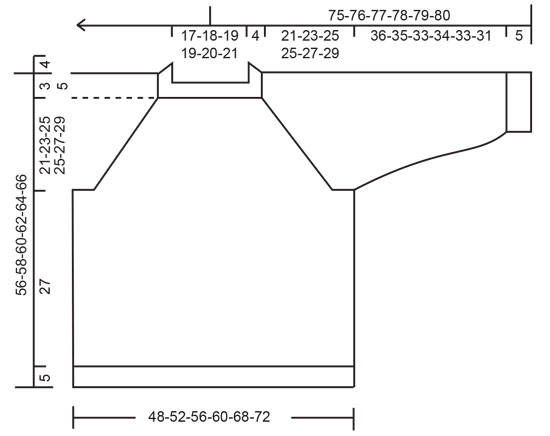
------------------------------------------------------- EXPLANATION FOR THE PATTERN: ------------------------------------------------------- PATTERN: Jumper: See diagrams A.1 and A.2. Choose diagram for your size (applies to A.1). Hat: See diagram A.3. Work the entire pattern in stocking stitch. INCREASE/DECREASE TIP (evenly): To calculate how to increase/decrease evenly, use the total number of stitches on row (e.g. 92 stitches) and divide stitches by number of increases/decreases to be done (e.g. 20) = 4.6. In this example increase by making 1 yarn over after alternately approx. every 4th and 5th stitch. On next round knit yarns over twisted to avoid holes. If decreasing knit in this example approx. every 3rd and 4th stitch and every 4th and 5th stitch together. KNITTING TIP: To avoid the knitting tension to tighten when working pattern with several colours, it is important not to tighten the strands on back of piece. Switch to a higher needle number when working pattern if the pattern is somewhat tight. RAGLAN: Increase for raglan by increasing 1 stitch on each side of the 4 stitches with markers - in every transition between front/back piece and sleeves (= 8 stitches increased on round). Increase 1 stitch by making 1 yarn over with pearl grey. On next round knit yarn over twisted with pearl grey to avoid holes. Then work the new stitches in A.1 and A.2. STRIPES-1 (applies to rib at the bottom of body and sleeves): 3 rounds pearl grey, 2 rounds grey blue, 2 rounds pearl grey, 2 rounds grey blue, 4 rounds pearl grey, 2 rounds grey blue. STRIPES-2 (applies to rib at the bottom of hat): 4 rounds pearl grey, 2 rounds grey blue, 2 rounds pearl grey, 2 rounds grey blue. DECREASE TIP-1 (applies to mid under sleeves): Decrease 2 stitches mid under sleeve as follows: Work until 2 stitches remain before marker thread, knit 2 together, marker thread, knit 2 twisted together (= 2 stitches decreased). DECREASE TIP-2 (applies to top of hat): Decrease 1 stitch after every marker thread as follows: Slip 1 stitch knitwise, knit 1, pass slipped stitch over stitch worked (= 1 stitch decreased = 8 stitches decreased in total on round). CAST-OFF TIP: To avoid a tight cast-off edge you may use a larger needle size. If this also is too tight, work a 1 yarn over after approx. every 6th stitch while casting off (cast off yarn overs as regular stitches). ------------------------------------------------------- START THE PIECE HERE: ------------------------------------------------------- JUMPER - SHORT OVERVIEW OF THE PIECE: Double neck edge and yoke are worked in the round on circular needle, top down. Now divide yoke for body and sleeves. Body is worked in the round on circular needle, top down. Work sleeves in the round on double pointed needles/a short circular needle, top down. DOUBLE NECK EDGE: Cast on 92-96-100-108-112-116 stitches on a short circular needle size 4.5 mm with grey blue. Switch to a short circular needle size 3.5 mm, and work rib in the round (= knit 1/purl 1). When 16 rounds rib have been worked with grey blue, work 2 rounds rib with pearl grey, 2 rounds rib with grey blue, and 4 rounds rib with pearl grey. Neck edge now measures approx. 8 cm. Knit 1 round with pearl grey while increasing 20-16-12-36-48-44 stitches evenly - read INCREASE/DECREASE TIP = 112-112-112-144-160-160 stitches. Switch to circular needle size 4.5 mm. Insert a marker at the beginning of round = right shoulder at the back when garment is worn. YOKE: Insert 4 markers in piece as explained below - insert markers without working them, and use markers when increasing for raglan: Count 11-11-11-19-19-19 stitches (= sleeve), insert 1 marker in next stitch (= raglan stitch), count 43-43-43-51-59-59 stitches (= front piece), insert 1 marker in next stitch, count 11-11-11-19-19-19 stitches (= sleeve), insert 1 marker in next stitch, count 43-43-43-51-59-59 stitches (= back piece), insert 1 marker in last stitch. On next round begin pattern - AT THE SAME TIME increase for RAGLAN - read explanation above, i.e. work first round as follows: Increase 1 stitch for raglan, work A.1 (= 11-11-11-19-19-19 stitches), increase for raglan on each side of stitch with marker (always work raglan stitch with pearl grey), work A.2A (= 9 stitches), work A.2B over the next 24-24-24-32-40-40 stitches (= 3-3-3-4-5-5 repetitions of 8 stitches), work A.2C (= 10 stitches), increase for raglan on each side of raglan stitch, work A.1 (= 11-11-11-19-19-19 stitches), increase for raglan on each side of raglan stitch, work A.2A (= 9 stitches), work A.2B over the next 24-24-24-32-40-40 stitches), work A.2C (= 10 stitches), and increase for raglan before the last raglan stitches (= 8 stitches increased on round), work the last raglan stitch. Read KNITTING TIP and continue pattern like this. REMEMBER THE KNITTING TENSION! AT THE SAME TIME increase for raglan every other round 24-28-32-28-32-36 times in total. After last increase for raglan there are 304-336-368-368-416-448 stitches on needle. Continue pattern without increasing until yoke measures 21-23-25-25-27-29 cm from under neck edge mid front (measured from transition between double neck edge and yoke), and finish round after 4th raglan stitch. On next round divide yoke for body and sleeves, i.e. work next round as follows: Slip the first 60-68-76-76-84-92 stitches on 1 stitch holder for sleeve, (= stitches from sleeve + 1 raglan sleeve), cast on 4-4-4-12-12-12 new stitches on needle (= in the side under sleeve) work as before over the next 92-100-108-108-124-132 stitches (= front piece - these stitches are stitches from front piece + 1 raglan stitch), slip the next 60-68-76-76-84-92 stitches on 1 stitch holder for sleeve (= stitches from sleeve + 1 raglan stitch), cast on 4-4-4-12-12-12 new stitches on needle (= in the side under sleeve), and work as before over the next 92-100-108-108-124-132 stitches (= back piece - these stitches are stitches from back piece + 1 raglan stitch). Cut the yarn. Finish body and sleeves separately. NOW MEASURE PIECE FROM HERE! BODY: = 192-208-224-240-272-288 stitches. Begin round in the middle of the 4-4-4-12-12-12 stitches cast on under sleeve in one side of piece, and continue pattern in the round – i.e. repeat A.2B but make sure to begin on correct round in A.2B according to last round on yoke (= 24-26-28-30-34-36 repetitions of 8 stitches). Work until piece measures approx. 27 cm from division, but finish pattern after one whole or half repetition vertically. Approx. 5 cm remain until finished measurements, try the jumper on and work until desired length. Knit 1 round with pearl grey while increasing 40-44-48-50-58-60 stitches evenly - remember INCREASE TIP = 232-252-272-290-330-348 stitches. Switch to circular needle size 3.5 mm. Work rib in the round (knit 1/purl 1) in STRIPES-1 - read explanation above. When stripes has been worked, rib measures approx. 5 cm. Cast off with grey blue and knit over knit and purl over purl - read CAST-OFF TIP! Jumper measures approx. 56-58-60-62-64-66 cm from shoulder and down. SLEEVE: Slip the 60-68-76-76-84-92 stitches from stitch holder in one side of piece on double pointed needles or a short circular needle size 4.5 mm and pick in addition up 1 stitch in each of the 4-4-4-12-12-12 new stitches cast on under sleeve = 64-72-80-88-96-104 stitches. Insert 1 marker thread in the middle of the 4-4-4-12-12-12 stitches under sleeve. Move the marker thread upwards when working; it should be used for decrease mid under sleeve. Begin round at the marker thread and continue pattern in the round - i.e. repeat A.2B but make sure that pattern fits nicely over stitches on yoke and to begin on correct round in A.2B according to last round on yoke. When sleeve measures 2-2-2-3-3-3 cm from division, decrease 2 stitches mid under sleeve - read DECREASE TIP-1. Decrease like this every 9-4-2½-2-1½-1 cm 4-8-12-12-16-20 times in total = 56-56-56-64-64-64 stitches. Work until sleeve measures approx. 36-35-33-34-33-31 cm from division. Approx. 5 cm remains until finished measurements. Try the jumper on and work to desired length, but finish pattern after one whole or half repetition vertically. NOTE! Shorter measurements in the larger sizes because of wider neck and longer yoke. Knit 1 round with pearl grey while decreasing 6-4-4-10-10-8 stitches evenly = 50-52-52-54-54-56 stitches. Switch to double pointed needles size 3.5 mm. Work rib in the round (knit 1/purl 1) in STRIPES-1 the same way as on body. When stripes has been worked, rib measures approx. 5 cm. Cast off with grey blue and knit over knit and purl over purl - remember CAST-OFF TIP. Work the other sleeve the same way. ASSEMBLY: Fold rib in the neck double in towards wrong side of piece. Fasten rib but to avoid a tight neck edge and avoiding the edge to tip outwards, it is important to make the seam elastic. ------------------------------------------------------ HAT - SHORT SUMMARY OF GARMENT: Worked in the round on a short circular needle, bottom up. Switch to double pointed needles when needed. HAT: Cast on 120-124-128 stitches on a short circular needle size 3 mm with blue grey. Knit 1 round. Then work rib in the round (= knit 1/purl 1) in STRIPES-2 - read explanation above. When stripes have been worked, switch to pearl grey. Knit 1 round while at the same time decrease 16-20-16 stitches evenly- read INCREASE/DECREASE TIP = 104-104-112 stitches. Switch to a short circular needle size 3.5 mm and knit 1 round with pearl grey. Then work A.3 in the round (= 13-13-14 repetitions of 8 stitches). Continue pattern like this. REMEMBER THE KNITTING TENSION. When A.3 has been worked vertically, piece measures approx. 15 cm from cast-on edge. Work in stocking stitch with pearl grey until piece measures 19-20-20 cm from cast-on edge. Insert 8 markers in piece 13-13-14 stitches apart. On next round, decrease 1 stitch at every marker – read DECREASE TIP-2. Decrease like this every other round 11-11-12 times in total = 16 stitches remain in all sizes. Knit 1 round where all stitches are knitted together 2 by 2 = 8 stitches remain in all sizes. Cut the yarn and pull it through the remaining stitches, tighten together and fasten. Hat measures approx. 26-27-28 cm from top and down. |
||||||||||
Diagram explanations |
||||||||||
|
||||||||||
 |
||||||||||
 |
||||||||||
 |
||||||||||
Have you finished this pattern?Tag your pictures with #dropspattern #fjordmosaicsweater or submit them to the #dropsfan gallery. Do you need help with this pattern?You'll find 33 tutorial videos, a Comments/Questions area and more by visiting the pattern on garnstudio.com. © 1982-2025 DROPS Design A/S. We reserve all rights. This document, including all its sub-sections, has copyrights. Read more about what you can do with our patterns at the bottom of each pattern on our site. |
||||||||||






Post a comment to pattern DROPS 216-28
We would love to hear what you have to say about this pattern!
If you want to leave a question, please make sure you select the correct category in the form below, to speed up the answering process. Required fields are marked *.