
Popular categories
Looking for a yarn?


|
||||||||||
Fjord Mosaic |
||||||||||
 |
 |
|||||||||
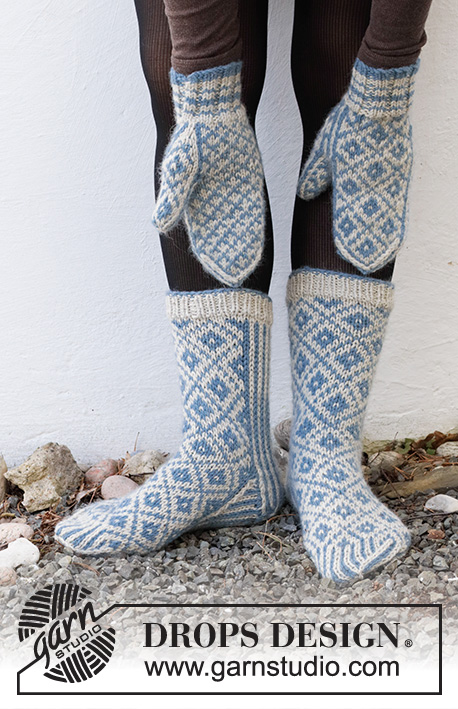
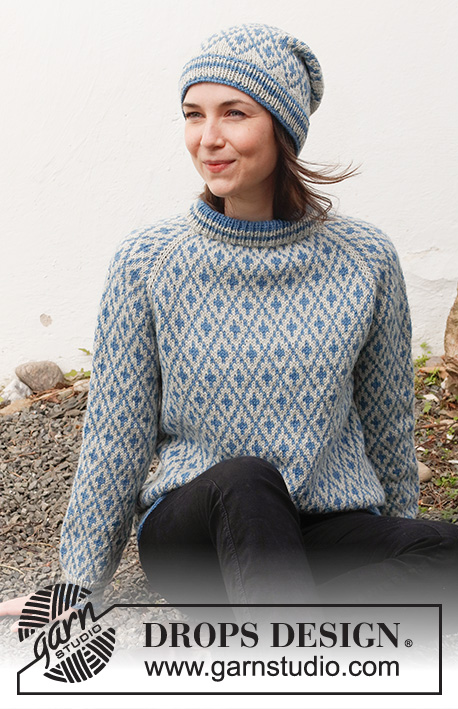
Knitted jumper and hat in DROPS Lima. Jumper is knitted top down with double neck edge, raglan and Nordic pattern. Hat is knitted with Nordic pattern. Size: S - XXXL
DROPS 216-28 |
||||||||||
|
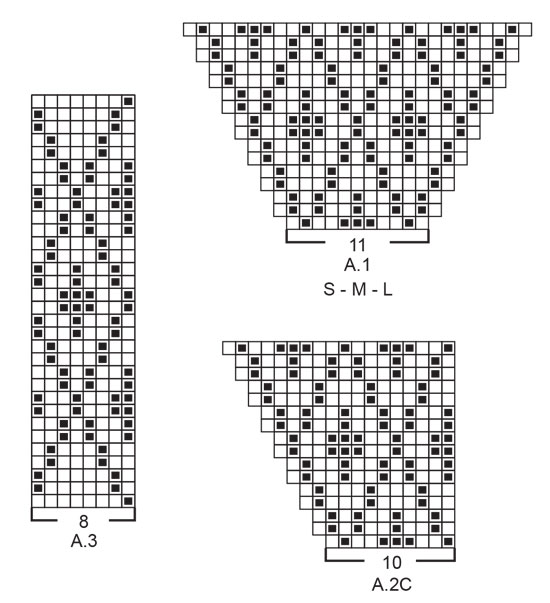
------------------------------------------------------- EXPLANATION FOR THE PATTERN: ------------------------------------------------------- PATTERN: Jumper: See diagrams A.1 and A.2. Choose diagram for your size (applies to A.1). Hat: See diagram A.3. Work the entire pattern in stocking stitch. INCREASE/DECREASE TIP (evenly): To calculate how to increase/decrease evenly, use the total number of stitches on row (e.g. 92 stitches) and divide stitches by number of increases/decreases to be done (e.g. 20) = 4.6. In this example increase by making 1 yarn over after alternately approx. every 4th and 5th stitch. On next round knit yarns over twisted to avoid holes. If decreasing knit in this example approx. every 3rd and 4th stitch and every 4th and 5th stitch together. KNITTING TIP: To avoid the knitting tension to tighten when working pattern with several colours, it is important not to tighten the strands on back of piece. Switch to a higher needle number when working pattern if the pattern is somewhat tight. RAGLAN: Increase for raglan by increasing 1 stitch on each side of the 4 stitches with markers - in every transition between front/back piece and sleeves (= 8 stitches increased on round). Increase 1 stitch by making 1 yarn over with pearl grey. On next round knit yarn over twisted with pearl grey to avoid holes. Then work the new stitches in A.1 and A.2. STRIPES-1 (applies to rib at the bottom of body and sleeves): 3 rounds pearl grey, 2 rounds grey blue, 2 rounds pearl grey, 2 rounds grey blue, 4 rounds pearl grey, 2 rounds grey blue. STRIPES-2 (applies to rib at the bottom of hat): 4 rounds pearl grey, 2 rounds grey blue, 2 rounds pearl grey, 2 rounds grey blue. DECREASE TIP-1 (applies to mid under sleeves): Decrease 2 stitches mid under sleeve as follows: Work until 2 stitches remain before marker thread, knit 2 together, marker thread, knit 2 twisted together (= 2 stitches decreased). DECREASE TIP-2 (applies to top of hat): Decrease 1 stitch after every marker thread as follows: Slip 1 stitch knitwise, knit 1, pass slipped stitch over stitch worked (= 1 stitch decreased = 8 stitches decreased in total on round). CAST-OFF TIP: To avoid a tight cast-off edge you may use a larger needle size. If this also is too tight, work a 1 yarn over after approx. every 6th stitch while casting off (cast off yarn overs as regular stitches). ------------------------------------------------------- START THE PIECE HERE: ------------------------------------------------------- JUMPER - SHORT OVERVIEW OF THE PIECE: Double neck edge and yoke are worked in the round on circular needle, top down. Now divide yoke for body and sleeves. Body is worked in the round on circular needle, top down. Work sleeves in the round on double pointed needles/a short circular needle, top down. DOUBLE NECK EDGE: Cast on 92-96-100-108-112-116 stitches on a short circular needle size 4.5 mm with grey blue. Switch to a short circular needle size 3.5 mm, and work rib in the round (= knit 1/purl 1). When 16 rounds rib have been worked with grey blue, work 2 rounds rib with pearl grey, 2 rounds rib with grey blue, and 4 rounds rib with pearl grey. Neck edge now measures approx. 8 cm. Knit 1 round with pearl grey while increasing 20-16-12-36-48-44 stitches evenly - read INCREASE/DECREASE TIP = 112-112-112-144-160-160 stitches. Switch to circular needle size 4.5 mm. Insert a marker at the beginning of round = right shoulder at the back when garment is worn. YOKE: Insert 4 markers in piece as explained below - insert markers without working them, and use markers when increasing for raglan: Count 11-11-11-19-19-19 stitches (= sleeve), insert 1 marker in next stitch (= raglan stitch), count 43-43-43-51-59-59 stitches (= front piece), insert 1 marker in next stitch, count 11-11-11-19-19-19 stitches (= sleeve), insert 1 marker in next stitch, count 43-43-43-51-59-59 stitches (= back piece), insert 1 marker in last stitch. On next round begin pattern - AT THE SAME TIME increase for RAGLAN - read explanation above, i.e. work first round as follows: Increase 1 stitch for raglan, work A.1 (= 11-11-11-19-19-19 stitches), increase for raglan on each side of stitch with marker (always work raglan stitch with pearl grey), work A.2A (= 9 stitches), work A.2B over the next 24-24-24-32-40-40 stitches (= 3-3-3-4-5-5 repetitions of 8 stitches), work A.2C (= 10 stitches), increase for raglan on each side of raglan stitch, work A.1 (= 11-11-11-19-19-19 stitches), increase for raglan on each side of raglan stitch, work A.2A (= 9 stitches), work A.2B over the next 24-24-24-32-40-40 stitches), work A.2C (= 10 stitches), and increase for raglan before the last raglan stitches (= 8 stitches increased on round), work the last raglan stitch. Read KNITTING TIP and continue pattern like this. REMEMBER THE KNITTING TENSION! AT THE SAME TIME increase for raglan every other round 24-28-32-28-32-36 times in total. After last increase for raglan there are 304-336-368-368-416-448 stitches on needle. Continue pattern without increasing until yoke measures 21-23-25-25-27-29 cm from under neck edge mid front (measured from transition between double neck edge and yoke), and finish round after 4th raglan stitch. On next round divide yoke for body and sleeves, i.e. work next round as follows: Slip the first 60-68-76-76-84-92 stitches on 1 stitch holder for sleeve, (= stitches from sleeve + 1 raglan sleeve), cast on 4-4-4-12-12-12 new stitches on needle (= in the side under sleeve) work as before over the next 92-100-108-108-124-132 stitches (= front piece - these stitches are stitches from front piece + 1 raglan stitch), slip the next 60-68-76-76-84-92 stitches on 1 stitch holder for sleeve (= stitches from sleeve + 1 raglan stitch), cast on 4-4-4-12-12-12 new stitches on needle (= in the side under sleeve), and work as before over the next 92-100-108-108-124-132 stitches (= back piece - these stitches are stitches from back piece + 1 raglan stitch). Cut the yarn. Finish body and sleeves separately. NOW MEASURE PIECE FROM HERE! BODY: = 192-208-224-240-272-288 stitches. Begin round in the middle of the 4-4-4-12-12-12 stitches cast on under sleeve in one side of piece, and continue pattern in the round – i.e. repeat A.2B but make sure to begin on correct round in A.2B according to last round on yoke (= 24-26-28-30-34-36 repetitions of 8 stitches). Work until piece measures approx. 27 cm from division, but finish pattern after one whole or half repetition vertically. Approx. 5 cm remain until finished measurements, try the jumper on and work until desired length. Knit 1 round with pearl grey while increasing 40-44-48-50-58-60 stitches evenly - remember INCREASE TIP = 232-252-272-290-330-348 stitches. Switch to circular needle size 3.5 mm. Work rib in the round (knit 1/purl 1) in STRIPES-1 - read explanation above. When stripes has been worked, rib measures approx. 5 cm. Cast off with grey blue and knit over knit and purl over purl - read CAST-OFF TIP! Jumper measures approx. 56-58-60-62-64-66 cm from shoulder and down. SLEEVE: Slip the 60-68-76-76-84-92 stitches from stitch holder in one side of piece on double pointed needles or a short circular needle size 4.5 mm and pick in addition up 1 stitch in each of the 4-4-4-12-12-12 new stitches cast on under sleeve = 64-72-80-88-96-104 stitches. Insert 1 marker thread in the middle of the 4-4-4-12-12-12 stitches under sleeve. Move the marker thread upwards when working; it should be used for decrease mid under sleeve. Begin round at the marker thread and continue pattern in the round - i.e. repeat A.2B but make sure that pattern fits nicely over stitches on yoke and to begin on correct round in A.2B according to last round on yoke. When sleeve measures 2-2-2-3-3-3 cm from division, decrease 2 stitches mid under sleeve - read DECREASE TIP-1. Decrease like this every 9-4-2½-2-1½-1 cm 4-8-12-12-16-20 times in total = 56-56-56-64-64-64 stitches. Work until sleeve measures approx. 36-35-33-34-33-31 cm from division. Approx. 5 cm remains until finished measurements. Try the jumper on and work to desired length, but finish pattern after one whole or half repetition vertically. NOTE! Shorter measurements in the larger sizes because of wider neck and longer yoke. Knit 1 round with pearl grey while decreasing 6-4-4-10-10-8 stitches evenly = 50-52-52-54-54-56 stitches. Switch to double pointed needles size 3.5 mm. Work rib in the round (knit 1/purl 1) in STRIPES-1 the same way as on body. When stripes has been worked, rib measures approx. 5 cm. Cast off with grey blue and knit over knit and purl over purl - remember CAST-OFF TIP. Work the other sleeve the same way. ASSEMBLY: Fold rib in the neck double in towards wrong side of piece. Fasten rib but to avoid a tight neck edge and avoiding the edge to tip outwards, it is important to make the seam elastic. ------------------------------------------------------ HAT - SHORT SUMMARY OF GARMENT: Worked in the round on a short circular needle, bottom up. Switch to double pointed needles when needed. HAT: Cast on 120-124-128 stitches on a short circular needle size 3 mm with blue grey. Knit 1 round. Then work rib in the round (= knit 1/purl 1) in STRIPES-2 - read explanation above. When stripes have been worked, switch to pearl grey. Knit 1 round while at the same time decrease 16-20-16 stitches evenly- read INCREASE/DECREASE TIP = 104-104-112 stitches. Switch to a short circular needle size 3.5 mm and knit 1 round with pearl grey. Then work A.3 in the round (= 13-13-14 repetitions of 8 stitches). Continue pattern like this. REMEMBER THE KNITTING TENSION. When A.3 has been worked vertically, piece measures approx. 15 cm from cast-on edge. Work in stocking stitch with pearl grey until piece measures 19-20-20 cm from cast-on edge. Insert 8 markers in piece 13-13-14 stitches apart. On next round, decrease 1 stitch at every marker – read DECREASE TIP-2. Decrease like this every other round 11-11-12 times in total = 16 stitches remain in all sizes. Knit 1 round where all stitches are knitted together 2 by 2 = 8 stitches remain in all sizes. Cut the yarn and pull it through the remaining stitches, tighten together and fasten. Hat measures approx. 26-27-28 cm from top and down. |
||||||||||
Diagram explanations |
||||||||||
|
||||||||||
|
||||||||||

|
||||||||||

|
||||||||||
|
Have you made this or any other of our designs? Tag your pictures in social media with #dropsdesign so we can see them! Do you need help with this pattern?You'll find tutorial videos, a Comments/Questions area and more by visiting the pattern on garnstudio.com. © 1982-2024 DROPS Design A/S. We reserve all rights. This document, including all its sub-sections, has copyrights. Read more about what you can do with our patterns at the bottom of each pattern on our site. |
||||||||||


With over 40 years in knitting and crochet design, DROPS Design offers one of the most extensive collections of free patterns on the internet - translated to 17 languages. As of today we count 304 catalogues and 11422 patterns - 11422 of which are translated into English (UK/cm).
We work hard to bring you the best knitting and crochet have to offer, inspiration and advice as well as great quality yarns at incredible prices! Would you like to use our patterns for other than personal use? You can read what you are allowed to do in the Copyright text at the bottom of all our patterns. Happy crafting!
Comments / Questions (91)
Pourquoi faut il couper le fil après la separation des manches
10.02.2024 - 15:58DROPS Design answered:
Bonjour Mme Brunet, pour que le motif commence correctement, on doit commencer au milieu des mailles montées sous une des manches, on doit donc couper le fil et recommencer le tour suivant au milieu des nouvelles mailles montées sous une des manches. Bon tricot!
12.02.2024 - 07:22Jeg kan umiddelbart ikke så hvad str. svarer til ift. brystmål
31.01.2024 - 15:10DROPS Design answered:
Hej Anne, jo måleskitsen finder du nederst i opskriften . Brystmålet bliver da 48x2=96cm i den mindste størrelse, 52x2=104 cm i næste størrelse osv :)
02.02.2024 - 12:11Bonjour Je suis arriver au bout de mon diagramme mais je dois faire 32 fois mes raglan au total comment continuer le diagramme ouisque la grille s arrete apres 8 augmentation de raglan Merci de m aider a comprendre
24.01.2024 - 17:12DROPS Design answered:
Bonjour Cathy, vous répétez simplement les diagrammes/motifs en hauteur, ainsi, vous tricotez A.2A, A.2B, A.2C au-dessus des mailles de A.1 et tricotez A.2A, A.2B (2 motifs de A.2B en plus que la fois précédente), A.2C au-dessus des mailles tricotées avec A.2 auparavant. Bon tricot!
25.01.2024 - 08:36Guten Tag, ich versuche gerade den Fjord Mosaik Pullover in gr.L zu stricken,leider begreife ich einfach nicht wie ich nach den ersten 17 Reihen fortfahren muss,bitte bitte könnten sie mir das etwas genauer erklären!vielen Dank im Voraus
12.01.2024 - 10:37DROPS Design answered:
Liebe Frau Thielen, nach den 17 ersten Runden stricken Sie die Maschen von vorrigen A.1 stricken Sie wie folgt: (A.2A, A.2B, A.2C) und die Maschen von vorrigen A.2 stricken Sie wie folgt: A.2A, A.2B (2 Rapporte mehr in der Breite als das vorrige Mal), A.2C. Viel Spaß beim stricken!
12.01.2024 - 13:49Jeg har strikket diagramma 1 gang ferdig nå. Det står fortsett mønster, men jeg forstår ikke helt fordi det går jo ikke opp i opp med antall masker. A1-A2a-A2b (3 gg) A2c. Eller hvordan strikker man dette når man er ferdig en runde?
27.11.2023 - 18:29DROPS Design answered:
Hej Annette, jo men de nye masker er tegnet ind i diagrammerne, så du skal fortsætte rundt ifølge diagrammet. Sæt gerne et mærke imellem hvert diagram, så det er tydeligt hvor næste diagram starter :)
28.11.2023 - 10:43Efter raglanudtaget står der "fortsæt mønsteret", men betyder det at den grå maske efter raglanmasken skal tages med i mønstret eller skal den være grå til der skal sættes masker på en tråd? Hilsen Eva
23.02.2023 - 12:52DROPS Design answered:
Hej Eva, den strikkes grå ifølge diagrammet :)
24.02.2023 - 15:47Warum soll man denn beim Rumpfteil unten kurz vom Bündchen Maschen zunehmen? Das macht für mich keinen Sinn.
17.01.2023 - 15:10DROPS Design answered:
Liebe Sabine, damit das Bündchen das untere Kante nicht zusammenzieht, man braucht mehr Maschen für das Bündchen mit den kleineren Nadeln als glatt rechts mit den grösseren Nadeln, so wird der Umfang gleich sein. Viel Spaß beim stricken!
17.01.2023 - 17:26Ska man verkligen ÖKA med 40 maskor innan man börjar sticka resåren nere i kanten av tröjan? Vanligtvis har ju resåren färre maskor än själva tröjan...
29.12.2022 - 18:52DROPS Design answered:
Hej, jo på denna modell ökas det maskor innan resåren. Detta görs för att resåren inte ska dra ihop sig så mycket.
02.01.2023 - 17:56Hej! Storlek L. Har stickat oket med raglanökningar 25 ggr i mönsterstickning och mitt arbete är nu 25 cm och 312 maskor. Man ska öka 32 ggr och ha 368 maskor vid 25 cm. Om jag ökarytterligare 7 ggr blir arbetet 6 cm för långt, 31 istället för 25 cm. På nästa varv ska maskorna delas upp på ärmar fram- och bakstycke. Vad är det som är fel???!!! Jag har exakt Stickfasthet 20 maskor på 26 varv och 10 cm Mvh Eva
14.11.2022 - 19:51DROPS Design answered:
Hej Eva. Har du mätt från efter halskanten? Har du gjort ökningar på vartannat varv och 25 ökningar så borde ditt arbete vara ca 19 cm (med stickfasthet 2,6 varv per cm). Mvh DROPS Design
16.11.2022 - 13:47Hallo und Danke für die vorherige Antwort, das hat mir sehr geholfen. Ich habe nun alle Raglanzunahmen fertig, weiß jetzt aber wieder nicht wie ich im Muster weiter verfahren soll, da im Muster Zunahmen eingezeichnet sind die so ja nicht gestrickt werden. Habe schon verschiedene Kombinationen ausprobiert aber es geht nicht auf. Hoffe Sie können mit helfen :) Danke Isabel
14.11.2022 - 14:52DROPS Design answered:
Liebe Isabel, markieren Sie die 1. Masche im A.2A / die letze Masche in A.2C und stricken Sie weiter die Diagramme so, dh A.2A wird jeweils von dieser Maschen beginnen und A.2C wird jeweils bis dieser Masche gestrickt werden, inzwischen stricken Sie A.2B. Viel Spaß beim stricken!
14.11.2022 - 16:18