
Looking for a yarn?


Comments / Questions (134)
![]() Bodil Liland wrote:
Bodil Liland wrote:
Har strikket ca halve genseren, og merker raskt at manglende utringning i halsen gjør modellen både ubekvem og lite pen foran v.brystet. Det ses jo også på bildet øverst i oppskriften at det legger seg en fold foran. Så skuffende, at det ikke er lagt opp til forhøyning (bak) men det kommer vel av at det er mønsterstikk fra halskant og videre. Bare å rekke opp og glemme :-//
06.06.2022 - 09:18DROPS Design answered:
Hej Bodil, Det stemmer, vi har ikke forhøjning i denne opskrift. Du kan evt strikke en ensfarvet forhøjning bagpå, vi har mange opskrifter som forklarer hvordan man gør. God fornøjelse!
08.06.2022 - 07:56
![]() Hawk wrote:
Hawk wrote:
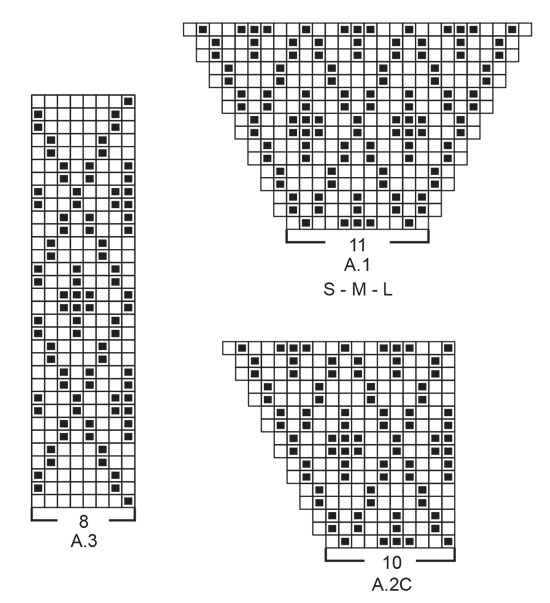
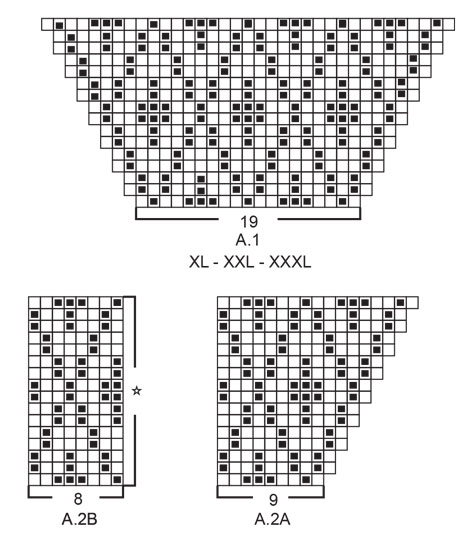
Hi, still unclear how to properly complete round 17. I followed your kind instructions per this: A2A, A2B (1 repetition), A2C, A2A, A2B (1 repetition), A2B (3 repetitions), A2B (1 repetition), A2C, A2A, A2B (1 repetition), A2C, A2A, A2B (1 repetition), A2B (3 repetitions), A2B (1 repetition), A2C. But it still doesn't add up, I end up having 9 extra stitches. Did I do smth wrong? Thanks in advance.
26.05.2022 - 00:29DROPS Design answered:
Dear Hawk, over A.1 you will work: (A.2A, A2B, A.2C) and over each A.2 you will work: A.2A, 2 more repeats A.2B, A.2C, and the raglan lines are worked as before. Your number of sts should match if you increased on every other round. Try to add markers between each repeat can help. Happy knitting!
27.05.2022 - 08:59
![]() Hawk wrote:
Hawk wrote:
Hi, I've finished the first 16 rows of the pattern. I've read your explanations to others how to continue, but still don't understand how it works, sorry :( I do 1 raglan + 11 stitches of A1 +raglan + 9 stitches of A2A and so on from the bottom up? But it wouldn't add up to the many stitches I've knitted up to round 16. Could you list out exactly how many stitches for each diagram section for round 17 and upwards please?
23.05.2022 - 04:16DROPS Design answered:
Dear Mrs Hawk, work the raglan stitches and increase for raglan as before, then over A.1 work: A.2A (= 9 sts), A.2B (= 8 sts) A.2C (= 10 sts) (so that you get 9+8+10=27 sts as on the last row in A.1); then over A.2 work: A.2A + A.2B over the previous A2.A, then work A.2B as before, and work A.2B + A.2C over previous A.2C. Happy knitting!
23.05.2022 - 08:51
![]() Hawk wrote:
Hawk wrote:
Hi, thanks so much for your previous response! Another question: at the end of the double neck edge, I have 112 stitches. When I add 8 for raglan, I end up with 120 in the first round of the pattern. However, the following round following the pattern doesn’t add up to 120 (the pattern round ends up being less than the number of stitches). I have recounted this several times. What am I doing wrong? Thanks!
18.05.2022 - 04:12DROPS Design answered:
Dear Hawk, after first increase, work 2nd row in diagrams: A.1 (= over the yarn over + the next 11 sts + the yarn over = 13 sts), work the raglan stitch, A.2A (= 1 yarn over + 9 = 10 sts), A.2B, A.2C (= 10 sts + 1 yarn over = 11 sts), the raglan stitch, A.1 (= over the yarn over + the next 11 sts + the yarn over = 13 sts), work the raglan stitch, A.2A (= 1 yarn over + 9 = 10 sts), A.2B, A.2C (= 10 sts + 1 yarn over = 11 sts), the raglan stitch = 13+1+10+24+11+1+13+1+10+24+11+1=120 sts. Happy knitting!
18.05.2022 - 08:22
![]() Hawk wrote:
Hawk wrote:
Hi, I'm new to knitting. For the yoke instructions, I'm not clear on the following part: "Increase 1 stitch for raglan, work A.1, etc." At the beginning it says to increase 1 stitch for raglan. So in this 1st round of the pattern, there will be a total of 9 additional stitches, not 8 right? Because it's saying to increase by 1 stitch at the very beginning (yarn over). Am I understanding this right? And then I'll add 8 for the markers for raglan. Please help! :)
17.05.2022 - 02:40DROPS Design answered:
Dear Hawk, you should increase 8 sts for the raglan: Increase 1 stitch, work A.1, increase for raglan on each side of stitch with marker (= 2 sts in total, work A.2A, A.2B and A.2C, increase for raglan on each side of raglan stitch (= 2 sts in total), A.1, increase for raglan on each side of raglan stitch, work A.2A, A.2B and A.2C, increase for raglan before the last raglan stitches (=1 stitch) = you have increased: 1+2+2+2+1=8 sts in total. Hope it can help, happy knitting!
17.05.2022 - 09:10
![]() Eva Noren wrote:
Eva Noren wrote:
Stemmer det at lengde på bol og ermer skal være så kort. Vanligvis ville jeg i min størrelse strikket ermer som er ca 48-50 cm men lengden her er 34 på en xl. Samme blir det fra under ermet og til nederst på bol. Ser at garnmengde som er kjøpt er alt for lite om man skal få en passe stor genser.
11.03.2022 - 07:59DROPS Design answered:
Hei Eva. Husk å legg til vrangborden på ermet, da blir ermet 34+5=39 cm, mål under erme. Mål over ermet (skulder) er målet 25+35+5=64 cm. Når du skal velge str å strikke, sjekk målene på målskissen og velg den str. som har de målene du ønsker. Målene på denne genseren er ganske lik andre gensere vi har, samt garnmengde. mvh DROPS Design
14.03.2022 - 13:28
![]() Kareen wrote:
Kareen wrote:
Hallo, ich habe die ersten 16 Reihen beendet. Wie verfahre ich weiter? Beginne ich wieder bei A1? Viele Grüße
26.02.2022 - 11:53DROPS Design answered:
Liebe Karen, jetzt stricken Sie the 27 sts in A.1 wie folgt: A.2A (= 9 M), A.2B (8 M) und A.2C (= 10 M) = 9+8+10= 27 M. NAch A.2A-A.2C stricken Sie: A.2A + A.2B über vorrige A.2A und A.2B + A.2C über vorrige A.2C, so haben Sie 2 A.B=2B mehr zwischen A.2A und A.2C. Viel Spaß beim stricken!
28.02.2022 - 09:16
![]() Eva Noren wrote:
Eva Noren wrote:
Hei Forsøker meg på denne Fjord Mosaic genser i XL. 19(+ merket maske) og 51 (+ merket maske) Hvordan/hvilken farge strikkes de fire merkemaskene ved Ragland.
26.02.2022 - 11:10DROPS Design answered:
Hej Eva, de strikkes i perlegrå, se forklaringen på RAGLAN øverst i opskriften :)
02.03.2022 - 11:22
![]() Eva Winnberg wrote:
Eva Winnberg wrote:
Jag stickar i storlek L och har 112 maskor. Mönstret ger 108 maskor
21.02.2022 - 18:01
![]() Eva Winnberg wrote:
Eva Winnberg wrote:
När jag stickar första mönstervarvet så stämmer inte maskantalet på slutet. Jag har 112 maskor. Vad gör jag fel?
21.02.2022 - 08:29DROPS Design answered:
Hej Eva, hvilken størrelse strikker du? Hvor mange masker har du og hvor mange masker skal du have?
21.02.2022 - 15:37
|
||||||||||
Fjord Mosaic#fjordmosaicsweater |
||||||||||
 |
 |
|||||||||
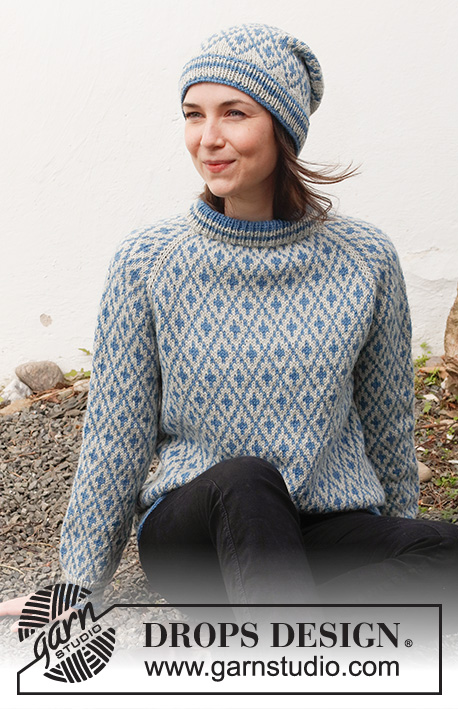
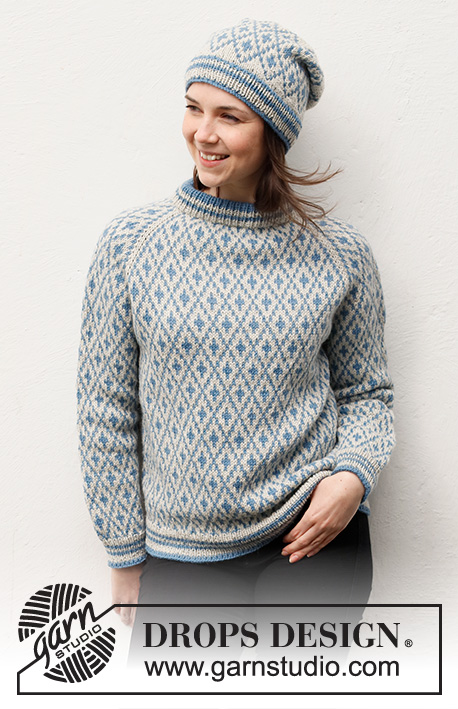
Knitted jumper and hat in DROPS Lima. Jumper is knitted top down with double neck edge, raglan and Nordic pattern. Hat is knitted with Nordic pattern. Size: S - XXXL
DROPS 216-28 |
||||||||||
|
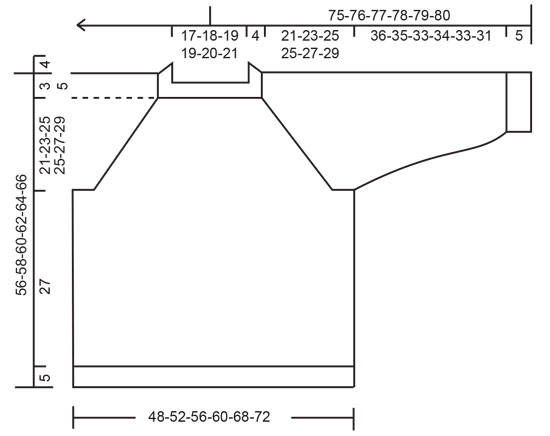
------------------------------------------------------- EXPLANATION FOR THE PATTERN: ------------------------------------------------------- PATTERN: Jumper: See diagrams A.1 and A.2. Choose diagram for your size (applies to A.1). Hat: See diagram A.3. Work the entire pattern in stocking stitch. INCREASE/DECREASE TIP (evenly): To calculate how to increase/decrease evenly, use the total number of stitches on row (e.g. 92 stitches) and divide stitches by number of increases/decreases to be done (e.g. 20) = 4.6. In this example increase by making 1 yarn over after alternately approx. every 4th and 5th stitch. On next round knit yarns over twisted to avoid holes. If decreasing knit in this example approx. every 3rd and 4th stitch and every 4th and 5th stitch together. KNITTING TIP: To avoid the knitting tension to tighten when working pattern with several colours, it is important not to tighten the strands on back of piece. Switch to a higher needle number when working pattern if the pattern is somewhat tight. RAGLAN: Increase for raglan by increasing 1 stitch on each side of the 4 stitches with markers - in every transition between front/back piece and sleeves (= 8 stitches increased on round). Increase 1 stitch by making 1 yarn over with pearl grey. On next round knit yarn over twisted with pearl grey to avoid holes. Then work the new stitches in A.1 and A.2. STRIPES-1 (applies to rib at the bottom of body and sleeves): 3 rounds pearl grey, 2 rounds grey blue, 2 rounds pearl grey, 2 rounds grey blue, 4 rounds pearl grey, 2 rounds grey blue. STRIPES-2 (applies to rib at the bottom of hat): 4 rounds pearl grey, 2 rounds grey blue, 2 rounds pearl grey, 2 rounds grey blue. DECREASE TIP-1 (applies to mid under sleeves): Decrease 2 stitches mid under sleeve as follows: Work until 2 stitches remain before marker thread, knit 2 together, marker thread, knit 2 twisted together (= 2 stitches decreased). DECREASE TIP-2 (applies to top of hat): Decrease 1 stitch after every marker thread as follows: Slip 1 stitch knitwise, knit 1, pass slipped stitch over stitch worked (= 1 stitch decreased = 8 stitches decreased in total on round). CAST-OFF TIP: To avoid a tight cast-off edge you may use a larger needle size. If this also is too tight, work a 1 yarn over after approx. every 6th stitch while casting off (cast off yarn overs as regular stitches). ------------------------------------------------------- START THE PIECE HERE: ------------------------------------------------------- JUMPER - SHORT OVERVIEW OF THE PIECE: Double neck edge and yoke are worked in the round on circular needle, top down. Now divide yoke for body and sleeves. Body is worked in the round on circular needle, top down. Work sleeves in the round on double pointed needles/a short circular needle, top down. DOUBLE NECK EDGE: Cast on 92-96-100-108-112-116 stitches on a short circular needle size 4.5 mm with grey blue. Switch to a short circular needle size 3.5 mm, and work rib in the round (= knit 1/purl 1). When 16 rounds rib have been worked with grey blue, work 2 rounds rib with pearl grey, 2 rounds rib with grey blue, and 4 rounds rib with pearl grey. Neck edge now measures approx. 8 cm. Knit 1 round with pearl grey while increasing 20-16-12-36-48-44 stitches evenly - read INCREASE/DECREASE TIP = 112-112-112-144-160-160 stitches. Switch to circular needle size 4.5 mm. Insert a marker at the beginning of round = right shoulder at the back when garment is worn. YOKE: Insert 4 markers in piece as explained below - insert markers without working them, and use markers when increasing for raglan: Count 11-11-11-19-19-19 stitches (= sleeve), insert 1 marker in next stitch (= raglan stitch), count 43-43-43-51-59-59 stitches (= front piece), insert 1 marker in next stitch, count 11-11-11-19-19-19 stitches (= sleeve), insert 1 marker in next stitch, count 43-43-43-51-59-59 stitches (= back piece), insert 1 marker in last stitch. On next round begin pattern - AT THE SAME TIME increase for RAGLAN - read explanation above, i.e. work first round as follows: Increase 1 stitch for raglan, work A.1 (= 11-11-11-19-19-19 stitches), increase for raglan on each side of stitch with marker (always work raglan stitch with pearl grey), work A.2A (= 9 stitches), work A.2B over the next 24-24-24-32-40-40 stitches (= 3-3-3-4-5-5 repetitions of 8 stitches), work A.2C (= 10 stitches), increase for raglan on each side of raglan stitch, work A.1 (= 11-11-11-19-19-19 stitches), increase for raglan on each side of raglan stitch, work A.2A (= 9 stitches), work A.2B over the next 24-24-24-32-40-40 stitches), work A.2C (= 10 stitches), and increase for raglan before the last raglan stitches (= 8 stitches increased on round), work the last raglan stitch. Read KNITTING TIP and continue pattern like this. REMEMBER THE KNITTING TENSION! AT THE SAME TIME increase for raglan every other round 24-28-32-28-32-36 times in total. After last increase for raglan there are 304-336-368-368-416-448 stitches on needle. Continue pattern without increasing until yoke measures 21-23-25-25-27-29 cm from under neck edge mid front (measured from transition between double neck edge and yoke), and finish round after 4th raglan stitch. On next round divide yoke for body and sleeves, i.e. work next round as follows: Slip the first 60-68-76-76-84-92 stitches on 1 stitch holder for sleeve, (= stitches from sleeve + 1 raglan sleeve), cast on 4-4-4-12-12-12 new stitches on needle (= in the side under sleeve) work as before over the next 92-100-108-108-124-132 stitches (= front piece - these stitches are stitches from front piece + 1 raglan stitch), slip the next 60-68-76-76-84-92 stitches on 1 stitch holder for sleeve (= stitches from sleeve + 1 raglan stitch), cast on 4-4-4-12-12-12 new stitches on needle (= in the side under sleeve), and work as before over the next 92-100-108-108-124-132 stitches (= back piece - these stitches are stitches from back piece + 1 raglan stitch). Cut the yarn. Finish body and sleeves separately. NOW MEASURE PIECE FROM HERE! BODY: = 192-208-224-240-272-288 stitches. Begin round in the middle of the 4-4-4-12-12-12 stitches cast on under sleeve in one side of piece, and continue pattern in the round – i.e. repeat A.2B but make sure to begin on correct round in A.2B according to last round on yoke (= 24-26-28-30-34-36 repetitions of 8 stitches). Work until piece measures approx. 27 cm from division, but finish pattern after one whole or half repetition vertically. Approx. 5 cm remain until finished measurements, try the jumper on and work until desired length. Knit 1 round with pearl grey while increasing 40-44-48-50-58-60 stitches evenly - remember INCREASE TIP = 232-252-272-290-330-348 stitches. Switch to circular needle size 3.5 mm. Work rib in the round (knit 1/purl 1) in STRIPES-1 - read explanation above. When stripes has been worked, rib measures approx. 5 cm. Cast off with grey blue and knit over knit and purl over purl - read CAST-OFF TIP! Jumper measures approx. 56-58-60-62-64-66 cm from shoulder and down. SLEEVE: Slip the 60-68-76-76-84-92 stitches from stitch holder in one side of piece on double pointed needles or a short circular needle size 4.5 mm and pick in addition up 1 stitch in each of the 4-4-4-12-12-12 new stitches cast on under sleeve = 64-72-80-88-96-104 stitches. Insert 1 marker thread in the middle of the 4-4-4-12-12-12 stitches under sleeve. Move the marker thread upwards when working; it should be used for decrease mid under sleeve. Begin round at the marker thread and continue pattern in the round - i.e. repeat A.2B but make sure that pattern fits nicely over stitches on yoke and to begin on correct round in A.2B according to last round on yoke. When sleeve measures 2-2-2-3-3-3 cm from division, decrease 2 stitches mid under sleeve - read DECREASE TIP-1. Decrease like this every 9-4-2½-2-1½-1 cm 4-8-12-12-16-20 times in total = 56-56-56-64-64-64 stitches. Work until sleeve measures approx. 36-35-33-34-33-31 cm from division. Approx. 5 cm remains until finished measurements. Try the jumper on and work to desired length, but finish pattern after one whole or half repetition vertically. NOTE! Shorter measurements in the larger sizes because of wider neck and longer yoke. Knit 1 round with pearl grey while decreasing 6-4-4-10-10-8 stitches evenly = 50-52-52-54-54-56 stitches. Switch to double pointed needles size 3.5 mm. Work rib in the round (knit 1/purl 1) in STRIPES-1 the same way as on body. When stripes has been worked, rib measures approx. 5 cm. Cast off with grey blue and knit over knit and purl over purl - remember CAST-OFF TIP. Work the other sleeve the same way. ASSEMBLY: Fold rib in the neck double in towards wrong side of piece. Fasten rib but to avoid a tight neck edge and avoiding the edge to tip outwards, it is important to make the seam elastic. ------------------------------------------------------ HAT - SHORT SUMMARY OF GARMENT: Worked in the round on a short circular needle, bottom up. Switch to double pointed needles when needed. HAT: Cast on 120-124-128 stitches on a short circular needle size 3 mm with blue grey. Knit 1 round. Then work rib in the round (= knit 1/purl 1) in STRIPES-2 - read explanation above. When stripes have been worked, switch to pearl grey. Knit 1 round while at the same time decrease 16-20-16 stitches evenly- read INCREASE/DECREASE TIP = 104-104-112 stitches. Switch to a short circular needle size 3.5 mm and knit 1 round with pearl grey. Then work A.3 in the round (= 13-13-14 repetitions of 8 stitches). Continue pattern like this. REMEMBER THE KNITTING TENSION. When A.3 has been worked vertically, piece measures approx. 15 cm from cast-on edge. Work in stocking stitch with pearl grey until piece measures 19-20-20 cm from cast-on edge. Insert 8 markers in piece 13-13-14 stitches apart. On next round, decrease 1 stitch at every marker – read DECREASE TIP-2. Decrease like this every other round 11-11-12 times in total = 16 stitches remain in all sizes. Knit 1 round where all stitches are knitted together 2 by 2 = 8 stitches remain in all sizes. Cut the yarn and pull it through the remaining stitches, tighten together and fasten. Hat measures approx. 26-27-28 cm from top and down. |
||||||||||
Diagram explanations |
||||||||||
|
||||||||||
 |
||||||||||
 |
||||||||||
 |
||||||||||
Have you finished this pattern?Tag your pictures with #dropspattern #fjordmosaicsweater or submit them to the #dropsfan gallery. Do you need help with this pattern?You'll find 33 tutorial videos, a Comments/Questions area and more by visiting the pattern on garnstudio.com. © 1982-2025 DROPS Design A/S. We reserve all rights. This document, including all its sub-sections, has copyrights. Read more about what you can do with our patterns at the bottom of each pattern on our site. |
||||||||||


With over 40 years in knitting and crochet design, DROPS Design offers one of the most extensive collections of free patterns on the internet - translated to 17 languages. As of today we count 320 catalogues and 12094 patterns translated into English (UK/cm). 12094
We work hard to bring you the best knitting and crochet have to offer, inspiration and advice as well as great quality yarns at incredible prices! Would you like to use our patterns for other than personal use? You can read what you are allowed to do in the Copyright text at the bottom of all our patterns. Happy crafting!
Post a comment to pattern DROPS 216-28
We would love to hear what you have to say about this pattern!
If you want to leave a question, please make sure you select the correct category in the form below, to speed up the answering process. Required fields are marked *.