
Looking for a yarn?


Comments / Questions (74)
![]() Karin Hemke wrote:
Karin Hemke wrote:
Hallo, Ich würde diesen Pullover gerne stricken und habe mir die Anleitung durchgelesen. Allerdings verwirrt mich die Erklärung des Musters bei der Passe etwas. Diese ist tatsächlich in Krausrippen gestrickt? Also 1 Reihe rechts, 1 Reihe links? Das sieht auf dem Foto anders aus. Können Sie mir da weiterhelfen? Danke MfG Karin
31.08.2020 - 08:12DROPS Design answered:
Liebe Frau Hemke, die Streifen werden im Rippenmuster (= 1 Masche rechts, 1 Masche Krausrechts) gestrickt, dh die Masche rechts wird immer rechts gestrickt und die Masche krausrechts wird abwechlunsweise rechts und links gestrickt. Viel Sapß beim stricken!
31.08.2020 - 10:25
![]() Nicolas Bernard wrote:
Nicolas Bernard wrote:
Bonjour, un grand merci déjà pour la réponse précédente concernant les marqueurs. J'ai maintenant un doute sur le tricotage des augmentations : Rang 0: jeté Rang 1 : jeté tricoté torse Rang 2 : comment tricote-t-on ces mailles torse supplémentaires dans le point texturé ? Pour avoir le motif, il faut continer les "cotes", la maille endroit du point. Mais pour cette maille supplémentaire torse, fait-on une maille endroit ou une maille envers ?
29.06.2020 - 14:59DROPS Design answered:
Bonjour Mme Bernard, les augmentations vont être tricotées torse pour éviter les trous, elles seront tricotées soit en jersey, soit au point mousse (à l'endroit/à l'envers) - cette vidéo devrait vous aider à bien comprendre comment tricoter les augmentations. Bon tricot!
29.06.2020 - 15:20
![]() Nicolas wrote:
Nicolas wrote:
Bonjour, pour les augmentations-1, il est dit de placer les marqueurs "dans" la 7ème maille (etc.). Mais faut-il le placer après la maille ou avant ? Par exemple pour la taille S, entre les marqueurs 2 et 3, je compte 15 mailles sur mon aiguille, alors qu'il ne devrait y en avoir que 14 n'est pas ? (13ème -> 27ème) Merci pour vos éclaircissements !
20.06.2020 - 19:00DROPS Design answered:
Bonjour Nicolas, les marqueurs doivent être placés dans les mailles indiquées, pas entre les mailles - cette vidéo montre au time code 1:32 comment on met un marqueur dans une maille. Bon tricot!
22.06.2020 - 08:24
![]() Lene Johnsson wrote:
Lene Johnsson wrote:
Tak svar - mit spsg. går Primært på udtagningerne - 1 r/1 v bliver til 1 r/2 v - hvordan bliver det til 1 r/1 v igen. Problemet fortsætter jo ved alle udtagninger. Vh. Lene
12.06.2020 - 10:09DROPS Design answered:
den bliver jo hvad du gør den til... strikker du de 3 masker du beskriver som 1r, 1vr, 1r så stemmer det :)
12.06.2020 - 10:23
![]() Lene Johnsson wrote:
Lene Johnsson wrote:
Hej - jeg forstår stadig ikke hvad du mener: De øgede masker strikkes fortløbende ind i strukturmønster, dvs 1.udtagning strikkes i rille, 2.økning strikkes i glattstrikk osv. Når strukturmønsteret er strikket ferdig strikkes de økte maskene i glattstrikk videre. vh. Lene
12.06.2020 - 09:33DROPS Design answered:
Hej Lene, du strikker kun struktur i den første hvide stribe, og her strikkes maskerne skiftevis i ret (glatstrik) og retstrik(riller). Så ja første pind strikkes hele pinden ret og anden pind ret og vrang. Selve udtagningen strikkes først ind i mønsteret på pinden efter. God fornøjelse!
12.06.2020 - 09:55
![]() Lene Johnsson wrote:
Lene Johnsson wrote:
Er det forstået korrekt - 1 pind rer/vrang - næste pind ret hele vejen rundt? Når der så tages ud så kommer mønsteret jo ikke til at passe med r/v for ved udtagningerne er der to ret - hvordan skal det passes ind?
07.06.2020 - 17:30DROPS Design answered:
Hei Lene. Nei, 1. omgang strikkes rett, deretter strikkes 2. omgang slik: 1 rett, 1 vrang, 3. omgang strikkes lik som 2. omgang og slik strikkes det helt til 1. stripe med lime. De økte maskene strikkes fortløpende inn i strukturmønster, dvs 1.økning strikkes i rille, 2.økning strikkes i glattstrikk osv. Når strukturmønsteret er strikket ferdig strikkes de økte maskene i glattstrikk videre. God Fornøyelse!
09.06.2020 - 10:29
![]() Käthe Mohr wrote:
Käthe Mohr wrote:
Kære Jane, nej så har jeg ikke skrevet det rigtigt. I selve opskriften står der, at når vi har nået 23 cm skal arb. deles op. Jeg har nået de 23 cm., men under forklaringen om striber, står der, at første stribe skal være 13 cm og anden stribe skal være 15 cm. Det er 28 cm? Min første stribe er 13 cm, men min anden stribe er 12 cm. Det er 25 cm., ? Min strikkeprøve var som sagt rigtig.
29.05.2020 - 11:50
![]() Käthe Mohr wrote:
Käthe Mohr wrote:
Under striber står der, at "Første stribe" skal være 13 cm. Det passer. Under "Anden stribe" skal målet være 15 cm. Det kommer ikke til at passe. Efter min 5' stribe med lime måler "Anden stribe" 12 cm. I selve opskriften skal de to striber være 23 cm inden arbejdets deling?? Der er en forskel på 3 cm? Min strikkeprøve var korrekt.
26.05.2020 - 13:00DROPS Design answered:
Hej Käthe, men så strikker du bare en lime stribe mere så du får det rigtige mål. God fornøjelse!
29.05.2020 - 10:50
![]() Jane Hegewald wrote:
Jane Hegewald wrote:
Tak for foreløbig svar 36. Men er stadig i tvivl. En vrid RET og en vrid GLATSTRIK er det det samme
25.05.2020 - 13:12
![]() Jane Hegewald wrote:
Jane Hegewald wrote:
Syntes strukturmønstret er svært, har lært lidt ved at læse svar nr. 32. 1 omgang ret og 1 omgang 1ret og 1 vrang. Men er det så på retpinden der skal tages ud ( slås om). Hvordan strikker man så næstepind. 1. Udtagning strikkes ret 2. Udtagning strikkes i glatstrik. Og hvordan strikkes så drejet.? Venlig hilsen jane hegewa
18.05.2020 - 14:29DROPS Design answered:
Hei Janne. Når det står at kastene skal strikkes vridd (drejet), strikkes det i bakre maskebue slik at det ikke blir hull/kun et lite hull. Strikker du kastet i den fremste maskebue (som man vanligvis gjør blir det hull). God Fornøyelse!
25.05.2020 - 11:32
|
|
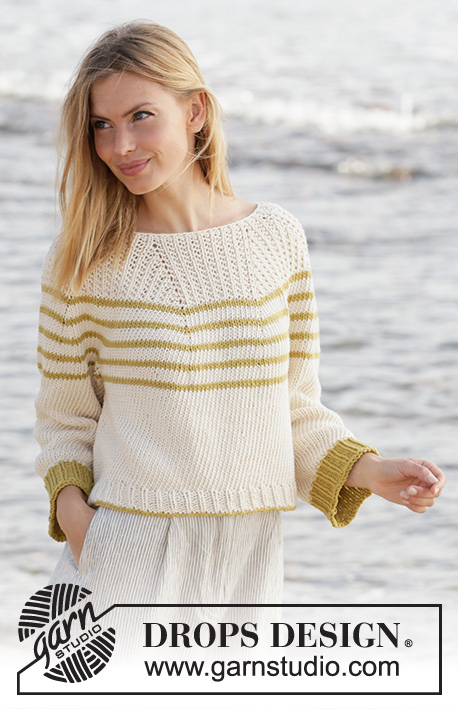
Breaking Sunlight#breakingsunlightsweater |
|
 |
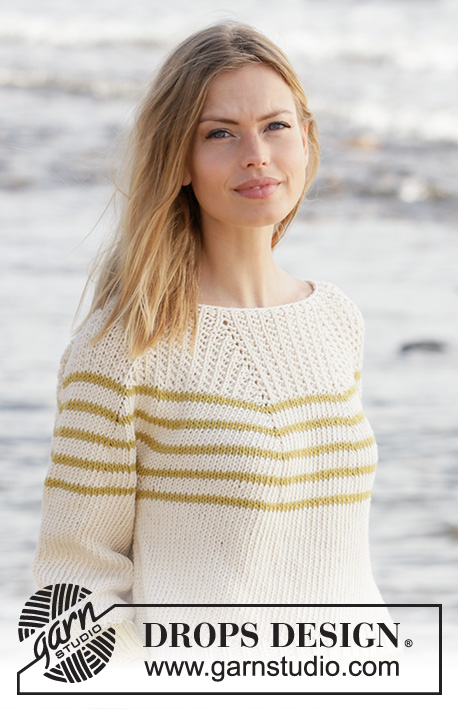 |
Knitted jumper with round yoke in DROPS Paris. The piece is worked top down with stripes and textured pattern. Sizes S - XXXL.
DROPS 213-36 |
|
|
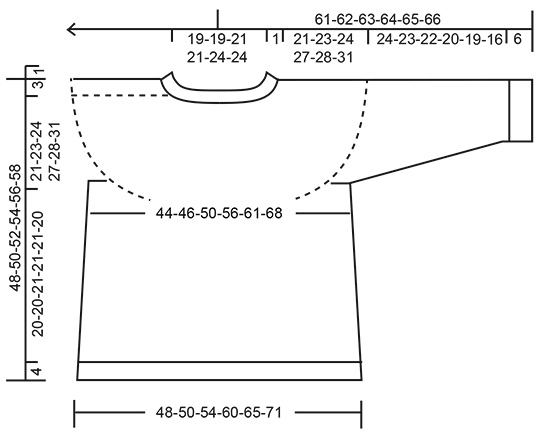
------------------------------------------------------- EXPLANATIONS FOR THE PATTERN: ------------------------------------------------------- RIDGE/GARTER STITCH (worked in the round): 1 ridge in height = 2 rounds; Knit 1 round and purl 1 round. INCREASE TIP-1 (for yoke): Increase with 1 yarn over after markers 1, 3, 5 and 7. Increase with 1 yarn over before markers 2, 4, 6 and 8. The yarn overs are worked twisted on the next round to avoid holes. The increase stitches are worked into the textured pattern as you go, i.e. increase-1 is worked in garter stitch, increase-2 is worked in stocking stitch etc. When the textured pattern is finished, work the increased stitches in stocking stitch. INCREASE TIP-2 (for sides of body): Work until there are 2 stitches left before the marker thread, make 1 yarn over, knit 4 (marker thread sits between these 4 stitches) make 1 yarn over (= 2 stitches increased at each marker thread; 4 stitches increased on round). On the next round work the yarn overs twisted to avoid holes. Then work the new stitches in stocking stitch. STRIPES: STRIPE 1: Work 13-13-14-14-14-14 cm with off-white and work textured pattern as follows: * Knit 1, work 1 stitch in GARTER STITCH – read description above *, work from *-* to end of round. STRIPE 2: Work stocking stitch and stripes as follows: Work * 2 rounds with lime, 4 rounds with off white *, work from *-* for 15-15-15-16-16-16 cm, adjust so you finish after a complete stripe (applies to the stripe with lime). STRIPE 3: Finish the piece with off-white and stocking stitch. DECREASE TIP (for sleeves): Decrease 1 stitch on each side of the marker thread as follows: Work until there are 3 stitches left before the marker thread, knit 2 together, knit 2 (marker thread sits between these 2 stitches), slip 1 stitch as if to knit, knit 1 and pass the slipped stitch over the knitted stitch. CASTING-OFF TIP: To avoid the cast-off edge being tight you can cast off with a larger size needle. If the edge is still tight, make 1 yarn over after approx. each 4th stitch at the same time as casting off and the yarn overs are cast off as normal stitches. ------------------------------------------------------- START THE PIECE HERE: ------------------------------------------------------- JUMPER – SHORT OVERVIEW OF THE PIECE: The neck and yoke are worked in the round with circular needle, from mid back and top down. The yoke is divided for body and sleeves and the body is continued in the round with circular needle. The sleeves are worked with double pointed needles, top down. NECK: Cast on 80-80-88-88-96-96 stitches with circular needle size 4.5 mm and off-white. Knit 1 round. The next round is worked as follows: * Knit 1, purl 1 *, work from *-* to end of round. Work 2 rounds like this and then change to circular needle size 5.5 mm. Insert 1 marker at the beginning of the round (= approx. mid back); the yoke will be measured from this marker! YOKE: The piece is worked in STRIPES – read description above. On the next round insert 8 markers (all markers are inserted into knitted stitches) as follows: Insert marker 1 in the 7th-7th-9th-9th-9th-9th stitch. Insert marker 2 in the 13th-13th-15th-15th-15th-15th stitch. Insert marker 3 in the 27th-27th-31st-31st-33rd-33rd stitch. Insert marker 4 in the 33rd-33rd-37th-37th-39th-39th stitch. Insert marker 5 in the 47th-47th-53rd-53rd-57th-57th stitch. Insert marker 6 in the 53rd-53rd-59th-59th-63rd-63rd stitch. Insert marker 7 in the 67th-67th-75th-75th-81st-81st stitch. Insert marker 8 in the 73rd-73rd-81st-81st-87th-87th stitch. On the next round increase 1 stich by each marker – read INCREASE TIP-1 (= 8 stitches increased). The number of stitches before marker 1, between markers 2 and 3, markers 4 and 5, markers 6 and 7 and after marker 8 remain the same. The increased stitches are between markers 1 and 2, markers 3 and 4, markers 5 and 6 and between markers 7 and 8. REMEMBER THE KNITTING TENSION! Increase like this every 2nd round a total of 15-17-19-23-24-27 times, every 4th round 1 time and every 6th round 1 time = 216-232-256-288-304-328 stitches. The piece measures approx. 19-21-23-27-28-31 cm from the marker. Continue working until the piece measures 21-23-24-27-28-31 cm. Now divide the piece for body and sleeves as follows: Work the first 31-33-36-41-44-49 stitches as before, place the next 46-50-56-62-64-66 stitches on a thread for sleeve and cast on 8-8-8-8-10-10 stitches under the sleeve, work 62-66-72-82-88-98 stitches as before, place the next 46-50-56-62-64-66 stitches on a thread for sleeve and cast on 8-8-8-8-10-10 stitches under the sleeve, and work 31-33-36-41-44-49 stitches as before. BODY: = 140-148-160-180-196-216 stitches. Insert 1 marker thread in the middle of the 8-8-8-8-10-10 stitches under each sleeve (= in sides of body). There are 70-74-80-90-98-108 stitches between the marker threads. Allow the threads to follow your work onwards; they will be used when increasing in the sides. When the piece measures 4 cm from the division, increase 1 stitch on each side of both marker threads – read INCREASE TIP-2 (= 4 stitches increased). Increase like this every 4 cm a total of 3 times = 152-160-172-192-208-228 stitches. When the body measures 20-20-21-21-21-20 cm from the division increase 10-11-11-12-11-12 stitches evenly on the next round = 162-171-183-204-219-240 stitches. Change to circular needle size 4.5 mm and work rib (= knit 1 / purl 2) for 4 cm. Cast off with knit using lime– read CASTING-OFF TIP! SLEEVES: Place the 46-50-56-62-64-66 stitches from the thread on the one side of the piece on double pointed needles size 5.5.mm and knit up 1 stitch in each of the 8-8-8-8-10-10 stitches cast on under the sleeve = 54-58-64-70-74-76 stitches. Insert a marker thread in the middle of the 8-8-8-8-10-10 stitches under the sleeve. Allow the thread to follow your work onwards; it will be used when decreasing under the sleeve. Continue with stocking stitch and stripes in the round. When the sleeve measures 3 cm from the division, decrease 1 stitch on each side of the marker thread – read DECREASE TIP (= 2 stitches decreased). Decrease like this every 3-2½-2-1½-1-1 cm a total of 6-7-9-11-12-12 times = 42-44-46-48-50-52 stitches. When the sleeve measures 24-23-22-20-19-16 cm from the division increase 0-1-2-0-1-2 stitches = 42-45-48-48-51-54 stitches. Change to double pointed needles size 4.5 mm and work rib (= knit 1 / purl 2) in the round using lime and for 6 cm. Cast off with knit using lime. Work the other sleeve in the same way. |
|
 |
|
Have you finished this pattern?Tag your pictures with #dropspattern #breakingsunlightsweater or submit them to the #dropsfan gallery. Do you need help with this pattern?You'll find 25 tutorial videos, a Comments/Questions area and more by visiting the pattern on garnstudio.com. © 1982-2025 DROPS Design A/S. We reserve all rights. This document, including all its sub-sections, has copyrights. Read more about what you can do with our patterns at the bottom of each pattern on our site. |
|


With over 40 years in knitting and crochet design, DROPS Design offers one of the most extensive collections of free patterns on the internet - translated to 17 languages. As of today we count 320 catalogues and 12094 patterns translated into English (UK/cm). 12094
We work hard to bring you the best knitting and crochet have to offer, inspiration and advice as well as great quality yarns at incredible prices! Would you like to use our patterns for other than personal use? You can read what you are allowed to do in the Copyright text at the bottom of all our patterns. Happy crafting!
Post a comment to pattern DROPS 213-36
We would love to hear what you have to say about this pattern!
If you want to leave a question, please make sure you select the correct category in the form below, to speed up the answering process. Required fields are marked *.