
Popular categories
Looking for a yarn?


Comments / Questions (65)
![]() Kara wrote:
Kara wrote:
What do you mean by '5 band stitches towards mid-front'? Don't understand at all. Pattern is gorgeous but confusing.
23.12.2019 - 00:37DROPS Design answered:
Dear Kara, the buttnband of this cardigan is knitted along with the whole sweater (and not added separately later). So when you cast on, you also cast on on both sides 5 stitches that are knitted in garter stitch throughout. Happy Knitting!
24.12.2019 - 17:37
![]() Kathryn Baron wrote:
Kathryn Baron wrote:
I think I have figured out the discrepancies between the row counts of row 2 and 3 of the pattern in the small size, It seems that on row 3, four of the 8 yarn overs around the A3 pattern are included in the pattern but 4 are not this accounts for the 4 remaining stitches.
06.11.2019 - 17:55DROPS Design answered:
Dear Mrs Baron, with only the increases for raglan you should get 123 sts after 1st row + the YO in A.1 + the YOs in A.3 (=4) + the YO in A.6, there are: 123 + 1 +4 + 1 = 129 sts. Happy knitting!
07.11.2019 - 08:30
![]() Kathryn Baron wrote:
Kathryn Baron wrote:
I am still stuck on the second row as you haven’t understood my question. I realize you are translating so I will try to make my issue clearer. I am working the small/med size. Row 1 ends with 129 stitches. Row 2 has only 125 stitches as I have listed in my first message. You said A4 has 41 but that is for XL size. A4 has only 37 in the small row 2. Has anyone else managed to knit this size and if so how did they get passed this? I won’t give up as I really want to knit this.
06.11.2019 - 09:19DROPS Design answered:
Dear Mrs Baron, sorry for late answer - after you have worked first row in diagrams, there are 129 sts including the yarn overs made in the lace patterns of diagrams A.1, A.3 and A.6 (these yarn overs are not increased stitches since they will be decreased on row 3 of these diagrams, but they are counted on this row). Happy knitting!
06.11.2019 - 12:00
![]() Kathryn Baron wrote:
Kathryn Baron wrote:
Please help me again. Your answer to my previous question only partially solved my issue. Regarding Row 2 of the small size pattern after the yoke and my being unable to account for 129 stitches. You said that pattern A4 should have 41 stitches yet on the diagram it only shows 37 on the second row. The first row has 35 and the second row only 1 extra at each end. Please help I can’t go further until I solve this and I really want to knit this jacket.
01.11.2019 - 13:06
![]() Kathryn Baron wrote:
Kathryn Baron wrote:
Hi, looking at A4 diagram row one has 35 stitches but row seems to have only one stitch extra at each end making 37. Where are the other 4 to make 41? I see 4 purl 2 knit 7 purl 2 knit (blacked out space in between) , 7 purl 2 knit (blacked out sp) 7 purl 2 knit 4 purl . Are the arrows at the top instructions to increase ?
28.10.2019 - 08:37DROPS Design answered:
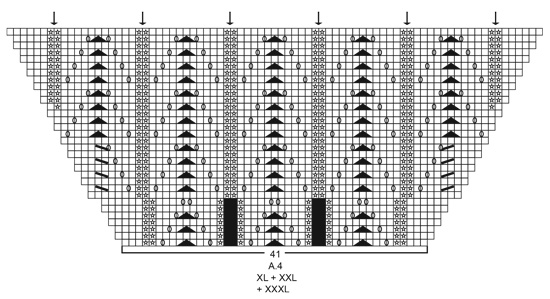
Dear Mrs Baron, if you are working size XL, XXL or XXXL you should follow diagram A.4 for these sizes = the last diagram just over the measurement chart, this A.4 is worked over 41 stitches, while A.4 in size S, M and L is worked over 35 sts. Happy knitting!
04.11.2019 - 12:41
![]() Kathryn wrote:
Kathryn wrote:
Hi, I have just finished the 1st row of the pattern after the yoke and have the required 129 stitches. Every time I try add up the stitches for the 2nd row it comes to only 125 which mean. See here: 5 garter stitches, A1=8 A2=11 A3=9 2x stocking stitch A3=9 A4-37 A3=9 2x Stkg St A3=9 A5=11 A6=8 and 5 garter stitch. Total 125. What am I missing?
27.10.2019 - 18:58DROPS Design answered:
Hi Kathryn, The only place you have counted the wrong number of stitches is in A4, which has 41 stitches, and provides your missing 4 stitches. Hope this helps and happy knitting!
28.10.2019 - 07:32
![]() Françoise wrote:
Françoise wrote:
Bonjour,je suis arrivée aux séparations devant,manches dos etc... Pourriez vous confirmer mes calculs?est ce que les motifs A3 qui bordent les manches de chaques cotés sont compris dans les mailles en attente?je vous remercie vraiment de votre réponse.
22.09.2019 - 19:13DROPS Design answered:
Bonjour Françoise, pouvez-vous nous indiquer la taille que vous tricotez? Merci!
23.09.2019 - 09:33
![]() Evelyne wrote:
Evelyne wrote:
Bonjour je suis désolée de revenir vers vous mais vous n'avez pas répondu à ma question je sais comment procéder pour les diverses séparations mais ma question était pour les mailles sous la manche faut-il les laisser en attente ou les tricoter en même temps que la continuité des rangs du modèle ? Merci
02.09.2019 - 12:34DROPS Design answered:
Bonjour Evelyne, la vidéo (cf lien souligné dans la réponse précédente) vous montre ces 2 étapes, quand vous glissez les mailles de chaque manche en attente, vous montez 8 mailles pour les remplacer, vous tricotez le dos puis glissez les mailles de la 2ème manche en attente et vous montez 8 mailles pour les remplacer et tricotez le devant. Vous continuez ensuite en allers et retours sur toutes les mailles du dos et des devants, c'est-à-dire y compris les 2 x 8 mailles montées pour le dessous des manches. Bon tricot!
02.09.2019 - 13:45
![]() Evelyne wrote:
Evelyne wrote:
Bonjour je suis perdue j'exécute ce modèle taille L et je suis aux 8 mailles rajoutées sous les manches faut il tricoter ces mailles en même temps que le reste du tricot ou les laisser en attente. Pour les manches toujours quand vous dites reprendre les 61 mailles et relever en plus 1 maille dans chacune des 8 mailles faut il reprendre simplement ces 8 mailles dès le 1er rang ? Merci pour votre aide
31.08.2019 - 19:49DROPS Design answered:
Bonjour Evelyne, cette vidéo montre comment procéder à la division du devant/dos (pour un pull, mais la technique sera la même pour les manches): comment glisser les mailles des manches en attente et monter vos 8 mailles (= 07:00 ) et comment reprendre les mailles des manches + relever 1 m dans chacune des 8 m montées sous la manche (=9:36 ). Bon tricot!
02.09.2019 - 10:15
![]() Joyce Ash wrote:
Joyce Ash wrote:
I am struggling with this pattern and I feel I am a fairly intelligent person. I have completed the neck edge I am beginning the yoke I’ve completed row one and have 139 stitches as indicated on my needles. I am now trying to do the second row and I am in the pattern portion labeled A.2. It has 12 stitches in it but when I do the second row it needs 13. What am I missing here. ? What is the “division” and where does it start.
20.03.2019 - 00:21DROPS Design answered:
Dear Mrs Ash, the first row in A.2 is worked over 12 sts, but after you have worked the first row on yoke you will have increased with 1 YO before A.3 = there are now 13 sts for A.2 that you will work as shown in row 2 (and 3) in A.2. When you work a pattern top down you will increase for sleeves until armhole, then you will have to slip sts for sleeves on a thread to work them later and continue body and each sleeve separately (see how to work a jumper top down here). Happy knitting!
20.03.2019 - 09:05
|
||||||||||||||||||||||||||||
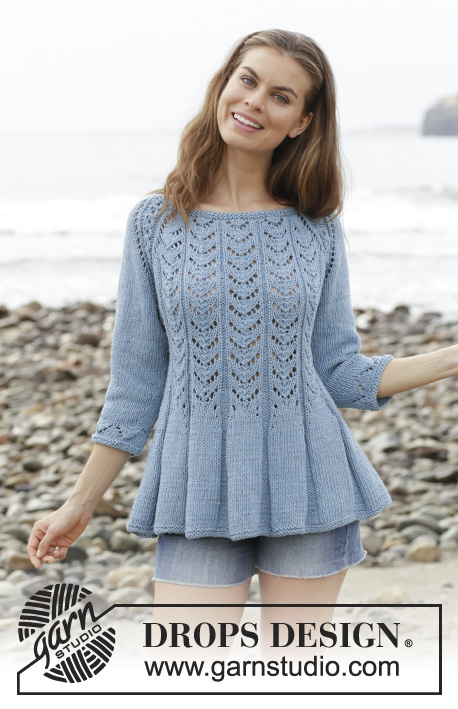
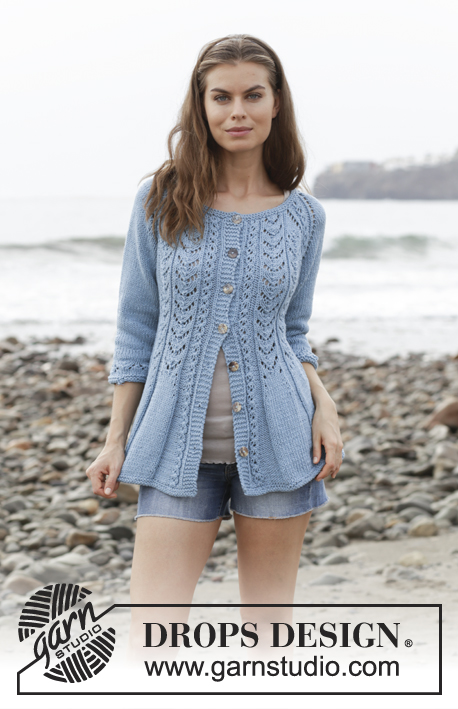
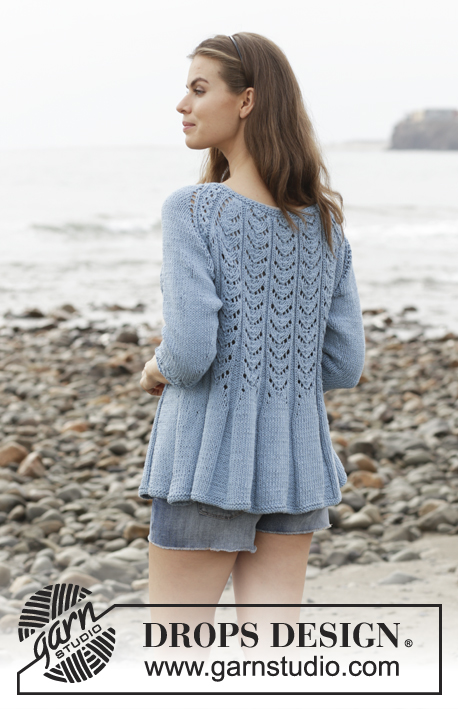
Belle Époque#belleepoquecardigan |
||||||||||||||||||||||||||||
 |
 |
|||||||||||||||||||||||||||
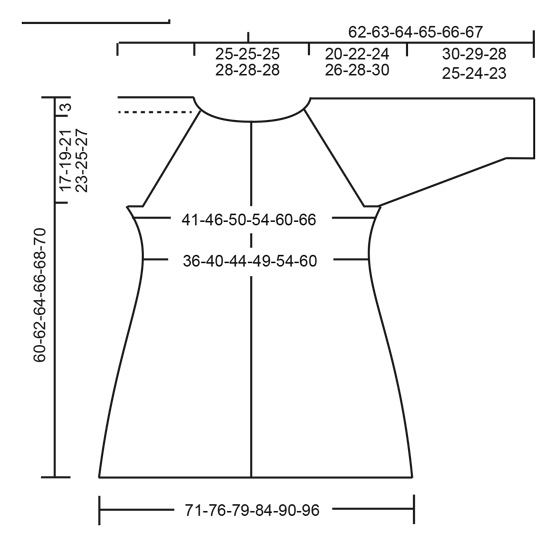
Fitted jacket with lace pattern, raglan and ¾ sleeves, knitted top down. Size: S - XXXL Piece is knitted in DROPS Paris.
DROPS 186-7 |
||||||||||||||||||||||||||||
|
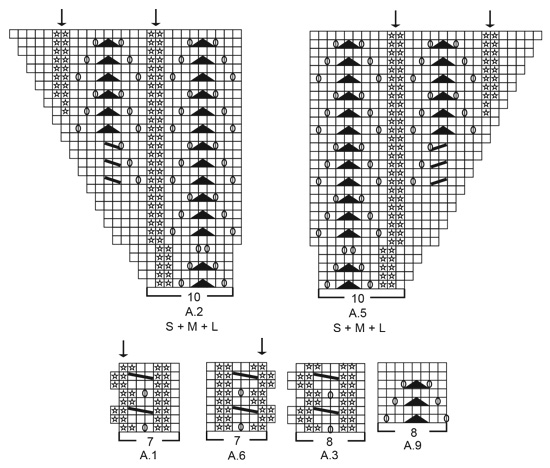
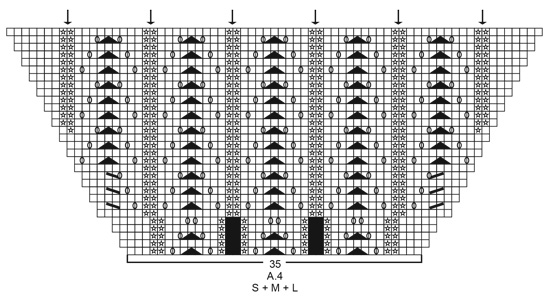
INFORMATION FOR PATTERN: GARTER STITCH (back and forth): 1 ridge = knit 2 rows. GARTER STITCH (worked in the round): 1 ridge = 2 rounds. Knit 1 round and purl 1 round. INCREASE TIP-1: To calculate how to increase evenly, use the total number of stitches on row (e.g. 98 stitches), minus bands (e.g. 10 stitches) and divide the remaining stitches by number of increases to be done (e.g. 17) = 5.2. In this example increase by making 1 yarn over after approx. every 5th stitch (do not increase over bands). On next row work yarn overs twisted to avoid holes. PATTERN: See diagrams A.1 to A.9. Choose diagram for your size (applies to A.2, A.4, A.5, A.7 and A.8). Diagrams show all rows in pattern seen from the right side. RAGLAN: All increases are done from the right side. Increase for raglan on each side of A.3 in every transition between body and sleeves (= 8 stitches increased on every increase row). Increase 1 stitch by making 1 yarn over, on next row (wrong side) purl yarns over to make holes. Work the increased stitches in stocking stitch on sleeves and according to diagram on front and back piece. DECREASE TIP (applies to sides on body and mid under sleeves): All decreases are done from the right side! Begin 4 stitches before marker and knit 2 together, knit 4 (marker is between these 4 stitches), slip 1 stitch knitwise, knit 1, pass slipped stitch over stitch worked (= 2 stitches decreased). INCREASE TIP-2 (applies to purl sections on body): All increases are done from the right side. Increase 1 stitch in every purl section by making 1 yarn over before all 2 purl stitches. On next row (wrong side) knit yarn over twisted to avoid hole. On next increase make 1 yarn over after every 3 purl stitches. Continue increase by alternately increasing at beginning and end of purl section. INCREASE TIP-3 (applies to sides of body): All increases are done from the right side. Begin 3 stitches before marker thread, make 1 yarn over, knit 6 (marker thread is in the middle of these 6 stitches), make 1 yarn over (= 2 stitches increased). On next row (wrong side) purl yarn overs twisted to avoid holes. INCREASE TIP-4 (applies to sections in stocking stitch over A.7/A.8 on body): All increases are done from the right side. When A.7/A.8 has been done, work in stocking stitch over the 9-9-9-11-11-11 stitches with lace pattern. Increase over these 9-9-9-11-11-11 stitches as follows: Work 1 stitch in stocking stitch, make 1 yarn over, work in stocking stitch until 1 stitch in stocking stitch remains, make 1 yarn over, work 1 stitch in stocking stitch. On next row (wrong side) purl yarn overs twisted to avoid holes. BUTTONHOLES: Decrease for buttonholes on right band (when garment is worn). 1 buttonhole = work from right side until 3 stitches remain on needle, make 1 yarn over, knit 2 together and finish by knitting 1. On next row (wrong side) knit the yarn over to make a hole. Decrease for first buttonhole on first row from right side after edge in garter stitch in neck. Then decrease the next 6-6-6-7-7-7 buttonholes, approx. 7-7-7½-7-7½-7½ cm between each. ---------------------------------------------------------- JACKET: Work back and forth on circular needle from mid front, work top down. Work sleeves in the round on double pointed needles/a short circular needle, top down. NECK EDGE: Cast on 98-102-106-110-114-118 stitches (including 5 band stitches in each side towards mid front) on circular needle size 4 mm with Paris. Work 2 ridges in GARTER STITCH - see explanation above. Knit 1 row from right side while increasing 17-13-9-15-11-7 stitches evenly - read INCREASE TIP-1 and remember BUTTONHOLES on right band - see explanation above = 115-115-115-125-125-125 stitches. Purl 1 row from wrong side inside 5 band stitches in garter stitch in each side towards mid front. Switch to circular needle size 5 mm and work yoke as explained below. YOKE: Work first row as follows from right side: Work 5 band stitches in garter stitch, A.1 (= 7 stitches), A.2 (= 10-10-10-12-12-12 stitches), make 1 yarn over, work A.3 (= 8 stitches), make 1 yarn over, work 2 stitches in stocking stitch (= sleeve cap), make 1 yarn over, work A.3, make 1 yarn over, work A.4 (= 35-35-35-41-41-41 stitches), make 1 yarn over, work A.3, make 1 yarn over, work 2 stitches in stocking stitch (= sleeve cap), make 1 yarn over, work A.3, make 1 yarn over, work A.5 (= 10-10-10-12-12-12 stitches), work A.6 (= 7 stitches) and finish with 5 band stitches in garter stitch towards mid front = 129-129-129-139-139-139 stitches (including yarn overs in A.1/A.3/A.6). Continue pattern like this. AT THE SAME TIME on every row from right side increase for RAGLAN - see explanation above, until increase has been done 14-18-20-21-24-26 times on each side of A.3 (including increases on first row from right side after neck edge). REMEMBER THE KNITTING TENSION! NOTE! When A.2/A.4/A.5 has been worked, continue pattern the same way, but work the next increased stitches on each side of A.3 in stocking stitch. In size S the increases for raglan is done when 3 rows remain in A.2/A.4/A.5, continue pattern without increase as explained below. After last increase for raglan there are 237-269-285-303-327-343 stitches on needle if it is on a row with 7/8/7 stitches in A.1/A.3/A.6 or 243-275-291-309-333-349 stitches if it is on a row with 8/9/8 stitches in A.1/A.3/A.6. Continue pattern as before without increases for raglan until piece measures 17-19-21-23-25-27 cm from cast-on edge mid front, but finish so that last row is a row with 7/8/7 stitches in A.1/A.3/A.6. Work next row as follows from right side: Continue with band, pattern and in stocking stitch as before over the first 37-41-43-47-51-55 stitches (= front piece), slip the next 49-57-61-62-66-66 stitches on 1 stitch holder for sleeve, cast on 6-6-8-8-10-12 new stitches on needle (= in the side under sleeve), continue in stocking stitch and pattern as before over the next 65-73-77-85-93-101 stitches (= back piece), slip the next 49-57-61-62-66-66 stitches on 1 stitch holder for sleeve, cast on 6-6-8-8-10-12 new stitches on needle (= in the side under sleeve) and continue in stocking stitch, pattern and band over the remaining 37-41-43-47-51-55 stitches (= front piece). Finish body and sleeves separately. NOW MEASURE PIECE FROM HERE! BODY: = 153-169-181-197-217-237 stitches (including yarn overs in A.1/A.6). Insert 1 marker thread in the middle of the 6-6-8-8-10-12 stitches cast on under sleeve in each side and move the marker threads upwards when working. Begin from wrong side and work 1 row with garter stitch over garter stitch, purl over purl, knit over knit. Work next row as follows from right side: 5 band stitches in garter stitch, continue A.1 (= 7 or 8 stitches), work A.7 over the next 22-22-22-26-26-26 stitches (= 2 repetitions of 11-11-11-13-13-13 stitches, continue on correct row in diagram where pattern was finished at division), work in stocking stitch over the next 13-21-27-26-36-46 stitches, A.8 over the next 55-55-55-65-65-65 stitches (= 5 repetitions of 11-11-11-13-13-13 stitches, continue on correct diagram), purl 2, 13-21-27-26-36-46 stitches in stocking stitch, A.8 over the next 22-22-22-26-26-26 stitches (= 2 repetitions of 11-11-11-13-13-13 stitches, continue on correct row in diagram), continue A.6 (= 7 or 8 stitches) and finish with 5 band stitches in garter stitch towards mid front. Continue the pattern like this – READ THE REST OF BODY BEFORE CONTINUING! DECREASE IN THE SIDES: When piece measures 1 cm from division, decrease 1 stitch on each side of both marker threads - read DECREASE TIP (= 4 stitches decreased). Decrease like this every other row (i.e. every row from right side) 5 times in total in each side = 131-147-159-175-195-215 stitches (without yarn overs in A.1/A.6). INCREASE IN PURL SECTIONS: When piece measures 6 cm from division, increase 1 stitch in every purl section marked with arrow in diagram (i.e. increase in all purl sections except the one purl section closest mid front in each side = 12 stitches increased) – read INCREASE TIP-2. Increase like this every 5 cm 6 times in total in every purl section (there are now 8 stitches in each of these purl sections). INCREASE IN THE SIDES: AT THE SAME TIME when piece measures 7 cm from division, increase 1 stitch on each side of both marker threads - read INCREASE TIP-3 (= 4 stitches increased). Increase like this every 6 cm 3 times in total in each side. INCREASE IN STOCKING STITCH SECTIONS: AT THE SAME TIME when piece measures approx. 15 cm from division, finish A.7 and A.8 after one whole repetition vertically. Then work knit over knit and purl over purl over these stitches. On next row from right side increase 2 stitches in each stocking stitch section over A.7/A.8 - read INCREASE TIP-4 (= 18 stitches increased). Repeat this increase after 2 cm (= 18 stitches increased). When all increases are done there are 251-267-279-295-315-335 stitches on row (without yarn overs in A.1/A.6). Continue with garter stitch over garter stitch, knit over knit and purl over purl until piece measures approx. 59-61-63-65-67-69 cm from shoulder and down, but adjust so that next row is worked from right side. Switch to circular needle size 4.5 mm. Work 2 ridges back and forth over all stitches. Switch back to circular needle size 5 mm and cast loosely off by knitting from right side. Jacket measures approx. 60-62-64-66-68-70 cm from shoulder and down. SLEEVE: Slip the 49-57-61-62-66-66 stitches from stitch holder in one side of piece on double pointed needles or a short circular needle size 5 mm and pick in addition up 1 stitch in each of the 6-6-8-8-10-12 new stitches cast on under sleeve = 55-63-69-70-76-78 stitches. Insert 1 marker thread in the middle of the 6-6-8-8-10-12 stitches under sleeve and begin round here. Work in stocking stitch in the round. When piece measures 2-2-2-2-3-3 cm from division, decrease 2 stitches mid under sleeve - read DECREASE TIP. Decrease like this every 3½-2½-2-1½-1-1 cm 7-10-12-12-14-14 times in total = 41-43-45-46-48-50 stitches. Continue until sleeve measures 26-25-24-21-20-19 cm (shorter measurements in the larger sizes because of longer yoke). Knit 1 round while adjusting number of stitches to 40-40-40-48-48-48. Work A.9 in the round (= 5-5-5-6-6-6 repetitions of 8 stitches). When A.9 has been worked, switch to double pointed needles size 4 mm. Work 2 ridges in the round. Switch back to double pointed needles size 5 mm and cast off by knitting. Sleeve measures approx. 30-29-28-25-24-23 cm from division. Work the other sleeve the same way. ASSEMBLY: Sew the buttons on to the left band. |
||||||||||||||||||||||||||||
Diagram explanations |
||||||||||||||||||||||||||||
|
||||||||||||||||||||||||||||
 |
||||||||||||||||||||||||||||
 |
||||||||||||||||||||||||||||
 |
||||||||||||||||||||||||||||
 |
||||||||||||||||||||||||||||
 |
||||||||||||||||||||||||||||
Have you finished this pattern?Tag your pictures with #dropspattern #belleepoquecardigan or submit them to the #dropsfan gallery. Do you need help with this pattern?You'll find 29 tutorial videos, a Comments/Questions area and more by visiting the pattern on garnstudio.com. © 1982-2026 DROPS Design A/S. We reserve all rights. This document, including all its sub-sections, has copyrights. Read more about what you can do with our patterns at the bottom of each pattern on our site. |
||||||||||||||||||||||||||||


With over 40 years in knitting and crochet design, DROPS Design offers one of the most extensive collections of free patterns on the internet - translated to 17 languages. As of today we count 324 catalogues and 12239 patterns translated into English (UK/cm). 12239
We work hard to bring you the best knitting and crochet have to offer, inspiration and advice as well as great quality yarns at incredible prices! Would you like to use our patterns for other than personal use? You can read what you are allowed to do in the Copyright text at the bottom of all our patterns. Happy crafting!
Post a comment to pattern DROPS 186-7
We would love to hear what you have to say about this pattern!
If you want to leave a question, please make sure you select the correct category in the form below, to speed up the answering process. Required fields are marked *.