
Popular categories
Looking for a yarn?


Comments / Questions (65)
![]() Doris wrote:
Doris wrote:
Also das heißt der Umschlag in der Beschreibung ist schon für die Raglanlinie gedacht? Ich dachte der Umschlag gehört zum Muster und für die Raglan gehört ein zusätzlicher Umschlag. Das hat mich verwirrt. Danke.
28.04.2025 - 10:50DROPS Design answered:
Liebe Doris, die Umschläge, die bei der 1. Reihe der Passe beschrieben sind, sind ja die für die Raglanzunahmen, so wird es jeweils 8 Umschläge = Zunahmen für Raglan in jeder Hinreihe bearbeitet, dazu kommen die Umschläge vom Muster (wie im Diagram). Viel Spaß beim Stricken!
28.04.2025 - 13:33
![]() Doris wrote:
Doris wrote:
Verstehe ich es richtig das für die Raglanlinie zwischen dem Umschlag und A3 ein weiterer Umschlag gemacht werden muss, also ein doppelter Umschlag? Und falls ja, wie stricken ich die beiden Umschläge auf der Rückreise? Danke LG Doris
27.04.2025 - 22:10DROPS Design answered:
Liebe Doris, für die Raglanzunahmen wird man 1 Umschlag vor jedem A.3 (Raglanlinie) und 1 Umschlag nach jedem A.3 stricken; diese Umschläge stricken Sie sie links bei der nächste Reihe und dann Glattrechts -siehe RAGLAN unter HINWEISE ZUR ANLEITUNG:. Viel Spaß beim Stricken!
28.04.2025 - 08:48
![]() Mrs McDpnald wrote:
Mrs McDpnald wrote:
Hi When reading the chart for wrong side rows (even numbered rows), do we read the chart left to right OR right to left. Manythanks
04.06.2024 - 19:13DROPS Design answered:
Dear Mrs McDonald, diagrams always show patterns as they look from the right side. In the case of knitting back and forth, right side rows are read from right to left, and wrong side rows are read from left to right. Happy Knitting!
04.06.2024 - 23:09
![]() Maria McDonald wrote:
Maria McDonald wrote:
Drops 186/7 Dear team. When reading the charts, on the wrong side row = even numbered rows, do we read the chart left to right OR right to left Many thanks
04.06.2024 - 19:03DROPS Design answered:
Dear Maria, please see our previous answer. Furthermore HERE is a lesson on how to read our knitting diagrams, that might also be helpful. Happy Knitting!
04.06.2024 - 23:10
![]() Ellen Kristiansen wrote:
Ellen Kristiansen wrote:
Når jeg har strikket hele diagrammet A2 , A5 og A4 slik det står i mønsteret og skal begynne på nytt til lengden er ok, hvor starter jeg på nytt ? Diagram A1, A3 og A 6 er helt ok og forstå. Veldig fin oppskrift
26.06.2022 - 17:54DROPS Design answered:
Hei Ellen. Jo, du fortsetter med A.2, A.4 og A.5 slik at mønstret gjentar seg. I f.eks str. S+M+L gjentar du de 6 siste radene, (men de neste økte maskene på hver side av A.3 strikkes i glattstrikk). mvh DROPS Design
27.06.2022 - 10:56
![]() Ella wrote:
Ella wrote:
Stl S. Minskn i sida (153 msk + omslag): det är 13 (6 msk med markör) rätmsk. Här ska minskas 10 msk. men 5+6+5=16, inte 13? Då kommer minskn. att omfatta de två avigmsk. på var sida. Vid ökning i de aviga msk, numera 0 och 1, stämmer då inte ökn. (2 +6 ökn=8, utan blir 6/7) avigmsk i varje avigt parti. Minskar jag på de 6 räta msk, stämmer inte ökningarna på dessa sedan. Hur ska jag göra?
26.07.2021 - 13:19DROPS Design answered:
Hej Ella, du har 13 maskor slätstickning i varje sida (markören i mitten). Du minskar i de slätstickade maskor på varje sida av markören, så dina minskningar påverkar inte mönsterrapporterna. God fornøjelse!
25.08.2021 - 10:09
![]() Midge Bussing wrote:
Midge Bussing wrote:
I’m going to make this sweater for the measurements of Bust 36” , waist 32”, hips 40”. What size should I make. Thank you Midge
19.04.2021 - 02:18DROPS Design answered:
Dear Midge, you can find the measurements of the finished piece of each size, at the bottom of the pattern, on the schematic drawing. Happy Knitting!
19.04.2021 - 03:40
![]() Midge wrote:
Midge wrote:
I am going to make this sweater for my daughter. Her measurements are bust 36”, waistline 32”, hips 40”. . Do I make a medium or a large. Sweater.
19.04.2021 - 02:13DROPS Design answered:
Dear Mrs Midge, Measure a similar garment she has and likes the shape and compare these measurements to those in the chart at the bottom of the page; this will be the best way to find the matching size. Red more about sizing here. Happy knitting!
19.04.2021 - 08:51
![]() Gisèle ROUSSEAU wrote:
Gisèle ROUSSEAU wrote:
Bonjour, après maintes péripéties enfin terminé avec succès, savez vous comment mettre la photo Merci
31.03.2021 - 18:47DROPS Design answered:
Bonjour Mme Rousseau, vous pouvez volontiers la publier dans notre DROPS Workshop ou bien/et partager votre lien pour la galerie ici. Bonne continuation!
07.04.2021 - 08:53
![]() Mary Vostal wrote:
Mary Vostal wrote:
On the yoke after completing the 8 rows do we start those charts over again from the bottom up or top down with charts A1, A3 and A6?
19.03.2021 - 01:16DROPS Design answered:
Dear Mrs Vostal, correct, repeat A.1, A.3 and A.6 from first row again. Happy knitting!
19.03.2021 - 07:44
|
||||||||||||||||||||||||||||
Belle Époque#belleepoquecardigan |
||||||||||||||||||||||||||||
 |
 |
|||||||||||||||||||||||||||
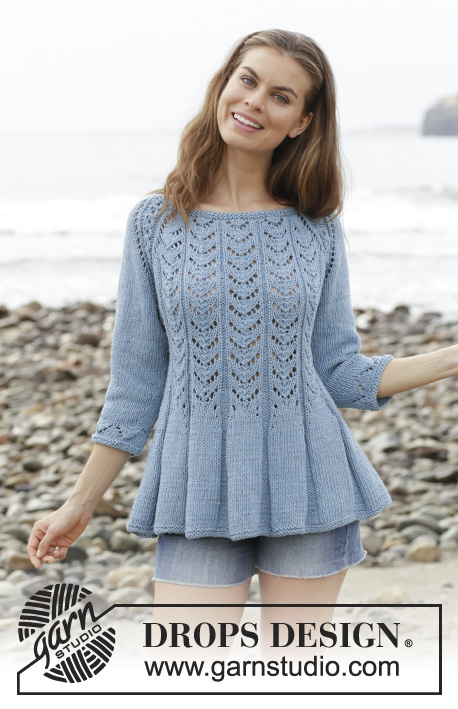
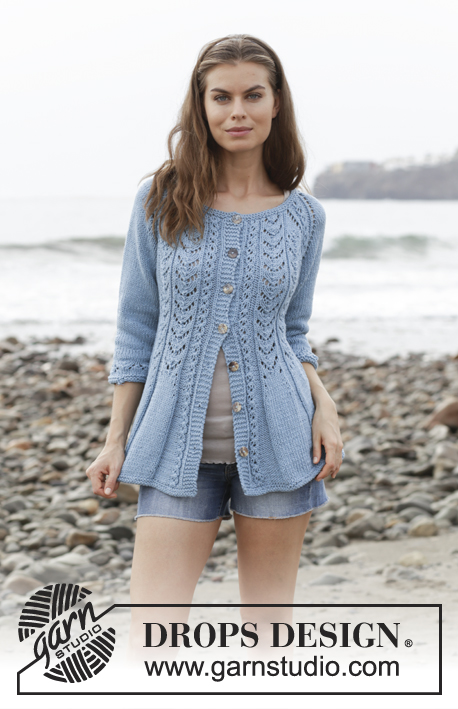
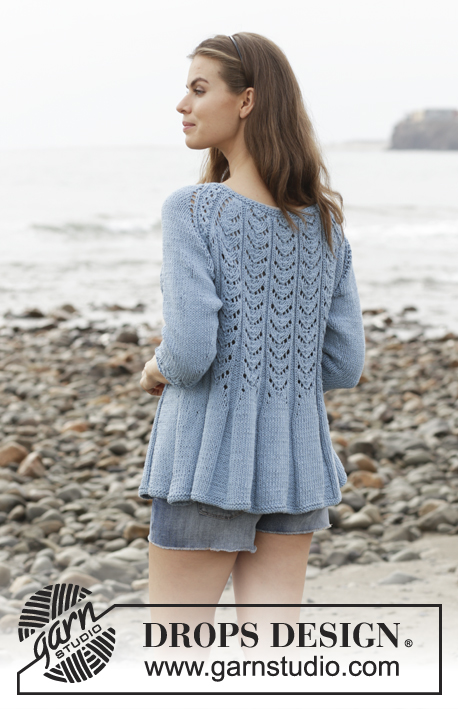
Fitted jacket with lace pattern, raglan and ¾ sleeves, knitted top down. Size: S - XXXL Piece is knitted in DROPS Paris.
DROPS 186-7 |
||||||||||||||||||||||||||||
|
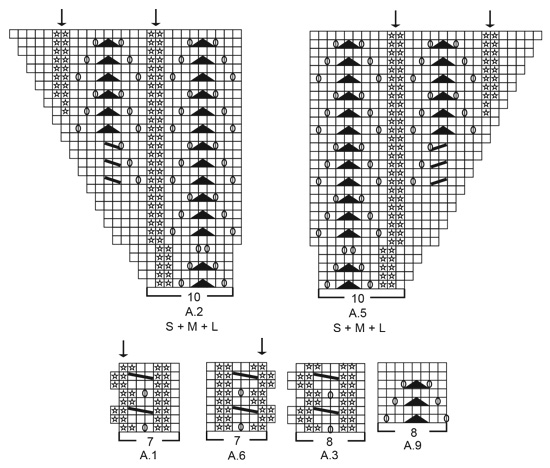
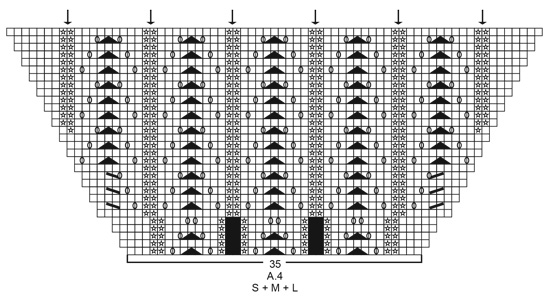
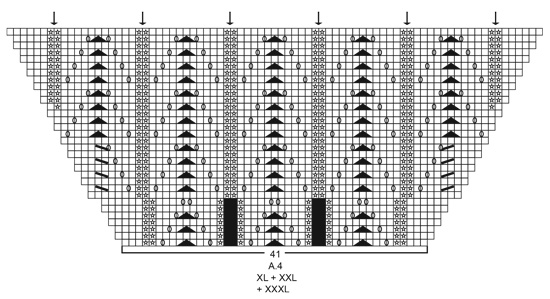
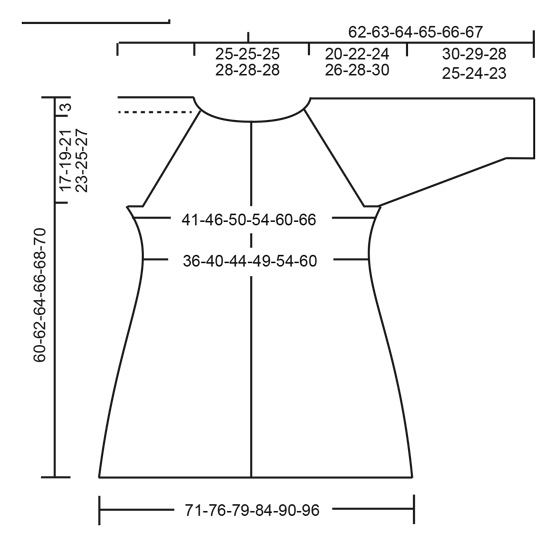
INFORMATION FOR PATTERN: GARTER STITCH (back and forth): 1 ridge = knit 2 rows. GARTER STITCH (worked in the round): 1 ridge = 2 rounds. Knit 1 round and purl 1 round. INCREASE TIP-1: To calculate how to increase evenly, use the total number of stitches on row (e.g. 98 stitches), minus bands (e.g. 10 stitches) and divide the remaining stitches by number of increases to be done (e.g. 17) = 5.2. In this example increase by making 1 yarn over after approx. every 5th stitch (do not increase over bands). On next row work yarn overs twisted to avoid holes. PATTERN: See diagrams A.1 to A.9. Choose diagram for your size (applies to A.2, A.4, A.5, A.7 and A.8). Diagrams show all rows in pattern seen from the right side. RAGLAN: All increases are done from the right side. Increase for raglan on each side of A.3 in every transition between body and sleeves (= 8 stitches increased on every increase row). Increase 1 stitch by making 1 yarn over, on next row (wrong side) purl yarns over to make holes. Work the increased stitches in stocking stitch on sleeves and according to diagram on front and back piece. DECREASE TIP (applies to sides on body and mid under sleeves): All decreases are done from the right side! Begin 4 stitches before marker and knit 2 together, knit 4 (marker is between these 4 stitches), slip 1 stitch knitwise, knit 1, pass slipped stitch over stitch worked (= 2 stitches decreased). INCREASE TIP-2 (applies to purl sections on body): All increases are done from the right side. Increase 1 stitch in every purl section by making 1 yarn over before all 2 purl stitches. On next row (wrong side) knit yarn over twisted to avoid hole. On next increase make 1 yarn over after every 3 purl stitches. Continue increase by alternately increasing at beginning and end of purl section. INCREASE TIP-3 (applies to sides of body): All increases are done from the right side. Begin 3 stitches before marker thread, make 1 yarn over, knit 6 (marker thread is in the middle of these 6 stitches), make 1 yarn over (= 2 stitches increased). On next row (wrong side) purl yarn overs twisted to avoid holes. INCREASE TIP-4 (applies to sections in stocking stitch over A.7/A.8 on body): All increases are done from the right side. When A.7/A.8 has been done, work in stocking stitch over the 9-9-9-11-11-11 stitches with lace pattern. Increase over these 9-9-9-11-11-11 stitches as follows: Work 1 stitch in stocking stitch, make 1 yarn over, work in stocking stitch until 1 stitch in stocking stitch remains, make 1 yarn over, work 1 stitch in stocking stitch. On next row (wrong side) purl yarn overs twisted to avoid holes. BUTTONHOLES: Decrease for buttonholes on right band (when garment is worn). 1 buttonhole = work from right side until 3 stitches remain on needle, make 1 yarn over, knit 2 together and finish by knitting 1. On next row (wrong side) knit the yarn over to make a hole. Decrease for first buttonhole on first row from right side after edge in garter stitch in neck. Then decrease the next 6-6-6-7-7-7 buttonholes, approx. 7-7-7½-7-7½-7½ cm between each. ---------------------------------------------------------- JACKET: Work back and forth on circular needle from mid front, work top down. Work sleeves in the round on double pointed needles/a short circular needle, top down. NECK EDGE: Cast on 98-102-106-110-114-118 stitches (including 5 band stitches in each side towards mid front) on circular needle size 4 mm with Paris. Work 2 ridges in GARTER STITCH - see explanation above. Knit 1 row from right side while increasing 17-13-9-15-11-7 stitches evenly - read INCREASE TIP-1 and remember BUTTONHOLES on right band - see explanation above = 115-115-115-125-125-125 stitches. Purl 1 row from wrong side inside 5 band stitches in garter stitch in each side towards mid front. Switch to circular needle size 5 mm and work yoke as explained below. YOKE: Work first row as follows from right side: Work 5 band stitches in garter stitch, A.1 (= 7 stitches), A.2 (= 10-10-10-12-12-12 stitches), make 1 yarn over, work A.3 (= 8 stitches), make 1 yarn over, work 2 stitches in stocking stitch (= sleeve cap), make 1 yarn over, work A.3, make 1 yarn over, work A.4 (= 35-35-35-41-41-41 stitches), make 1 yarn over, work A.3, make 1 yarn over, work 2 stitches in stocking stitch (= sleeve cap), make 1 yarn over, work A.3, make 1 yarn over, work A.5 (= 10-10-10-12-12-12 stitches), work A.6 (= 7 stitches) and finish with 5 band stitches in garter stitch towards mid front = 129-129-129-139-139-139 stitches (including yarn overs in A.1/A.3/A.6). Continue pattern like this. AT THE SAME TIME on every row from right side increase for RAGLAN - see explanation above, until increase has been done 14-18-20-21-24-26 times on each side of A.3 (including increases on first row from right side after neck edge). REMEMBER THE KNITTING TENSION! NOTE! When A.2/A.4/A.5 has been worked, continue pattern the same way, but work the next increased stitches on each side of A.3 in stocking stitch. In size S the increases for raglan is done when 3 rows remain in A.2/A.4/A.5, continue pattern without increase as explained below. After last increase for raglan there are 237-269-285-303-327-343 stitches on needle if it is on a row with 7/8/7 stitches in A.1/A.3/A.6 or 243-275-291-309-333-349 stitches if it is on a row with 8/9/8 stitches in A.1/A.3/A.6. Continue pattern as before without increases for raglan until piece measures 17-19-21-23-25-27 cm from cast-on edge mid front, but finish so that last row is a row with 7/8/7 stitches in A.1/A.3/A.6. Work next row as follows from right side: Continue with band, pattern and in stocking stitch as before over the first 37-41-43-47-51-55 stitches (= front piece), slip the next 49-57-61-62-66-66 stitches on 1 stitch holder for sleeve, cast on 6-6-8-8-10-12 new stitches on needle (= in the side under sleeve), continue in stocking stitch and pattern as before over the next 65-73-77-85-93-101 stitches (= back piece), slip the next 49-57-61-62-66-66 stitches on 1 stitch holder for sleeve, cast on 6-6-8-8-10-12 new stitches on needle (= in the side under sleeve) and continue in stocking stitch, pattern and band over the remaining 37-41-43-47-51-55 stitches (= front piece). Finish body and sleeves separately. NOW MEASURE PIECE FROM HERE! BODY: = 153-169-181-197-217-237 stitches (including yarn overs in A.1/A.6). Insert 1 marker thread in the middle of the 6-6-8-8-10-12 stitches cast on under sleeve in each side and move the marker threads upwards when working. Begin from wrong side and work 1 row with garter stitch over garter stitch, purl over purl, knit over knit. Work next row as follows from right side: 5 band stitches in garter stitch, continue A.1 (= 7 or 8 stitches), work A.7 over the next 22-22-22-26-26-26 stitches (= 2 repetitions of 11-11-11-13-13-13 stitches, continue on correct row in diagram where pattern was finished at division), work in stocking stitch over the next 13-21-27-26-36-46 stitches, A.8 over the next 55-55-55-65-65-65 stitches (= 5 repetitions of 11-11-11-13-13-13 stitches, continue on correct diagram), purl 2, 13-21-27-26-36-46 stitches in stocking stitch, A.8 over the next 22-22-22-26-26-26 stitches (= 2 repetitions of 11-11-11-13-13-13 stitches, continue on correct row in diagram), continue A.6 (= 7 or 8 stitches) and finish with 5 band stitches in garter stitch towards mid front. Continue the pattern like this – READ THE REST OF BODY BEFORE CONTINUING! DECREASE IN THE SIDES: When piece measures 1 cm from division, decrease 1 stitch on each side of both marker threads - read DECREASE TIP (= 4 stitches decreased). Decrease like this every other row (i.e. every row from right side) 5 times in total in each side = 131-147-159-175-195-215 stitches (without yarn overs in A.1/A.6). INCREASE IN PURL SECTIONS: When piece measures 6 cm from division, increase 1 stitch in every purl section marked with arrow in diagram (i.e. increase in all purl sections except the one purl section closest mid front in each side = 12 stitches increased) – read INCREASE TIP-2. Increase like this every 5 cm 6 times in total in every purl section (there are now 8 stitches in each of these purl sections). INCREASE IN THE SIDES: AT THE SAME TIME when piece measures 7 cm from division, increase 1 stitch on each side of both marker threads - read INCREASE TIP-3 (= 4 stitches increased). Increase like this every 6 cm 3 times in total in each side. INCREASE IN STOCKING STITCH SECTIONS: AT THE SAME TIME when piece measures approx. 15 cm from division, finish A.7 and A.8 after one whole repetition vertically. Then work knit over knit and purl over purl over these stitches. On next row from right side increase 2 stitches in each stocking stitch section over A.7/A.8 - read INCREASE TIP-4 (= 18 stitches increased). Repeat this increase after 2 cm (= 18 stitches increased). When all increases are done there are 251-267-279-295-315-335 stitches on row (without yarn overs in A.1/A.6). Continue with garter stitch over garter stitch, knit over knit and purl over purl until piece measures approx. 59-61-63-65-67-69 cm from shoulder and down, but adjust so that next row is worked from right side. Switch to circular needle size 4.5 mm. Work 2 ridges back and forth over all stitches. Switch back to circular needle size 5 mm and cast loosely off by knitting from right side. Jacket measures approx. 60-62-64-66-68-70 cm from shoulder and down. SLEEVE: Slip the 49-57-61-62-66-66 stitches from stitch holder in one side of piece on double pointed needles or a short circular needle size 5 mm and pick in addition up 1 stitch in each of the 6-6-8-8-10-12 new stitches cast on under sleeve = 55-63-69-70-76-78 stitches. Insert 1 marker thread in the middle of the 6-6-8-8-10-12 stitches under sleeve and begin round here. Work in stocking stitch in the round. When piece measures 2-2-2-2-3-3 cm from division, decrease 2 stitches mid under sleeve - read DECREASE TIP. Decrease like this every 3½-2½-2-1½-1-1 cm 7-10-12-12-14-14 times in total = 41-43-45-46-48-50 stitches. Continue until sleeve measures 26-25-24-21-20-19 cm (shorter measurements in the larger sizes because of longer yoke). Knit 1 round while adjusting number of stitches to 40-40-40-48-48-48. Work A.9 in the round (= 5-5-5-6-6-6 repetitions of 8 stitches). When A.9 has been worked, switch to double pointed needles size 4 mm. Work 2 ridges in the round. Switch back to double pointed needles size 5 mm and cast off by knitting. Sleeve measures approx. 30-29-28-25-24-23 cm from division. Work the other sleeve the same way. ASSEMBLY: Sew the buttons on to the left band. |
||||||||||||||||||||||||||||
Diagram explanations |
||||||||||||||||||||||||||||
|
||||||||||||||||||||||||||||
|
||||||||||||||||||||||||||||

|
||||||||||||||||||||||||||||
|
||||||||||||||||||||||||||||
|
||||||||||||||||||||||||||||
|
||||||||||||||||||||||||||||
Have you finished this pattern?Tag your pictures with #dropspattern #belleepoquecardigan or submit them to the #dropsfan gallery. Do you need help with this pattern?You'll find 29 tutorial videos, a Comments/Questions area and more by visiting the pattern on garnstudio.com. © 1982-2025 DROPS Design A/S. We reserve all rights. This document, including all its sub-sections, has copyrights. Read more about what you can do with our patterns at the bottom of each pattern on our site. |
||||||||||||||||||||||||||||


With over 40 years in knitting and crochet design, DROPS Design offers one of the most extensive collections of free patterns on the internet - translated to 17 languages. As of today we count 314 catalogues and 11822 patterns translated into English (UK/cm).
We work hard to bring you the best knitting and crochet have to offer, inspiration and advice as well as great quality yarns at incredible prices! Would you like to use our patterns for other than personal use? You can read what you are allowed to do in the Copyright text at the bottom of all our patterns. Happy crafting!
Post a comment to pattern DROPS 186-7
We would love to hear what you have to say about this pattern!
If you want to leave a question, please make sure you select the correct category in the form below, to speed up the answering process. Required fields are marked *.