
Popular categories
Looking for a yarn?


Comments / Questions (207)
![]() K-todd wrote:
K-todd wrote:
AH. I see my mistake: (A.2a dec 2 and make 1, A.3a dec 4 and make 2, decrease 7 evenly over the next section, A.3a dec 4 and make 2, A.6a dec 2 and make 1, decrease 9 evenly over the next section.) That\'s a total of 22 decreased stitches x 2 = 44 stitches. Size M 280 cast on -44=236.
10.03.2021 - 03:16
![]() K-todd wrote:
K-todd wrote:
Hi, I'm making Size M, with 280 sts cast on. In the ribbing decrease round, using the 3rd row of the diagram, I end up with 232 stitches, not 236. (A.2a dec 2, A.3a dec 2, decrease 7 evenly over the next section, A.3a dec 2, A.6a dec 2, decrease 9 evenly over the next section.) That\'s a total of 24 x 2 = 48 stitches. I can\'t figure out what i\'m doing wrong. Thanks for your help!
13.02.2021 - 22:35
![]() Eve wrote:
Eve wrote:
Bonjour, pour les manches je ne comprends pas les augmentations. "Augmenter 5 fois tous les 9 tours et 10 fois tous les 8 tours" cela veut dire que sur les 5 premiers 9 tours j'augmente de 2 mailles et en même temps sur les 10 premiers 8 tours j'augmente de 2 mailles ? Ceci donne bien 84 mailles. Ou dois-je faire autrement. Merci pour votre aide Eve
13.02.2021 - 21:12DROPS Design answered:
Bonjour Eve, pour augmenter 5 fois tous les 9 tours et 10 fois tous les 8 tours, tricotez ainsi: *1 tour d'augmentations, 8 tours sans augmenter*, tricotez 4 fois de *-*, tricotez 1 tour d'augmentations (= 5 fois au total tous les 9 tours), *tricotez 1 tour d'augmentations, 7 tours sans augmenter*, tricotez de *-* 9 fois au total, tricotez encore 1 tour d'augmentations (= 10 fois tous les 8 tours). Bon tricot!
15.02.2021 - 08:39
![]() Tina Toomey wrote:
Tina Toomey wrote:
The body begins after 1 row of knit ... why does it not begin with 2-3 inches of knit 2, pearl 2 for the ribbing? Thank you!
05.02.2021 - 20:22DROPS Design answered:
Dear Mrs Toomey, you first work 1 round knitting all stitches, then start working rib as shown in the different diagrams and with K3/P3 as described - Repeat the first 2 rows in diagram until you have worked a total of 12 rows then work 3rd row in diagram decreasing evenly in the rib section as well as decreasing/increasing as shown in the diagrams. Happy knitting!
08.02.2021 - 07:41
![]() Tina Toomey wrote:
Tina Toomey wrote:
When the instructions state "repeat from (-) 6-6-7-7-8-8 times, for example, I don't where the instructions are referring to, that is, I don't understand the symbol in the parenthesis. Thank you.
05.02.2021 - 13:09DROPS Design answered:
Dear Mrs Toomey, when pattern says: ..., (K 3/P 3), repeat from (-) 6-6-7-7-8-8 times in total, this means oyu have to work in rib K3/P3 over the next 36-36-42-42-48-48 sts (= work 6-7-8 times K3/P3). And then: (K 3/P 3), repeat from (-) 3-4-4-6-7-10 times in total, work K3/P3 over the next 18-24-24-36-42-60 stitches. Happy knitting!
05.02.2021 - 13:51
![]() Acacia wrote:
Acacia wrote:
Hej. Strikker i L, og skal tage masker ind i rib, der står 9 + 5 m ind x 2 = 28 masker det giver 264 masker tilbage men i opskrift er der 252 masker? Friendly regards Acacia
01.02.2021 - 13:54DROPS Design answered:
Hej. På omg 3 i diagram A.2a, A.3a och A.6a feller du masker (2 per diagram) och du stickar diagrammen 2 gånger på omg, så totalt 12 m fellt i de diagrammen. Mvh DROPS Design
03.02.2021 - 08:30
![]() Karoline wrote:
Karoline wrote:
Hei, Jeg strikker i Str L. På bolen sliter jeg litt med å forstå overgangen fra vrangbord til mønsteret. Det står "strikk 3. omgang i diag over de første 36 m". Hva betyr dette? Det er jo 11 forskjellige diagrammer. Hvilket er det man skal strikke over de første 36 m?
29.01.2021 - 11:09DROPS Design answered:
Hei Karoline. Beskrivelsen på hvilken diagram står lengre opp i avsnittet, slik: ... Deretter strikkes det vrbord slik: * A.2a (= 12 m), A.3a (= 15 m), A.4a (= 9 m), ..... Nå har du strikket 36 masker og så fortsetter du med hva som står videre i oppskriften (som er: , ...deretter strikkes det vrbord som før over de neste 41-41-47-47-53-53 m SAMTIDIG...) mvh DROPS design
01.02.2021 - 13:24
![]() Stéphanie Boisseau wrote:
Stéphanie Boisseau wrote:
Bonjour Dans le diagramme que signifie « pas de maille »? On ne la tricote pas ? Merci pour votre réponse
29.01.2021 - 05:12DROPS Design answered:
Bonjour Mme Boisseau, cette maille n'existe pas encore dans le diagramme, passez directement au symbole suivant. Ainsi dans A.2a, vous allez augmenter au 3ème rang en faisant 1 jeté après les 2 premières mailles endroit, au 4ème rang, vous aurez bien 6 mailles endroit, mais avant cette augmentation, vous devez n'avoir que 5 mailles endroit. Bon tricot!
29.01.2021 - 08:17
![]() Lauren wrote:
Lauren wrote:
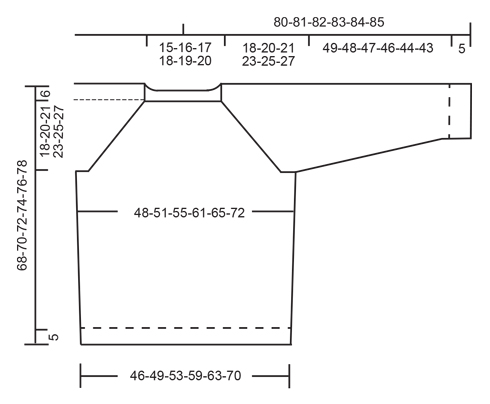
How can I find the finished measurements so I know what size to knit? I’m looking to knit for someone with a 49 inch chest. Thank you!
21.01.2021 - 22:24DROPS Design answered:
Hi Lauren, There is a sketch at the bottom of the pattern with all the measurements for the different sizes. Happy knitting!
22.01.2021 - 07:59
![]() Kirsti wrote:
Kirsti wrote:
Hei, eg slit litt med å skjøna overgang frå vrangbord til mønster på erme. Slik eg les det vil A.4b verta forskyven i forhold til A.4a, medan A.5b kjem rett over A.5a. Eg tykkjer at det er litt rart, og eg må ha tolka oppskrifta feil på eit tidspunkt?
21.01.2021 - 10:24DROPS Design answered:
Hei Kirsti. Hvilken str. strikker du? Har sett over str. S og den stemmer slik at A.4b kommer rett over A.4a og A.5a kommer rett over A.5b. mvh DROPS design
27.01.2021 - 15:31
|
|||||||||||||||||||||||||||||||
The Rower#therowersweater |
|||||||||||||||||||||||||||||||
 |
 |
||||||||||||||||||||||||||||||
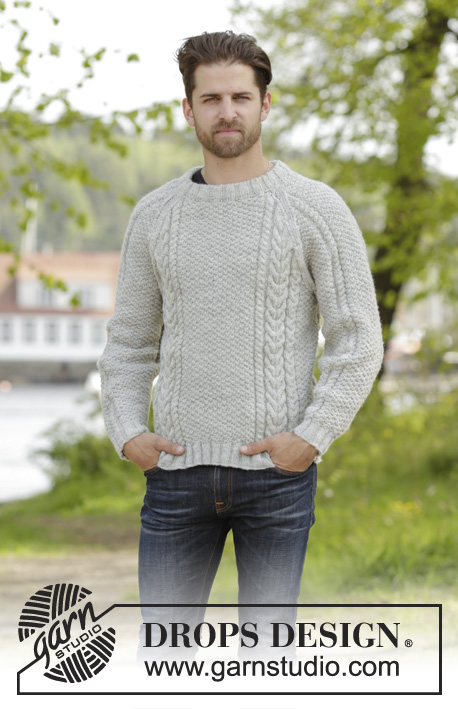
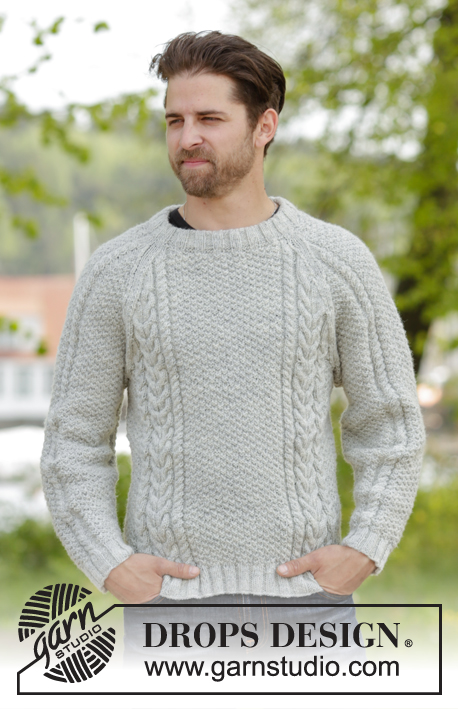
Knitted DROPS men’s jumper with cables, raglan and folding edge at the neck in Karisma. Size: S - XXXL.
DROPS 174-15 |
|||||||||||||||||||||||||||||||
|
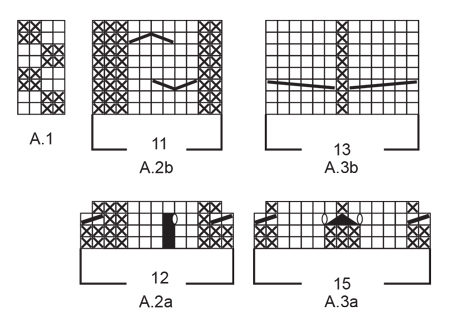
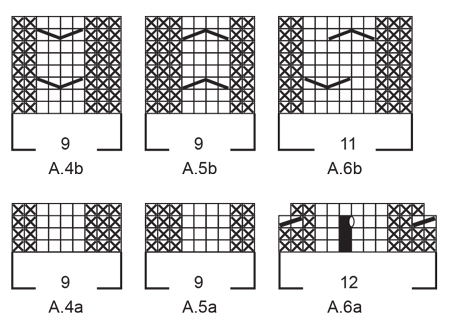
PATTERN: See diagrams A.1 to A.6. INCREASE TIP: Work until 1 st remains before marker, 1 YO, work next 2 (marker is between these sts), 1 YO. On next round work YOs twisted. Work the new sts into the pattern. DECREASE TIP 1 (applies to rib): When dec sts in rib, dec evenly by P 2 tog over sections with P in rib. DECREASE TIP 2 (applies to elevation): All dec are done from RS! Work until 4 sts remain before marker, work the next 3 K tog (= 2 sts dec), work the next 2 K (marker is in the middle of these sts), work the next 3 K twisted tog (= 2 sts dec). Repeat at the other marker. RAGLAN: Dec as follows before marker: Work until 3 sts remain before marker, K 2 tog, K 1 (marker is here). Dec as follows after marker: K 1, slip 1 st as if to K, K 1, psso NOTE: When dec sts in stocking st in diagram A.2, A.3, A.4, A.5 and A.6 (i.e. there is not enough sts for cable), continue with K over K and P over P until all sts in diagram have been dec. ---------------------------------------------------------- JUMPER: Worked in the round. BODY: Cast on 268-280-292-316-340-376 sts with Karisma on circular needle size 3.5 mm. K 1 round. Then work rib as follows: * A.2a (= 12 sts), A.3a (= 15 sts), A.4a (= 9 sts), P 1, (K 3/P 3), repeat from (-) 6-6-7-7-8-8 times in total, K 3, P 1, A.5a (= 9 sts), A.3a, A.6a (= 12 sts), (K 3/P 3), repeat from (-) 3-4-4-6-7-10 times in total, K 3 *, repeat from *-* 1 more time on round. Repeat the first 2 round in diagram and work K over K and P over P the remaining sts until 12 rounds have been worked in total. Now work as follows: * Work 3rd round in diagram over the first 36 sts, the work rib as before over the next 41-41-47-47-53-53 sts AT THE SAME TIME dec 11-7-9-9-11-11 sts evenly - READ DECREASE TIP 1, work 3rd round over the next 36 sts, then work rib as before over the next 21-27-27-39-45-63 sts AT THE SAME TIME dec 7-9-5-5-7-9 sts evenly *, repeat from *-* 1 more time on round = 220-236-252-276-292-324 sts. Work last round in diagram A.2a to A.6.a and K over K and P over P over the remaining sts in rib. Rib measures approx. 5 cm. Switch to circular needle size 4 mm. Now work pattern as follows: * Work A.2b (= 11 sts), A.3b (= 13 sts), A.4b (= 9 sts), work A.1 over the next 28-32-36-36-40-40 sts, work the first 2 sts in A.1, A.5b (= 9 sts), A.3b (= 13 sts), A.6b (= 11 sts), work A.1 over the next 12-16-20-32-36-52 sts, work the first 2 sts in A.1 *, repeat from *-* 1 more time. Continue pattern like this in the round. REMEMBER THE KNITTING TENSION When piece measures 15-15-16-16-17-17 cm, insert 2 markers in piece as follows: Insert 1st marker after 103-109-115-121-127-135 sts and 2nd marker 7-9-11-17-19-27 sts before end of round (= 110-118-126-138-146-162 sts between each of the markers). On next round inc 1 st in each side of marker in each side - Read INCREASE TIP! Repeat inc when piece measures 26-27-27-28-28-29 cm = 228-244-260-284-300-332 sts. When piece measures 44-44-45-45-45-45 cm, work as follows: Work until 5 sts remain before 1st marker, cast off the next 10 sts for armhole (= 5 sts on each side of marker), work until 5 sts remain before 2nd marker, cast off the next 10 sts for armhole (= 5 sts on each side of marker), work the remaining sts on round. There are 104-112-120-132-140-156 sts for both front and back piece. Put piece aside and knit the sleeves. SLEEVES: Worked in the round on double pointed needles/circular needle. Cast on 60-60-66-66-66-72 sts with Karisma on double pointed needles size 3.5 mm. Work rib as follows: K 3, (P 3, K 3) repeat from (-) 3-3-4-4-4-5 times in total, A.4a (= 9 sts), K 3, (P 3, K 3), repeat from (-) 3 times in total for all sizes, A.5a (= 9 sts). Continue like this and repeat the first 2 rounds in diagram until 12 rounds have been worked. Now work from the 3rd round in diagram as follows: Work rib as before over the first 21-21-27-27-27-33 sts AT THE SAME TIME dec 3-3-5-5-5-7 sts evenly, continue over A.4a as before, work rib as before over the next 21 sts AT THE SAME TIME dec 3 sts evenly in all sizes = 54-54-58-58-58-62 sts. Work last round in diagram A.4a to A.5.a and K over K and P over P over the remaining sts. Now continue as follows: K the first 9-9-11-11-11-13 sts, insert a marker here (= mid under sleeve). NOTE: This is done to re-place the start of round. The round starts here now. Change to double pointed needles size 4 mm. Work the last 3-3-1-1-1-3 sts in diagram A.1, then work entire A.1 1-1-2-2-2-2 times in width, work the first 2 sts in A.1, A.4b, work A.1 over the next 18 sts, A.5b, work A.1 2-2-2-2-2-3 times in width and finish with the first 1-1-3-3-3-1 st in A.1. Continue pattern in the round like this. When piece measures 7 cm in all sizes, beg inc under sleeve. READ INCREASE TIP. Inc like this every 12th-9th-9th-7th-6th-6th round 11-5-5-17-15-15 times and every 0-8th-8th-0-5th-5th round 0-10-10-0-4-4 times (= 11-15-15-17-19-19 times in total) = 76-84-88-92-96-100 sts. When piece measures 54-53-52-51-49-48 cm (NOTE: shorter measurements in the larger sizes because of longer yoke), cast off 10 sts mid under sleeve (= 5 sts on each side of marker) = 66-74-78-82-86-90 sts. Knit another sleeve the same way. YOKE: Slip sleeves on to same circular needle size 4 mm as body where armholes were cast off (without working them first) = 340-372-396-428-452-492 sts. Insert 1 marker in every transition between sleeves and body = 4 markers. Continue pattern as before but now work 4 K over every transition between body and sleeves (= 2 K on each side of markers). NOTE: Beg of round is at marker in transition between right sleeve and back piece. AT THE SAME TIME on first round, beg dec for RAGLAN – see explanation above! NOTE: Dec differently on body and sleeves. RAGLAN BODY: Dec like this every other round 17-20-20-22-25-26 times and every round 13-13-15-17-17-22 times (= 30-33-35-39-42-48 times in total). RAGLAN SLEEVES: Dec like this every 4th round 4-3-2-3-4-5 times and every other round 16-21-24-25-26-27 times (= 20-24-26-28-30-32 times in total). When all dec for raglan are done, 140-144-152-160-164-172 sts remain. Work 1 round with pattern as before but finish when 24 sts remain on round in all sizes (= after 2 sts after marker between front piece and right sleeve). Insert a marker here. This is now beg of round. Now work an elevation back and forth in the back of neck as follows: NOTE: Continue with pattern as before and now dec 2 sts on each side of marker in transition between sleeves and back piece (= 8 sts dec on row from RS) - READ DECREASE TIP 2! AT THE SAME TIME work back and forth as follows: ROW 1 (= RS): Work 92-94-98-102-104-108 sts (including the 8 dec sts), ROW 2 (= WS): Turn and work 81-83-87-91-93-97 sts, ROW 3: Turn and work 78-80-84-88-90-94 sts (including the 8 dec sts), ROW 4: Turn and work 67-69-73-77-79-83 sts, ROW 5: Turn and work 64-66-70-74-76-80 sts (including the 8 dec sts), ROW 6: Turn and work 53-55-59-63-65-69 sts, ROW 7: Turn and work 50-52-56-60-62-66 sts (including the 8 dec sts), ROW 8: Turn and work back to marker (= beg of round). 32 sts have been dec in total in elevation and 108-112-120-128-132-140 sts remain on round. Switch to circular needle size 3.5 mm. Now work 1 round K as follows: Work the first 14 sts and inc 1 st (= sleeve), work the next 4 sts, then work the next 24-26-30-34-36-40 sts (= back piece) while inc 3-1-3-5-3-5 sts evenly, work the next 4 sts, work the next 14 sts and inc 1 st (= sleeve), work the next 4 sts, work the next 40-42-46-50-52-56 sts (= front piece) while dec 1-3-1-5-1-5 sts evenly, work the remaining 4 sts = 112-112-124-130-136-142 sts. Now work rib as follows: P 3, K 3, P 3, K 3, P 3, K 4, (P 3, K 3), repeat from (-) 4-4-5-6-6-7 times in total, P 3, K 4, P 3, K 3, P 3, K 3, P 3, K 4, (P 3, K 3), repeat from (-) 6-6-7-7-8-8 times, P 3, K 4. Continue in the round with K over K and P over P until rib measures 7 cm. Loosely cast off. ASSEMBLY: Sew the openings under the sleeves. Fold rib at the top of neck down on inside of garment. Fasten rib to get a folding edge, make sure to avoid a tight edge. |
|||||||||||||||||||||||||||||||
Diagram explanations |
|||||||||||||||||||||||||||||||
|
|||||||||||||||||||||||||||||||
 |
|||||||||||||||||||||||||||||||
 |
|||||||||||||||||||||||||||||||
 |
|||||||||||||||||||||||||||||||
Have you finished this pattern?Tag your pictures with #dropspattern #therowersweater or submit them to the #dropsfan gallery. Do you need help with this pattern?You'll find 34 tutorial videos, a Comments/Questions area and more by visiting the pattern on garnstudio.com. © 1982-2026 DROPS Design A/S. We reserve all rights. This document, including all its sub-sections, has copyrights. Read more about what you can do with our patterns at the bottom of each pattern on our site. |
|||||||||||||||||||||||||||||||


With over 40 years in knitting and crochet design, DROPS Design offers one of the most extensive collections of free patterns on the internet - translated to 17 languages. As of today we count 324 catalogues and 12285 patterns translated into English (UK/cm). 12285
We work hard to bring you the best knitting and crochet have to offer, inspiration and advice as well as great quality yarns at incredible prices! Would you like to use our patterns for other than personal use? You can read what you are allowed to do in the Copyright text at the bottom of all our patterns. Happy crafting!
Post a comment to pattern DROPS 174-15
We would love to hear what you have to say about this pattern!
If you want to leave a question, please make sure you select the correct category in the form below, to speed up the answering process. Required fields are marked *.