Comments / Questions (280)
![]() Christel Bravo wrote:
Christel Bravo wrote:
Bonjour, je fais le modèle en M, j avais terminé le dos, mais en regardant la photo de plus près, je me rends compte que je n ai pas bien fait le diagramme A7. je n ai q un rang de côtes mousse, alors que j en vois 2 sur la photo. J ai beau reprendre le diagramme A7, j ai vu qu il avait été modifié, mais ça ne fait pas du tout du point mousse. Si je me base sur la photo, il faut faire le symbole ( - )en jersey et le symbole (vide )en point mousse? merci d avance pour votre réponse
22.02.2021 - 16:28DROPS Design answered:
Bonjour Mme Bravo, vous parlez probablement des 2 premiers rangs de A.7, il ne s'agit pas ici d'une côte mousse mais des 2 premiers rangs de A.7 qui se compose de 2 rangs jersey envers et 4 rangs jersey endroit. Le symbole vide = 1 maille jersey (= tricoté à l'endroit sur l'endroit et à l'envers sur l'envers), pas une maille point mousse, et le tiret correspond à 1 maille jersey envers (= tricoté à l'envers sur l'endroit et à l'endroit sur l'envers). Bon tricot!
23.02.2021 - 09:36
![]() Patricia Gambini wrote:
Patricia Gambini wrote:
Merci de votre réponse
04.02.2021 - 15:46
![]() Fanielle Lionel wrote:
Fanielle Lionel wrote:
Je suis un homme et j'aime tricoter je me deébrouille plutôt bien, pourquoi indique t'on toujours le poids de laine nécessaire pour effectuer un modèle sachant qu'une pelote pèse en général 50 g, la longueur varie suivant la laine choisie entre 70 et 240 mètres a t-on la possibilité de calculer le nombre de pelotes en fonction de la laine choisie
04.02.2021 - 15:16DROPS Design answered:
Bonjour Lionel, nous indiquons toujours la quantité nécessaire au poids pour chaque taille, autrement dit, pour ce modèle en taille S il vous faudra 800 g DROPS Lima /50 g la pelote = 16 pelotes. Si vous souhaitez utiliser une autre laine, utilisez notre convertisseur et/ou découvrez plus d'infos sur les alternatives ici. Bon tricot!
04.02.2021 - 15:34
![]() Patricia Gambini wrote:
Patricia Gambini wrote:
Bonjour j\' ai montre mes 85 mailles pour le devant droit taille M j ai suivi le schéma mes a la fin il me reste 4 mailles pouvez vous me aidez merci d avance
04.02.2021 - 13:29DROPS Design answered:
Bonjour Mme Gambini, en taille M tricotez ainsi: A.1 (= 12 m), A.2 (= 14 m), 2 m env, A.3 (= 36 m), A.4 (= 10 m), A.5 (= 10 m), 1 m lis au point mousse soit: 12+ 14+2+36+10+10+1= 85 m. Bon tricot!
04.02.2021 - 15:40
![]() Myriam DEVAUCHELLE wrote:
Myriam DEVAUCHELLE wrote:
J'ai dû me tromper à la fin du col châle, car ce n'est pas beau, il y a une ligne marquée. J'ai repris les 26 mailles en attente sur l'envers: 1 rang mousse de 13 mailles, retour en mousse, 2 rangs mousse de 26 mailles, 2 rangs mousses de 13 mailles, ainsi que suit. il y a une marque entre la 13 ème maille et la 14 ème, sur toute la hauteur. ne me suis je pas trompée dans la technique?
29.01.2021 - 10:26DROPS Design answered:
Bonjour Mme Devauchelle, pour le devant droit, vous tricotez d'abord les 26 mailles sur l'envers (le rang précédent était sur l'endroit), puis tricotez les rangs raccourcis en commençant sur l'endroit (= le col doit être plus haut côté extérieur et plus court côté épaule). Pour le devant gauche, vous rabattez les premières mailles pour l'épaule et tricotez les mailles restantes du col, tournez et commencez les rangs raccourcis sur l'envers. En espérant répondre à votre question. Bon tricot!
29.01.2021 - 14:20
![]() Myriam DEVAUCHELLE wrote:
Myriam DEVAUCHELLE wrote:
Merci de votre réponse, mais il me semble qu'il y a une erreur, en effet il n'y a plus de A2 qui est remplacé par A9, soit: 1 maille lisière ; A6 ; A4 ; A3 ; 2 mailles envers ; A9 et A10. le trou des boutonnières me parait un peu petit (une maille)
25.01.2021 - 10:59DROPS Design answered:
oops j'ai sauté une ligne en recopiant ... il fallait lire: 1 m lis, A.6, A.4, A.4, 2 m env, A.9, A.10 (= sur l'endroit, on commence par le côté = la maille lisière et on termine par A.10 = la bordure du devant). Si votre tension est juste, alors les boutonnières sont adaptées à la taille des boutons. Bon tricot!
25.01.2021 - 11:58
![]() Myriam DEVAUCHELLE wrote:
Myriam DEVAUCHELLE wrote:
Pour le devant gauche, on fait sauf erreur: 1 m. lisière, A10, A9, 2 mailles envers? A3 , A4, A6..Les deux mailles envers sont elles bien entre A9 et A3. Pour les boutonnières elles seraient sur le diagramme A10? merci de me dire comment faire
23.01.2021 - 19:38DROPS Design answered:
Bonjour Mme Devauchelle, tricotez le devant gauche ainsi (sur l'endroit): 1 m lisière, A.6, A.4, A.3, A.2, 2 m env, A.9 et A.10. Ouvrez les boutonnières (= dans A.10) comme expliqué sous BOUTONNIÈRES au tout début des explications. Bon tricot!
25.01.2021 - 08:59
![]() Nicole Chapdelaine wrote:
Nicole Chapdelaine wrote:
Bonjour Oubliez ma question d'hier J'ai 81 mailles pour le devant Après la diminution pour la manche j'ai 75 mailles lorsque je termine les le col châle combien me reste t'il de manches Lorsque je fait le col châle je dois finir pour qu'il me reste deux mailles de A2 juste avant de commencer le A7 mais après on embarque dans A7 alors il ne nous reste plus 75 mailles
18.01.2021 - 01:51DROPS Design answered:
Bonjour Mme Chapdelaine, vous allez diminuer 10 mailles à 55 cm = il restera 65 m au total (à répartir entre les mailles de A.1 et point mousse pour le col/la bordure devant, et les autres en A.7) - si votre décalage de A.1 n'est pas terminé, continuez comme avant, mais avec A.7. Vous rabattez ensuite les 39 m de l'épaule et tricotez le col sur les 26 m. Bon tricot!
18.01.2021 - 11:10
![]() Nicole Chapdelaine wrote:
Nicole Chapdelaine wrote:
Bonjour Pour la grandeur Large Pour les diminutions du dos vous rabattez 3 m au début des 4 rangs suivant mais pour les devant vous rabattez 3 m au début de seulement 2 rangs suivant
16.01.2021 - 21:56DROPS Design answered:
Bonjour Mme Chapdelaine, pour le dos, on doit rabattre des 2 côtés (gauche et droit) autrement dit, sur l'endroit et sur l'envers, on va avoir besoin de 4 rangs au total pour rabattre 2 x 3 m de chaque côté. Pour les devants, il ne faut que 2 rangs car on diminue d'un seul côté. Bon tricot!
18.01.2021 - 11:12
![]() Myriam DEVAUCHELLE wrote:
Myriam DEVAUCHELLE wrote:
J'ai des difficultés à comprendre. Quand vous dites qu'il y aura moins de mailles en point fantaisie, cela affecte donc le diagramme A2, mais au bout d'un moment il n'y aura plus du tout de A2, est ce cela ? cordialement
14.01.2021 - 09:57DROPS Design answered:
Effectivement, cela va affecter le diagramme A.2 - comme vous pouvez le voir sur la photo zoomée (3ème photo), au bout d'un moment (à 55 cm en taille L), vous tricotez A.7 au lieu de A.2 et la torsade) et toujours A.1 et les mailles point mousse comme avant. Bon tricot!
14.01.2021 - 15:42
Finnley |
|||||||||||||||||||
 |
 |
||||||||||||||||||
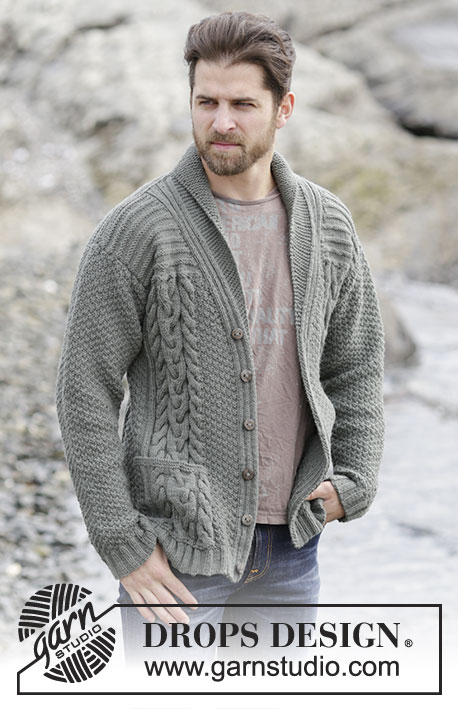
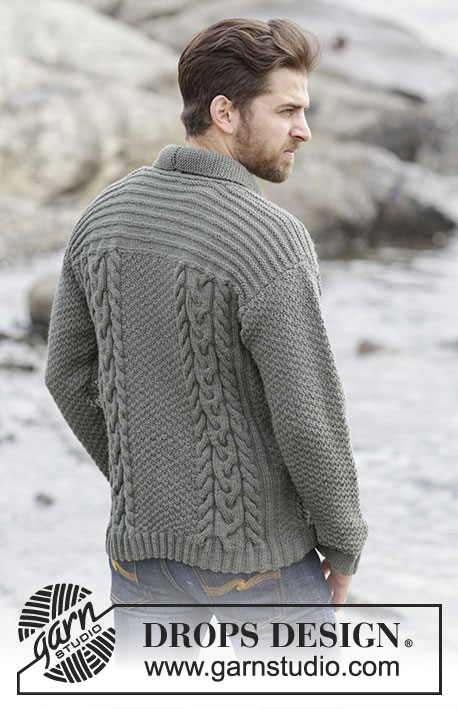
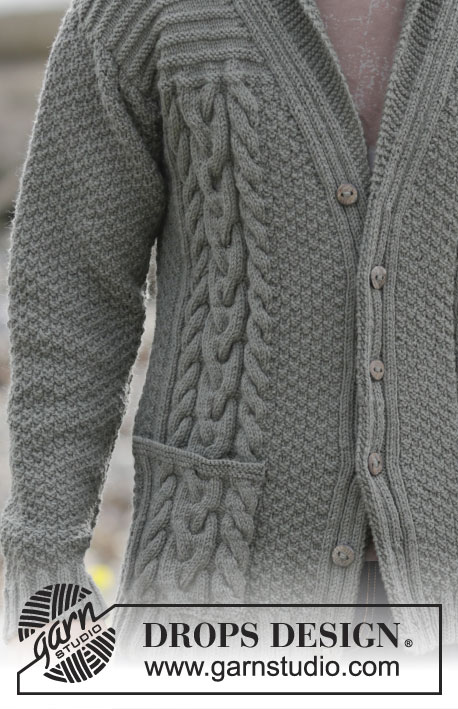
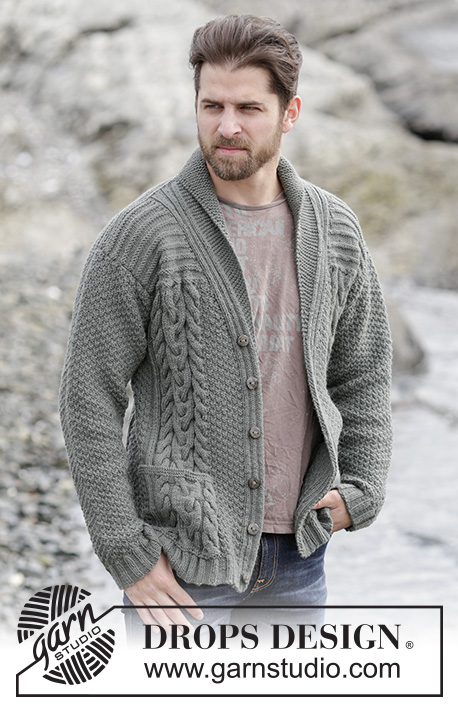
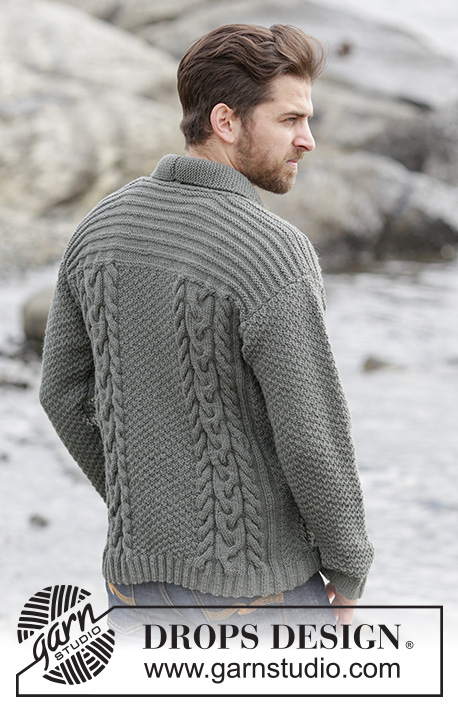
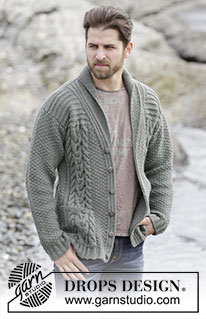
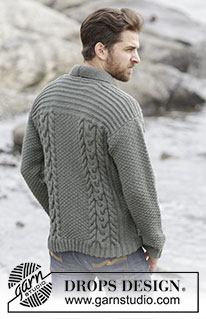
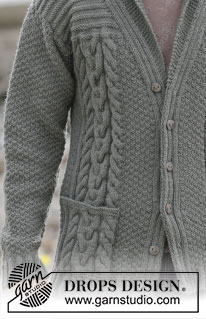
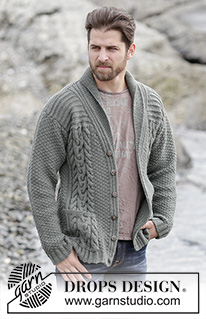
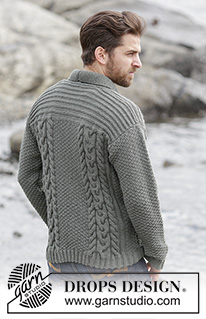
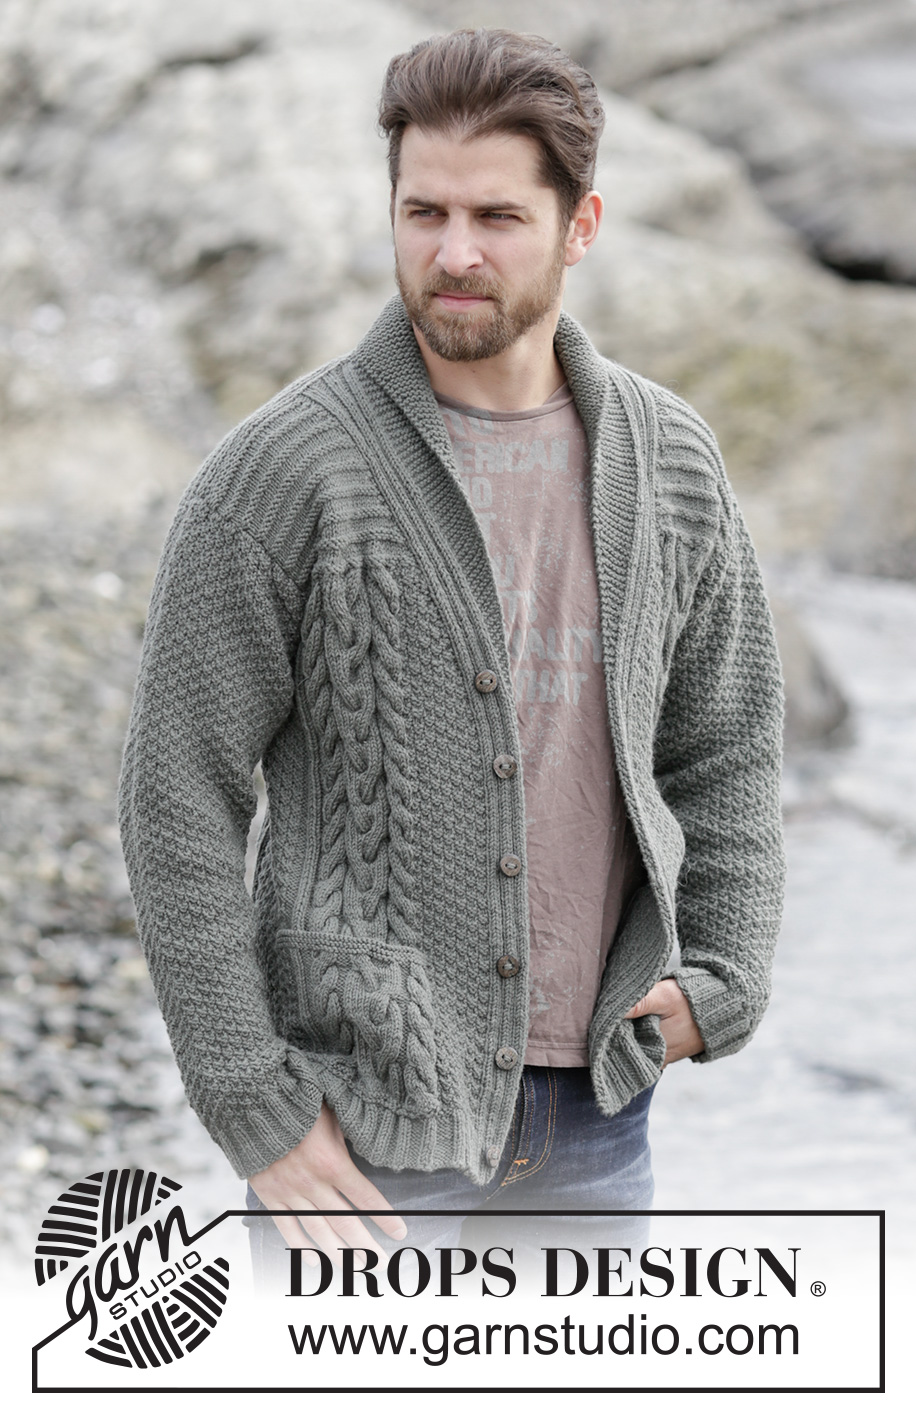
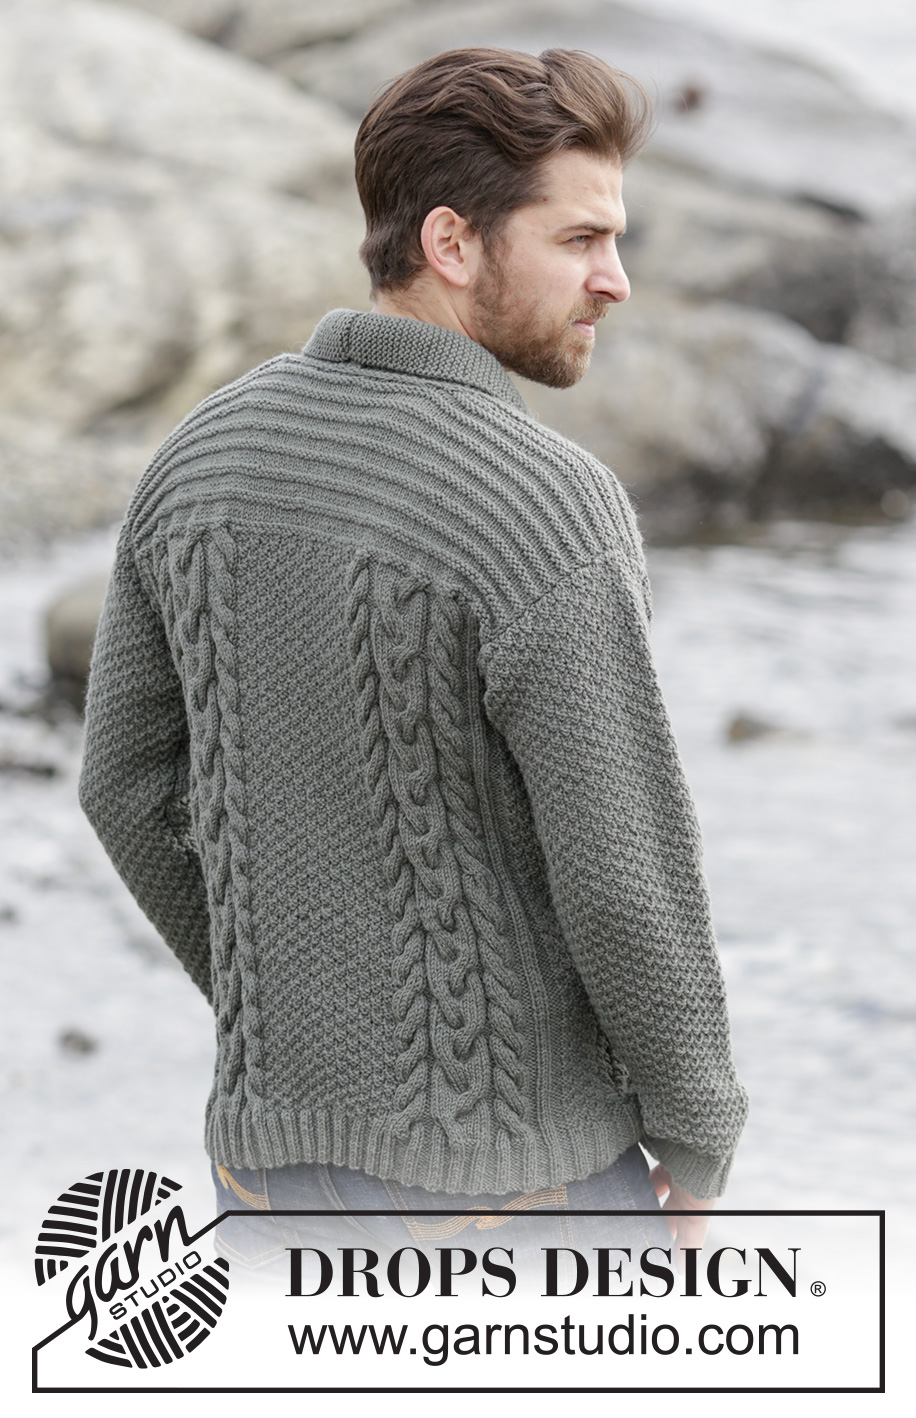
Men's knitted jacket in DROPS Lima, with cables and shawl collar. Size: S - XXXL.
DROPS Extra 0-1132 |
|||||||||||||||||||
|
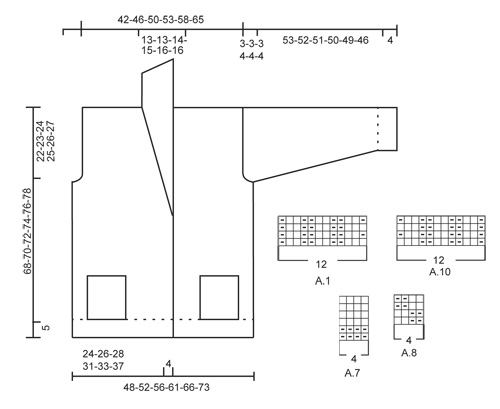
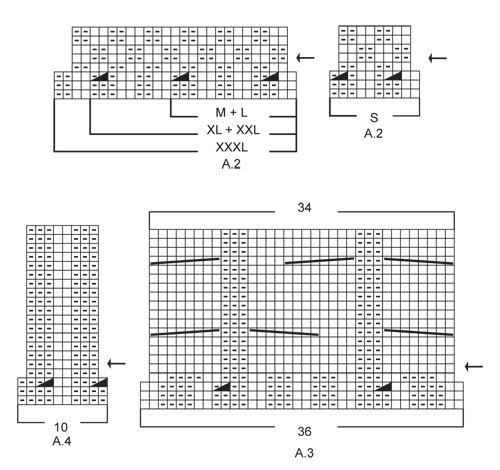
GARTER ST (back and forth): K all rows. 1 ridge = 2 rows K. PATTERN: See diagrams A.1-A.10. The diagrams show all rows in pattern seen from RS. INCREASE TIP: Inc 1 st by making 1 YO, on next row work YO twisted (i.e. work in the back loop of st instead front) to avoid holes. DECREASE TIP: All dec are done from RS! Dec as follows after A.1: P 2 tog Dec as follows before A.1: Work until 2 sts remain before A.1, P 2 tog. BUTTONHOLES: Dec for buttonholes on left band. 1 buttonhole = K tog sixth and seventh st from edge and make 1 YO. Dec for buttonholes when piece measures: SIZE S: 2, 9, 17, 25, 33 and 41 cm. SIZE M: 2, 10, 18, 26, 34 and 42 cm. SIZE L: 3, 11, 19, 27, 35 and 43 cm. SIZE XL: 3, 12, 20, 28, 36 and 44 cm. SIZE XXL: 4, 13, 21, 29, 37 and 45 cm. SIZE XXXL: 5, 14, 22, 30, 38 and 46 cm. SHORT ROWS (applies to shawl collar): Work short rows over sts in garter st from mid front as follows: For every 14th row work as follows (beg from RS): Work over all sts in garter st, turn piece, tighten yarn and K back, turn piece and work as before over all sts. That way the ridges in collar will not contract as much. On left front piece work reversed, i.e. beg short rows from WS. ---------------------------------------------------------- JACKET: Worked back and forth and sewn tog when finished. BACK PIECE: Cast on 145-150-158-178-186-206 sts on circular needle size 3.5 mm with Lima. Work rib as follows: 1 edge st in GARTER ST - see explanation above, A.6 (find diagram for correct size), A.4, A.3, P 2, K 2, * P 3, K 2 *, repeat from *-* 4-5-5-9-9-11 more times, P 2, A.3, A.4, A.5 (find diagram for correct size), 1 edge st in garter st. Continue like this and repeat the first 2 rows in A.3-A.6 until 12 rows have been worked. Now continue pattern from 3rd row in diagram and work as follows: Work the first 59-59-63-63-67-72 sts as before, work the next 27-32-32-52-52-62 sts AT THE SAME TIME dec 11-8-8-12-12-14 sts evenly in sections with P, continue as before over the remaining 59-59-63-63-67-72 sts = 122-130-138-154-162-178 sts. Work 1 row. Now switch to circular needle size 4 mm and continue with pattern but work A.8 over the middle 16-24-24-40-40-48 sts. NOTE: Now repeat A.3- A.6 from arrow in diagram. REMEMBER THE KNITTING TENSION When piece measures 46-47-48-49-50-51 cm, cast off 3-3-3-4-4-4 sts at beg of the next 4 rows for armholes = 110-118-126-138-146-162 sts on needle. When piece measures 53-54-55-56-57-58 cm, work A.7 over all sts inside 1 edge st in garter st in each side AT THE SAME TIME on first row dec 20-20-18-24-22-24 sts evenly in all sizes = 90-98-108-114-124-138 sts. Repeat A.7 until finished measurements. When piece measures 66-68-70-72-74-76 cm, work as follows: Work the first 32-36-40-42-46-53 sts, cast off the next 26-26-28-30-32-32 sts and work the remaining 32-36-40-42-46-53 sts. Then finish each shoulder separately as follows: On next row from the neck, dec 1 st = 31-35-39-41-45-52 sts remain on each shoulder. When piece measures 68-70-72-74-76-78 cm, work 1 ridge over all sts. Cast off. Work the other shoulder the same way. RIGHT FRONT PIECE: Cast on 81-85-89-98-102-111 sts on circular needle size 3.5 mm with Lima. Work rib as follows: A.1 (= 12 sts), A.2 (find diagram for correct size), P 2, A.3, A.4, A.5 (find diagram for correct size), 1 edge st in garter st. Continue like this and repeat the first 2 rows in A.2-A.5 until 12 rows have been worked. Switch to circular needle size 4 mm and continue with pattern = 73-77-81-89-93-101 sts. NOTE: Now repeat diagram from arrow. When piece measures 40-41-42-43-44-46 cm, beg shawl collar while AT THE SAME TIME working shoulder as explained below: READ ALL OF THE FOLLOWING SECTION BEFORE CONTINUING! SHAWL COLLAR: Work first st in A.1, 1 YO, work the remaining 11 sts in A.1, dec 1 st - READ DECREASE TIP, continue over the remaining sts on needle as before. Repeat displacement over A.1 every 1½ cm 0-2-3-3-3-4 times in total and every cm 26-24-23-24-25-24 times = 26-26-26-27-28-28 sts (incl the first st in A.1). Work the inc sts towards mid front in garter st, AT THE SAME TIME work SHORT ROWS - see explanation above. SHOULDER: When piece measures 46-47-48-49-50-51 cm, cast off 3-3-3-4-4-4 sts at beg of the next 2 rows from WS = 67-71-75-81-85-93 sts on needle. When piece measures 53-54-55-56-57-58 cm, work collar sts in garter st and A.1 as before, then work A.7 over the remaining sts on needle, AT THE SAME TIME dec 10-10-10-13-12-13 sts evenly = 57-61-65-68-73-80 sts. Continue pattern until finished measurements. Then work as follows from RS: When piece measures 68-70-72-74-76-78 cm - adjust after back piece - work the first 26-26-26-27-28-28 sts before slipping them on a stitch holder, then work a ridge over the remaining 31-35-39-41-45-52 sts. Cast off. Slip sts back on needle. Then work short rows in garter st as follows, beg from WS: Work over all 26-26-26-27-28-28 sts, * 2 rows back and forth over the first 13-13-14-14-15-15 sts, 2 rows over all sts *, repeat from *-* until piece measures 7-7-7-8-8-8 cm on the shortest. Cast off. LEFT FRONT PIECE: Work as right front piece but reversed. I.e. work A.10 instead of A.1, A.9 instead of A.2 and A.6 instead of A.5. Remember BUTTONHOLES on left band - see explanation above. SLEEVE: The sleeve is worked back and forth on circular needle. Cast on 59-64-64-69-69-74 sts (incl 1 edge st in garter st in each side) on circular needle size 3.5 mm with Lima. Work rib as follows: 1 edge st in garter st, * K 2, P 3 *, repeat from *-* until 3 sts remain, K 2, 1 edge st in garter st. Continue like this until rib measures 4 cm. Switch to circular needle size 4 mm and work 1 row in stocking st while AT THE SAME TIME dec 9-10-10-11-11-12 sts evenly = 50-54-54-58-58-62 sts. Continue with A.8 inside 1 edge st in garter st in each side. When piece measures 14-13-8-8-13-11 cm, inc 1 st inside edge st in garter st in each side - read INCREASE TIP. Repeat inc approx. every 2-2-1½-1½-1½-1½ cm 20-20-22-22-25-25 more times = 92-96-100-104-110-114 sts. When piece measures 57-56-55-54-53-50 cm, cast off at beg of every row in each side: 3 sts 1-1-1-2-2-2 times, 2 sts 1 time and 3 st 2-2-2-3-3-3 times. Cast off. Sleeve measures approx. 60-59-58-58-57-54 cm. Knit another sleeve. POCKETS: Worked back and forth on circular needle. Cast on 42 sts on circular needle size 4 mm with Lima. Work 1 ridge in garter st AT THE SAME TIME inc 6 sts evenly on row from RS = 48 sts. On next row from RS work pattern as follows: NOTE: Beg and repeat pattern in A.3 and A.4 from 5th row in A.3 and A.4. 1 edge sts in garter st, A.3, A.4, A.8, 1 edge st in garter st. Continue like this back and forth until A.3 and A.4 have been worked 2 times vertically. Then continue with the first 6 rows from arrows in diagram 1 more time. Then work and dec as follows: 1 edge st in garter st, K the next 4 sts tog 2 by 2 (= 2 sts dec), continue as before over the next 7 sts, K the next 4 sts tog 2 by 2, continue with pattern as before over the next 15 sts, K the next 4 sts tog 2 by 2, Work remaining sts as before and finish with 1 edge st in garter st. Then switch to needle 3.5 mm and work 2 ridges over all sts, beg from WS. Cast off from WS. Work another pocket the same way but reversed. ASSEMBLY: Sew the shoulder seams tog. Sew sleeves in body. Sew underarm and side seams in one inside 1 edge st in garter st. Sew the buttons on to the right band. Sew cast-off edge on collars tog mid back, sew collar to the back of neck. Fasten pockets on front pieces so that pattern on pocket is placed over pattern on front piece. Sew pocket neatly through both layers in edge st in garter st in each side and at the bottom of pocket. Cut the yarn and fasten. |
|||||||||||||||||||
Diagram explanations |
|||||||||||||||||||
|
|||||||||||||||||||
 |
|||||||||||||||||||
 |
|||||||||||||||||||
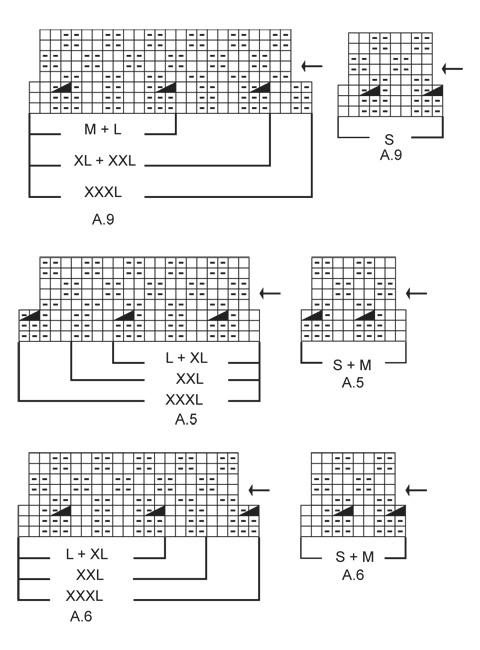 |
|||||||||||||||||||
Have you finished this pattern?Tag your pictures with #dropspattern or submit them to the #dropsfan gallery. Do you need help with this pattern?You'll find 24 tutorial videos, a Comments/Questions area and more by visiting the pattern on garnstudio.com. © 1982-2026 DROPS Design A/S. We reserve all rights. This document, including all its sub-sections, has copyrights. Read more about what you can do with our patterns at the bottom of each pattern on our site. |
|||||||||||||||||||






Post a comment to pattern DROPS Extra 0-1132
We would love to hear what you have to say about this pattern!
If you want to leave a question, please make sure you select the correct category in the form below, to speed up the answering process. Required fields are marked *.