
Looking for a yarn?


Comments / Questions (28)
![]() Celyne R wrote:
Celyne R wrote:
Quand on fait le devant gauche, par exemple, comment peut-on diminuer pour l’encolure toujours sur les rangs endroit, avant ou après A2? Si je commence le devant gauche sur l’envers, A2 est au début du rang. Quand on est à l’endroit, A2 est à la fin du rang. Quand je suis sur l’endroit, je ne pourrai toujours diminuer qu’à la fin du rang, avant A2. Or on dit de faire toutes les diminutions sur l’endroit donc avant A2.
26.06.2025 - 20:58DROPS Design answered:
Bonjour Celyne, vous tricotez A.2 en début de rang sur l'envers = en fin de rang sur l'endroit, autrement dit, côté encolure et vous diminuerez pour l'encolure avant les mailles de A.2, sur l'endroit. Pour le devant droit, vous tricoterez A.2 en début de rang sur l'endroit et diminuerez après A.2. Bon tricot!
27.06.2025 - 08:04
![]() Celyne Ross wrote:
Celyne Ross wrote:
Ma taille est M. Quand le dos et le devant atteint 26 cm, on commence à diminuer pour l’encolure et les emmanchures et on place la maille du milieu de A1 en attente. Je ne vois pas ce que l’on en fait plus tard, où elle est reprise?
25.06.2025 - 20:05DROPS Design answered:
Bonjour Mme Ross, la maille centrale en attente sera reprise lorsque l'on va relever les mailles du col - cf COL à la fin des explications. Bon tricot!
26.06.2025 - 16:14
![]() Celyne Ross wrote:
Celyne Ross wrote:
Bonjour! Je fais la section « Dos&Devant ». J’utilise la taille moyenne. Quand on commence les augmentations quand l’ouvrage mesure 9cm, après 2 tours, on atteint le 162 mailles. Est-ce qu’on continue les augmentations jusqu’à atteindre 19 cm de haut? Le patron dit ensuite: Quand l’ouvrage mesure 27 cm. Est-ce que là aussi on doit continuer les augmentations jusqu’à ce que l’ouvrage mesure 27 cm??
01.06.2025 - 20:18DROPS Design answered:
Bonjour Mme Ross, vous augmentez 2 fois en taille M: une fois quand l'ouvrage mesure 9 cm et une fois quand l'ouvrage mesure 18 cm. Quand l'ouvrage mesures 26 cm, vous formez les emmanchures, et terminez chaque partie (devant et dos) séparément; en même temps, à 27 cm pour le devant, vous commencerez à diminuer pour l'encolure V. Bon tricot!
02.06.2025 - 08:32
![]() Elisabeth Kowatsch wrote:
Elisabeth Kowatsch wrote:
Habe eine Frage zu der einen Masche die ich stilllegen soll bei Arm Ausschnitt und V- Ausschnitt. Da soll man 6 Maschen abketten und dann 34 Maschen normal weiter stricken dann 1 Masche stilllegen, dann 34 Maschen stricken und 6 Maschen wieder abketten. Meine Frage dazu? Was mache ich mit der einen stillgelegten Masche dann?
18.03.2025 - 16:19DROPS Design answered:
Liebe Frau Kowatsch, diese einzige Masche in der Mitte vom Vorderteil wird später für die Halsblende gestrick- siehe HALSBLENDE am Ende der schriftlichen Anleitung. Viel Spaß beim Stricken!
19.03.2025 - 15:48
![]() GROS HOURDRY VERONIQUE wrote:
GROS HOURDRY VERONIQUE wrote:
Quand vous dites dans l’explication : « quand l’ouvrage mesure 27 cm » vous mesurez bien en tenant compte des rangs de cotes 1/1?
27.02.2025 - 13:26DROPS Design answered:
Bonjour Mme Gros Hourdry, tout à fait, mesurez à partir du rang de montage, au tout début de l'ouvrage. Bon tricot!
27.02.2025 - 16:57
![]() Nathalie Maitre wrote:
Nathalie Maitre wrote:
Bonjour, Meilleurs Vœux Je suis assez novice en tricot et j'ai commencé ce pull. J'en suis aux diminutions et réalisation de l'encolure... Je n'ai jamais suivi de patron et je ne comprends pas. Que veux dire 0-0-0-0-1-1 et 1-2-3-4-4-5 et encore 4-3-3-3-4-5. Je vous remercie pour votre aide
02.01.2025 - 11:51DROPS Design answered:
Bonjour Mme Maître, merci pour vos voeux, recevez les nôtres en retour. Chaque chiffre s'applique à la taille dans l'ordre indiqué, lorsqu'il y a un 0, sautez simplement cette information et passez à la suivante. Bon tricot!
02.01.2025 - 16:23
![]() Michèle Castonguay wrote:
Michèle Castonguay wrote:
Bonjour\\r\\nJ’ai souvent tricoté des gilet s de votre compagnie.Avant on pouvait traduire le patron dans la langue que l’on voulait. J’ai trouvé ce patron et je m’aperçois que l’on ne peut pas le traduire pourquoi?
23.09.2024 - 19:41DROPS Design answered:
Bonjour Mme Castonguay, tous nos modèles sont disponibles en français, le lien pour changer la langue a juste changé de place, vous le trouverez maintenant à côté de l'icône de l'imprimante - ou bien ici pour celui-ci. Bon tricot!
24.09.2024 - 09:01
![]() Cecilia wrote:
Cecilia wrote:
Bonjour, le modèle est tricoté avec deux qualités de fils, mais comment assortir les couleurs . Avez-vous des suggestions
10.11.2023 - 09:27DROPS Design answered:
Bonjour Cecilia, vous trouverez d'autres exemples de cette association sous le nuancier de DROPS Flora, votre magasin saura également vous conseiller les couleurs assorties dans les nuances que vous recherchez, n'hésitez pas à le contacter, même par mail ou téléphone. Bon tricot!
10.11.2023 - 11:26
![]() Kaja Bordenave wrote:
Kaja Bordenave wrote:
Hi. I am on the beginning of the V-neck and armholes. I have cast off 6 stitches at the marker, then knitted to A1, placed a stitch on a marker, and then I counted 27 stitches to the marker. It says to knit 34 stitches and then cast off, but I counted 24 stitches, and it turns out I've knitted 24 stitches before A1 as well. Is this a typo on the recipe?
24.08.2023 - 14:29DROPS Design answered:
Dear Mrs Bordenave, when casting off for armhole, you should cast off 3 sts before the marker at the beg of the round + 3 sts after this marker, then work 34 sts, slip the middle stitch on a thread, work 34 sts, cast off the next 6 sts (3 sts on each side of the marker) and work the last 69 sts = 6+34+1+34+6+69=150 sts. Hope it can help. Happy knitting!
25.08.2023 - 08:07
![]() Michèle Tremblay wrote:
Michèle Tremblay wrote:
Bonjour, Je suis rendue au devant gauche. Ils disent de tricoter le motif A2 au dessus des 8 mailles du milieu si je tricote comme cela je n’arrive pas à couvrir le A1 car il reste d’eux maille sur le motif A1. Merci de me répondre
12.03.2023 - 22:51DROPS Design answered:
Bonjour Mme Tremblay, quand on divise le devant, on divise au milieu de A.1 = on a pour le devant gauche les 10 premières mailles de A.1 ( puis 1 m en attente (= la m centrale de A.1) et les 10 dernières mailles de A.1 pour le devant droit), mais on ne va plus tricoter la torsade (= les 2 premières mailles de A.1), on va donc tricoter A.2 sur les 8 premières mailles sur l'envers/dernières mailles sur l'endroit (devant gauche). Bon tricot!
13.03.2023 - 10:35
|
||||||||||||||||||||||
Cooler Days Ahead#coolerdaysaheadvest |
||||||||||||||||||||||
 |
 |
|||||||||||||||||||||
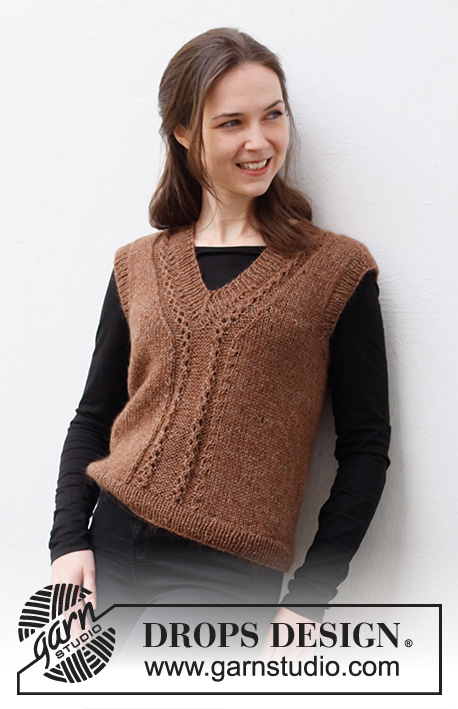
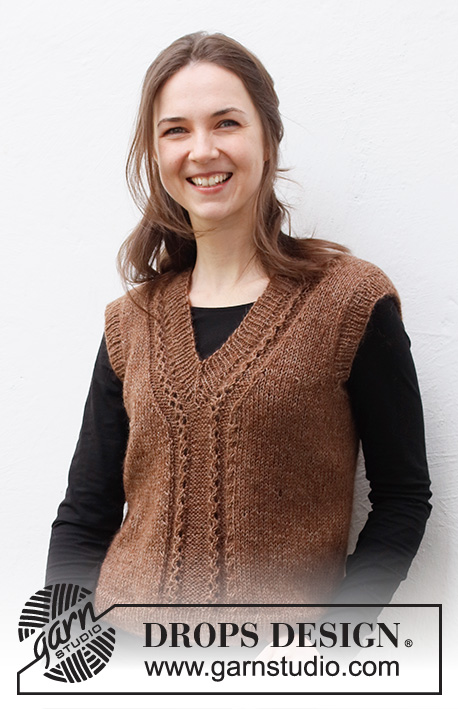
Knitted vest with V-neck in DROPS Flora and DROPS Kid-Silk. Sizes S - XXXL.
DROPS 216-35 |
||||||||||||||||||||||
|
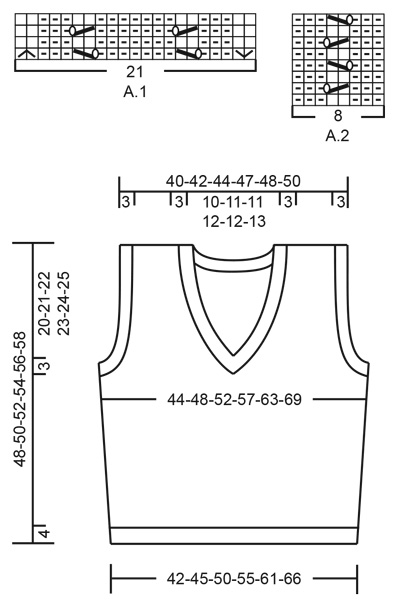
------------------------------------------------------- EXPLANATIONS FOR THE PATTERN: ------------------------------------------------------- PATTERN: See diagrams A.1 and A.2. The diagrams show all rows from the right side. DECREASE TIP-1 (evenly spaced): To work out how to decrease evenly, count the total number of stitches on needle (e.g. 170 stitches) and divide by number of decreases to be made (e.g. 28) = 6.1. In this example decrease by knitting each 5th and 6th stitch together. DECREASE TIP-2 (for V-neck): All decreases are worked from the right side! DECREASE AS FOLLOWS AFTER A.2: Slip 1 stitch as if to knit, knit 1 and pass the slipped stitch over the knitted stitch (= 1 stitch decreased). DECREASE AS FOLLOWS BEFORE A.2: Start 2 stitches before A.2 and knit 2 together (= 1 stitch decreased). INCREASE TIP (for sides of body): Work until there are 2 stitches left before the marker thread, make 1 yarn over, knit 4 (marker thread sits between these 4 stitches) make 1 yarn over (= 2 stitches increased). On the next round knit the yarn overs twisted to avoid holes. Then work the new stitches in stockinette stitch. BINDING-OFF TIP: To avoid the bind-off edge being tight you can bind off with a larger size needle. If the edge is still tight, make 1 yarn over after approx. each 4th stitch at the same time as binding off; the yarn overs are bind off as normal stitches. ------------------------------------------------------- START THE PIECE HERE: ------------------------------------------------------- VEST – SHORT OVERVIEW OF THE PIECE: The piece is worked in the round with circular needle bottom up, as far as the beginning of the V-neck. Then the piece is worked back and forth as far as the armholes, after which the front and back pieces are finished separately. Ribbed edges are worked around the neck and armholes. BODY: Cast on 170-184-204-224-248-272 stitches with circular needle size 5 mm = US 8 and 1 strand Flora and 1 strand Kid-Silk (= 2 strands). Change to circular needle size 4 mm = US 6 and knit 1 round. Then work rib in the round (= knit 1, purl 1) for 4 cm = 1½". Change back to circular needle size 5 mm = US 8 and knit 1 round where you decrease 28-30-34-38-42-46 stitches evenly spaced – read DECREASE TIP-1 = 142-154-170-186-206-226 stitches. Insert 1 marker thread at the beginning of the round and 1 marker thread after 71-77-85-93-103-113 stitches (= sides of body). Allow the threads to follow your work onwards; they will be used when increasing in the sides. Work 25-28-32-36-41-46 stitches in stockinette stitch, A.1 (= 21 stitches mid front) and stockinette stitch to the end of the round. Continue this pattern. REMEMBER THE KNITTING GAUGE! When the piece measures 9-9-10-10-11-11 cm = 3½"-3½"-4"-4"-4⅜"-4⅜", increase 1 stitch on each side of both marker threads – read INCREASE TIP (= 4 stitches increased). Repeat this increase when the piece measures 18-18-20-20-22-22 cm = 7"-7"-8"-8"-8¾"-8¾" = 150-162-178-194-214-234 stitches. When the piece measures 25-26-27-28-29-30 cm = 9¾"-10¼"-10⅝"-11"-11⅜"-11¾", start to decrease for V-neck and armholes. Adjust so that next round is 1st or 3rd round in A.1 and work next round as follows: Begin 3 stitches before the marker thread on the beginning of the round, bind off 6 stitches for armhole, work 34-37-41-45-50-55 stitches as before, place next stitch on a strand of yarn or a stitch holder (= mid front and middle of A.1), work 34-37-41-45-50-55 stitches as before, bind off 6 stitches for armhole (i.e. bind off 3 stitches on each side of the marker thread), and knit the remaining 69-75-83-91-101-111 stitches in stockinette stitch. BACK PIECE: = 69-75-83-91-101-111 stitches. Begin from the wrong side, and work stockinette stitch back and forth as before. AT THE SAME TIME bind off for armhole on the beginning of each row in each side as follows: Bind off 3 stitches 0-0-0-0-1-1 time, 2 stitches 1-2-3-4-4-5 times and 1 stitch 4-3-3-3-4-5 times on each side = 57-61-65-69-71-75 stitches. Continue working until the piece measures 45-47-49-51-53-55 cm = 17¾"-18½"-19¼"-20"-21"-21⅝". On the next row bind off the middle 19-19-21-21-23-23 stitches for the neck and each shoulder is finished separately. Continue with stockinette stitch and bind off 2 stitches on the next row from the neck = 17-19-20-22-22-24 stitches on the shoulder. Continue working until the piece measures 48-50-52-54-56-58 cm = 19"-19¾"-20½"-21¼"-22"-22¾". Bind off a little loosely. Work the other shoulder in the same way. LEFT FRONT PIECE (when garment is worn): Begin from the wrong side from mid front, work A.2 over the first 8 stitches (A.2 is read from left to right when working from wrong side), and work stockinette stitch over the remaining stitches. Continue the pattern as this – A.2 should now fit nicely above A.1. AT THE SAME TIME bind off for armhole and v-neck as described below. ARMHOLE: Bind off for armhole on the beginning of the row from the armhole as follows: Bind off 3 stitches 0-0-0-0-1-1 times, 2 stitches 1-2-3-4-4-5 times and 1 stitch 4-3-3-3-4-5 times. V-NECK: AT THE SAME TIME on first row from right side, decrease 1 stitch for v-neck before A.2 on the mid front (seen from right side) – read DECREASETIP-2. Decrease as this every 2nd row (i.e. every row from the right side) a total of 5 times in all sizes, and then on every 4th row (i.e. every other row from right side) a total of 6-6-7-7-8-8 times. After all decreases for v-neck and bind off for armhole is done, there is 17-19-20-22-22-24 stitches on shoulder. Work until the piece measures 48-50-52-54-56-58 cm = 19"-19¾"-20½"-21¼"-22"-22¾". Bind off a little loosely. RIGHT FRONT PIECE: Begin from the wrong side in the armhole side, work in stockinette stitch as before until 8 stitches remains towards mid front, work A.2 over the last 8 stitches. Continue the pattern as this. AT THE SAME TIME decrease for v-neck and bind off for armhole in the same way as left front piece but the in the opposite side. I.e. decrease for v-neck as described above, after A.2 mid front (seen from right side) and bind off for armhole on the beginning of each row from the armhole as described above. ASSEMBLY: Sew the shoulder seams inside the bind-off edge. SLEEVE EDGE: Starting from the right side at the bottom of the armhole, knit up approx. 92 to 114 stitches inside the 1 edge stitch around the armhole, using short circular needle size 4 mm = US 6 and 1 strand of each quality (the number of stitches should be divisible by 2). Work rib in the round (= knit 1, purl 1) for 3 cm = 1⅛". Loosely bind off with knit over knit and purl over purl – read BINDING-OFF TIP! Work the other sleeve edge in the same way. NECK: Start from the right side, at one of the shoulder seams, and knit up approx. 114 to 140 stitches around the neck (including the 1 stitch on the thread mid front), using short circular needle size 4 mm = US 6 and 1 strand of each quality (the number of stitches should be divisible by 2). Work rib in the round (= knit 1, purl 1), making sure 1 knitted stitch is mid front over the stitch on the thread. AT THE SAME TIME every 2nd round decrease 2 stitches mid front as follows: Work until there is 1 stitch left before the knitted stitch mid front, slip 2 stitches as if to knit together, knit 1 and pass the 2 slipped stitch over the knitted stitch (= 2 stitches decreased). This will allow the V-neck to lie neatly and the knitted stitch will create a line mid front. Bind off with knit over knit and purl over purl when the edge measures 3 cm = 1⅛" – remember BINDING-OFF TIP! |
||||||||||||||||||||||
Diagram explanations |
||||||||||||||||||||||
|
||||||||||||||||||||||
|
||||||||||||||||||||||
Have you finished this pattern?Tag your pictures with #dropspattern #coolerdaysaheadvest or submit them to the #dropsfan gallery. Do you need help with this pattern?You'll find 22 tutorial videos, a Comments/Questions area and more by visiting the pattern on garnstudio.com. © 1982-2025 DROPS Design A/S. We reserve all rights. This document, including all its sub-sections, has copyrights. Read more about what you can do with our patterns at the bottom of each pattern on our site. |
||||||||||||||||||||||


With over 40 years in knitting and crochet design, DROPS Design offers one of the most extensive collections of free patterns on the internet - translated to 17 languages. As of today we count 314 catalogs and 11822 patterns - 11812 of which are translated into English (US/in).
We work hard to bring you the best knitting and crochet have to offer, inspiration and advice as well as great quality yarns at incredible prices! Would you like to use our patterns for other than personal use? You can read what you are allowed to do in the Copyright text at the bottom of all our patterns. Happy crafting!
Post a comment to pattern DROPS 216-35
We would love to hear what you have to say about this pattern!
If you want to leave a question, please make sure you select the correct category in the form below, to speed up the answering process. Required fields are marked *.