
Looking for a yarn?


Comments / Questions (16)
![]() Maggie wrote:
Maggie wrote:
Hello, Can the front and back be knit in the round ? Thank you
14.08.2024 - 13:34DROPS Design answered:
Hi Maggie, of course you can. Happy knitting!
14.08.2024 - 13:57
![]() Maggie wrote:
Maggie wrote:
Hello Can the back and front be worked together in the round? Thank you
13.08.2024 - 15:28
![]() Louet wrote:
Louet wrote:
Bonjour je pense que les explications entre la manche gauche et la droite sont différentes, vous nous faites rabattre des mailles à 11 cm des emmanchures sur la droites alors que sur la gauche c’est à partir de 19 cm suivant la taille. Je me suis basée sur l’explication de la manche gauche qui me paraissait plus cohérente. Mais je pense que vous devriez revoir vos explications. Cordialement. Danilou6.
17.03.2024 - 23:37DROPS Design answered:
Bonjour Mme Louet, les hauteurs sont les mêmes pour les 2 manches, pour la manche droite, vous avez (en taille S), 10 cm à partir des mailles rabattues + 9 cm supplémentaires à partir du marqueur = 19 cm. Bon tricot!
18.03.2024 - 10:21
![]() Hanne Boghøj Bendtsen wrote:
Hanne Boghøj Bendtsen wrote:
I starten af venstre ærme: Kan det tænkes ved str. XL og XXL er skrevet 15 og 16 cm istedet for 25 og 26 cm?
01.04.2023 - 09:40DROPS Design answered:
Hei Hanne. Ja, her har det vært en tastefeil. Rikitg som du skriver, skal være 25-26 cm i str. XL og XXL. Takk for at du gjorde oss oppmerksom på dette. Vi vil rette dette asap. mvh DROPS Design
17.04.2023 - 08:21
![]() Nicoletta wrote:
Nicoletta wrote:
Salve,purtroppo ho un’altra domanda riguardo alle maniche. Dalle foto sembrerebbe che il motivo treccia + diagramma A2 debba proseguire fino al collo,dalle spiegazioni sembra che gli ultimi 8 cm debba lavorare solo le 5 maglie del diagramma A2… Ringrazio anticipatamente per la vostra preziosa disponibilità! Cordiali saluti Nicoletta
26.02.2023 - 23:26DROPS Design answered:
Buonasera Nicoletta, le spiegazioni sono corrette, questa parte verrà poi cucita alle maglie intrecciate sul dietro. Buon lavoro!
08.03.2023 - 20:04
![]() Nicoletta wrote:
Nicoletta wrote:
Salve,purtroppo ho un’altra domanda riguardo alle maniche. Dalle foto sembrerebbe che il motivo treccia + diagramma A2 debba proseguire fino al collo,dalle spiegazioni sembra che gli ultimi 8 cm debba lavorare solo le 5 maglie del diagramma A2… Ringrazio anticipatamente per la vostra preziosa disponibilità! Cordiali saluti Nicoletta
11.02.2023 - 11:42DROPS Design answered:
Buonasera Nicoletta, le spiegazioni sono corrette, questa parte verrà poi cucita alle maglie intrecciate sul dietro. Buon lavoro!
08.03.2023 - 20:04
![]() Nicoletta Zonca wrote:
Nicoletta Zonca wrote:
Buongiorno ,ho finito gli scalfi dietro del modello 217-5, le 22 maglie da diminuire, sono tutte sullo stesso ferro?in questo modo finisco le diminuzioni in un'unica volta...non riesco a capire questa parte...ringrazio anticipatamente per la vostra disponibilità. Buona serata
22.01.2023 - 21:30DROPS Design answered:
Buonasera Nicoletta, si, le 22 maglie si diminuiscono su un ferro solo. Buon lavoro!
23.01.2023 - 21:57
![]() Gabriele Bauer wrote:
Gabriele Bauer wrote:
Leider ist kein Foto des Rückteils zu sehen. Das macht es schwierig zu verstehen, warum man an jedem Ärmel 9 cm mit 5 Maschen höher strickt und diese wohl dann am Rückteil oben annäht. Warum macht man das? Dann sind Rückansicht und Vorderansicht ja verschieden???
30.11.2022 - 15:27DROPS Design answered:
Liebe Frau Bauer, die Ärmel werden unterschiedlich abgekettet damit sie gegen Rückenteil länger werden so ist der Hals höher am Rückenteil als am Vorderteil. Viel Spaß beim stricken!
30.11.2022 - 17:04
![]() Gabriele Bauer wrote:
Gabriele Bauer wrote:
Hallo, auf dem Foto sind die Ärmel umgeschlagen, also sind sie wohl extra lang in der Anleitung. Ich möchte das so nicht, sondern normal lange Ärmel. Wo und wieviel soll ich kürzen bei XXL? Danke sehr.
17.11.2022 - 11:26DROPS Design answered:
Liebe Frau Bauer, je nach gewünschte Armlänger können Sie mit der Hilfe der Maßskizze die Ärmellänge anpassen - hier lesen Sie mehr über die Maßskizze. Viel Spaß beim stricken!
17.11.2022 - 16:07
![]() Olympe wrote:
Olympe wrote:
Bonjour, modèle 217-15. Je ne comprends pas : diagramme A2, 2ème rang : carré noir « ce carré n’est pas une maille, passer directement au symbole suivant ». Que dois-je faire avec le carré noir ??? Merci
26.06.2022 - 17:47DROPS Design answered:
Bonjour Olympe, lorsque vous avez tricoté le 1er rang de A.2, il vous reste 2 mailles dans A.2, vous tricotez ces 2 mailles comme dans le diagramme (il n'y a que 2 mailes, pas 3, d'où le carré noir), au rang suivant, faites 1 jeté entre ces 2 mailles (= vous avez de nouveau 3 mailles). Bon tricot!
27.06.2022 - 08:50
|
||||||||||||||||||||||
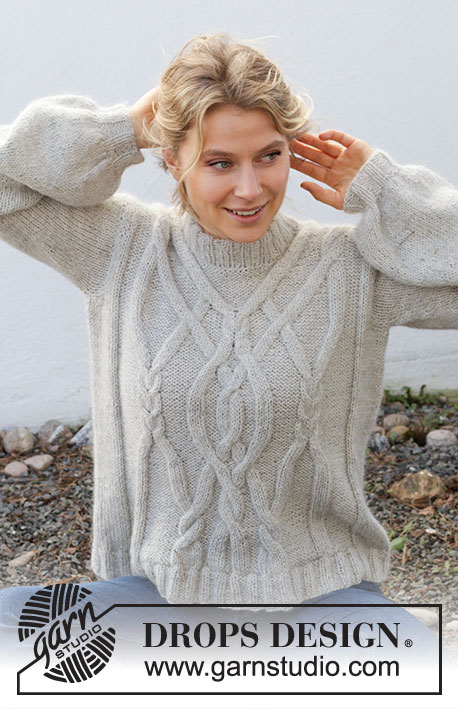
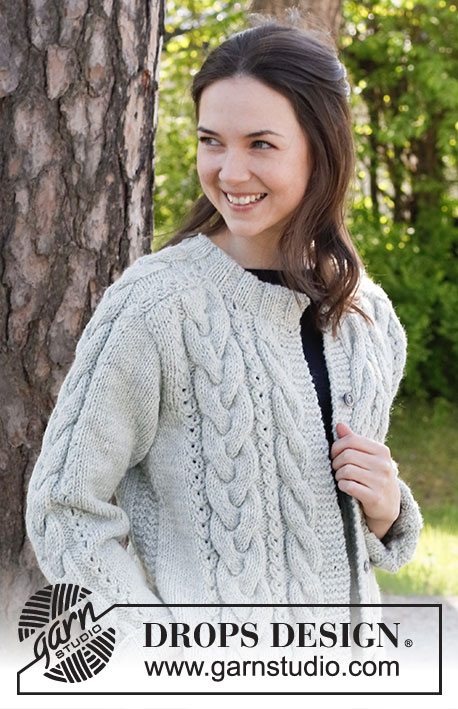
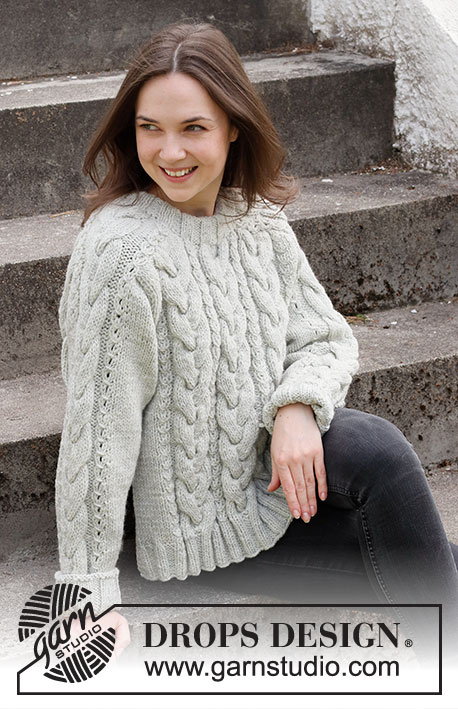
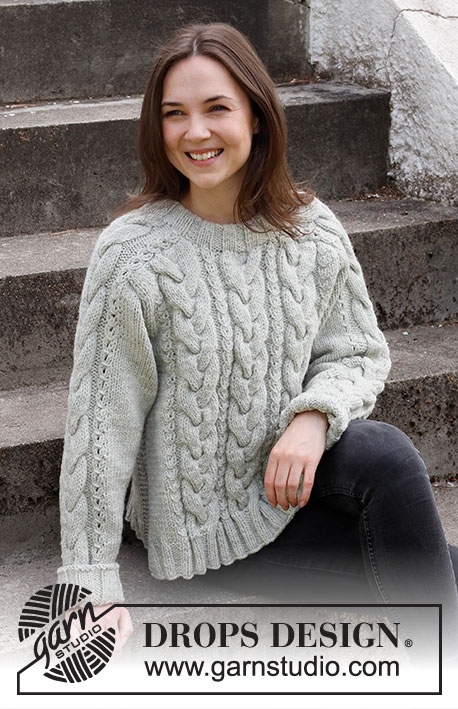
Columns of Valhalla#columnsofvalhallasweater |
||||||||||||||||||||||
 |
 |
|||||||||||||||||||||
Knitted sweater in DROPS Alaska. The piece is worked with saddle shoulders, cables and split in the sides. Sizes S - XXXL.
DROPS 217-15 |
||||||||||||||||||||||
|
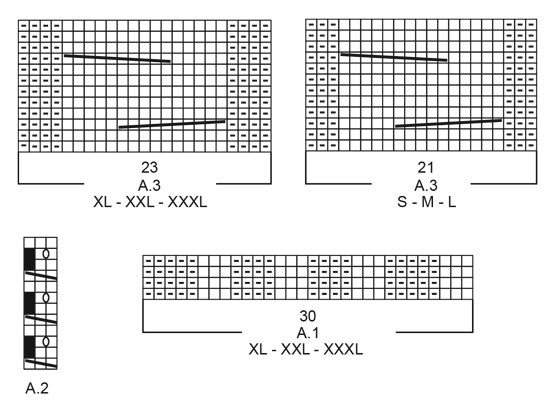
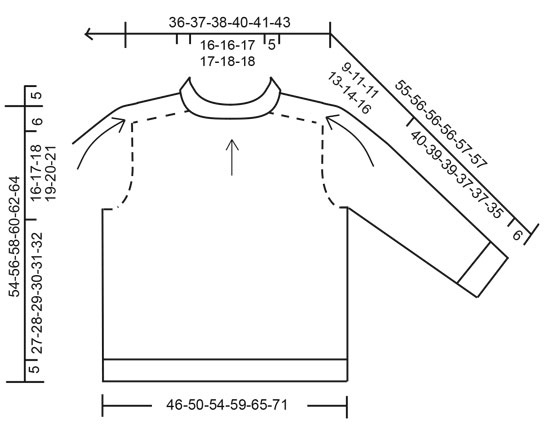
------------------------------------------------------- EXPLANATIONS FOR THE PATTERN: ------------------------------------------------------- RIDGE/GARTER STITCH (worked back and forth): Knit all rows. 1 ridge in height = Knit 2 rows. PATTERN: See diagrams A.1 to A.3. Choose diagram for your size (applies to A.3). A.1 applies to sizes XL, XXL and XXXL. DECREASE TIP (evenly spaced): To work out how to decrease evenly, count the number of stitches to be decreased over (e.g. 14 stitches) and divide by the number of decreases to be made (e.g. 3) = 4.6. In this example decrease by knitting together alternately each 3rd and 4th and each 4th and 5th stitch (approx.). INCREASE TIP: Increase 1 stitch on each side of the marker thread as follows: Work until there are 2 stitches left before the marker thread, make 1 yarn over, knit 4 (marker thread sits in the middle of these 4 stitches), 1 yarn over. On the next round knit the yarn overs twisted to avoid holes. ------------------------------------------------------- START THE PIECE HERE: ------------------------------------------------------- SWEATER – SHORT OVERVIEW OF THE PIECE: The piece is worked in sections which are sewn together to finish. The front and back pieces are worked back and forth with circular needle. The sleeves are worked in the round with double pointed needles/short circular needle as far as the armholes. The rest of the sleeve is worked back and forth. A double neck is worked in the round to finish. BACK PIECE: Cast on 107-121-135-141-141-155 stitches with circular needle size 4.5 mm = US 7 and Alaska. Purl 1 row (= wrong side). Then work rib in the different sizes as follows: Sizes S, M and L: Work 3 stitches in GARTER STITCH – read description above, work rib (= knit 3, purl 4) until there are 6 stitches left, knit 3 and work 3 garter stitches. Continue back and forth with knit over knit, purl over purl and 3 stitches in garter stitch on each side. When the rib measures 5 cm = 2", change to circular needle size 5.5 mm = US 9. Work the next row from the right side as follows: 3 garter stitches, knit 7-14-21 and decrease at the same time 0-3-7 stitches evenly spaced over these stitches (= 7-11-14 stitches), knit over knit and purl over purl the next 87-87-87 stitches and decrease, at the same time, all purl-4 sections to purl-3 by purling 2 together (= 12-12-12 stitches decreased), knit 7-14-21 and decrease at the same time 0-3-7 stitches evenly spaced over these stitches and work 3 garter stitches = 95-103-109 stitches. Work back with knit over knit, purl over purl and 3 garter stitches on each side. Sizes XL, XXL and XXXL: Work 3 stitches in GARTER STITCH – read description above, work rib (= knit 3, purl 4) over the next 21-21-28 stitches, A.1 over the next 90 stitches (= 3 repeats of 30 stitches), rib (= knit 3 / purl 4) over the next 21-21-28 stitches, knit 3 and work 3 garter stitches. Continue back and forth like this. When the rib measures 5 cm = 2", change to circular needle size 5.5 mm = US 9. Work the next row from the right side as follows: 3 garter stitches, knit 21-21-28 decrease at the same time 6-2-4 stitches evenly spaced over these stitches (= 15-19-24 stitches), knit 3, knit over knit and purl over purl the next 87-87-87 stitches and decrease at the same time all purl sections by purling 2 together (i.e. all purl-4 sections become purl-3 and all purl-5 sections become purl-4 = 12-12-12 stitches decreased), knit 3, knit 21-21-28 and decrease at the same time 6-2-4 stitches evenly spaced over these stitches (= 15-19-24 stitches), 3 garter stitches = 117-125-135 stitches. Work back with knit over knit, purl over purl and 3 garter stitches on each side. All sizes: Now work pattern as follows: 3 garter stitches, stockinette stitch over the next 7-11-14-15-19-24 stitches, * A.2, A.3 (choose diagram for your size) *, work from *-* 3 times, A.2, stockinette stitch over the next 7-11-14-15-19-24 stitches and work 3 garter stitches. Continue this pattern back and forth. REMEMBER THE KNITTING GAUGE! When the piece measures 32-33-34-35-36-37 cm = 12½"-13"-13⅜"-13¾"-14¼"-14½", bind off for the armholes on both sides as follows: Bind off 4-4-5-5-6-6 stitches 1 time, 3 stitches 0-1-1-1-1-2 times, 2 stitches 1-1-1-2-3-3 times and 1 stitch 1-1-2-3-3-3 times (= 7-10-12-15-18-21 stitches bind off for each armhole) = 81-83-85-87-89-93 stitches. Continue back and forth with pattern as before over the middle 75-75-75-81-81-81 stitches, 1 edge stitch in garter stitch on each side, and the remaining stitches in stockinette stitch (= 2-3-4-2-3-5 stockinette stitches between the pattern and the edge stitches). When the piece measures 48-50-52-54-56-58 cm = 19"-19¾"-20½"-21¼"-22"-22¾" – adjust so the next row is worked from the right side (the armhole measures 16-17-18-19-20-21 cm = 6¼"-6¾"-7"-7½"-8"-8¼"), work as follows: 1 edge stitch in garter stitch, knit over knit and purl over purl until there is 1 stitch left and, at the same time, decrease 22 stitches evenly over the knitted sections in the large cables, 1 edge stitch in garter stitch = 59-61-63-65-67-71 stitches. Bind off. FRONT PIECE: Cast on 107-121-135-141-141-155 stitches with circular needle size 4.5 mm = US 7 and Alaska. Purl 1 row (= wrong side). Then work rib and pattern in the same way as the back piece. When the piece measures 32-33-34-35-36-37 cm = 12½"-13"-13⅜"-13¾"-14¼"-14½", bind off for the armholes in the same way as for the back piece = 81-83-85-87-89-93 stitches. Continue back and forth with pattern over the middle 75-75-75-81-81-81 stitches, 1 edge stitch in garter stitch on each side and the remaining stitches in stockinette stitch (= 2-3-4-2-3-5 stockinette stitches between the pattern and the edge stitches). When the piece measures 45-47-48-50-51-53 cm = 17¾"-18½"-19"-19¾"-20"-21", adjust so the next row is worked from the right side, work as follows: Work as before over the first 30-31-31-32-32-34 stitches, knit over knit and purl over purl for the next 21-21-23-23-25-25 stitches and decrease, at the same time, 6 stitches evenly over the knitted stitches in the large cable (= 21-21-23-23-25-25 stitches decreased to 15-15-17-17-19-19 stitches), place these 15-15-17-17-19-19 stitches on a thread (= neck) and work the last 30-31-31-32-32-34 stitches. The shoulders are now finished separately. Work back and forth with pattern as before, at the same time, on each row from the neck bind off stitches as follows: Bind off 2 stitches 2 times and 1 stitch 1 time = 25-26-26-27-27-29 stitches. Continue back and forth until the piece measures 48-50-52-54-56-58 cm = 19"-19¾"-20½"-21¼"-22"-22¾" – adjust so the next row is worked from the right side (the armhole now measures 16-17-18-19-20-21 cm = 6¼"-6¾"-7"-7½"-8"-8¼"). Work 1 edge stitch in garter stitch, knit until there is 1 stitch left and, at the same time, decrease 8 stitches evenly spaced over these stitches, 1 edge stitch in garter stitch = 17-18-18-19-19-21 stitches. Bind off. Work the other shoulder in the same way. RIGHT SLEEVE: Cast on 46-52-52-58-58-58 stitches with double pointed needles size 4.5 mm = US 7 and Alaska. Knit 1 round. Insert a marker thread at the beginning of the round. Then work rib as follows: (Purl 3, knit 3) over the first 12-18-18-24-24-24 stitches, purl 3, (knit 3, purl 4) over the next 28 stitches, knit 3. Continue this rib in the round for 6 cm = 2⅜". The next round is worked as follows: Knit 15-21-21-27-27-27 and at the same time decrease 1-5-1-7-7-5 stitches evenly over these stitches, knit over knit and purl over purl for the next 31 stitches and decrease in the different sizes as follows: Sizes S, M and L: Decrease 1 stitch in each of the purl-4 sections (= 4 stitches decreased). Sizes XL, XXL and XXXL: Decrease 1 stitch in the 2 middle purled sections (= 2 stitches decreased). There are now 41-43-47-49-49-51 stitches on the round. Change to double pointed needles size 5.5 mm = US US 9. Knit 7-8-10-10-10-11 stitches. Insert a marker thread here (= this marks mid-under the sleeve and the new beginning of the round). The marker thread follows your work onwards, and will be used when increasing under the sleeve. Now work pattern as follows: Knit 7-8-10-10-10-11, work A.2 over the next 3 stitches, A.3 (choose diagram for your size) over the next 21-21-21-23-23-23 stitches, A.2 over the next 3 stitches and knit 7-8-10-10-10-11. Continue like this in the round. When the sleeve measures 11-10-10-7-11-8 cm = 4⅜"-4"-4"-2¾"-4⅜"-3⅛", increase 1 stitch on each side of marker thread – read INCREASE TIP. Increase like this every 2-2-2-2-1½-1½ cm = ¾"-¾"-¾"-¾"-½"-½" a total of 16-16-16-17-19-21 times = 73-75-79-83-87-93 stitches. Continue working until the sleeve measures 46-45-45-43-43-41 cm = 18"-17¾"-17¾"-17"-17"-16⅛" from the cast-on edge. Now bind off the middle 8-8-10-10-12-12 stitches under the sleeve for the armhole (= 4-4-5-5-6-6 stitches on each side of the marker thread) = 65-67-69-73-75-81 stitches. Continue back and forth with pattern as before and 1 edge stitch in garter stitch on each side. At the beginning of each row bind off stitches for the sleeve cap on each side as follows: Bind off 3 stitches 1-1-2-2-2-2 times, 2 stitches 7-6-5-4-4-5 times and 1 stitch 1-4-4-7-8-9 times (= a total of 18-19-20-21-22-25 stitches bind off on each side) = 29-29-29-31-31-31 stitches. The sleeve measures approx. 9-11-11-13-14-16 cm = 3½"-4⅜"-4⅜"-5⅛"-5½"-6¼" from the bind-off stitches. Insert a marker. THE PIECE IS NOW MEASURED FROM HERE. Continue back and forth with 1 edge stitch in garter stitch on each side until the sleeve measures 10-11-11-12-12-13 cm = 4"-4⅜"-4⅜"-4¾"-4¾"-5⅛" – adjust so the next row is from the right side. Knit over knit and purl over purl the first 23-23-23-25-25-25 stitches and, at the same time, knit together (2 and 2) the first 14 knitted stitches in A.3, (= 7 stitches decreased), knit the next 2 stitches together (= 1 stitch decreased), work pattern as before over the last 4 stitches = 21-21-21-23-23-23 stitches. Turn and work pattern as before over the first 5 stitches, then purl the remaining stitches. Turn and bind off the first 16-16-16-18-18-18 stitches and insert a marker at the end of row (marker marks which side of the sleeve will later be sewn to the back piece). Then work back and forth with A.2 and 1 edge stitch in garter stitch on each side over the remaining 5 stitches until the piece measures 8-8-8-8-9-9 cm = 3⅛"-3⅛"-3⅛"-3⅛"-3½"-3½". Bind off. The sleeve measures a total of 73-75-76-77-78-79 cm = 28¾"-29½"-29½"-30⅜"-30¾"-31". LEFT SLEEVE: Work in the same way as the right sleeve, but when the sleeve cap is finished and the sleeve measures 19-22-22-25-26-29 cm = 7½"-8¾"-8¾"-9¾"-10¼"-11⅜" from the bind-off stitches, work the next row from the right side as follows: Work the first 4 stitches as before, knit 2 together (= 1 stitch decreased), knit over knit and purl over purl the last 23-23-23-25-25-25 stitches and, at the same time knit together (2 and 2) the last 14 knitted stitches in A.3 (= 7 stitches decreased) = 21-21-21-23-23-23 stitches. Turn and bind off the first 16-16-16-18-18-18 stitches and insert a marker at the end of row (marker marks which side of the sleeve will later be sewn to the back piece). Then work back and forth with A.2 and 1 edge stitch in garter stitch on each side over the remaining 5 stitches until the piece measures 8-8-8-8-9-9 cm = 3⅛"-3⅛"-3⅛"-3⅛"-3½"-3½". Bind off. The sleeve measures a total of 73-75-76-77-78-79 cm = 28¾"-29½"-29½"-30⅜"-30¾"-31". ASSEMBLY: Sew sleeves to front- and back piece inside 1 edge stitch/bind off edge as follows: Sew one sleeve to back piece by sewing seam from armhole and up along the shoulder to mid back of back piece. Repeat on the other sleeve, and finish by sewing the bind off edges on sleeves (= the last 5 stitches that were bind off on sleeves) mid back. Sew one sleeve to front piece from armhole and up along the shoulder to the neck. Repeat on the other sleeve. Sew the side seams in the outermost loop of the outermost stitch top down leaving 17 cm = 6¾" at the bottom (= split). DOUBLE NECK: Knit up 66 to 84 stitches (including the stitches on the thread mid-front) inside the 1 edge stitch, from the right side with Alaska and circular needle size 4.5 mm = US 7. The number of stitches must be divisible by 6. Work rib (= knit 3, purl 3) in the round for 10-11 cm = 4"-4⅜". Bind off with knit over knit and purl over purl. Fold the neck double to the wrong side and sew down. To avoid the neck being tight and rolling outwards it is important the seam is elastic. |
||||||||||||||||||||||
Diagram explanations |
||||||||||||||||||||||
|
||||||||||||||||||||||
|
||||||||||||||||||||||
|
||||||||||||||||||||||
Have you finished this pattern?Tag your pictures with #dropspattern #columnsofvalhallasweater or submit them to the #dropsfan gallery. Do you need help with this pattern?You'll find 27 tutorial videos, a Comments/Questions area and more by visiting the pattern on garnstudio.com. © 1982-2025 DROPS Design A/S. We reserve all rights. This document, including all its sub-sections, has copyrights. Read more about what you can do with our patterns at the bottom of each pattern on our site. |
||||||||||||||||||||||


With over 40 years in knitting and crochet design, DROPS Design offers one of the most extensive collections of free patterns on the internet - translated to 17 languages. As of today we count 314 catalogs and 11821 patterns - 11811 of which are translated into English (US/in).
We work hard to bring you the best knitting and crochet have to offer, inspiration and advice as well as great quality yarns at incredible prices! Would you like to use our patterns for other than personal use? You can read what you are allowed to do in the Copyright text at the bottom of all our patterns. Happy crafting!
Post a comment to pattern DROPS 217-15
We would love to hear what you have to say about this pattern!
If you want to leave a question, please make sure you select the correct category in the form below, to speed up the answering process. Required fields are marked *.