
Popular categories
Looking for a yarn?


Comments / Questions (15)
![]() Audhild wrote:
Audhild wrote:
Hjelp,jeg skal dele til bol og armer og har 263 m etter pil nr 3, størrelse m. Så skal det strikkes 50 m,66 m på tråd til arm + legge til 6 m,så strikke 99 m,så 66 på tråd + 6. nye,og så strikke 50 m. Det blir jo 312 + 12 nye. Hva er det jeg ikke har forstått? Mvh Audhild
14.02.2025 - 15:29DROPS Design answered:
Hej, i størrelse M skal du først dele til bol og ermer når du har taget ud ifølge Pil-6 og har 331 masker (50+66+99+66+50) på pinden. 50+6+99+6+50=211 masker til BOL :)
18.02.2025 - 10:31
![]() Mima Suvalija wrote:
Mima Suvalija wrote:
Kan oppskrift sendes i posten?
19.04.2024 - 21:31DROPS Design answered:
Hei Mima. Du kan laste ned oppskriften og skrive de ut. Har du ikke printer, kontakt ditt lokale bibliotekt, mulig de kan hjelpe. mvh DROPS Design
22.04.2024 - 13:00
![]() Laura Cole wrote:
Laura Cole wrote:
Are there instructions for knitting in the round and steeking?
07.09.2023 - 17:31DROPS Design answered:
Dear Mrs Cole, there is no extra pattern with steek stitches, but this video might help you. Happy knitting!
08.09.2023 - 07:51
![]() Ann wrote:
Ann wrote:
Picking up sts for the underarm, there appears to be an error. Size L 72 sts plus 8 from cast on = 80 sts. Moving on to the next point, markers and dividing we now appear to have 8 extra sts…. Where did they come from ?
08.01.2023 - 14:36DROPS Design answered:
Dear Ann, in this paragrah M, L, XL, XXL and XXXL:, L is now the 2nd size, ie insert 1 marker in the first stitch after the middle, count 39 stitches, insert 1 marker in next stitch = 39 stitches remain on round after stitch with marker = 1+39+1+39=80 sts. Happy knitting!
09.01.2023 - 10:16
![]() Melanie wrote:
Melanie wrote:
Hallo, wird die passe in runden gestrickt und dann später aufgetrennt? Oder wird das Muster hin und zurück gestrickt?
09.10.2022 - 19:31DROPS Design answered:
Liebe Melanie, die Passe stricken Sie in Hin- und Rückreihen vom Anfang bis zur Ende, nur die Ärmel werden in Runden gestrickt. Viel Spaß beim stricken!
10.10.2022 - 09:27
![]() Fernando wrote:
Fernando wrote:
Hacen envíos de los materiales a Japón? Como hago para pedir y comprar los materiales? Gracias!
11.11.2021 - 01:28DROPS Design answered:
Hola Fernando, puedes consultar las tiendas con envío internacional en el siguiente enlace: https://www.garnstudio.com/findastore.php?s=w&cid=19
14.11.2021 - 19:11
![]() Fernando wrote:
Fernando wrote:
Hola! Muchas gracias por tanta inspiración! Quiero preguntar si envían materiales a Japón. Me gustaría comprar de ustedes las llamas necesarias. Es posible? Como lo hago? Gracias!
11.11.2021 - 01:26
![]() JOHAN Catherine wrote:
JOHAN Catherine wrote:
Bonjour. J'ai imprimé le modèle de gilet 217-9. Mais les pages où se trouvent les diagrammes ne s'impriment pas. De même pour la page où se trouvent les dimensions du tricot. Pouvez vous le dire comment faire ? J'attends votre réponse pour commander la laine. Merci.
28.04.2021 - 10:38DROPS Design answered:
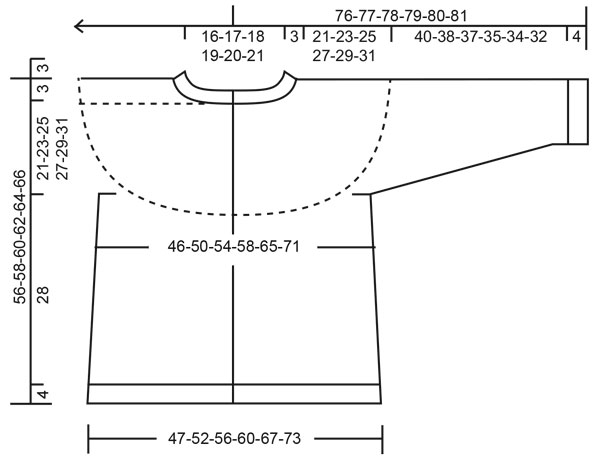
Bonjour Mme Johan, j'ai pu imprimer ce modèle pour tester et tout à bien fonctionné. Pensez à vérifier les paramètres de votre imprimante pour que toutes les pages soient imprimées, les diagrammes se trouvent sur les pages 7 et 8 et le schéma des mesures sur la page 9. Bon tricot!
28.04.2021 - 11:23
![]() Alison MacDonaldcan I wrote:
Alison MacDonaldcan I wrote:
Can I have this pattern in English please? Mange tak. Alison
01.11.2020 - 13:02DROPS Design answered:
Dear Alison, you can change the language under the photo in the pattern. The UK English version is here: https://www.garnstudio.com/pattern.php?id=9894&cid=19
01.11.2020 - 16:10
![]() Sofia Broborg wrote:
Sofia Broborg wrote:
Hej! Vart har A1 tagit vägen? Ni har skrivit att ni lagt ut det men det finns inte där, men två måttskisser i stället... 😅
29.09.2020 - 21:26DROPS Design answered:
Hej Sofia. A.1 finns precis över måttskissen (jag ser bara en måttskiss). Kanske du måste uppdatera sidan eller byta webläsare för att se det? Mvh DROPS Design
30.09.2020 - 07:11
|
|||||||||||||
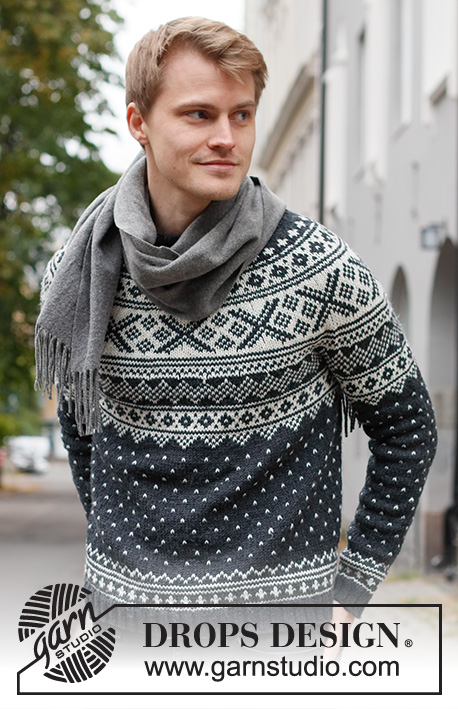
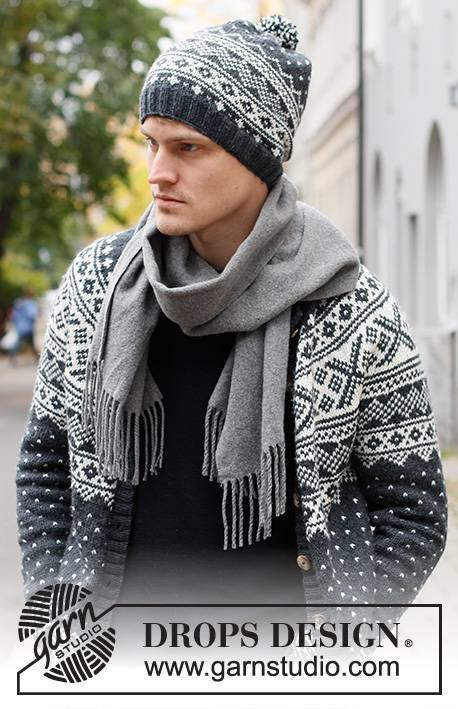
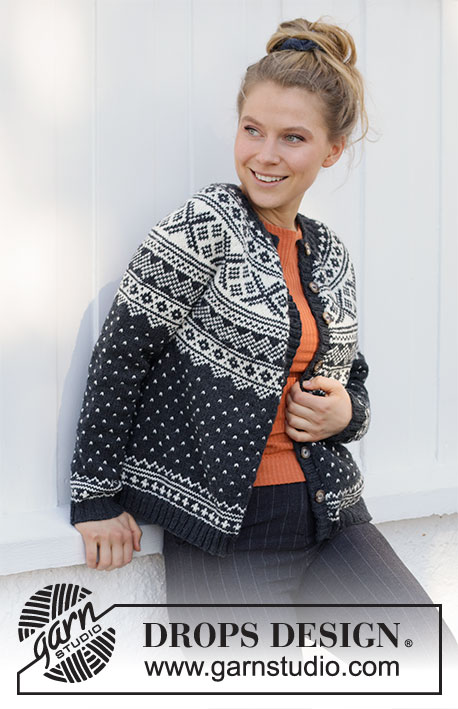
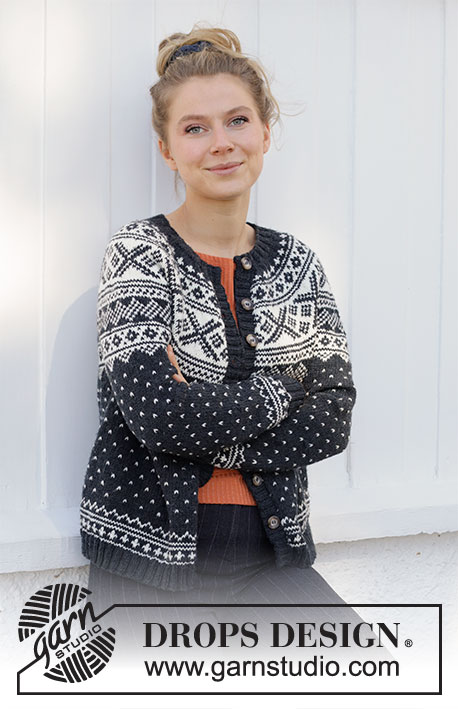
Winter's Night Enchantment Jacket#wintersnightenchantmentjacket |
|||||||||||||
 |
 |
||||||||||||
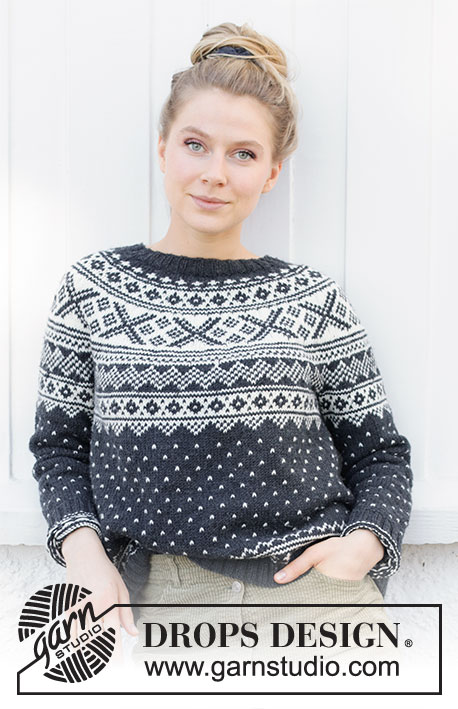
Knitted jacket in DROPS Karisma. Piece knitted top down with round yoke and Nordic pattern. Size: S - XXXL
DROPS 217-9 |
|||||||||||||
|
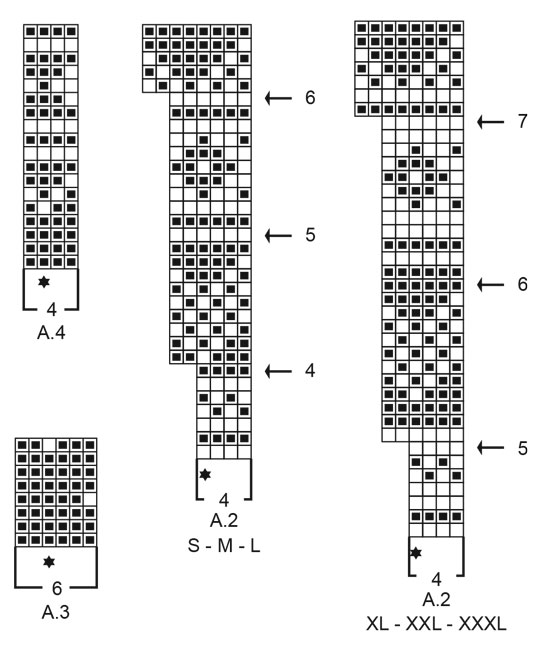
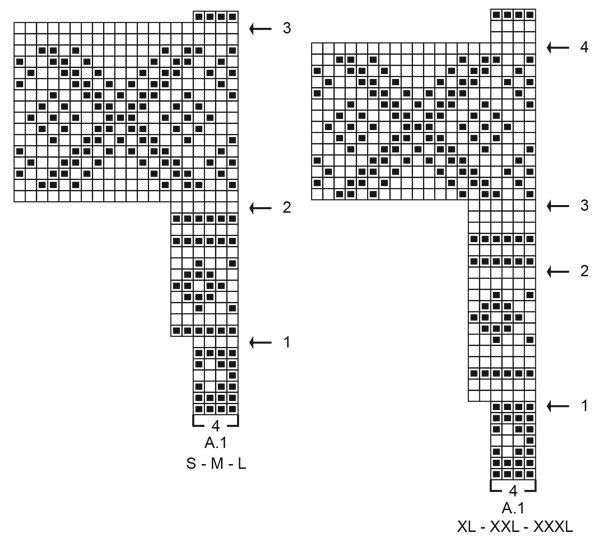
------------------------------------------------------- EXPLANATION FOR THE PATTERN: ------------------------------------------------------- GARTER STITCH (back and forth): Knit all rows. 1 ridge vertically = knit 2 rows. INCREASE TIP (evenly): To calculate how to increase evenly, use the total number of stitches on row (e.g. 94 stitches) minus edge stitches (e.g. 2 edge stitches) and divide the remaining 92 stitches by number of increases to be done (e.g. 29) = 3.2. In this example increase by making 1 yarn over after approx. every 3rd stitch (do not increase over edge stitches). On next row work yarn overs twisted to avoid holes ELEVATION (in back of neck): To make the jacket higher in the back of neck when working round yoke work an elevation as explained below. Skip this paragraph if you do not want an elevation. Insert 1 marker in the middle stitch on row. Begin from right side with anthracite and knit 12-13-14-15-15-16 stitches past stitch with marker, turn, tighten yarn and purl 25-27-29-31-31-33. Turn, tighten yarn and knit 37-40-43-46-46-49, turn, tighten yarn and purl 49-53-57-61-61-65. Turn, tighten yarn and knit 61-66-71-76-76-81, turn, tighten yarn and purl 73-79-85-91-91-97, turn, tighten yarn and knit the rest of row (work band in garter stitch). Work 1 row from wrong side. Then work YOKE as explained in pattern. PATTERN: See diagrams A.1 to A.4. Choose diagram for your size (applies to A.1 and A.2). Work the entire pattern in stocking stitch. KNITTING TIP: To avoid the garment losing elasticity when working pattern, it is important not to tighten the strands on back side of piece. Switch to a higher needle number when working pattern if the pattern is somewhat tight. If the knitting tension is wrong vertically and the garment is worked to tight, it will be too short and the armhole will be too small - this can be adjusted by working 1 row more evenly in the sections with one colour. If the garment is too loose, it will be too long and the armhole too big, this can be adjusted by working 1 row less in the sections in one colour. DECREASE TIP (applies to mid under sleeves): Decrease 2 stitches mid under sleeve as follows: S: Work until 2 stitches remain before marker mid under sleeve, knit 2 together with anthracite, marker, knit 2 twisted together with anthracite (= 2 stitches decreased). M, L, XL, XXL and XXXL: Work until 2 stitches remain before stitch with marker, knit 2 together with anthracite, knit stitch with marker with anthracite, knit 2 twisted together with anthracite (= 2 stitches decreased). BUTTONHOLE ON NECK EDGE: When neck edge measures 1½ to 2 cm, decrease for 1 buttonhole on right side of neck edge (when garment is worn). Decrease from right side when 5 stitches remain on row as follows: Make 1 yarn over, purl the next 2 stitches together, knit 2, and finish with 1 edge stitch in garter stitch. On next row (wrong side) knit the yarn over to make a hole. CAST-OFF TIP: To avoid a tight cast-off edge you may use a larger needle size. If this also is too tight, work a 1 yarn over after approx. every 4th stitch while casting off (cast off yarn overs as regular stitches). ------------------------------------------------------- START THE PIECE HERE: ------------------------------------------------------- JACKET - SHORT OVERVIEW OF THE PIECE: Work neck edge and yoke back and forth on circular needle from mid front, top down. Now divide yoke for body and sleeves. Work body back and forth on circular needle from mid front, top down. Work sleeves in the round on double pointed needles/short circular needle, top down. Work the bands at the end. NECK EDGE: Cast on 104-108-112-116-120-124 stitches (including 6 band stitches in each side towards mid front) on circular needle size 3 mm with anthracite. Purl 1 row (= wrong side). Work next row as follows from right side: 1 edge stitch in GARTER STITCH – read explanation above, * knit 2, purl 2 *, work from *-* until 3 stitches remain, knit 2, and finish with 1 edge stitch in garter stitch. Continue rib like this for 3 cm – remember BUTTONHOLE in right side – read explanation above. When rib has been worked, switch to circular needle size 4 mm. Work next row as follows from right side: Cast off the first 6 stitches (fasten band here later), make 1 yarn over, knit the next 92-96-100-104-108-112 stitches AT THE SAME TIME increase 29-29-33-33-37-41 stitches evenly over these 92-96-100-104-108-112 stitches - read INCREASE TIP, then work rib as before over the next 5 stitches and finish with 1 edge stitch in garter stitch. Turn and cast off the first 6 stitches, make 1 yarn over (on next row, knit yarn over twisted to avoid hole) and purl the rest of the stitches, apart from the yarn overs which are purled twisted (avoid holes) and edge stitches (the outermost stitch on each side of the piece) which are worked in garter stitch = 123-127-135-139-147-155 stitches on row. Insert 1 marker after edge stitch at the beginning of row mid front, measure yoke from this marker! Now work an ELEVATION in the back of neck - read explanation above. If you do not want an elevation, skip directly to YOKE. YOKE: Work 0-0-2-2-4-6 rows in stocking stitch with anthracite and 1 edge stitch in garter stitch in each side towards mid front. Read KNITTING TIP and work next row as follows from right side: 1 edge stitch in garter stitch, work A.1 until 2 stitches remain on row (= 30-31-33-34-36-38 repetitions of 4 stitches), work first stitch in A.1 (so that pattern begins and ends the same way in each side towards mid front), and finish with 1 edge stitch in garter stitch. Continue pattern like this. When A.1 has been worked vertically, work A.2 the same way. REMEMBER THE KNITTING TENSION! AT THE SAME TIME on every row marked with arrow in A.1 and A.2, increase stitches evenly as explained below - remember INCREASE TIP: SIZE S, M and L: Arrow-1: Increase 36-38-42 stitches evenly = 159-165-177 stitches (there is now room for 26-27-29 repetitions of 6 stitches). Arrow-2: Increase 64-58-66 stitches evenly = 223-223-243 stitches (there is now room for 11-11-12 repetitions of 20 stitches). Arrow-3: Increase 32-40-36 stitches evenly = 255-263-279 stitches (there is now room for 63-65-69 repetitions of 4 stitches). Arrow-4: Increase 30-34-36 stitches evenly = 285-297-315 stitches (there is now room for 47-49-52 repetitions of 6 stitches). Arrow-5: Increase 24-30-36 stitches evenly = 309-327-351 stitches (there is now room for 51-54-58 repetitions of 6 stitches). Arrow-6 (only applies to M and L since S is divided for body and sleeves before this border begins): Increase 4-4 stitches evenly = 309-331-355 stitches (there is now room for 41-44 repetitions of 8 stitches in M and L). SIZE XL, XXL and XXXL: Arrow-1: Increase 44-48-52 stitches evenly = 183-195-207 stitches (there is now room for 30-32-34 repetitions of 6 stitches). Arrow-2: Increase 42-48-54 stitches evenly = 225-243-261 stitches (there is now room for 37-40-43 repetitions of 6 stitches). Arrow-3: Increase 18-20-22 stitches evenly = 243-263-283 stitches (there is now room for 12-13-14 repetitions of 20 stitches). Arrow-4: Increase 60-64-68 stitches evenly = 303-327-351 stitches (there is now room for 75-81-87 repetitions of 4 stitches). Arrow-5: Increase 54-54-60 stitches evenly = 357-381-411 stitches (there is now room for 59-63-68 repetitions of 6 stitches). Arrow-6: Increase 30-30-30 stitches evenly = 387-411-441 stitches (there is now room for 64-68-73 repetitions of 6 stitches). Arrow-7: Increase 8-8-10 stitches evenly = 395-419-451 stitches (there is now room for 49-52-56 repetitions of 8 stitches. ALL SIZES: Work until piece measures 21-23-25-27-29-31 cm from marker in neck. NOTE! In some sizes some rows of A.2 will remain when piece is divided for body and sleeves - finish the rest of A.2 on body and sleeves. Divide the yoke for body and sleeves as follows: Work 46-50-53-58-64-70 stitches as before (= front piece), slip the next 63-66-72-82-82-86 stitches on 1 stitch holder for sleeve, cast on 6-6-8-8-10-10 new stitches on row (= in the side under sleeve), work 91-99-105-115-127-139 stitches as before (= back piece), slip the next 63-66-72-82-82-86 stitches on 1 stitch holder for sleeve, cast on 6-6-8-8-10-10 new stitches on row (= in the side under sleeve) and work the remaining 46-50-53-58-64-70 stitches as before (= front piece). Finish body and sleeves separately. NOW MEASURE PIECE FROM HERE! BODY: = 195-211-227-247-275-299 stitches. Finish A.2, with 1 edge stitch in garter stitch in each side towards mid front - make sure that pattern fits nicely over A.2 on yoke but note that pattern does not fit under sleeves in all sizes when working the last rows in A.2. When A.2 has been worked, work next row as follows from right side: 1 edge stitch in garter stitch, work A.3 until 2 stitches remain on row and increase 6-8-10-8-10-10 stitches evenly over these stitches, work first stitch in A.3 (so that pattern begins and ends the same way in each side towards mid front), and finish with 1 edge stitch in garter stitch = 201-219-237-255-285-309 stitches on row. There is now room for 33-36-39-42-47-51 repetitions A.3 of 6 stitches. Repeat A.3 vertically until piece measures approx. 22 cm from division in all sizes, but finish after a row with dots. Approx. 10 cm remain until finished measurements, try the jacket on and work A.3 in the until desired length. Work next row as follows from wrong side: 1 edge stitch in garter stitch, work first stitch in A.4 (seen from right side), work A.4 until 1 stitch remains on row (read diagram from left to right when working from wrong side) and increase at the same time 2-0-2-0-2-2 stitches evenly over these stitches, finish with 1 edge stitch in garter stitch = 203-219-239-255-287-311 stitches on row. There is now room for 50-54-59-63-71-77 repetitions A.4 of 4 stitches. When A.4 has been worked, piece measures approx. 28 cm from division. Work the rest of the body in anthracite. Purl 1 row from wrong side while increasing 45-49-53-57-65-69 stitches evenly = 248-268-292-312-352-380 stitches. Increase stitches to avoid the rib from contracting when working the piece together. Switch to circular needle size 3 mm and work first row from right side as follows: 1 edge stitch in garter stitch, * knit 2, purl 2 *, repeat from *-* until 3 stitches remain on needle, knit 2, and finish with 1 edge stitch in garter stitch. Continue rib like this for 4 cm. Cast off stitches with knit over knit and purl over purl - read CAST OFF TIP! Jacket measures approx. 56-58-60-62-64-66 cm from shoulder and down. SLEEVES: Slip the 63-66-72-82-82-86 stitches from stitch holder in one side of piece on double pointed needles or a short circular needle size 4 mm – pick in addition up 1 stitch in each of the 6-6-8-8-10-10 stitches cast on under sleeve = 69-72-80-90-92-96 stitches. Now insert 2 markers in piece (this is done without working the stitches): S: Insert 1 marker mid under sleeve between the middle 6 stitches, count 34 stitches, insert 1 marker in next stitch = 34 stitches remain on round after stitch with marker. M, L, XL, XXL and XXXL: Begin mid under sleeve between the 6-8-8-10-10 stitches, insert 1 marker in the first stitch after the middle, count 35-39-44-45-47 stitches, insert 1 marker in next stitch = 35-39-44-45-47 stitches remain on round after stitch with marker. ALL SIZES: Move markers upwards when working. Use marker later when decreasing mid under sleeve. Use marker mid on top of sleeve when counting out where pattern should start. Then work PATTERN at the same time DECREASE mid under sleeve as explained below - read the rest of sleeve before continuing: PATTERN: Begin round mid under sleeve and finish A.2 the same way as on body, but count outwards from the middle of sleeve where pattern should begin - stitch with marker mid on top of sleeve should fit stitch marked with star in A.2 (decrease under sleeve while working the pattern). When A.2 has been worked, work A.3 in the round the same way. Repeat A.3 vertically until sleeve measures approx. 34-32-31-29-28-26 cm from division, but finish after a round with dots. NOTE! Shorter measurements in the larger sizes because of wider neck and longer yoke. Approx. 10 cm remain until finished measurements, try the jacket on and work A.3 in the until desired length. Then work A.4 in the round. DECREASE: AT THE SAME TIME when sleeve measures 3 cm from division in all sizes, decrease 2 stitches mid under sleeve - read DECREASE TIP. Decrease like this every 3-2½-2-1½-1½-1½ cm 12-13-16-20-20-20 times in total = 45-46-48-50-52-56 stitches. When A.4 has been worked and decreases are done, sleeve measures approx. 40-38-37-35-34-32 cm from division. Work the rest of the sleeve in anthracite. Knit 1 round while increasing 7-6-8-10-8-8 stitches evenly = 52-52-56-60-60-64 stitches. Switch to double pointed needles size 3 mm. Work rib in the round = knit 2/purl 2 for 4 cm. Cast off with knit over knit and purl over purl - remember CAST-OFF TIP. Sleeve measures approx. 44-42-41-39-38-36 cm from division. Work the other sleeve the same way. LEFT BAND (when garment is worn): Pick up from right side inside 1 edge stitch in garter stitch approx. 132-136-144-148-152-160 stitches along mid front piece on circular needle size 3 mm with anthracite (number of stitches should be divisible by 4). Work first row as follows from wrong side: 1 edge stitch in garter stitch, * purl 2, knit 2 *, repeat from *-* until 3 stitches remain on needle, purl 2 and finish with 1 edge stitch in garter stitch. Continue rib like this for approx. 3 cm – adjust so band is the same width as the 6 stitches cast off in the neck edge. Cast off stitches with knit over knit and purl over purl. RIGHT BAND: Work the same way as left band but after approx. 1 to 1½ cm decrease evenly for 6-6-6-7-7-7 buttonholes. Place bottom buttonhole approx. 10 cm from bottom edge, and place top buttonhole approx. 7-7-7-8-8-8 cm from buttonhole on neck edge. NOTE! It will look better to decrease in a purl section (seen from right side) by making 1 yarn over and then purling 2 stitches together. On next row knit yarn overs to make holes. ASSEMBLY: Sew edge at the top of band neatly to neck edge inside 1 edge stitch with seam in towards wrong side. Sew the buttons on to the left band. |
|||||||||||||
Diagram explanations |
|||||||||||||
|
|||||||||||||
|
|||||||||||||
|
|||||||||||||
|
|||||||||||||
Have you finished this pattern?Tag your pictures with #dropspattern #wintersnightenchantmentjacket or submit them to the #dropsfan gallery. Do you need help with this pattern?You'll find 33 tutorial videos, a Comments/Questions area and more by visiting the pattern on garnstudio.com. © 1982-2025 DROPS Design A/S. We reserve all rights. This document, including all its sub-sections, has copyrights. Read more about what you can do with our patterns at the bottom of each pattern on our site. |
|||||||||||||


With over 40 years in knitting and crochet design, DROPS Design offers one of the most extensive collections of free patterns on the internet - translated to 17 languages. As of today we count 314 catalogues and 11822 patterns translated into English (UK/cm). 11822
We work hard to bring you the best knitting and crochet have to offer, inspiration and advice as well as great quality yarns at incredible prices! Would you like to use our patterns for other than personal use? You can read what you are allowed to do in the Copyright text at the bottom of all our patterns. Happy crafting!
Post a comment to pattern DROPS 217-9
We would love to hear what you have to say about this pattern!
If you want to leave a question, please make sure you select the correct category in the form below, to speed up the answering process. Required fields are marked *.