Elegant Emerald by DROPS Design

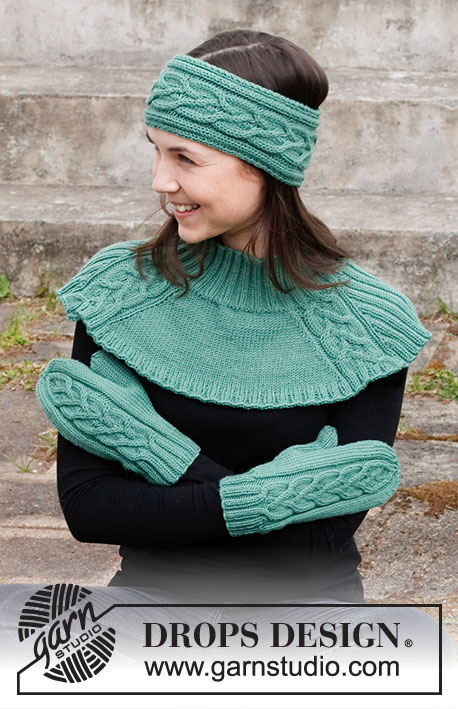
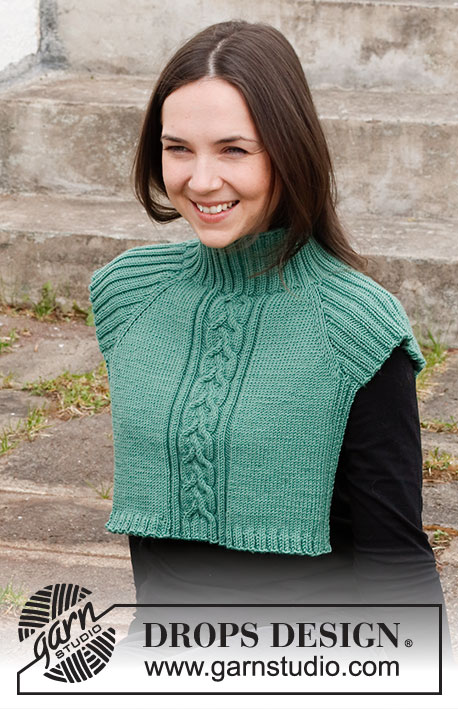
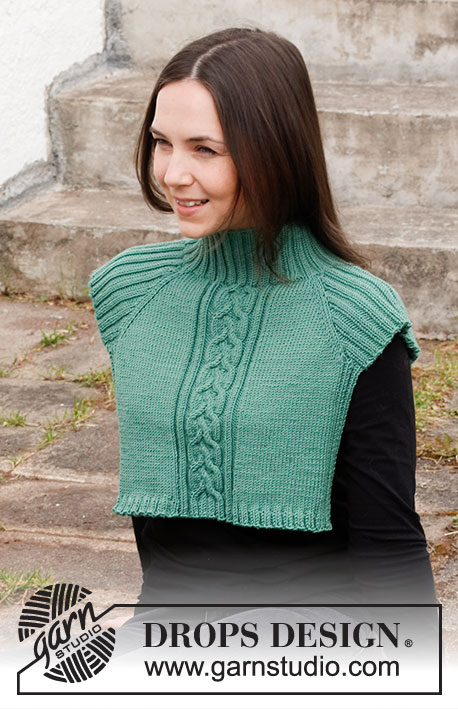
Knitted neck warmer in DROPS Merino Extra Fine. The piece is worked top down with raglan and cables. Sizes S - XXXL.

DROPS 214-36
DROPS Design: Pattern no me-216
Yarn group B
-------------------------------------------------------

SIZES:
S/M - L/XL - XXL/XXXL
The piece measures approx.: Shoulder-width = 46-48-54 cm = 18"-19"-21 1/4". Length = 34-35-38 cm = 13 3/8"-13 3/4"-15" from shoulder down.

MATERIALS:
DROPS MERINO EXTRA FINE from Garnstudio (belongs to yarn group B)
250-250-300 g color 31, forest green.

KNITTING GAUGE:
21 stitches in width and 28 rows in height with stockinette stitch = 10 x 10 cm = 4” x 4”.

NEEDLES:
DROPS CIRCULAR NEEDLE SIZE 4 MM = US 6: Length 40 cm = 16” and 60 cm = 24” or 80 cm = 32”.
DROPS CIRCULAR NEEDLE SIZE 3 MM = US 2,5: Length 40 cm = 16” and 60 cm = 24” for rib.
DROPS CABLE NEEDLE – for cables.
Needle size is only a guide. If you get too many stitches on 10 cm = 4”, change to a larger needle size. If you get too few stitches on 10 cm = 4”, change to a smaller needle size.

-------------------------------------------------------

Knitting tension – See how to measure it and why here
Alternative Yarn – See how to change yarns here
Yarn Groups A to F – Use the same pattern and change the yarn here
Yarn usage using an alternative yarn – Use our yarn converter here

-------------------------------------------------------


100% Wool
from 2.80 $ /50g
DROPS Merino Extra Fine uni colour DROPS Merino Extra Fine uni colour 2.80 $ /50g
Wool Warehouse Direct Ltd
Order
DROPS Merino Extra Fine mix DROPS Merino Extra Fine mix 2.80 $ /50g
Wool Warehouse Direct Ltd
Order
needles DROPS Needles & Hooks
You can get the yarn to make this pattern from 14.00$. Read more.

Pattern instructions

NOTE: This pattern is written in American English. All measurements in charts are in cm. For conversion from inches to cm - click here. There are different terms for crocheting in American and British English. If this pattern includes crochet, click for "crochet terms" here. For this pattern in British English, please click here.
-------------------------------------------------------

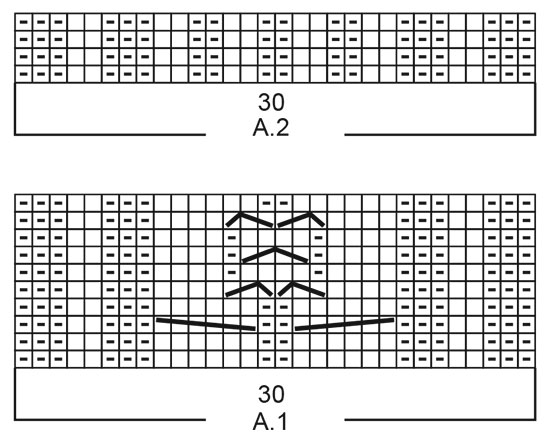
EXPLANATIONS FOR THE PATTERN:

-------------------------------------------------------

RIDGE/GARTER STITCH (worked back and forth):
Knit all rows.
1 ridge in height = Knit 2 rows.

PATTERN:
See diagrams A.1 and A.2.

INCREASE TIP (evenly spaced):
To work out how to increase evenly, count the total number of stitches on the needle (e.g. 44 stitches) and divide by the number of increases to be made (e.g. 4) = 11.
In this example, increase by making 1 yarn over after each 11th stitch. On the next row/round work the yarn overs twisted to avoid holes.

RAGLAN:
Increase 1 stitch on each side of the marker threads in each transition between body and shoulders (8 stitches increased on each increase-round): Work until there is 1 stitch left before marker thread, 1 yarn over, knit 2 (marker thread sits between these 2 stitches), 1 yarn over (= 2 stitches increased). On the next row work the yarn overs twisted to avoid holes. Then the new stitches are worked in stockinette stitch on the front and back pieces, and in rib on the shoulders (= knit 2, purl 2).

BINDING-OFF TIP:
To avoid the bind-off edge being tight you can bind off with a larger size needle. If the edge is still tight, make 1 yarn over after approx. each 4th stitch at the same time as binding off; the yarn overs are bind off as normal stitches.

-------------------------------------------------------

START THE PIECE HERE:

-------------------------------------------------------

NECK WARMER – SHORT OVERVIEW OF THE PIECE:
The neck and yoke are worked in the round with circular needle, top down. The yoke is divided for the front/back pieces and shoulders. Then stitches are knitted up along the shoulder-edges and the front and back pieces finished separately, back and forth.

NECK:
Cast on 124-132-132 stitches with circular needle size 3 mm = US 2,5 and Merino Extra Fine. Knit 1 round. Then work rib (= knit 2, purl 2) in the round for 8 cm = 3 1/8".
The next round is worked as follows: Knit 2, then knit 44-44-44 and at the same time increase 4 stitches evenly spaced over these stitches – read INCREASE TIP, knit 18-22-22, knit 44-44-44 and at the same time increase 4 stitches evenly spaced over these stitches, knit 16-20-20 = 132-140-140 stitches. Change to circular needle size 4 mm = US 6. Knit 1 round. Insert 1 marker after the 26th stitch on the round (= mid back), the yoke is measured from this marker!

YOKE:
Now insert 4 marker threads as follows: Knit 1 and insert the first marker thread after this stitch (= transition between left shoulder and back piece – this is now the beginning of the round). Insert the other 3 marker threads without working the stitches as follows: Skip the next 50-50-50 stitches, insert a marker thread here (= transition between back piece and right shoulder), skip the next 16-20-20 stitches, insert a marker thread here (= transition between right shoulder and front piece), skip the next 50-50-50 stitches, insert a marker thread here (= transition between front piece and left shoulder), there are 16-20-20 stitches left on the round after the last marker thread.
Now work pattern as follows: * Knit 1, make 1 yarn over, knit 9-9-9, work A.1 over the next 30 stitches, knit 9-9-9, make 1 yarn over, knit 2 (marker thread is between these 2 stitches), make 1 yarn over, work rib (purl 2, knit 2) over the next 12-16-16 stitches, purl 2, make 1 yarn over, knit 1, (marker thread here) *, work from *-* 1 more time = 8 stitches increased for RAGLAN – read description above. Continue this pattern in the round and increase to raglan every 2nd round a total of 15-15-19 times = 252-260-292 stitches. REMEMBER THE KNITTING GAUGE! When all the increases are finished the piece measures approx. 11-11-14 cm = 4 3/8"-4 3/8"-5 1/2" from the marker by the neck. If the piece is shorter than this, continue working to the correct length – make sure you finish after an odd row in A.1. The next round is worked as follows: Work as before over the first 81-81-89 stitches and place these stitches on a thread (= back piece), work the next 44-48-56 stitches and place these on a thread (= right shoulder), work the next 82-82-90 stitches and place these on a thread (= front piece), work the next 44-48-56 stitches (= left shoulder) and leave these stitches on the needle. Move the last stitch onto the thread with the stitches for the back piece (= 82-82-90 stitches on the back piece). The raglan lines are now on the front/back pieces. All sections are finished separately, back and forth.

LEFT SHOULDER:
= 44-48-56 stitches. Work rib back and forth as before with 1 edge stitch in GARTER STITCH – read description above, on each side. After working 8 rows bind off with knit over knit and purl over purl.

RIGHT SHOULDER:
Work in the same way as the right shoulder.

FRONT PIECE:
Start from the right side with circular needle size 4 mm = US 6 and Merino Extra Fine, and knit up 8 stitches in each edge stitch along the side of the right shoulder (the 8 rows of rib), work the 82-82-90 stitches from the thread for the front piece as before, knit up 8 stitches in each edge stitch along the side of the left shoulder (the 8 rows of rib) = 98-98-106 stitches. Work the next row from the wrong side as follows: Purl 2, knit 2, purl 2, knit 2, pattern as before over the next 82-82-90 stitches, knit 2, purl 2, knit 2, purl 2.
Continue back and forth like this; i.e. pattern as before with 8 stitches in rib on either side (the outermost 2 stitches are in stockinette stitch to allow the edges to roll inwards). Continue like this until the piece measures approx. 18-18-18 cm = 7"-7"-7" from the division (where stitches were knitted up on each side) – adjust to finish after row 4 in A.1. Now increase 8-8-8 stitches evenly spaced – read INCREASE TIP, on each side of A.1 (do not increase over the ribbed sections) = 114-114-122 stitches.
Change to circular needle size 3 mm = US 2,5 and work 1 row back with knit over knit and purl over purl. Now work from the right side as follows: Rib as before over the first 8 stitches and (= knit 2, purl 2) over the next 34-34-38 stitches, work A.2 over A.1, rib (= knit 2, purl 2) over the next 34-34-38 stitches and rib as before over the last stitches. Continue this rib for a total of 4 rows. Bind off with knit over knit and purl over purl – read BINDING-OFF TIP. The neck warmer measures 34-35-38 cm = 13 3/8"-13 3/4"-15" from the shoulder down.

BACK PIECE:
Work in the same way as the front piece.

Diagram

All measurements in charts are in cm.

symbols = knit from the right side, purl from the wrong side
symbols = purl from the right side, knit from the wrong side
symbols = place 4 stitches on cable needle behind piece, knit 2, knit 4 from cable needle
symbols = place 2 stitches on cable needle in front of piece, knit 4, knit 2 from cable needle
symbols = place 2 stitches on cable needle in front of piece, purl 1, knit 2 from cable needle
symbols = place 1 stitch on cable needle behind piece, knit 2, purl 1 from cable needle
symbols = place 2 stitches on cable needle in front of piece, knit 2, knit 2 from cable needle
diagram

Do you need help with this pattern?

Thank you for choosing a DROPS Design pattern. We take pride in providing patterns that are correct and easy to understand. All patterns are translated from Norwegian and you can always check the original pattern (DROPS 214-36) for measurements and calculations.

Are you having trouble following the pattern? See below for a list of resources to help you finish your project in no time - or why not, learn something new.

signature-image signature

Are you having trouble following the pattern? See below for a list of resources to help you finish your project in no time - or why not, learn something new.

Each of our patterns has specific tutorial videos to help you.

We have also step-by-step guides for different techniques which you'll find here.

1) Why is the knitting/crochet tension so important?

Knitting tension is what determines the final measurements of your work, and is usually measured per 10 x 10 cm. It is provided like so: number of stitches in width x number of rows in height - eg: 19 stitches x 26 rows = 10 x 10 cm.

The knitting tension is very individual; some people knit/crochet loosely while others work tightly. You adjust the knitting tension with the needle size, which is why the suggested needle size only serve as a guide! You need to adjust this (up or down) to ensure that YOUR knitting tension matches the knitting tension provided in the pattern. If you work with a different knitting tension than provided you will have a different yarn consumption, and your work will have different measurements than what the pattern suggests.

The knitting tension also determines which yarns can replace each other. As long as you achieve the same knitting tension you can replace one yarn with another.

See DROPS lesson: How to measure your tension/gauge

See DROPS video: How to make a gauge tension swatch

to top

2) What are the yarn groups?

All our yarns are categorised into yarn groups (from A to F) according to thickness and knitting tension – group A contains the thinnest yarns and group F the thickest. This makes it easier for you to find alternative yarns to our patterns, should you wish to switch yarn. All yarns within the same group have a similar knitting tension and can easily replace each other. However, different yarn qualities have different structures and properties which will give the finished work a unique look and feel.

Click here for an overview of the yarns in each yarn group

to top

3) Can I use a different yarn than what the pattern suggests?

The important thing when changing from one yarn to another is that the knitting/crochet tension remains the same. This is so that the measurements of the finished piece will be the same as on the sketch provided. It is easier to achieve the same knitting tension using yarns from the same yarn group. It is also possible to work with multiple strands of a thinner yarn to achieve the knitting tension of a thicker one. Please try our yarn converter. We recommend you to always work a test swatch.

Please NOTE: when changing yarn the garment might have a different look and feel to the garment in the photo, due to individual properties and qualities of each yarn.

See DROPS lesson: Can I use a different yarn than the one mentioned in the pattern?

to top

4) How do I use the yarn converter?

At the top of all our patterns you’ll find a link to our yarn converter, which is a helpful tool should you wish to use a different yarn than suggested. By filling in the yarn quality you wish to replace, the amount (in your size) and number of strands, the converter will present good alternative yarns with the same knitting tension. Additionally it will tell you how much you’ll require in the new qualities and whether you’ll need to work with multiple strands. Most skeins are 50g (some are 25g or 100g).

If the pattern is worked with multiple colours, every colour will have to be converted separately. Similarly, if the pattern is worked with several strands of different yarns (for example 1 strand Alpaca and 1 strand Kid-Silk) you will have to find alternatives for each, individually.

Click here to see our yarn converter

to top

5) Why do I get the wrong knitting tension with the suggested needle size?

The needle size provided in the pattern serves only as a guide, the important thing is to follow the knitting tension. And since knitting tension is very individual, you will have to adjust the needle size to ensure that YOUR tension is the same as in the pattern – maybe you’ll have to adjust 1, or even 2 needle sizes, up or down to achieve the correct tension. For this, we recommend that you work test swatches.

Should you work with a different knitting tension than the one provided, the measurements of the finished garment might deviate from the measurement sketch.

See DROPS lesson: How to measure your tension/gauge

See DROPS video: How to make a gauge tension swatch

to top

6) Why is the pattern worked top-down?

Working a garment top-down provides more flexibility and room for personal adjustment. For example it is easier to try the garment on while working, as well as making adjustments to length of yoke and shoulder caps.

The instructions are carefully explaining every step, in the correct order. Diagrams are adjusted to the knitting direction and are worked as usual.

to top

7) Why are the sleeves shorter in larger sizes?

The total width of the garment (from wrist-to-wrist) will be larger in the larger sizes, despite the actual sleeves being shorter. The larger sizes have longer sleeve caps and wider shoulders, so there will be a good fit in all sizes.

to top

8) What is a repeat?

Diagrams are often repeated on the round or in height. 1 repeat is the diagram the way it appears in the pattern. If it says to work 5 repeats of A.1 in the round, then you work A.1 a total of 5 times after/next to each other in the round. If it says to work 2 repeats of A.1 vertically/in height you work the entire diagram once, then begin again at the start and work the entire diagram one more time.

to top

9) How do I work according to a knitting diagram?

The diagram depicts all rows/rounds, and every stitch seen from the right side. It is read from bottom to top, from right to left. 1 square = 1 stitch.

When working back and forth, every other row is worked from the right side and every other row is worked from the wrong side. When working from the wrong side, the diagram will have to be worked reversed: from left to right, knit stitches are purled, purl stitches are knit etc.

When working in the round every round is worked from the right side and the diagram are worked from right to left on all rounds.

See DROPS lesson: How to read knitting diagrams

to top

10) How do I work according to a crochet diagram?

The diagram depicts all rows/rounds, and every stitch seen from the right side. It is worked from bottom to top, from right to left.

When working back and forth every other row is worked from the right side: from right to left and every other row is worked from the wrong side: from left to right.

When working in the round, every row in the diagram are worked from the right side, from right to left.

When working a circular diagram you start in the middle and work your way outwards, counter clockwise, row by row.

The rows usually start with a given number of chain stitches (equivalent to the height of the following stitch), this will either be depicted in the diagram or explained in the pattern.

See DROPS lesson: How to read crochet diagrams

to top

11) How do I work several diagrams simultaneously on the same row/round?

Instructions for working several diagrams after each other on the same row/round, will often be written like so: “work A.1, A.2, A.3 a total of 0-0-2-3-4 times". This means you work A.1 once, then A.2 is worked once, and A.3 is repeated (in width) the number of times provided for your size – in this case like so: S = 0 times, M = 0 times, L=2 times, XL= 3 times and XXL = 4 times.

The diagrams are worked as usual: begin with the first row in A.1, then work the first row in A.2 etc.

See DROPS lesson: How to read knitting diagrams

See DROPS lesson: How to read crochet diagrams

to top

12) Why does the piece start with more chain stitches than it’s worked with?

Chain stitches are slightly narrower than other stitches and to avoid working the cast-on edge too tight, we simply chain more stitches to begin with. The stitch count will be adjusted on the following row to fit the pattern and measurement sketch.

to top

13) Why increase before the rib edge when the piece is worked top-down?

The rib edge is more elastic and will contract slightly compared to, for example, stocking stitch. By increasing before the rib edge, you avoid a visible difference in width between the rib edge and the rest of the body.

to top

14) Why increase in the cast-off edge?

It’s very easy to cast off too tightly, and by making yarn overs while casting off (and simultaneously casting these off) you avoid a too tight cast off edge.

See DROPS video: How to bind off with yarn overs (yo)

to top

15) How do I increase/decrease on every 3rd and 4th row/round alternately?

To achieve an even increase (or decrease) you can increase on, for example: every 3rd and 4th row alternately, like so: work 2 rows and increase on the 3rd row, work 3 rows and increase on the 4th. Repeat this until the increase is complete.

See DROPS lesson: Increase or decrease 1 st on every 3rd and 4th row alternately

to top

16) Why is the pattern slightly different than what I see in the photo?

Pattern repeats can vary slightly in the different sizes, in order to get the correct proportions. If you’re not working the exact same size as the garment in the photo, yours might deviate slightly. This has been carefully developed and adjusted so that the complete impression of the garment is the same in all sizes.

Make sure to follow instructions and diagrams for your size!

to top

17) How can I work a jacket in the round instead of back and forth?

Should you prefer to work in the round instead of back and forth, you may of course adjust the pattern. You’ll need to add steeks mid-front (usually 5 stitches), and follow the instructions. When you would normally turn and work from the wrong side, simply work across the steek and continue in the round. At the end you’ll cut the piece open, pick up stitches to work bands, and cover the cut edges.

See DROPS video: How to knit steeks and cut open

to top

18) Can I work a jumper back and forth instead of in the round?

Should you prefer to work back and forth instead of in the round, you may of course adjust the pattern so you work the pieces separately and then assemble them at the end. Divide the stitches for the body in 2, add 1 edge stitch in each side (for sewing) and work the front and back pieces separately.

See DROPS lesson: Can I adapt a pattern for circular needles into straight needles?

to top

19) Why do you show discontinued yarns in the patterns?

Since different yarns have different qualities and textures we have chosen to keep the original yarn in our patterns. However, you can easily find options among our available qualities by using our yarn converter, or simply pick a yarn from the same yarn group.

It is possible that some retailers still have discontinued yarns in stock, or that someone has a few skeins at home that they would like to find patterns for.

The yarn converter will provide both alternative yarn as well as required amount in the new quality.

to top

20) How do I make a women’s size garment into a men’s size one?

If you have found a pattern you like which is available in women’s size it’s not very difficult to convert it to men’s size. The biggest difference will be the length of sleeves and body. Start working on the women size that you think would fit across the chest. The additional length will be worked right before you cast off for the armhole/sleeve cap. If the pattern is worked top-down you can add the length right after the armhole or before the first decrease on sleeve.

Regarding additional yarn amount, this will depend on how much length you add, but it is better with a skein too many than too few.

to top

21) How do I prevent a hairy garment from shedding?

All yarns will have excess fibres (from production) that might come off as lint or shedding. Brushed yarns (ie hairier yarns) have more of these loose, excess fibres, causing more shedding.

Shedding also depends on what is worn under or over the garment, and whether this pulls at the yarn fibres. It’s therefore not possible to guarantee that there will be no shedding

Below are some tips on how to get the best result when working with hairier yarns:

1. When the garment is finished (before you wash it) shake it vigorously so the looser hairs come off. NOTE: do NOT use a lint roller, brush or any method that pulls at the yarn.

2. Place the garment in a plastic bag and put it in your freezer - the temperature will cause the fibres to become less attached to each other, and excess fibres will come off easier.

3. Leave in the freezer for a few hours before taking it out and shaking it again.

4. Wash the garment according to the instructions on the yarn label.

to top

22) Where on the garment is the length measured?

The measurement sketch/schematic drawing provides information regarding the full length of the garment. If it’s a jumper or a jacket the length is measured from the highest point on the shoulder (usually closest to the neckline), and straight down to the bottom of the garment. It is NOT measured from the tip of shoulder. Similarly, the length of yoke is measured from the highest point on the shoulder and down to where yoke is split into body and sleeves.

See DROPS lesson: How to read a schematic drawing

to top

23) How do I know how many balls of yarn I need?

The required amount of yarn is provided in grams, eg: 450 g. To calculate how many balls you’ll need you first need to know how many grams are in 1 ball (25g, 50g or 100g). This information is available if you click on the individual yarn quality on our pages. Divide the amount required with the amount of each ball. For example, if each ball is 50g (the most common amount), the calculation will be as follows: 450 / 50 = 9 balls.

to top

Have you purchased DROPS yarn to make this pattern? Then you are entitled to receive help from the store where you bought the yarn. Find a list of DROPS stores here!
Still can't find the answer you need? Then scroll down and leave your question so one of our experts can try to help you. This will be done normally within 5 to 10 working days. In the meantime, you can read the questions and answers that others have left to this pattern or join the DROPS Workshop on Facebook to get help from fellow knitters/crocheters!

Comments / Questions (14)

country flag Lyse Goyette wrote:

Bonjour est ce qu'il y aurait une erreur dans le nombre de fois d'augmentations pour la 2ième grandeur , ( moi il me manque 5 augmentations .... Merci de votre réponse ...

23.08.2022 - 05:35

DROPS Design answered:

Bonjour Mme Goyette, vous avez 140 m avant le raglan, vous augmentez 15 fois 8 mailles = 140 +(15*8)= 260 mailles quand toutes les augmentations des raglans ont été faites. En espérant que ceci puisse vous aider. Bon tricot!

23.08.2022 kl. 08:06

country flag Margaret Sedgwick wrote:

Hi, would love to knit this lovely pattern, but just cannot use circular needles. Help! Please. Thank you.

15.01.2022 - 09:14

DROPS Design answered:

Dear Mrs Sedgwick, this lesson might help you to adapt this pattern into straight needles. Happy knitting!

17.01.2022 kl. 08:09

country flag GRETA VANTWEMBEKE wrote:

Cet possible d'avoirle potron en nerlandais svp

19.11.2021 - 20:07

DROPS Design answered:

Bonjour Mme Vantwembeke, tout à fait, cliquez sur le menu déroulant sous la photo et sélectionnez "nederlands" - Bon tricot!

22.11.2021 kl. 07:16

country flag Josee Brunette wrote:

Bonjour.. je tricote l'empiècement. J'ai terminé les augmentations pour le Raglan et j'ai atteint le nombre de mailles requis cependant, je n'ai pas la longueur demandé. Selon les instructions, je dois continuer jusqu'à la longueur indiquée. Dois-je aussi continuer les augmentations?? Merci à l'avance Josée

21.09.2021 - 01:10

DROPS Design answered:

Bonjour Mme Brunette, si votre tension en hauteur n'est pas juste, tricotez simplement comme avant jusqu'à la hauteur indiquée, mais n'augmentez plus, pensez à bien arrêter après un rang impair de A.1 pour que le tour suivant (lorsque vous divisez l'ouvrage) soit un tour pair de A.1. Bon tricot!

21.09.2021 kl. 09:08

country flag Josée Brunette wrote:

Bonjour, pour l'empiècement, j'ai 140 mailles. On me demande de tricoter 1 maille endroit marqueur - glisser 50 mailles, marqueur - 20 mailles marqueur - 50 mailles, marqueur - 20 mailles - marqueur. 1+50+20+50+20 égal 141 mailles. Pouvez vous m'expliquer ce que je ne comprends pas?? Merci

12.09.2021 - 20:18

DROPS Design answered:

Bonjour Mme Brunette, la 1ère maille ne compte pas, vous la tricotez pour décaler le début du tour, autrement dit vous avez: 50+20+50+20 = 140 mailles (la maille que vous avez tricoté avant de mettre le marqueur est maintenant la dernière maille du tour). Bon tricot!

13.09.2021 kl. 09:05

country flag Stephanie Bevis wrote:

Should the smaller sized needle be 3 mm (as noted in the pattern instructions) or 3.5 mm as stated in the list of equipment needed, please?

27.03.2021 - 19:00

DROPS Design answered:

Dear Stephanie, it seems it's a mistake of the equipment section: you use 3 mm needles, instead of 3.5 mm. We'll proceed to correct the mistake. Happy knitting!

28.03.2021 kl. 20:38

country flag Carin Perman wrote:

Beskrivning :sticka som förut över de första 81 mask.o sätt dem på en tråd sticka över nästa 44 och sätt på en tråd osv Jag undrar skall maskorna sitta kvar på rundstickan förklara den här biten av stickbeskr för mig Tack på förhand

19.02.2021 - 17:19

DROPS Design answered:

Hej Carin. Efter att du har satt maskor på tråden så ska du endast ha de 44 m till vänster axel kvar på stickan. Du stickar efter detta de olika delarna fram och tillbaka var för sig. Mvh DROPS Design

22.02.2021 kl. 11:37

country flag Adriana wrote:

Holaaa!! Consulta: a que le llaman extra fine cuando hablan del grosor del hilado?. Muchas gracias.

09.01.2021 - 01:35

DROPS Design answered:

Hola Adriana. Merino Extra Fine es una forma especial del hilo (cable spun). Normalmente es para agujas de 4-5 mm y 50 gr = aprox. 105 m. Estos hilos parecen voluminosos, pero al trabajar la labor tienen una textura bastante fina.

10.01.2021 kl. 12:21

country flag Nicole wrote:

Would love to see this as a pullover or cardigan pattern

09.11.2020 - 07:17

country flag Birgitte wrote:

Jeg er begyndt på denne, men synes ikke mine snoninger bliver som på billedet. Er det mig der har misforstået noget eller er der fejl i diagrammet?

11.10.2020 - 21:17

DROPS Design answered:

Hej Birgitte, starter du diagrammet i nederste højre hjørne og strikker opad? For at kunne sammenligne er du nødt til at vende dit arbejde om, så den vender samme vej som på billedet (da du strikker halsen ovenfra og ned). God fornøjelse!

12.10.2020 kl. 15:43

Post a comment to pattern DROPS 214-36

We would love to hear what you have to say about this pattern!

If you want to leave a question, please make sure you select the correct category in the form below, to speed up the answering process. Required fields are marked *.