
Looking for a yarn?


Comments / Questions (3)
![]() Petra wrote:
Petra wrote:
Meine Maschenprobe stimmt in der Breite aber nicht in der Länge (Anzahl der Reihen). In der Anleitung sollen die Zunahmen etc. nach einer bestimmtem cm-Zahl gemacht werden, soweit ich das beim Querlesen gesehen habe. Ist das richtig ? Ist das der Grund, weshalb im Kapitel "Maschenprobe" nur auf die Breite der Probe eingegangen wird und die Länge/Höhe unberücksichtigt bleibt ? Damit sollte die Anleitung für mich ohne Umrechnung passen, wenn ich nachmesse oder wie seht ihr das ? Danke
18.09.2022 - 10:06DROPS Design answered:
Liebe Petra, sollte Ihre Reihenanzahl nicht stimmen, dann brauchen Sie wahrscheinlich auch eine unterschiedliche Garnmenge - hier lesen Sie mehr über Maschenprobe; die Anleitung können Sie aber gerne genau mit der Höhe anpassen, wenn Sie aber mehr Reihen für 10 cm brauchen, dann brauchen Sie auch mehr Wolle. Viel Spaß beim stricken!
19.09.2022 - 10:10
![]() Pia wrote:
Pia wrote:
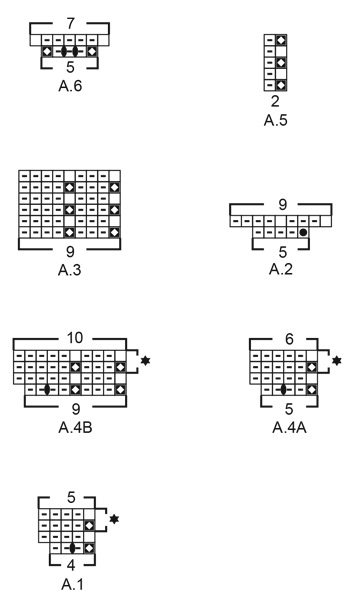
Olen aloittamassa kaarrokkeen A.1 mallineuletta. Se alkaa nurja silmukka oikealta puolelta, oikea silmukka nurjalta puolelta, mitä tämä tarkoittaa? Oikealta puolelta mitä? Valokuvasta näen että napinläpikaistaleen reunassa kulkee oikea silmukkarivistö ylhäältä alas.
15.01.2021 - 19:22DROPS Design answered:
Hei, aloita mallineule piirroksen oikeasta alareunasta. Eli neulo aluksi 1 oikea silmukka seuraavan silmukan alla olevaan silmukkaan. Seuraava silmukka neulotaan nurin, sitten 1 langankierto jne.
22.03.2021 - 17:05
![]() Carine wrote:
Carine wrote:
Begin je met naalden nr 3 na de boordsteek aan de hals ?
23.10.2020 - 15:41DROPS Design answered:
Dag Carine,
Pas wanneer je met de PAS begint ga je verder met rondbreinaald 3, zoals ook aangegeven in de eerste zin van die paragraaf.
25.10.2020 - 19:16
|
|||||||||||||||||||
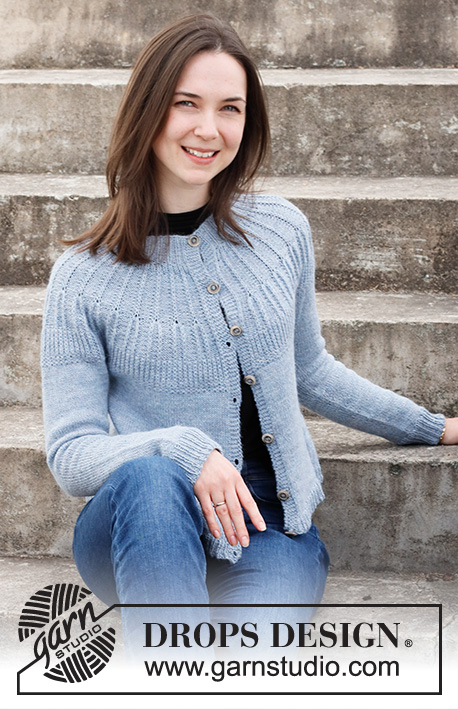
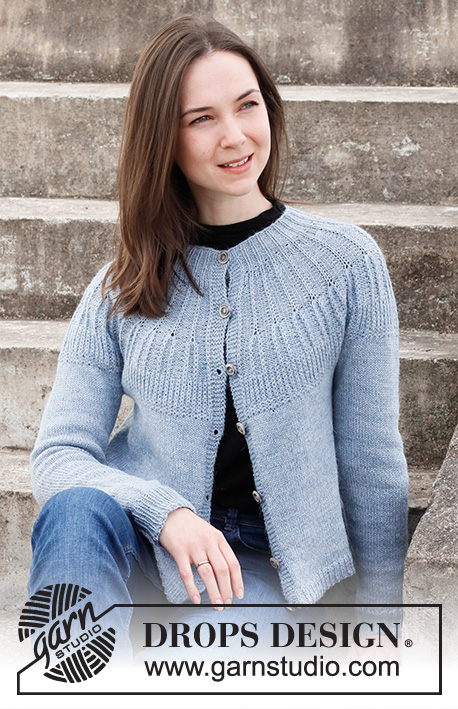
Smell of Rain Jacket#smellofrainjacket |
|||||||||||||||||||
 |
 |
||||||||||||||||||
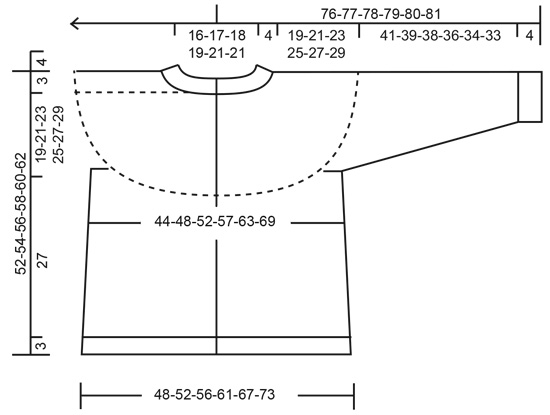
Knitted jacket in DROPS Nord. Piece is knitted top down with round yoke and textured pattern on yoke. Size: S - XXXL
DROPS 216-16 |
|||||||||||||||||||
|
------------------------------------------------------- EXPLANATION FOR THE PATTERN: ------------------------------------------------------- GARTER STITCH (back and forth): Knit all rows. 1 ridge vertically = knit 2 rows. PATTERN: See diagrams A.1 to A.6. Diagrams show all rows in pattern seen from the right side! INCREASE TIP-1 (evenly): To calculate how to increase evenly, use the total number of stitches on row (e.g. 367 stitches) minus bands (e.g. 10 stitches) and divide the remaining 357 stitches by number of increases to be done (e.g. 14) = 25.5. In this example increase by making 1 yarn over after alternately every 25th and 26th stitch, do not increase over bands. On next row work yarn overs twisted to avoid holes INCREASE TIP-2 (applies to sides of body): Work until 3 stitches remain before marker thread, make 1 yarn over, knit 6 (marker thread is in the middle of these 6 stitches), make 1 yarn over (= 2 stitches increased at marker thread). On next row work yarn overs twisted to avoid holes. Then work the new stitches in stockinette stitch. DECREASE TIP (applies to mid under sleeves): Begin 3 stitches before marker thread and knit 2 together, knit 2 (marker thread is between these 2 stitches), slip 1 stitch knitwise, knit 1, pass slipped stitch over stitch worked (= 2 stitches decreased). BUTTONHOLES: Decrease for buttonholes on right band (when garment is worn). Decrease from right side when 3 stitches remain on row as follows: Make 1 yarn over, knit the next 2 stitches together, knit last stitch. On next row (wrong side) knit the yarn over to make a hole. Decrease first buttonhole when rib in neck measures approx. 2 cm = ¾". Then decrease the next 6-6-6-7-7-7 buttonholes, approx. 8-8½-9-7½-8-8½ cm = 3⅛"-3¼"-3½"-2⅞"-3⅛"-3¼" between each buttonhole. BIND-OFF TIP: To avoid a tight bind-off edge you may use a larger needle size. If this also is too tight work 1 yarn over after approx. every 6th stitch while binding off (bind off yarn overs as regular stitches). ------------------------------------------------------- START THE PIECE HERE: ------------------------------------------------------- JACKET - SHORT OVERVIEW OF THE PIECE: Work neck edge and yoke back and forth on circular needle from mid front, top down. Now divide yoke for body and sleeves. Work body back and forth on circular needle from mid front, top down. Work sleeves in the round on double pointed needles/short circular needle, top down. NECK EDGE: Cast on 113-119-125-131-137-143 stitches (including 5 band stitches in each side towards mid front) on circular needle size 2.5 mm = US 1,5 with Nord. Purl 1 row (= wrong side). Work next row as follows from right side: 5 band stitches in GARTER STITCH - read explanation above, * knit 1, purl 2 *, repeat from *-* until 6 stitches remain, knit 1 and finish with 5 band stitches in garter stitch. Continue rib like this – remember BUTTONHOLES on right band – read explanation above. When rib measures 4 cm = 1½", work next row as follows from right side: 5 band stitches in garter stitch, * knit 1, purl 1, make 1 yarn over, purl 1 *, repeat from *-* until 6 stitches remain on needle, knit 1, and finish with 5 band stitches in garter stitch = 147-155-163-171-179-187 stitches. Work back from wrong side with garter stitch over garter stitch, purl over purl and knit over knit (purl yarn overs twisted to avoid holes). Insert 1 marker at the inside of band mid front. Work yoke as explained below, measure yoke from this marker. YOKE: Switch to circular needle size 3 mm = US 2,5 and work first row from right side as follows: 5 band stitches in garter stitch, * knit 1, purl 1 *, repeat from *-* until 6 stitches remain on needle, knit 1 , and finish with 5 band stitches in garter stitch. Continue rib like this for 2-2-2-3-3-3 cm = ¾"-¾"-¾"-1⅛"-1⅛"-1⅛". Work next row as follows from right side: 5 band stitches in garter stitch, work A.1 until 6 stitches remain on row (= 34-36-38-40-42-44 repetitions of 4 stitches), work first stitch in A.1 (so that pattern begins and ends the same way in each side), and finish with 5 band stitches in garter stitch. After first row in A.1 there are 181-191-201-211-221-231 stitches on needle. Continue pattern, i.e. when A.1 has been worked vertically, repeat the 2 rows marked with star. REMEMBER THE KNITTING GAUGE! When piece measures 9-9-10-10-11-11 cm = 3½"-3½"-4"-4"-4⅜"-4⅜" from marker at the neck, work next row as follows from right side: 5 band stitches in garter stitch, continue A.1 over the first 5 stitches, work A.2 until 6 stitches remain on row (= 33-35-37-39-41-43 repetitions of 5 stitches), work first stitch in A.1 as before, and finish with 5 band stitches in garter stitch. When entire A.2 has been worked vertically, there are 313-331-349-367-385-403 stitches on needle. Work next row as follows from right side: 5 band stitches in garter stitch, continue A.1 over the first 5 stitches, work A.3 until 6 stitches remain on row (= 33-35-37-39-41-43 repetitions of 9 stitches), work first stitch in A.1, and finish with 5 band stitches in garter stitch. Continue pattern like this. When piece measures 11-12-13-14-15-16 cm = 4⅜"-4¾"-5⅛"-5½"-6"-6¼" from marker at the neck, work next row as follows from right side: 5 band stitches in garter stitch, work A.4A (= 5 stitches), work A.4B until 6 stitches remain on row (= 33-35-37-39-41-43 repetitions of 9 stitches), work first stitch in A.4A, and finish with 5 band stitches in garter stitch. After first row in A.4 there are 347-367-387-407-427-447 stitches on needle. Continue pattern, i.e. when A.4 has been worked vertically, repeat the 2 rows marked with star. When piece measures 14-15-17-17-19-20 cm = 5½"-6"-6¾"-6¾"-7½"-8" from marker at the neck, work next row as follows from right side: S, M and L: 5 edge stitches in garter stitch, work A.5 until 6 stitches remain on needle, work first stitch in A.5, finish with 5 band stitches in garter stitch – pattern should fit nicely over the other stitches. Work like this until piece measures approx. 18-19-21 cm = 7"-7½"-8¼" from marker at the neck (A.5 measures approx. 4 cm = 1½" vertically). Continue to ALL SIZES! XL, XXL and XXXL: Work 2 rows back and forth as before – AT THE SAME TIME increase 38-40-42 stitches evenly, by increasing 2 stitches in every other section with 1 English rib stitch + 3 purl stitches + 1 English rib stitch (see A.6 for placement of increase) = 445-467-489 stitches on row. Then work next row as follows from right side: 5 edge stitches in garter stitch, work A.5 until 6 stitches remain on needle, work first stitch in A.5, finish with 5 band stitches in garter stitch – pattern should fit nicely over the other stitches. Work like this until piece measures approx. 22-24-25 cm = 8¾"-9½"-9¾" from marker at the neck (A.5 measures approx. 4 cm = 1½" vertically). Continue to ALL SIZES! ALL SIZES: Work 2 rows in stockinette stitch with 5 band stitches in garter stitch in each side towards mid front BUT on first row (right side) continue English rib stitches as before - i.e. English rib stitches are less visible on these 2 rows but they give a softer transition between textured and stockinette stitch. Then work stockinette stitch back and forth over all stitches with 5 band stitches in garter stitches in each side towards mid front – AT THE SAME TIME on first row from right side increase 2-14-26-8-18-32 stitches evenly - read INCREASE TIP-1= 349-381-413-453-485-521 stitches. When piece measures 19-21-23-25-27-29 cm = 7½"-8¼"-9"-9¾"-10⅝"-11⅜" from marker at the neck, divide yoke for body and sleeves. I.e. work next row as follows: Work 55-60-64-70-76-83 stitches in garter stitch and stockinette stitch as before (= front piece), slip the next 70-76-84-92-96-100 stitches on 1 stitch holder for sleeve, cast on 6-6-8-8-10-10 new stitches on row (= in the side under sleeve), work 99-109-117-129-141-155 stitches in stockinette stitch (= back piece), slip the next 70-76-84-92-96-100 stitches on 1 stitch holder for sleeve, cast on 6-6-8-8-10-10 new stitches on row (= in the side under sleeve) and work the 55-60-64-70-76-83 stitches in stockinette stitch and garter stitch as before (= front piece). Finish body and sleeves separately. NOW MEASURE PIECE FROM HERE! BODY: = 221-241-261-285-313-341 stitches. Insert 1 marker thread after 58-63-68-74-81-88 stitches in from each side (= in the side of body). There are 105-115-125-137-151-165 stitches between marker threads on back piece. Move the marker threads upwards when working; they should be used for increase later in the sides on body. Work in stockinette stitch back and forth with 5 band stitches in garter stitch in each side towards mid front. When piece measures 3 cm = 1⅛" from division in all sizes, increase 1 stitch on each side of both marker threads - READ INCREASE TIP-2 (= 4 stitches increased). Increase like this every 4 cm = 1½" 5 times in total = 241-261-281-305-333-361 stitches. Work until piece measures 27 cm = 10⅝" from division. Approx. 3 cm = 1⅛" remain until finished measurements, try the jacket on and work until desired length. Knit 1 row from right side while increasing 58-65-69-75-83-88 stitches evenly - remember INCREASE TIP-1 = 299-326-350-380-416-449 stitches. Increase stitches to avoid the rib to be worked, from contracting the piece. Switch to circular needle size 2.5 mm = US 1,5. Work next row as follows from wrong side: 5 band stitches in garter stitch, * purl 1, knit 2 *, repeat from *-* until 6 stitches remain on needle, purl 1 , and finish with 5 band stitches in garter stitch. Continue rib like this for 3 cm = 1⅛". Bind off stitches with knit over knit and purl over purl - read BIND OFF TIP! Jacket measures approx. 52-54-56-58-60-62 cm = 20½"-21¼"-22"-22¾"-23⅝"-24⅜" from shoulder and down. SLEEVE: Slip the 70-76-84-92-96-100 stitches from stitch holder in one side of piece on double pointed needles or a short circular needle size 3 mm = US 2,5 and pick in addition up 1 stitch in each of the 6-6-8-8-10-10 new stitches cast on under sleeve = 76-82-92-100-106-110 stitches. Insert 1 marker thread in the middle of the 6-6-8-8-10-10 stitches under sleeve and move the marker thread upwards when working. Use marker later when decreasing mid under sleeve. Begin round at the marker thread and work stockinette stitch in the round. When sleeve measures 3-2-2-3-1-2 cm = 1⅛"-¾"-¾"-1⅛"-⅜"-¾" from division, decrease 2 stitches mid under sleeve - read DECREASE TIP. Decrease like this every 3-2½-2-1½-1½-1 cm = 1⅛"-⅞"-¾"-½"-½" 13-15-18-21-22-24 times in total = 50-52-56-58-62-62 stitches. Work until sleeve measures 41-39-38-36-34-33 cm = 16⅛"-15¼"-15"-14¼"-13⅜"-13" from division. Approx. 4 cm = 1½" remain until finished measurements, try the jacket on and work until desired length. NOTE! Shorter measurements in the larger sizes because of wider neck and longer yoke. Knit 1 round while increasing 10-11-10-11-13-13 stitches evenly = 60-63-66-69-75-75 stitches. Switch to double pointed needles size 2.5 mm = US 1,5. Work rib in the round = knit 1/purl 2 for 4 cm = 1½". Bind off with knit over knit and purl over purl - remember BIND-OFF TIP! Sleeve measures approx. 45-43-42-40-38-37 cm = 17¾"-17"-16½"-15¾"-15"-14½" from division. Work the other sleeve the same way. ASSEMBLY: Sew the buttons on to the left band. |
|||||||||||||||||||
Diagram explanations |
|||||||||||||||||||
|
|||||||||||||||||||
|
|||||||||||||||||||
|
|||||||||||||||||||
Have you finished this pattern?Tag your pictures with #dropspattern #smellofrainjacket or submit them to the #dropsfan gallery. Do you need help with this pattern?You'll find 29 tutorial videos, a Comments/Questions area and more by visiting the pattern on garnstudio.com. © 1982-2025 DROPS Design A/S. We reserve all rights. This document, including all its sub-sections, has copyrights. Read more about what you can do with our patterns at the bottom of each pattern on our site. |
|||||||||||||||||||


With over 40 years in knitting and crochet design, DROPS Design offers one of the most extensive collections of free patterns on the internet - translated to 17 languages. As of today we count 314 catalogs and 11822 patterns - 11812 of which are translated into English (US/in).
We work hard to bring you the best knitting and crochet have to offer, inspiration and advice as well as great quality yarns at incredible prices! Would you like to use our patterns for other than personal use? You can read what you are allowed to do in the Copyright text at the bottom of all our patterns. Happy crafting!
Post a comment to pattern DROPS 216-16
We would love to hear what you have to say about this pattern!
If you want to leave a question, please make sure you select the correct category in the form below, to speed up the answering process. Required fields are marked *.