
Looking for a yarn?


Comments / Questions (52)
![]() Anastasia wrote:
Anastasia wrote:
Hello, I have a question about the first row of the Left Front Piece, size M. I start with 39 stitches. The last 12 towards the neck are for A2, this leaves me with 27 stiches. After one garter stitch, I have 26 varying stitches knit/purl. I start with the knit stitch (because I start with the right side), then I will finish with the purl stitch. But A2 is also starting with the purl stitch, which makes two purl stitches after each other. Am I understanding it correctly? Best regards, Anastasia
23.05.2025 - 12:54DROPS Design answered:
Dear Anastasia, as explained before separating for the front pieces, you cast off for the first armhole while working row 1 of A.1. Then, you cast off for the second armhole while working row 2 of A.1. So now you should start with row 3, which is a purl stitch (so you should work purl 1, knit 1 the whole row. Then you finish with knit 1 and start A.2 with purl 1. So there are no 2 purl stitches together. Happy knitting!
25.05.2025 - 22:40
![]() Conny Sieber wrote:
Conny Sieber wrote:
Ich habe schon 95 M angeschlagen und 14 cm gestrickt und je 1 M abgenommen. In welchem Abstand sollte ich noch abnehmen um 87 M zu haben ? In jeder 2. oder 4. Reihe? Vielen Dank!
31.03.2025 - 14:28DROPS Design answered:
Liebe Frau Sieber, wenn Sie lieber ein A -Schnitt möchten, dann können Sie sich von einem Pullover mit der gleichen Maschenprobe und trapezförmig inspirieren - siehe Modellen hier; vielleicht kann Ihnen ein davon helfen. Viel Spaß beim Stricken!
31.03.2025 - 15:27
![]() Conny Sieber wrote:
Conny Sieber wrote:
Guten Tag, ich stricke gerade und stelle fest, dass mir 95 Maschen zu beit werden. Habe bei 14 cm je eine M abgenommen, in welchen Abstände soll ich abnehmen,dass ich bei Größe M bin? Vielen Dank für Ihre Hilfe. Beste Grüße
31.03.2025 - 10:27DROPS Design answered:
Liebe Frau Sieber, in M sollen Sie nur 87 Maschen für Rücken- sowie Vorderteil haben, so sind sie beide ca 53 cm breit (mit 16 M = 10 cm). Ich sehe aber keine Zunahmen bei 14 cm, misverstehe ich Ihre Frage?
31.03.2025 - 12:37
![]() Saskia wrote:
Saskia wrote:
Ik heb hetzelfde probleem als Sabine, veel meer steken nodig voor 10 cm en het gerstekorrelpatroon is vrijwel niet zichtbaar doordat het zo los zit.
09.03.2025 - 12:16
![]() Tifaine wrote:
Tifaine wrote:
Bonjour Est-ce possible d’adapter le modèle pour le faire en circulaire sans aller/retour ? En vous remerciant
08.11.2024 - 10:49DROPS Design answered:
Bonjour Tifaine, tout à fait car on tricote ici chaque partie en allers et retours sur aiguille circulaire, vos mailles seront juste plus serrées, pensez à bien conserver la bonne tension. Pour la prochaine fois, cette leçon pourra vous aider. Bon tricot!
08.11.2024 - 12:48
![]() Tifaine wrote:
Tifaine wrote:
Bonjour Je vois aux explications qu’il faut utiliser des aiguilles circulaires en aller retour Ça signifie qu’il faut coudre ensemble l’avant et le dos, une fois les deux pièces réalisées ? En vous remerciant Tifaine
07.11.2024 - 18:50DROPS Design answered:
Bonjour Tifaine, tout à fait, on tricote chaque partie séparément et on les assemble ensuite entre elles. Bon tricot!
08.11.2024 - 07:39
![]() Nadia wrote:
Nadia wrote:
Buon pomeriggio, vorrei chiedere un chiarimento perché sono alle prime armi a alcune termini non sono ancora familiari. Cosa si intende con: intrecciare le prima 3 maglie all'inizio dei 2 ferri successivi per gli scalfi? E intrecciare le 21 maglie centrali per lo scollo e finire ogni spalla separatamente? Grazie mille e buona giornata!
29.03.2024 - 17:44DROPS Design answered:
Buonasera Nadia, per intrecciare si intende "chiudere". Buon lavoro!
01.04.2024 - 20:16
![]() Sabine wrote:
Sabine wrote:
Stricke ich zweifädig oder
05.03.2024 - 12:10DROPS Design answered:
Liebe Sabine, dieser Pullover wird mit 1 Faden Brushed Alpaca Silk gestrickt. Viel Spaß beim Stricken!
05.03.2024 - 15:34
![]() Sabine wrote:
Sabine wrote:
Ich komme niemals mit der Maschenprobe hin. Ich benötige mit der angegebenen Nadelstärke 22 Maschen für 10 cm - und das sieht schon sehr löchrig aus!
04.03.2024 - 18:03DROPS Design answered:
Liebe Sabine, stricken Sie mit Brushed Alpaca Silk? 16 Maschen für 10 cm ist eine übliche Maschenprobe - wenn Sie diese Maschenprobe nicht erreichen, sollen Sie die ganze Anleitung nach Ihrer eigenen Maschenprobe umrechnen. Viel Spaß beim Stricken!
05.03.2024 - 09:02
![]() Sylfil wrote:
Sylfil wrote:
Bonjour, Y a-t-il une erreur ou bien est-ce que je comprends mal ? Il est écrit : "Quand A.2 a été tricoté 1 fois en hauteur, on a diminué 3 fois 2 mailles. Continuer à diminuer pour l'encolure V encore 3-3-3-4-4-4 fois de la même façon (= on diminue 12-12-12-14-14-14 mailles au total pour l'encolure)" D'après mes calculs : 3 fois 2 mailles = 6 encore 3 fois : 3 x 6 = 18 et non 12 Merci pour votre aide. Cordialement
07.01.2023 - 11:18DROPS Design answered:
Bonjour Sylfil, dans A.2 vous diminuez 3 fois 2 mailles (soit 6 mailles au total), puis vous répétez ces diminutions encore 3 fois (soit encore 3 x 2 m = 6 m), soit 6 fois 2 mailles au total; vous aurez diminué 12 mailles au total. Bon tricot!
09.01.2023 - 08:59
|
||||||||||||||||
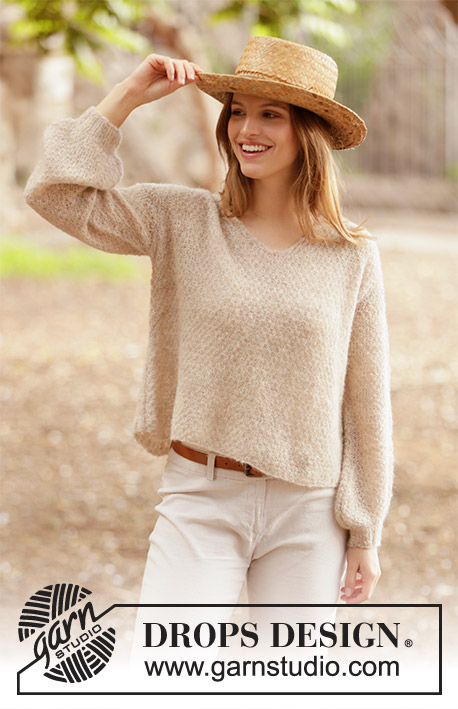
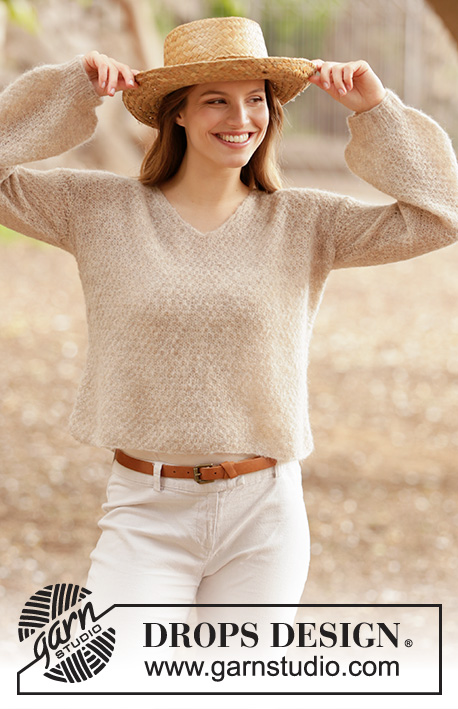
Oats and Honey#oatsandhoneysweater |
||||||||||||||||
 |
 |
|||||||||||||||
Knitted sweater with V-neck in DROPS Brushed Alpaca Silk. The piece is worked with double moss stitch and balloon sleeves. Sizes XS - XXL.
DROPS 213-20 |
||||||||||||||||
|
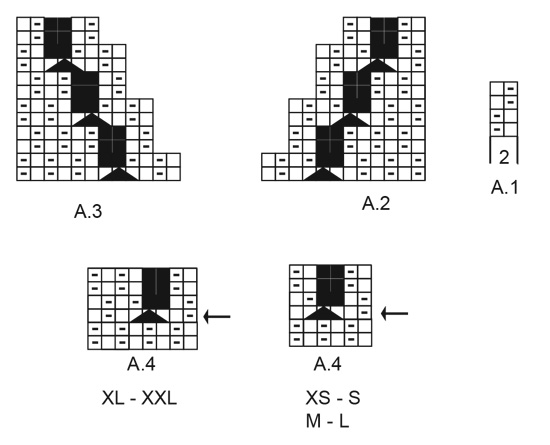
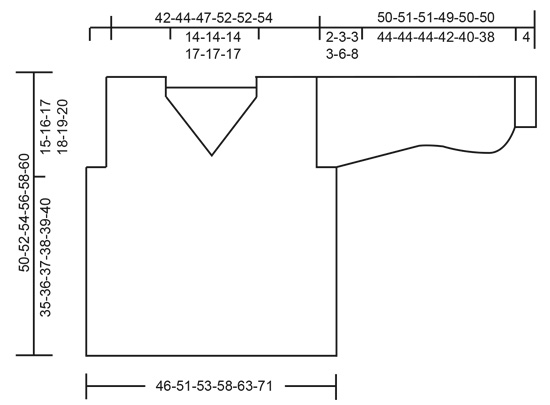
------------------------------------------------------- EXPLANATIONS FOR THE PATTERN: ------------------------------------------------------- RIDGE/GARTER STITCH (worked back and forth): Knit all rows. 1 ridge in height = Knit 2 rows. PATTERN: See diagrams A.1 to A.4. The diagrams show all the rows in the pattern seen from the right side. Choose diagram for your size (applies to A.4). INCREASE TIP-1 (evenly spaced): To work out how to increase evenly, count the total number of stitches on the needle (e.g. 42 stitches) minus the 2 edge stitches and divide by the number of increases to be made (e.g. 20) = 2. In this example, increase by making 1 yarn over after each 2nd stitch. On the next row work the yarn overs twisted to avoid holes. INCREASE TIP-2 (for sleeves): Increase by making 1 yarn over inside 1 edge stitch in each side, on next row knit the yarn over twisted to avoid making a hole. Thereafter the new stitches are worked into the pattern. ------------------------------------------------------- START THE PIECE HERE: ------------------------------------------------------- SWEATER – SHORT OVERVIEW OF THE PIECE: The piece is worked back and forth, in sections, which are sewn together to finish. The sleeves are worked back and forth with circular needle. BACK PIECE: Cast on 75-83-87-95-103-115 stitches with circular needle size 5.5 mm = US 9 and Brushed Alpaca Silk. Purl 1 row (= wrong side). Then work pattern back and forth as follows: 1 edge stitch in GARTER STITCH – read description above, A.1 over the next 73-81-85-93-101-113 stitches, 1 edge stitch in garter stitch. Continue like this back and forth. REMEMBER THE KNITTING GAUGE! When the piece measures 35-36-37-38-39-40 cm = 13¾"-14¼"-14½"-15"-15¼"-15¾" work as follows: Bind off the first 3-5-5-5-9-13 stitches at the beginning of the next 2 rows for the armholes = 69-73-77-85-85-89 stitches. Continue with double moss stitch and 1 edge stitch in garter stitch on each side. When the piece measures 48-50-52-54-56-58 cm = 19"-19¾"-20½"-21¼"-22"-22¾", bind off the middle 21-21-21-25-25-25 stitches for the neck (bind off with knit over knit and purl over purl) and each shoulder is finished separately. On the next row from the neck bind off 1 stitch = 23-25-27-29-29-31 stitches left on the shoulder. When the piece measures 15-16-17-18-19-20 cm = 6"-6¼"-6¾"-7"-7½"-8" from where you bind off stitches for the armhole, bind off with knit over knit and purl over purl. The piece measures 50-52-54-56-58-60 cm = 19¾"-20½"-21¼"-22"-22¾"-23⅝" from the shoulder down. Work the other shoulder in the same way. FRONT PIECE: Cast on 75-83-87-95-103-115 stitches with circular needle size 5.5 mm = US 9 and Brushed Alpaca Silk. Purl 1 row (= wrong side). Then work pattern back and forth as follows: 1 edge stitch in garter stitch, A.1 over the next 73-81-85-93-101-113 stitches, 1 edge stitch in garter stitch. Continue back and forth like this. When the piece measures 35-36-37-38-39-40 cm = 13¾"-14¼"-14½"-15"-15¼"-15¾" – adjust so the next row is worked from the right side and matches row 1 in A.1 (i.e. the first stitch after the edge stitch at the beginning of the row is knitted), work as follows: Bind off the first 3-5-5-5-9-13 stitches for the armhole, work as before over the next 34-36-38-42-42-44 stitches, work 2 stitches in the next stitch (= mid-stitch), work the remaining stitches on the row. The next row is worked as follows: Bind off the first 3-5-5-5-9-13 stitches, work the next 35-37-39-43-43-45 stitches before placing them on a thread for the right front piece and work the remaining 35-37-39-43-43-45 stitches (= left front piece). LEFT FRONT PIECE: Continue back and forth with double moss stitch, 1 edge stitch in garter stitch towards the armhole and work A.2 over the 12 stitches towards the v-neck. When A.2 has been completed in height you have decreased 2 stitches 3 times. Continue to decrease for the v-neck in the same way 3-3-3-4-4-4 more times (= a total of 12-12-12-14-14-14 stitches decreased for the neck) = 23-25-27-29-29-31 stitches for the shoulder. Work double moss stitch and 1 edge stitch in garter stitch towards the armhole to finished length. When the piece measures 15-16-17-18-19-20 cm = 6"-6¼"-6¾"-7"-7½"-8" from where you bind off stitches for the armhole, bind off with knit over knit and purl over purl. The piece measures approx. 50-52-54-56-58-60 cm = 19¾"-20½"-21¼"-22"-22¾"-23⅝" from the shoulder down. RIGHT FRONT PIECE: Place the stitches from the thread back on the needle = 35-37-39-39-43-45 stitches. Continue back and forth with double moss stitch, 1 edge stitch in garter stitch towards the armhole and work A.3 over the first 12 stitches towards the v-neck. When A.3 has been completed in height you have decreased 2 stitches 3 times. Continue to decrease for the v-neck in the same way 3-3-3-4-4-4 more times (= a total of 12-12-12-14-14-14 stitches decreased for the neck) = 23-25-27-29-29-31 stitches for the shoulder. Work double moss stitch and 1 edge stitch in garter stitch towards the armhole to finished length. When the piece measures 15-16-17-18-19-20 cm = 6"-6¼"-6¾"-7"-7½"-8" from where you bind off stitches for the armhole, bind off with knit over knit and purl over purl. The piece measures approx. 50-52-54-56-58-60 cm = 19¾"-20½"-21¼"-22"-22¾"-23⅝" from the shoulder down. SLEEVE: Cast on 42-46-46-46-50-50 stitches with needle size 4.5 mm = US 7 and Brushed Alpaca Silk. Purl 1 row (= wrong side). Then work rib as follows: 1 edge stitch in garter stitch, * knit 2, purl 2 *, work from *-* until there is 1 stitch left on the row, 1 edge stitch in garter stitch. When the rib measures 4 cm = 1½", knit 1 row and increase 20-20-22-22-22-22 stitches evenly spaced – read INCREASE TIP-1 = 62-66-68-68-72-72 stitches. Change to circular needle size 5.5 mm = US 8 and purl 1 row back from the wrong side. Now work pattern as follows: 1 edge stitch in garter stitch, A.1 until there is 1 stitch left on the row, 1 edge stitch in garter stitch. Continue this pattern back and forth. When the piece measures 17 cm = 6¾" in all sizes decrease as follows from the right side: Work 4-6-7-7-4-4 stitches as before, A.4 (choose diagram for your size) over the next 54-54-54-54-64-64 stitches (= 9-9-9-9-8-8 repeats of 6-6-6-6-8-8 stitches), work the last 4-6-7-7-4-4 stitches = 44-48-50-50-56-56 stitches. Continue back and forth with double moss stitch and 1 edge stitch in garter stitch on each side. On the next row from the right side begin to increase mid under the sleeve – read INCREASE TIP-2. Increase like this every 13-13-8½-6-11½-5 cm = 5⅛"-5⅛"-3¼"-2⅜"-4½"-2" a total of 3-3-3-5-3-5 times = 50-54-56-60-62-66 stitches. Continue working until the sleeve measures 48-48-48-46-44-42 cm = 19"-19"-19"-18"-17¼"-16½". Insert 1 marker on each side of the sleeve – they mark where the bottom of the armhole begins. Continue working until the sleeve measures 50-51-51-49-50-50 cm = 19¾"-20"-20"-19¼"-19¾"-19¾". Bind off with knit over knit and purl over purl. Work the other sleeve in the same way. ASSEMBLY: Sew the shoulder seams inside the bind-off edge. Sew in the sleeves and sew the bottom of the armhole – the markers on the sleeve should match the sides of the body. Sew the sleeve seams and continue down the side seams. |
||||||||||||||||
Diagram explanations |
||||||||||||||||
|
||||||||||||||||
|
||||||||||||||||
|
||||||||||||||||
Have you finished this pattern?Tag your pictures with #dropspattern #oatsandhoneysweater or submit them to the #dropsfan gallery. Do you need help with this pattern?You'll find 20 tutorial videos, a Comments/Questions area and more by visiting the pattern on garnstudio.com. © 1982-2025 DROPS Design A/S. We reserve all rights. This document, including all its sub-sections, has copyrights. Read more about what you can do with our patterns at the bottom of each pattern on our site. |
||||||||||||||||


With over 40 years in knitting and crochet design, DROPS Design offers one of the most extensive collections of free patterns on the internet - translated to 17 languages. As of today we count 314 catalogs and 11821 patterns - 11811 of which are translated into English (US/in).
We work hard to bring you the best knitting and crochet have to offer, inspiration and advice as well as great quality yarns at incredible prices! Would you like to use our patterns for other than personal use? You can read what you are allowed to do in the Copyright text at the bottom of all our patterns. Happy crafting!
Post a comment to pattern DROPS 213-20
We would love to hear what you have to say about this pattern!
If you want to leave a question, please make sure you select the correct category in the form below, to speed up the answering process. Required fields are marked *.