
Looking for a yarn?


Comments / Questions (18)
![]() Emilie wrote:
Emilie wrote:
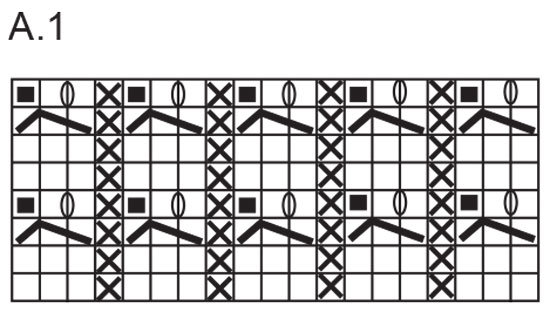
Bonjour, Désolée, je ne comprends toujours pas. Au rang 2, on diminue d'une maille avec la maille glissée. Au rang 3, le diagramme n'indique pas de faire de jeté. Ou faut il ajouter ce jeté ? Ou alors, est ce qu'il y a une erreur dans le diagramme ? Est-ce qu'il ne faudrait pas plutôt lire : 2 m end + pas de maille; sauter cette case + 1 m env ? Merci
07.02.2025 - 12:45DROPS Design answered:
Bonjour Émilie, c'est au rang 3 du diagramme que l'on diminue 1 maille et on a ainsi (2 m end, 1 m env) x 5; vous avez 15 mailles - au rang suivant, tricotez (1 m end, 1 jeté, 1 m end, 1 m env) x 5 = vous avez de nouveau 20 mailles. Retrouvez également dans cette vidéo comment réaliser ce type de torsades ajourée (un peu différemment mais le résultat est sensiblement le même). Bon tricot!
07.02.2025 - 16:08
![]() Emilie wrote:
Emilie wrote:
Bonsoir, Sur le deuxième rang du schéma a1, je n'obtiens que 14 mailles une fois tricoté au lieu des 19 du rangs précédant et suivant. Est-ce que c'est normal ? Merci d'avance, Émilie
06.02.2025 - 22:33DROPS Design answered:
Bonjour Émilie, c'est normal, au 3ème rang de A.1 vous diminuez 1 maille dans chaque section "3 m end" où vous n'avez plus que 2 mailles endroit, mais au tour suivant, vous allez faire 1 jeté entre ces 2 m endroit et vous aurez de nouveau votre bon nombre de mailles. Bon tricot!
07.02.2025 - 08:32
![]() Emilie wrote:
Emilie wrote:
Bonjour, Pour la partie en cote, je ne comprends pas bien sur combien de tour je dois faire des cotes. Le patron donne 4m lisière mais sur l'image de rendu on a l'impression qu'il y a beaucoup plus de tour que 4. Merci de votre retour, Emilie
02.02.2025 - 11:45DROPS Design answered:
Bonjour Émilie, au tout début des moufles, on tricote 4 cm de côtes dans les 2 tailles - le "c" de cm manquait, il a été ajouté, merci pour l'info. Bonne continuation!
03.02.2025 - 09:07
![]() Jana Bullová wrote:
Jana Bullová wrote:
Prosím jak si mám uložit na těchto stránkách návod?Již dříve jsem si uložila jiné,ale ted nemohu najít.děkuji.Jana
30.11.2024 - 07:55
![]() Dorthe wrote:
Dorthe wrote:
Når jeg strikker A1, er der kun én maske og så omslag, så der mangler en ret maske, hvordan skal jeg gøre det? Mønsteret er forkert. Venlig hilsen Dorthe.
22.11.2023 - 16:05DROPS Design answered:
Hej Dorthe, du starter diagrammet i nederste højre hjørne og strikker mod venstre. Når du strikker de 3 masker ifølge diagrammet, så løfter du 1 maske, strikker 2 masker (strikkes ikke sammen - men hver for sig) og løfter den løse over de 2 masker. På næste pind laver du omslag imellem de 2 masker :)
24.11.2023 - 14:25
![]() Luďka wrote:
Luďka wrote:
Mám pocit, že jen český návod má ty velikosti s palcem, tak poslední poznámka. U druhé rukavice se oka pro palec odkládají až za druhou značkou (ne před), jinak by byly rukavice nesouměrné.
26.10.2021 - 11:06DROPS Design answered:
Milá Luďko, díky za upozornění - návod prošel revizí a nyní by mělo být skutečně vše v pořádku. Hezký den! Hana
26.10.2021 - 17:02
![]() Luďka wrote:
Luďka wrote:
Palec je taky špatně, za odložená oka se stejný počet nahodí okamžitě a ne až v následující řadě. To by dost dobře nešlo. Nebo alespoň nevím jak.
25.10.2021 - 21:37
![]() Luďka wrote:
Luďka wrote:
Další nejasnost, která zazněla v předchozích komentářích, ale v textu není opravena. Nahození v první řadě po pružném vzoru se plete normálně, aby se vytvořila dírka pro vázačku, ale ve vzoru A1 se nahození plete za zadní nit, aby se dírka nevytvořila.
24.10.2021 - 23:06
![]() Luďka wrote:
Luďka wrote:
V popisu schématu A1 je chyba, která už měla být dle předchozích komentářů opravena, ale není. Třetí řádek má znít: 1 oko sejmeme hl., dvě oka upleteme (ne spleteme) hl. a sejmuté oko přes ně přetáhneme.
24.10.2021 - 22:44
![]() Anita Jónsdóttir wrote:
Anita Jónsdóttir wrote:
Þarf ekki að leiðrétta útskýringu á munstri = slétt lykkja frá réttu, brugðin lykkja frá röngu = brugðin lykkja frá réttu, slétt lykkja frá röngu
17.11.2020 - 15:42
|
||||||||||||||||
Stroll in the Park Mittens#strollintheparkmittens |
||||||||||||||||
 |
 |
|||||||||||||||
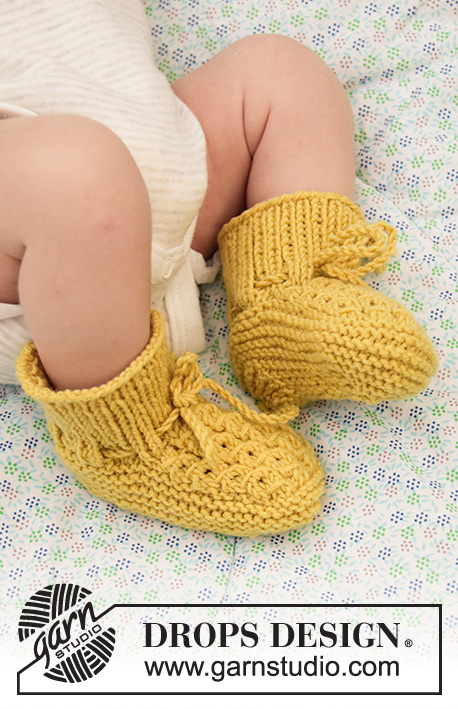
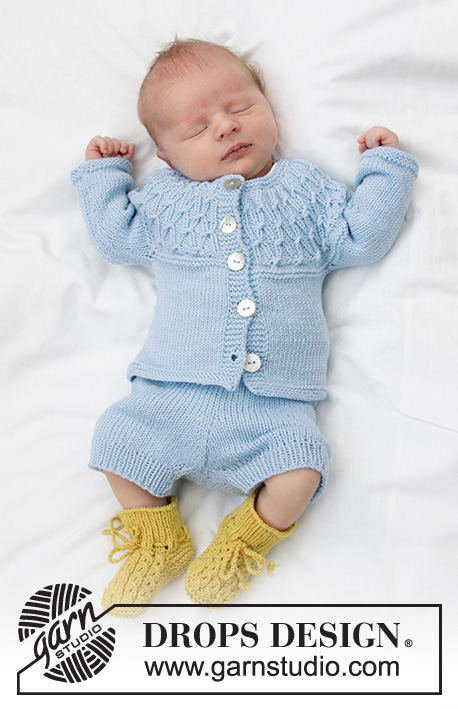
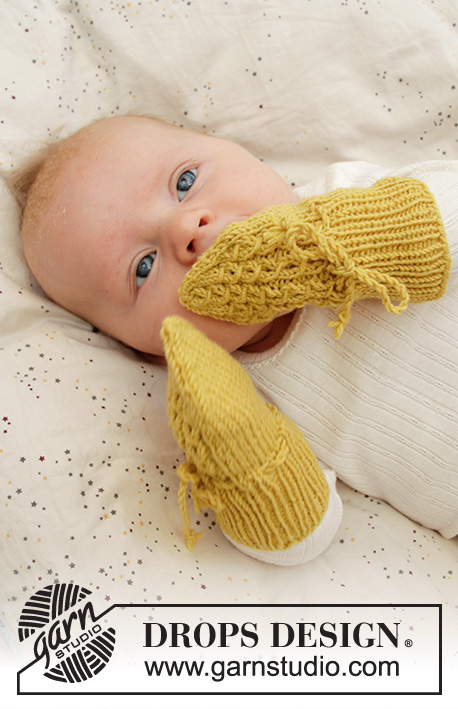
Knitted mittens for babies with false cables in DROPS BabyMerino. Sizes 1 month – 9 months.
DROPS Baby 33-28 |
||||||||||||||||
|
------------------------------------------------------- EXPLANATIONS FOR THE PATTERN: ------------------------------------------------------- PATTERN: See diagram A.1. DECREASE TIP: Decrease 1 stitch on each side of the marker thread as follows: Work until there are 2 stitches left before the marker thread, knit 2 together, slip 1 stitch as if to knit, knit 1 and pass the slipped stitch over the knitted stitch. ------------------------------------------------------- START THE PIECE HERE: ------------------------------------------------------- MITTENS – SHORT OVERVIEW OF THE PIECE: The piece is worked in the round with double pointed needles. Cast on 40-44 stitches with double pointed needles size 2.5 mm = US 1,5 and lemon. Knit 1 round. Work rib (= knit 1 / purl 1) for 4-4 = 1½"-1½". Work the next round as follows: * Knit 2 together, knit 1, purl 1, 1 yarn over *, work from *-* to end of round. Change to double pointed needles size 3 mm = US 2,5 and continue as follows: Knit 2-2, work A.1 (= 19 stitches) and knit to end of round. Insert 1 marker thread at the beginning of the round and 1 marker thread after 23-23 stitches; the threads are used for when decreasing for the top of the mitten. REMEMBER THE KNITTING GAUGE! Continue this pattern. When the piece measures 8-10 cm = 3⅛"-4" decrease 1 stitch on each side of both marker threads – read DECREASE TIP (= 4 stitches decreased). Decrease every round 7-8 times in total = 12-12 stitches left. Knit all stitches together 2 and 2 = 6-6 stitches. Cut the strand, pull it through the remaining stitches, tighten and fasten well. The mitten measures approx. 10-13 cm = 4"-5⅛". Work the other mitten in the same way. CORD: Cut 3 strands of approx. 1 meter = 40". Twist them together until they begin to resist, fold the strands double and they will continue to twist. Tie a knot in each end. Thread the cord through the row of holes in the mitten (starting and ending mid front). Repeat on the other mitten. |
||||||||||||||||
Diagram explanations |
||||||||||||||||
|
||||||||||||||||
|
||||||||||||||||
Have you finished this pattern?Tag your pictures with #dropspattern #strollintheparkmittens or submit them to the #dropsfan gallery. Do you need help with this pattern?You'll find 21 tutorial videos, a Comments/Questions area and more by visiting the pattern on garnstudio.com. © 1982-2025 DROPS Design A/S. We reserve all rights. This document, including all its sub-sections, has copyrights. Read more about what you can do with our patterns at the bottom of each pattern on our site. |
||||||||||||||||


With over 40 years in knitting and crochet design, DROPS Design offers one of the most extensive collections of free patterns on the internet - translated to 17 languages. As of today we count 314 catalogs and 11822 patterns - 11812 of which are translated into English (US/in).
We work hard to bring you the best knitting and crochet have to offer, inspiration and advice as well as great quality yarns at incredible prices! Would you like to use our patterns for other than personal use? You can read what you are allowed to do in the Copyright text at the bottom of all our patterns. Happy crafting!
Post a comment to pattern DROPS Baby 33-28
We would love to hear what you have to say about this pattern!
If you want to leave a question, please make sure you select the correct category in the form below, to speed up the answering process. Required fields are marked *.