
Popular categories
Looking for a yarn?


Comments / Questions (87)
![]() RayG wrote:
RayG wrote:
What is the best type of yarn to use for this? Is a cotton yarn one of the best to use?
28.06.2025 - 20:18DROPS Design answered:
Dear RayG, this pattern has been worked with a cotton yarn. For this type of project, where we need to have a durable thread, it's best to use vegetable fibers, such as cotton yarns (or mercerized cotton, which is slightly stronger than normal cotton) or linen yarns. Happy crochetting!
29.06.2025 - 19:48
![]() Jen wrote:
Jen wrote:
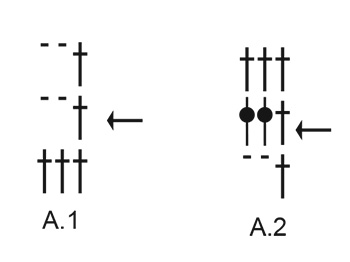
Can you better explain the pattern in diagram in A1. It looks like chain two and skip two loops then double crochet but that doesn’t say that in the diagram. And the is each different pattern a row? Says repeat 46 times. Is that 46 rows?
18.06.2025 - 04:32DROPS Design answered:
Dear Jean, on first row in A.1 (the row with an arrow), work (1 double crochet in the first double crochet, 2 chains, skip 2 double crochets), repeat from (to) all the round, there are 138 sts on previous round, you will repeat the 3-sts-repeat a total of 46 times in the round (3x46=138). Happy crocheting!
19.06.2025 - 11:16
![]() Anne wrote:
Anne wrote:
Hej. Hvad betyder det når der står at A2 skal hækles over hver rapport?
07.07.2024 - 21:37DROPS Design answered:
Hei Anne. Du har 138 staver og har heklet 46 rapporter av A.1. A.1 = 1 rapport av diagrammet, som består av 3 masker (1 stav + 2 luftmasker) . Når arbeidet måler 31 cm fra oppleggskanten skal du bytte A.1 med A.2, altså du skal nå hekle A.2 over A.1 46 ganger. mvh DROPS Design
09.07.2024 - 12:52
![]() Heidi Prenosil wrote:
Heidi Prenosil wrote:
Is it me or is there a part of the pattern missing? The picture shows an off-white border at the top of the bag and then the handles, but I cannot find this mentioned in the pattern.
28.06.2024 - 00:41DROPS Design answered:
Dear Mrs Prenosil, here it is: When the piece measure 18 cm = 7" from the cast-on edge change to off white., after the explanation of the 6th round under BAG, in the first paragraph. Happy crocheting!
28.06.2024 - 07:53
![]() Manon wrote:
Manon wrote:
Pour le sac, les tours 2 à 5 une maille de chaque côté du fil, Ça veut dire 1 maille 1 bride 1maille ?
02.04.2024 - 02:24DROPS Design answered:
Bonjour, crochetez de chaque côté du sac ainsi: 2 brides dans la bride après le marqueur du début du tour, 1 bride dans chaque bride jusqu'à ce qu'il reste 1 bride avant le marqueur de l'autre côté du sac, 2 brides dans la bride avant le marqueur, 2 brides dans la bride après le marqueur, 1 bride dans chaque bride jusqu'à ce qu'il reste 1 bride avant le marqueur, 2 brides dans la bride avant le marqueur (dernière maille du tour). Bon crochet!
03.04.2024 - 08:04
![]() Line wrote:
Line wrote:
- Dans les diagrammes, qu' est-ce qui. nous dit que l'on doit sauter des brides ? - Qu' est-ce que l'arceau ?
17.02.2024 - 03:39DROPS Design answered:
Bonjour Line, lorsqu'il n'y a pas de mailles crochetées dans la maille du rang précédent, cela indique que l'on ne va pas la crocheter = on va donc la sauter; autrement dit dans A.1, crochetez: *1 bride dans la bride, 2 mailles en l'air, sautez 2 brides*, et répétez de *-*. Bon crochet!
19.02.2024 - 08:44
![]() Line wrote:
Line wrote:
Donc, si j'ai bien compris :lorsqu'on commence A1, la 1ere maille on fait 5 mailles en l'air, on saute 2 brides et on fait 1 bride, 2 mailles en l'air.... A la fin du rang on fait quoi ?
17.02.2024 - 02:05DROPS Design answered:
Bonjour Line, effectivement, on commence le tour ainsi, les 3 premières de ces 5 mailles en l'air remplacent la 1ère bride, à la fin du tour, on termine par 1 maille coulée dans la 3ème maille en l'air du début du tour. Bon crochet!
19.02.2024 - 08:43
![]() Line wrote:
Line wrote:
Je suis seulement au 1er tour, je ne comprends pas, est-ce que l'on fait une maille en l'air et 4 mailles serrées sur tout le rang ou ???
10.02.2024 - 23:22DROPS Design answered:
Bonjour Line, comme la chaînette de base est souvent trop serrée, on crochète ici plus de mailles en l'air que l'on a besoin de mailles au 1er tour, autrement dit, au 1er tour, vous allez sautez 1 maille en l'air sur 5, crochetez ainsi: 1 maille serrée dans la maille en l'air suivante, *sautez 1 maille en l'air, crochetez 1 maille serrée dans chacune des 4 mailles en 'lair suivantes*, répétez de *-* tout le tour = vous avez désormais 114 mailles serrées. Bon crochet!
12.02.2024 - 07:34
![]() Hanne Sørensen wrote:
Hanne Sørensen wrote:
Hej forstår ikke diagram 1og 2 vil I skrive hvad jeg gør med hver diagram
11.10.2023 - 13:53
![]() Katja Schmidtpott wrote:
Katja Schmidtpott wrote:
Ik vind het resultaat erg leuk. Maar het patroon volgens mij erg ingewikkeld opgeschreven helaas. Ik heb net aardig wat tijd verloren naar het zoeken of ik na iedere toer deze moet laten aansluiten op de vorige door een halve vaste. Want alleen in bij de eerste toer staat dit expliciet geschreven, maar in geen van de andere toeren. Dat brengt mij aan het twijfelen: waarom staat het er niet in. En moet het dan wel of niet? M.vr.gr. Katja Schmidtpott
14.05.2023 - 17:44DROPS Design answered:
Dag Katja,
Bovenaan bij 'informatie voor het haken' staat beschreven dat je de toer eindigt me t1 halve vaste vaste of 3e losse op het begin van de toer.
15.05.2023 - 20:22
|
|||||||||||||
Back to the Beach#backtothebeachbag |
|||||||||||||
 |
 |
||||||||||||
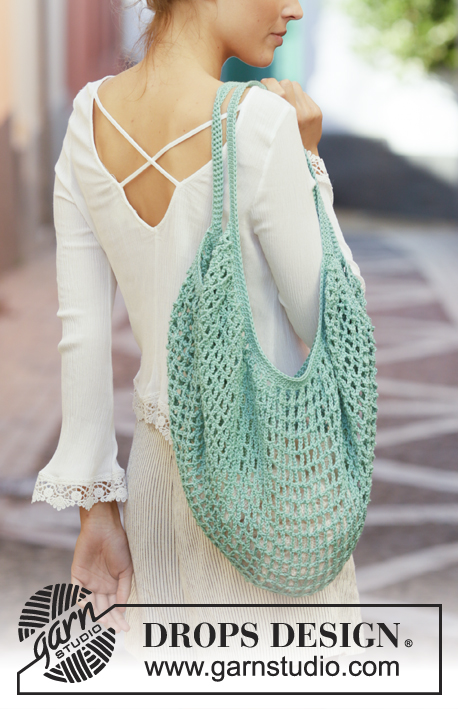
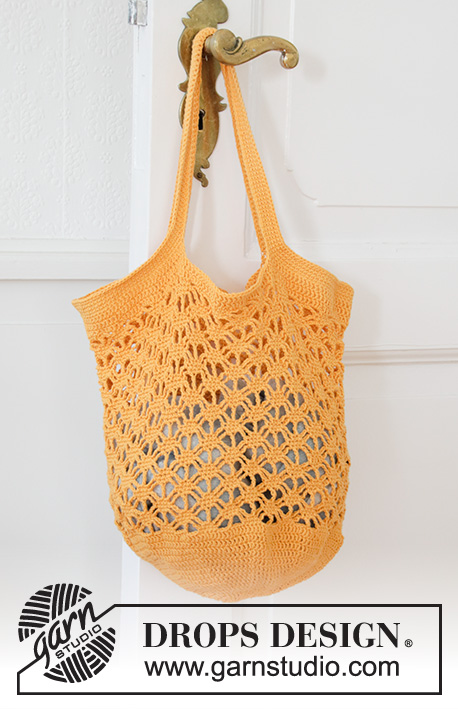
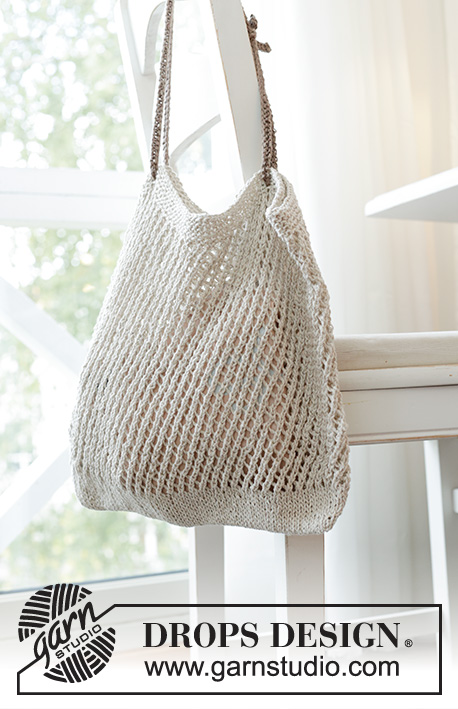
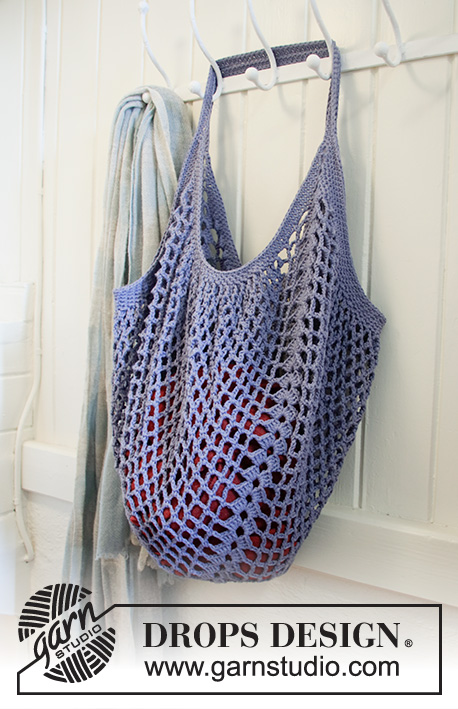
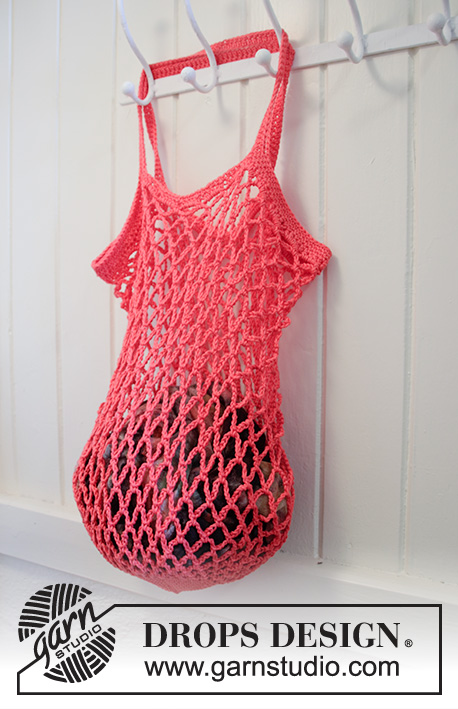
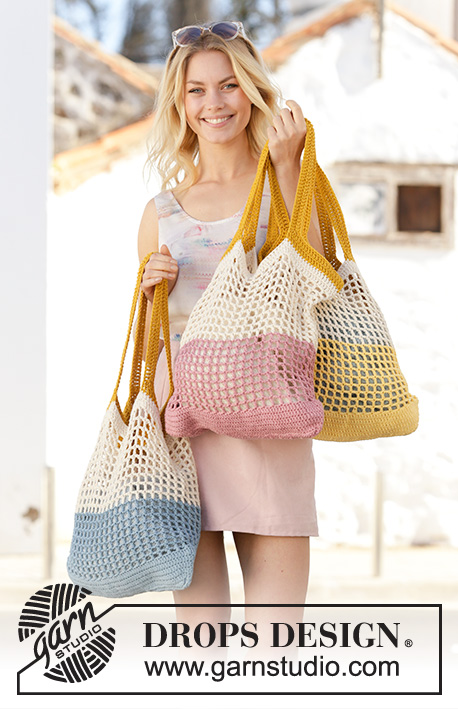
Crocheted bags with stripes in DROPS Paris. The piece is worked in the round, bottom up.
DROPS 200-1 |
|||||||||||||
|
EXPLANATIONS FOR THE PATTERN: ------------------------------------------------------- PATTERN: See diagrams A.1 and A.2. CROCHET INFORMATION: At the beginning of each round of double crochets, replace the first double crochet with 1 chain stitch. The round finishes with 1 slip stitch in the first chain stitch at the beginning of the round. At the beginning of each round of treble crochets, replace the first treble crochet with 3 chain stitches. The round finishes with 1 slip stitch in the 3rd chain stitch at the beginning of the round. CROCHET TIP (for chain stitches): 1 chain stitch is equivalent to 1 treble crochet in width. Make sure the loop made in the chain stitch is pulled some way up the hook so that it is not tight. If the chain stitch is worked too tightly, the pattern will be tight in sections where there are lots of chain stitches. INCREASE TIP-1: Increase 1 treble crochet by working 2 treble crochets in 1 treble crochet. Increase 1 treble crochet in each stitch before and after both marker threads (= 4 treble crochets increased on round). INCREASE TIP-2 (evenly spaced): To work out how to increase evenly count the total number of stitches on the round (e.g. 130 stitches) and divide by the number of increases to be made (e.g. 8) = 16.25. In this example increase by working 2 treble crochets in approx. each 16th stitch. 3 TREBLE CROCHETS TO 1 TREBLE CROCHET: Work 1 treble crochet in first stitch, but wait with the last yarn over and pull through (= 2 loops on hook), work 1 more treble crochet in the same way in each of the next 2 stitches, but pull the last yarn over through all 4 loops on the hook (= 1 stitch) ------------------------------------------------------- START THE PIECE HERE: ------------------------------------------------------- BAG - SHORT OVERVIEW OF THE PIECE: The piece is worked in the round, bottom up. The bottom is crocheted together to finish. BAG: Work 142 chain stitches with hook size 4.5 mm and old pink. Form them into a ring with 1 slip stitch in the first chain stitch on the round. ROUND 1: Work 1 chain stitch (= 1 double crochet) – read CROCHET INFORMATION, work 1 double crochet in the next chain stitch, * skip the next chain stitch, work 1 double crochet in each of the next 4 chain stitches *, work from *-* a total of 28 times = 114 double crochets. Insert a marker thread at the beginning of the round and a marker thread after 57 double crochets (= 57 double crochets left on round). ROUNDS 2-5: Work 1 treble crochet in each double crochet. AT THE SAME TIME on each round increase 1 stitch on each side of both marker threads – read INCREASE TIP-1 = 130 stitches. REMEMBER THE CROCHET TENSION! ROUND 6: Work 1 treble crochet in each treble crochet and increase 8 treble crochets evenly on round – read INCREASE TIP-2 = 138 treble crochets. Now continue as follows – read CROCHET TIP: Work A.1 a total of 46 times on the round. When the diagram has been completed in height repeat the last row in the diagram. When the piece measure 18 cm from the cast-on edge change to off white. Continue working the last round in A.1 until the piece measures 31 cm from the cast on edge. Work A.2 over each repeat of A.1 – remember CROCHET INFORMATION. Change to mustard and work the edge and straps as follows: ROUND 1: Work * 1 treble crochet in each of the first 23 treble crochets, work 72 chain stitches – make sure that the chain stitches are not tight (the row of chain stitches should measure 45 cm), skip 23 treble crochets, work 1 treble crochet in each of the next 23 treble crochets *, work from *-* 1 more time on the round = 2 straps. ROUND 2: Work * 1 treble crochet in each of the first 21 treble crochets, work 3 TREBLE CROCHETS TO 1 TREBLE CROCHET – read description above, work 1 treble crochet in each of the next 70 chain stitches (there is 1 chain stitch left before the next treble crochet on the round), work 3 TREBLE CROCHETS TO 1 TREBLE CROCHET, work 1 treble crochet in each of the next 21 treble crochets *, work from *-* 1 more time on the round = 228 treble crochets. ROUND 3: * Work 1 double crochet in every treble crochet until the 3 treble crochets that were crocheted together into 1 treble crochet before the strap, work 1 chain stitch, skip the treble crochet worked together, work 1 treble crochet in every treble crochet to the 3 treble crochets that were crocheted together into 1 treble crochet on the other side of the strap, work 1 chain stitch and skip the treble crochet worked together *, work from *-* one more time on the round and finish with 1 double crochet in every treble crochet to the end of the round. Cut and fasten the strands. Turn the piece so that right side faces right side and crochet the bottom together along the first row of chain stitches worked. Crochet using the same colour as you have used at the bottom of the bag and work through both layers starting from the marker thread at the beginning of the round as follows: Work 1 double crochet in each chain stitch, but skip the same chain stitches skipped at the start of the piece. Cut and fasten the strand. Work 2 more bags in the same way, but start with light blue or vanilla instead of old pink. |
|||||||||||||
Diagram explanations |
|||||||||||||
|
|||||||||||||
|
|||||||||||||
Have you finished this pattern?Tag your pictures with #dropspattern #backtothebeachbag or submit them to the #dropsfan gallery. Do you need help with this pattern?You'll find 12 tutorial videos, a Comments/Questions area and more by visiting the pattern on garnstudio.com. © 1982-2025 DROPS Design A/S. We reserve all rights. This document, including all its sub-sections, has copyrights. Read more about what you can do with our patterns at the bottom of each pattern on our site. |
|||||||||||||


With over 40 years in knitting and crochet design, DROPS Design offers one of the most extensive collections of free patterns on the internet - translated to 17 languages. As of today we count 314 catalogues and 11822 patterns translated into English (UK/cm).
We work hard to bring you the best knitting and crochet have to offer, inspiration and advice as well as great quality yarns at incredible prices! Would you like to use our patterns for other than personal use? You can read what you are allowed to do in the Copyright text at the bottom of all our patterns. Happy crafting!
Post a comment to pattern DROPS 200-1
We would love to hear what you have to say about this pattern!
If you want to leave a question, please make sure you select the correct category in the form below, to speed up the answering process. Required fields are marked *.