DROPS Paris
DROPS Paris
100% Cotton
from 1.10 £ /50g
Get the yarn to make this pattern from 15.40£.

The yarn cost is calculated from the pattern’s smallest size and the yarn’s cheapest product type. Looking for an even better price? You might find it on the DROPS Deals!

DROPS SS24

Back to the Beach

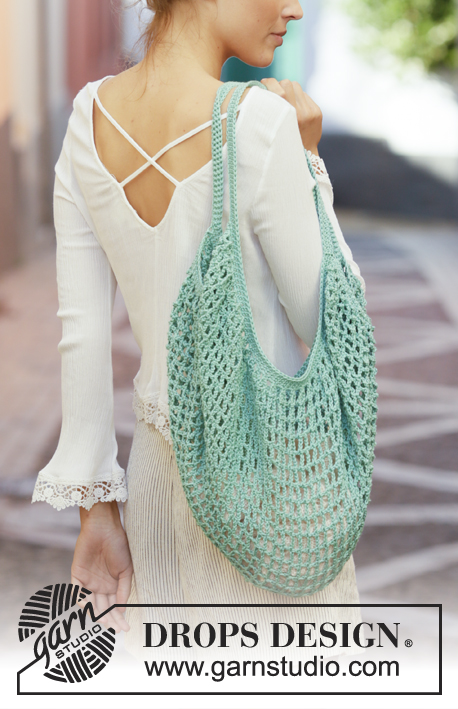
Crocheted bags with stripes in DROPS Paris. The piece is worked in the round, bottom up.

DROPS 200-1
DROPS Design: Pattern no w-767
Yarn group C or A + A
-------------------------------------------------------

SIZE:
One-size.
Measurements: Circumference: 86 cm. Length (without straps): 36 cm.

MATERIALS (for 1 bag in each colour):
DROPS PARIS from Garnstudio (belongs to yarn group C)
250 g colour 17, off white
150 g colour 41, mustard
100 g colour 59, old pink
100 g colour 101, light blue
100 g colour 35, vanilla
For 1 bag you need 100 g colour 17 off white, 50 g colour 41 mustard and 100 g of colour at bottom of bag.

If you work the piece in one colour only, you will need:
250 g Paris for 1 bag.

CROCHET TENSION:
16 treble crochets in width and 9 rows in height = 10 x 10 cm.

CROCHET HOOK:
DROPS CROCHET HOOK SIZE 4.5 MM.
The hook size is only a guide. If you get too many stitches on 10 cm, change to a larger hook size. If you get too few stitches on 10 cm, change to a smaller hook size.

-------------------------------------------------------

-------------------------------------------------------

Alternative Yarn – See how to change yarns here
Yarn Groups A to F – Use the same pattern and change the yarn here
Yarn usage using an alternative yarn – Use our yarn converter here

-------------------------------------------------------

DROPS Paris
DROPS Paris
100% Cotton
from 1.10 £ /50g
Get the yarn to make this pattern from 15.40£.

The yarn cost is calculated from the pattern’s smallest size and the yarn’s cheapest product type. Looking for an even better price? You might find it on the DROPS Deals!

Pattern instructions

NOTE: This pattern is written in British English. All measurements in charts are in cm. For conversion from cm to inches - click here. There are different terms for crocheting in British and American English. If this pattern includes crochet, click for "crochet terms" here. For this pattern in American English, please click here.
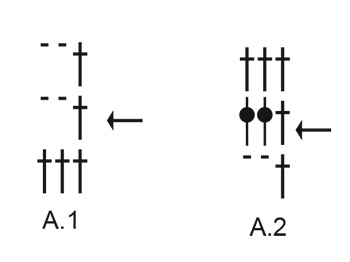
EXPLANATIONS FOR THE PATTERN:

-------------------------------------------------------

PATTERN: 
See diagrams A.1 and A.2.

CROCHET INFORMATION:
At the beginning of each round of double crochets, replace the first double crochet with 1 chain stitch. The round finishes with 1 slip stitch in the first chain stitch at the beginning of the round.
At the beginning of each round of treble crochets, replace the first treble crochet with 3 chain stitches. The round finishes with 1 slip stitch in the 3rd chain stitch at the beginning of the round.

CROCHET TIP (for chain stitches):
1 chain stitch is equivalent to 1 treble crochet in width. Make sure the loop made in the chain stitch is pulled some way up the hook so that it is not tight. If the chain stitch is worked too tightly, the pattern will be tight in sections where there are lots of chain stitches.

INCREASE TIP-1:
Increase 1 treble crochet by working 2 treble crochets in 1 treble crochet. Increase 1 treble crochet in each stitch before and after both marker threads (= 4 treble crochets increased on round).

INCREASE TIP-2 (evenly spaced):
To work out how to increase evenly count the total number of stitches on the round (e.g. 130 stitches) and divide by the number of increases to be made (e.g. 8) = 16.25. 
In this example increase by working 2 treble crochets in approx. each 16th stitch.

3 TREBLE CROCHETS TO 1 TREBLE CROCHET:
Work 1 treble crochet in first stitch, but wait with the last yarn over and pull through (= 2 loops on hook), work 1 more treble crochet in the same way in each of the next 2 stitches, but pull the last yarn over through all 4 loops on the hook (= 1 stitch)

-------------------------------------------------------

START THE PIECE HERE:

-------------------------------------------------------

BAG - SHORT OVERVIEW OF THE PIECE:
The piece is worked in the round, bottom up. The bottom is crocheted together to finish.

BAG:
Work 142 chain stitches with hook size 4.5 mm and old pink. Form them into a ring with 1 slip stitch in the first chain stitch on the round.
ROUND 1: Work 1 chain stitch (= 1 double crochet) – read CROCHET INFORMATION, work 1 double crochet in the next chain stitch, * skip the next chain stitch, work 1 double crochet in each of the next 4 chain stitches *, work from *-* a total of 28 times = 114 double crochets. Insert a marker thread at the beginning of the round and a marker thread after 57 double crochets (= 57 double crochets left on round).
ROUNDS 2-5: Work 1 treble crochet in each double crochet. AT THE SAME TIME on each round increase 1 stitch on each side of both marker threads – read INCREASE TIP-1 = 130 stitches. REMEMBER THE CROCHET TENSION!
ROUND 6: Work 1 treble crochet in each treble crochet and increase 8 treble crochets evenly on round – read INCREASE TIP-2 = 138 treble crochets.
Now continue as follows – read CROCHET TIP: Work A.1 a total of 46 times on the round. When the diagram has been completed in height repeat the last row in the diagram. When the piece measure 18 cm from the cast-on edge change to off white. Continue working the last round in A.1 until the piece measures 31 cm from the cast on edge.

Work A.2 over each repeat of A.1 – remember CROCHET INFORMATION.
Change to mustard and work the edge and straps as follows:
ROUND 1: Work * 1 treble crochet in each of the first 23 treble crochets, work 72 chain stitches – make sure that the chain stitches are not tight (the row of chain stitches should measure 45 cm), skip 23 treble crochets, work 1 treble crochet in each of the next 23 treble crochets *, work from *-* 1 more time on the round = 2 straps.
ROUND 2: Work * 1 treble crochet in each of the first 21 treble crochets, work 3 TREBLE CROCHETS TO 1 TREBLE CROCHET – read description above, work 1 treble crochet in each of the next 70 chain stitches (there is 1 chain stitch left before the next treble crochet on the round), work 3 TREBLE CROCHETS TO 1 TREBLE CROCHET, work 1 treble crochet in each of the next 21 treble crochets *, work from *-* 1 more time on the round = 228 treble crochets.
ROUND 3: * Work 1 double crochet in every treble crochet until the 3 treble crochets that were crocheted together into 1 treble crochet before the strap, work 1 chain stitch, skip the treble crochet worked together, work 1 treble crochet in every treble crochet to the 3 treble crochets that were crocheted together into 1 treble crochet on the other side of the strap, work 1 chain stitch and skip the treble crochet worked together *, work from *-* one more time on the round and finish with 1 double crochet in every treble crochet to the end of the round.
Cut and fasten the strands. Turn the piece so that right side faces right side and crochet the bottom together along the first row of chain stitches worked. Crochet using the same colour as you have used at the bottom of the bag and work through both layers starting from the marker thread at the beginning of the round as follows: Work 1 double crochet in each chain stitch, but skip the same chain stitches skipped at the start of the piece. Cut and fasten the strand.
Work 2 more bags in the same way, but start with light blue or vanilla instead of old pink.

This pattern has been corrected.

Updated online: 02.05.2019
Correction - straps: ROUND 2: Work * 1 treble crochet in each of the first 21 treble crochets, work 3 TREBLE CROCHETS TO 1 TREBLE CROCHET – read description above, work 1 treble crochet in each of the next 70 chain stitches (there is 1 chain stitch left before the next treble crochet on the round), work 3 TREBLE CROCHETS TO 1 TREBLE CROCHET, work 1 treble crochet in each of the next 21 treble crochets *, work from *-* 1 more time on the round = 228 treble crochets.
Updated online: 30.09.2021
Correction 3rd round, straps.

Diagram

symbols = 1 chain stitch
symbols = 1 treble crochet in stitch
symbols = 1 treble crochet around chain-space
symbols = start on this round - previous round already worked
diagram
Do you have a question? See a list of frequently asked questions (FAQ)

Knitting tension is what determines the final measurements of your work, and is usually measured per 10 x 10 cm. It is provided like so: number of stitches in width x number of rows in height - eg: 19 stitches x 26 rows = 10 x 10 cm.

The knitting tension is very individual; some people knit/crochet loosely while others work tightly. You adjust the knitting tension with the needle size, which is why the suggested needle size is only meant as a guide! You need to adjust this (up or down) to ensure that YOUR knitting tension matches the knitting tension provided in the pattern. If you work with a different knitting tension than provided you will have a different yarn consumption, and your work will have different measurements than what the pattern suggests.

The knitting tension also determines which yarns can replace each other. As long as you achieve the same knitting tension you can replace one yarn with another.

See DROPS lesson: How to measure your tension/gauge

See DROPS video: How to make a gauge tension swatch

The required amount of yarn is provided in grams, eg: 450 g. To calculate how many balls you’ll need you first need to know how many grams are in 1 ball (25g, 50g or 100g). This information is available if you click on the individual yarn quality on our pages. Divide the amount required with the amount of each ball. For example, if each ball is 50g (the most common amount), the calculation will be as follows: 450 / 50 = 9 balls.

The important thing when changing from one yarn to another is that the knitting/crochet tension remains the same. This is so that the measurements of the finished piece will be the same as on the sketch provided. It is easier to achieve the same knitting tension using yarns from the same yarn group. It is also possible to work with multiple strands of a thinner yarn to achieve the knitting tension of a thicker one. Please try our yarn converter. We recommend you to always work a test swatch.

Please NOTE: when changing yarn the garment might have a different look and feel to the garment in the photo, due to individual properties and qualities of each yarn.

See DROPS lesson: Can I use a different yarn than the one mentioned in the pattern?

All our yarns are categorised into yarn groups (from A to F) according to thickness and knitting tension – group A contains the thinnest yarns and group F the thickest. This makes it easier for you to find alternative yarns to our patterns, should you wish to switch yarn. All yarns within the same group have a similar knitting tension and can easily replace each other. However, different yarn qualities have different structures and properties which will give the finished work a unique look and feel.

Click here for an overview of the yarns in each yarn group

At the top of all our patterns you’ll find a link to our yarn calculator, which is a helpful tool should you wish to use a different yarn than suggested. By filling in the yarn quality you wish to replace, the amount (in your size) and number of strands, the calculator will present good alternative yarns with the same knitting tension. Additionally it will tell you how much you’ll require in the new qualities and whether you’ll need to work with multiple strands. Most skeins are 50g (some are 25g or 100g).

If the pattern is worked with multiple colours, every colour will have to be calculated separately. Similarly, if the pattern is worked with several strands of different yarns (for example 1 strand Alpaca and 1 strand Kid-Silk) you will have to find alternatives for each, individually.

Click here to see our yarn calculator

Since different yarns have different qualities and textures we have chosen to keep the original yarn in our patterns. However, you can easily find options among our available qualities by using our yarn calculator, or simply pick a yarn from the same yarn group.

It is possible that some retailers still have discontinued yarns in stock, or that someone has a few skeins at home that they would like to find patterns for.

The yarn calculator will provide both alternative yarn as well as required amount in the new quality.

If you think it's hard to decide what size to make, it can be a good idea to measure a garment you own already and like the size of. Then you can pick the size by comparing those measures with the ones available in the pattern's size chart.

You'll find the size chart at the bottom of the pattern.

See DROPS lesson: How to read size chart

The needle size provided in the pattern serves only as a guide, the important thing is to follow the knitting tension. And since knitting tension is very individual, you will have to adjust the needle size to ensure that YOUR tension is the same as in the pattern – maybe you’ll have to adjust 1, or even 2 needle sizes, up or down to achieve the correct tension. For this, we recommend that you work test swatches.

Should you work with a different knitting tension than the one provided, the measurements of the finished garment might deviate from the measurement sketch.

See DROPS lesson: How to measure your tension/gauge

See DROPS video: How to make a tension/gauge swatch

Working a garment top-down provides more flexibility and room for personal adjustment. For example it is easier to try the garment on while working, as well as making adjustments to length of yoke and shoulder caps.

The instructions are carefully explaining every step, in the correct order. Diagrams are adjusted to the knitting direction and are worked as usual.

The diagram depicts all rows/rounds, and every stitch seen from the right side. It is read from bottom to top, from right to left. 1 square = 1 stitch.

When working back and forth, every other row is worked from the right side and every other row is worked from the wrong side. When working from the wrong side, the diagram will have to be worked reversed: from left to right, knit stitches are purled, purl stitches are knit etc.

When working in the round every round is worked from the right side and the diagram are worked from right to left on all rounds.

See DROPS lesson: How to read knitting diagrams

The diagram depicts all rows/rounds, and every stitch seen from the right side. It is worked from bottom to top, from right to left.

When working back and forth every other row is worked from the right side: from right to left and every other row is worked from the wrong side: from left to right.

When working in the round, every row in the diagram are worked from the right side, from right to left.

When working a circular diagram you start in the middle and work your way outwards, counter clockwise, row by row.

The rows usually start with a given number of chain stitches (equivalent to the height of the following stitch), this will either be depicted in the diagram or explained in the pattern.

See DROPS lesson: How to read crochet diagrams

Instructions for working several diagrams after each other on the same row/round, will often be written like so: “work A.1, A.2, A.3 a total of 0-0-2-3-4 times". This means you work A.1 once, then A.2 is worked once, and A.3 is repeated (in width) the number of times provided for your size – in this case like so: S = 0 times, M = 0 times, L=2 times, XL= 3 times and XXL = 4 times.

The diagrams are worked as usual: begin with the first row in A.1, then work the first row in A.2 etc.

See DROPS lesson: How to read knitting diagrams

See DROPS lesson: How to read crochet diagrams

The total width of the garment (from wrist-to-wrist) will be larger in the larger sizes, despite the actual sleeves being shorter. The larger sizes have longer sleeve caps and wider shoulders, so there will be a good fit in all sizes.

The measurement sketch/schematic drawing provides information regarding the full length of the garment. If it’s a jumper or a jacket the length is measured from the highest point on the shoulder closest to the neckline, and straight down to the bottom of the garment. It is NOT measured from the tip of shoulder. Similarly, the length of yoke is measured from the highest point on the shoulder and down to where yoke is split into body and sleeves.

On a jacket measures are never taken along bands, unless specifically stated. Always measure inside band stitches when measuring the length.

See DROPS lesson: How to read a schematic drawing

Diagrams are often repeated on the round or in height. 1 repeat is the diagram the way it appears in the pattern. If it says to work 5 repeats of A.1 in the round, then you work A.1 a total of 5 times after/next to each other in the round. If it says to work 2 repeats of A.1 vertically/in height you work the entire diagram once, then begin again at the start and work the entire diagram one more time.

Chain stitches are slightly narrower than other stitches and to avoid working the cast-on edge too tight, we simply chain more stitches to begin with. The stitch count will be adjusted on the following row to fit the pattern and measurement sketch.

The rib edge is more elastic and will contract slightly compared to, for example, stocking stitch. By increasing before the rib edge, you avoid a visible difference in width between the rib edge and the rest of the body.

It’s very easy to cast off too tightly, and by making yarn overs while casting off (and simultaneously casting these off) you avoid a too tight cast off edge.

See DROPS video: How to bind off with yarn overs (yo)

To achieve an even increase (or decrease) you can increase on, for example: every 3rd and 4th row alternately, like so: work 2 rows and increase on the 3rd row, work 3 rows and increase on the 4th. Repeat this until the increase is complete.

See DROPS lesson: Increase or decrease 1 st on every 3rd and 4th row alternately

Should you prefer to work in the round instead of back and forth, you may of course adjust the pattern. You’ll need to add steeks mid-front (usually 5 stitches), and follow the instructions. When you would normally turn and work from the wrong side, simply work across the steek and continue in the round. At the end you’ll cut the piece open, pick up stitches to work bands, and cover the cut edges.

See DROPS video: How to knit steeks and cut open

Should you prefer to work back and forth instead of in the round, you may of course adjust the pattern so you work the pieces separately and then assemble them at the end. Divide the stitches for the body in 2, add 1 edge stitch in each side (for sewing) and work the front and back pieces separately.

See DROPS lesson: Can I adapt a pattern for circular needles into straight needles?

Pattern repeats can vary slightly in the different sizes, in order to get the correct proportions. If you’re not working the exact same size as the garment in the photo, yours might deviate slightly. This has been carefully developed and adjusted so that the complete impression of the garment is the same in all sizes.

Make sure to follow instructions and diagrams for your size!

If you have found a pattern you like which is available in women’s size it’s not very difficult to convert it to men’s size. The biggest difference will be the length of sleeves and body. Start working on the women size that you think would fit across the chest. The additional length will be worked right before you cast off for the armhole/sleeve cap. If the pattern is worked top-down you can add the length right after the armhole or before the first decrease on sleeve.

Regarding additional yarn amount, this will depend on how much length you add, but it is better with a skein too many than too few.

All yarns will have excess fibres (from production) that might come off as lint or shedding. Brushed yarns (ie hairier yarns) have more of these loose, excess fibres, causing more shedding.

Shedding also depends on what is worn under or over the garment, and whether this pulls at the yarn fibres. It’s therefore not possible to guarantee that there will be no shedding

Below are some tips on how to get the best result when working with hairier yarns:

1. When the garment is finished (before you wash it) shake it vigorously so the looser hairs come off. NOTE: do NOT use a lint roller, brush or any method that pulls at the yarn.

2. Place the garment in a plastic bag and put it in your freezer - the temperature will cause the fibres to become less attached to each other, and excess fibres will come off easier.

3. Leave in the freezer for a few hours before taking it out and shaking it again.

4. Wash the garment according to the instructions on the yarn label.

Pilling is a natural process that happens to even the most exclusive of fibers. It's a natural sign of wear and tear that is hard to avoid, and that is most visible in high friction areas of your garment like a sweater's arms and cuffs.

You can make your garment look as new by removing the pilling, using a fabric comb or a pill/lint remover.

Still can't find the answer you need? Then scroll down and leave your question so one of our experts can try to help you. This will be done normally within 5 to 10 working days.
In the meantime, you can read the questions and answers that others have left to this pattern or join the DROPS Workshop on Facebook to get help from fellow knitters/crocheters!

You might also like...

Back to the Beach

Dorota Poprzeplatana, Poland

Back to the Beach

Elina, Estonia

Back to the Beach

Elisabeth, Norway

Back to the Beach

Aleksandra, Norway

Back to the Beach

Jana, Czech Republic

Back to the Beach

Kaderus, Czech Republic

Back to the beach

Julia, Sweden

Back to the Beach

Aleksandra, Norway

Post a comment to pattern DROPS 200-1

We would love to hear what you have to say about this pattern!

If you want to leave a question, please make sure you select the correct category in the form below, to speed up the answering process. Required fields are marked *.

Comments / Questions (83)

country flag Le Diagramme A1 Et A2 On Des Fautes? wrote:

Bonjour le diagramme A1 a une faute le dernier rang je crois

14.06.2020 - 22:12

DROPS Design answered:

Bonjour, les diagrammes A.1 et A.2 sont justes - on lit les diagramme à partir du rang 2 (celui avec la flèche) et on répète le 2ème rang. Bon crochet!

15.06.2020 - 10:05

country flag Rhona Liddle wrote:

I dont understand it at all. i've done the first 6 rows/rounds and am now onto doing the A1 diagram but i just dont understand. there's well over a hundred stitches in the row/round so how can i merely do three trebbles? or does it mean i do 3 trebbles all the way round as in one trebble in every stitch all the way round? OR... does it mean i do, 3 trebbles, 1 trebble & 2 chain, 1 trebble and 2 chain, repeated all the way round? + when i do the ch's do i skip 2 sts? else it changes shape

07.06.2020 - 16:18

DROPS Design answered:

Dear Mrs Liddle, find here how to read crochet diagrams - you will repeat A.1 a total of 46 times in the round starting with the row with an arrow (= 1 double crochet (US-English), 2 chains, skip 2 sts), repeat from *-*. Then work 2nd row: (1 dc in the dc, 2 ch). Happy crocheting!

08.06.2020 - 09:14

country flag Sandra wrote:

Hallo... auf den Fotos sieht es aus, als wären die Träger in der 3. R. mit festen M gehäkelt... in der Anleitung steht jedoch eine Reihe feste M häkeln... Was ist nun richtig? LG

28.05.2020 - 18:19

DROPS Design answered:

Liebe Sandra, je nach Wunsch können Sie ene zusätzliche Reihe mit feste Maschen häkeln oder nicht. Viel Spaß beim häkeln!

29.05.2020 - 07:46

country flag Birgitta Rödjer wrote:

Tack det blev lite klarare! Dock undrar jag om det 3:e varvet. På diagrammet ser det ut som man ska virka stolpar utan luftmaskor mellan. Kan det bli rätt?

24.05.2020 - 21:41

DROPS Design answered:

Hej. Varv 3 i diagram A.1 virkar du *1 stolpe i stolpen under, 2 luftmaskor*. Detta upprepas varvet ut. Varv 3 i diagram A.2 är 1 stolpe i stolpen under och det upprepas hela varvet. Diagram A.2 virkar du då alltså endast precis innan du byter till färg senap (du virkar diagram A.1 tills arbetet mäter 31 cm). Mvh DROPS Design

25.05.2020 - 09:02

country flag Birgitta Rödjer wrote:

Tyvärr blev jag inte klokare av svaret!\\r\\nJag vill ha diagrammet beskrivet varv för varv! Tack

18.05.2020 - 16:00

DROPS Design answered:

Hej Birgitta På varvet med pilen i A.1 virkar du: *1 stolpe i stolpen under, 2 luftmaskor, hoppa över 2 stolpar*. Detta upprepas varvet ut. På nästa varv i diagram A.1 virkar du: *1 stolpe i stolpen under, 2 luftmaskor*. Detta upprepas varvet ut. Mvh DROPS Design

19.05.2020 - 07:52

country flag Valérie Ciaccafava wrote:

Même soucis que Gauthier (commentaire posé en juillet 2019) Avec 100gr de gris, je suis arrivée à ne faire que 4 rangs de grille. Sur la photo, il y en a 9... Pourtant, les dimensions semblent bonnes....

16.05.2020 - 16:10

country flag Birgitta wrote:

Hur löser jag diagram A1 och A2 på kassen 200-1? Första varvet är väl 1 stolpe och 2 luftmassor i vart stolp-mellanrum från föregående varv? På mönstret ser det ut som att varv 2 är likadant, blir bara större då? Blev inte klokare av uppdateringen från 2 maj 2020! Tacksam för hjälp!

15.05.2020 - 14:09

DROPS Design answered:

Hej. Du virkar först diagram A.1 tills arbetet mäter 31 cm (med färgbytet efter 18 cm). Sedan virkar du A.2 över varje rapport av A.1. När du ska virka första varvet i A.2 virkar du 1 stolpe i maskan under och sedan 2 luftmaskor på samma sätt som du gjorde på varv 2 och 3 i A.1. Mvh DROPS Design

18.05.2020 - 13:22

country flag Elina wrote:

Hei. I 2.omgang på kant og stropper, så skal man hekle staver i de 21 første stavene, og så 3 staver til en stav. Men når jeg har heklet de første 21, så er det bare 2 staver igjen før luftmaskeraden til stroppen begynner. Hva har jeg gjort feil? Eller har jeg bare misforstått noe? Mvh Elina

12.05.2020 - 23:33

DROPS Design answered:

Hei Elina. Ja, du skal ha 2 staver igjen og når du skal hekle 3 staver til 1 stav, hekler du i de 2 stavene + i 1.luftmasken i luftmaskeraden. Nå har du 71 luftmasker igjen på luftmaskeraden/stroppen, hekle 1 stave i hver av de neste 70 luftmaskene, deretter hekles det 3 staver til 1 stav. Det hekle 3 staver til 1 stav i hver overgang, 4 steder på omgangen. God Fornøyelse!

18.05.2020 - 12:55

country flag Adriana wrote:

In portuguese there is a mistake: it was that is made up to botton instead of botton up

04.05.2020 - 13:57

DROPS Design answered:

Obrigado pelo seu interesse nos nossos modelos. Efectivamente, havia uma falha que já foi corrigida, Bom croché!

04.05.2020 - 16:53

country flag Beate wrote:

Hallo liebes Drops-Team, ich verstehe leider die Anleitung ab Beginn von A1 nicht. Was ist gemeint mit: „ Wenn das ganze Diagramm in der Höhe zu Ende gehäkelt wurde, die letzte Runde des Diagramms häkeln“? 1. was ist mit „in der Höhe“ gemeint? 2. die „letzte“ Runde des Diagramms stimmt doch mit der vorherigen genau überein? Es wäre super, wenn Ihr mir behilflich sein könntet! LG Beate

02.05.2020 - 14:19

DROPS Design answered:

Liebe Beate, wenn die 2 Runden in A.1 einmal gestrickt werden, wiederholen Sie die letzte Runde bis geschriebene Höhe/Länge. Viel Spaß beim häkeln!

04.05.2020 - 11:54