
Popular categories
Looking for a yarn?


Comments / Questions (16)
![]() Amparo Bravo wrote:
Amparo Bravo wrote:
Podrías enviarme en gráfico gracias???
19.03.2025 - 08:35DROPS Design answered:
Hola Amparo, nosotros no hacemos patrones personalizados. Esta es el único formato del patrón disponible, en forma escrita. El patrón consiste en montar para la parte inferior del bolso y trabajar en punto jersey a la vez que aumentas en los lados. Después trabajas el PATRÓN DE CALADOS (ver explicación en su apartado) hasta que el bolso mida 29cm y trabajar un borde en punto musgo, en el que se trabajan agujeros para las asas.
23.03.2025 - 13:55
![]() Rene Gould wrote:
Rene Gould wrote:
The four holes that are made for the strap I can’t understand how you bring these holes together because I did the holes at the beginning of the pattern as it says an then at the top ene I did another 4holes on each side but you can’t put the bottom holes with the top hole as it work can you please explain about where an how you make your holes cos mine are working right now thank you
13.02.2023 - 19:13DROPS Design answered:
Dear Mrs Gould, the 4 holes should be worked on the same round , starting the round on one side of bag work as follows: *knit 15, K2 tog, YO, knit 30, K2 tog, YO, knit 15*, repeat from *-* one more time to the end of the round - there are a total of 4 holes on this round. Happy knitting!
14.02.2023 - 13:39
![]() Bain wrote:
Bain wrote:
Merci pour vos explications . Je n'avais vu que la vidéo du grafting avec les mailles encore sur les aiguilles et non sur des mailles rabattues .
22.04.2022 - 10:23
![]() Blain wrote:
Blain wrote:
Bonjour, j' ai deux questions pour ce modèle. faut il tricoter une maille torse sur le jeté ou comme le fil se présente le tour suivant ? Et enfin je vois qu\'il faut coudre le fond du sac en grafting mais je regarde les vidéos mais elles montrent que les mailles doivent êtres sur les aiguilles ce qui n\'est pas le cas Je ne comprends pas cette méthode . Merci
21.04.2022 - 19:34DROPS Design answered:
Bonjour Mme Blain, lorsque vous augmentez les 4 mailles par tour, les jetés se tricotent torse (cf AUGMENTATIONS, mais lorsque vous tricotez le point ajouré ensuite, les jetés se tricotent normalement. Vous pouvez utiliser cette vidéo pour l'assemblage du fond. Bon tricot!
22.04.2022 - 07:37
![]() Cecilia wrote:
Cecilia wrote:
Muchísimas gracias por este patrón. No lo he hecho igual. He modificado el punto y lo he hecho con punto de arroz. También le he puesto forro. Ha quedado genial
24.06.2021 - 13:53
![]() Monica wrote:
Monica wrote:
Non mi è chiaro come inserire la tracolla...
25.05.2020 - 10:18DROPS Design answered:
Buongiorno Monica. Deve far passare una estremità della tracolla attraverso due fori coincidenti (uno sul davanti e uno sul dietro della borsa), poi passa la stessa estremità attraverso gli altri due fori , sull'altro lato della borsa. Annoda poi le estremità della tracolla. Buon lavoro!
25.05.2020 - 12:32
![]() Suzy wrote:
Suzy wrote:
Bonjour, 32 cm, la hauteur total du sac je trouve que c'est trop court, étant donné que vous donnez 200grs de laine. J'ai utilisé que 3 pelotes. Merci
26.07.2019 - 16:21DROPS Design answered:
Bonjour Suzy! Cela peut dependre de la tension de votre ouvrage. Si vous voulez avoir un sac plus long, continuez a la hauteur souhaitee. Bon tricot!
26.07.2019 - 23:47
![]() Charlotte wrote:
Charlotte wrote:
I jeres udtagningstips står der at man skal slå om, strikke to ret og slå om igen. Næste runde strikker man så drejet ret så der ikke kommer hul... Mit problem er at det skulle være glat strik, så to runder i træk kan da ikke være ret - og hvis jeg kun strikker det drejede ret i ret og resten af runden i vrang kan det vel ses?
13.07.2019 - 17:28DROPS Design answered:
Hej Charlotte, da strikker du drejet vrang, så det bliver ret fra retsiden. God fornøjelse!
30.09.2019 - 08:35
![]() Sharron wrote:
Sharron wrote:
I love the seaside life pattern but don't know how to download or print it off my phone or from Facebook.
13.07.2019 - 07:51DROPS Design answered:
Dear Sharron, you can only print our patterns, but choosing a virtual printer may allow you to save them as a .PDF file. Happy knitting!
15.07.2019 - 11:53
![]() Sylvie wrote:
Sylvie wrote:
Bonjour, Avez vous le pull en patron ? je trouve le dos magnifique
21.03.2019 - 11:13DROPS Design answered:
Bonjour Sylvie, le haut porté par le modèle sur la photo n'est pas un modèle tricoté, désolée. Bon tricot!
21.03.2019 - 11:45
|
|
Seaside Life#seasidelifebag |
|
 |
 |
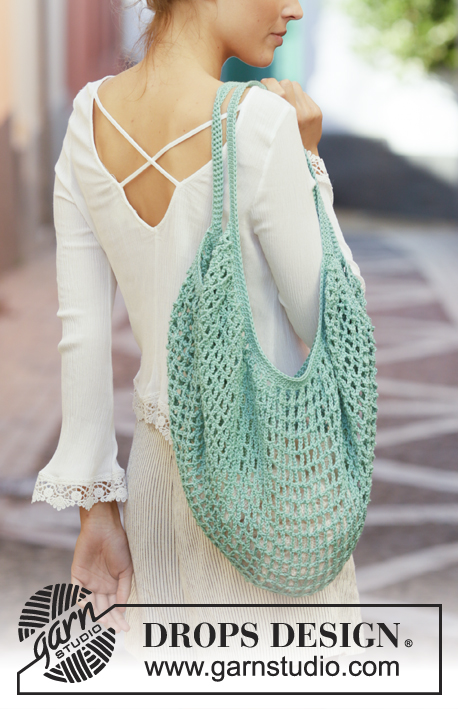
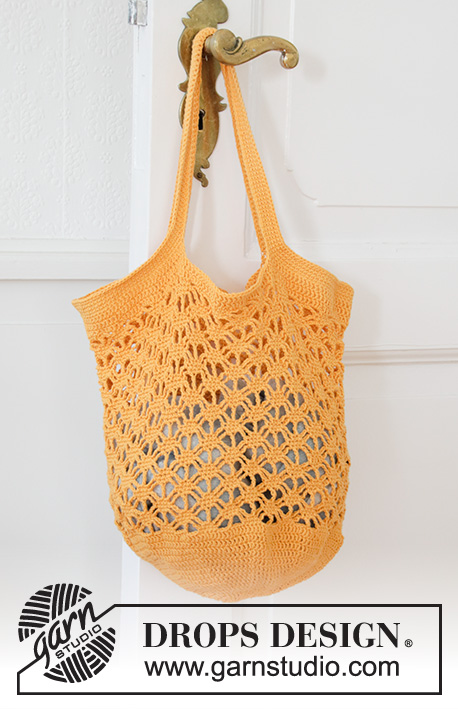
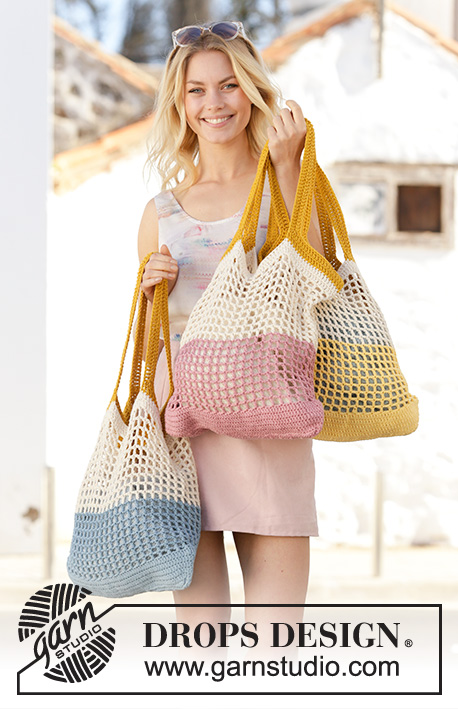
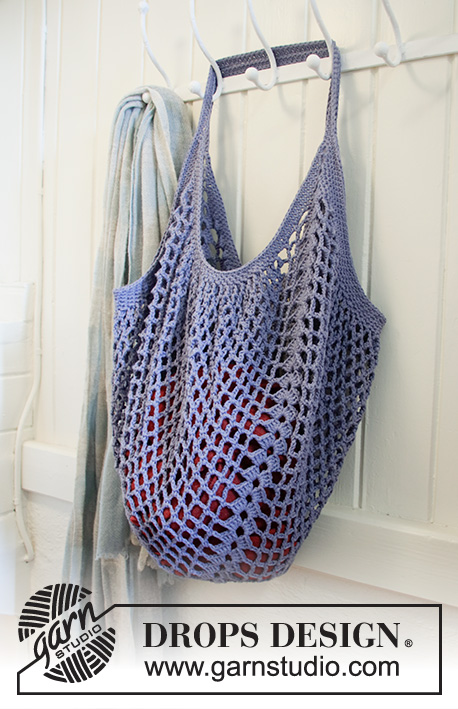
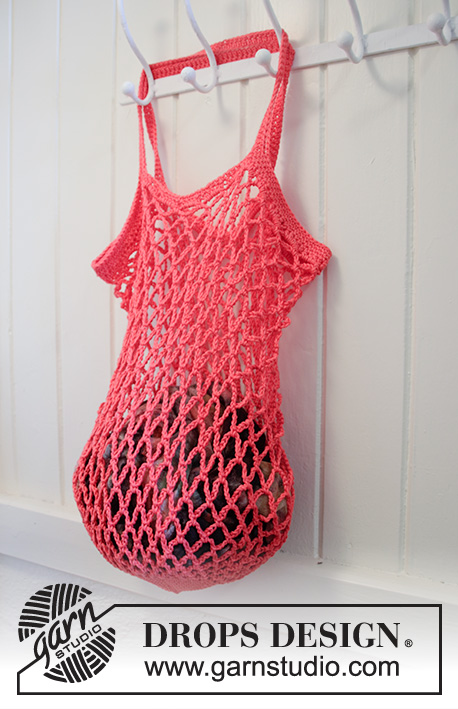
Knitted bag in DROPS Bomull-Lin or DROPS Paris. The piece is worked in the round with lace pattern.
DROPS 200-4 |
|
|
EXPLANATIONS FOR THE PATTERN: ------------------------------------------------------- RIDGE/GARTER STITCH (worked in the round): 1 ridge = 2 rounds. Knit 1 round and purl 1 round. RIDGE/GARTER STITCH (worked back and forth): Knit all rows. 1 ridge in height = Knit 2 rows. LACE PATTERN: ROUND 1: * 1 yarn over, knit 2 together *, work from *-*. ROUND 2: Knit. Repeat rounds 1 and 2. INCREASE TIP: Work as far as 1 stitch before the marker thread, 1 yarn over, knit 2 (marker thread sits between these 2 stitches), 1 yarn over. Repeat on the other side. On the next round knit the yarn overs twisted to avoid holes. ------------------------------------------------------- START THE PIECE HERE: ------------------------------------------------------- BAG - SHORT OVERVIEW OF THE PIECE: The piece is worked in the round with circular needle. BAG: Cast on 116 stitches with circular needle size 5 mm and light beige Bomull-Lin or beige Paris. Insert 1 marker thread at the beginning of the round and 1 marker thread after 58 stitches (= 1 marker thread in each side). Work stocking stitch in the round at the same time as on the first round increasing 1 stitch on each side of the marker threads - read INCREASE TIP (= 4 stitches increased). Increase like this every 4th round a total of 3 times = 128 stitches. When all the increases are finished and you have worked 12 rounds stocking stitch, work LACE PATTERN – read description above. REMEMBER THE KNITTING TENSION! Continue in the round with lace pattern until the piece measures 29 cm. Now work an edge in GARTER STITCH - read description above, as follows: Work 4 ridges, AT THE SAME TIME on round 3 (= a knitted round) make 4 holes on the round to thread the strap through: * Knit 15, knit the next 2 stitches together and make 1 yarn over, knit 30, knit 2 together and make 1 yarn over, knit 15 *, work from *-* 1 more time on the round (= 4 holes). Purl 1 round. Then work 2 more ridges. Cast off. Make sure that the cast-off edge is not tight; you can use a size larger needle if necessary. STRAP: Cast on 224 stitches with brown Bomull-Lin or brown Paris. Work 1 ridge. Cast off. Make sure that the cast-off edge is not tight; you can use a size larger needle if necessary. Lay the bag in front of you so that there are 2 layers with 2 and 2 holes on top of each other. Thread the strap from you through 2 of the holes so that it comes out at the other side of the bag. Pull the strap a little so that you can thread it through the other 2 holes, from the back towards you. Tie the 2 ends together. ASSEMBLY: Sew the bottom of the bag together with grafting stitches. Cut and fasten the strand well. |
|
Have you finished this pattern?Tag your pictures with #dropspattern #seasidelifebag or submit them to the #dropsfan gallery. Do you need help with this pattern?You'll find 20 tutorial videos, a Comments/Questions area and more by visiting the pattern on garnstudio.com. © 1982-2025 DROPS Design A/S. We reserve all rights. This document, including all its sub-sections, has copyrights. Read more about what you can do with our patterns at the bottom of each pattern on our site. |
|


With over 40 years in knitting and crochet design, DROPS Design offers one of the most extensive collections of free patterns on the internet - translated to 17 languages. As of today we count 314 catalogues and 11822 patterns translated into English (UK/cm).
We work hard to bring you the best knitting and crochet have to offer, inspiration and advice as well as great quality yarns at incredible prices! Would you like to use our patterns for other than personal use? You can read what you are allowed to do in the Copyright text at the bottom of all our patterns. Happy crafting!
Post a comment to pattern DROPS 200-4
We would love to hear what you have to say about this pattern!
If you want to leave a question, please make sure you select the correct category in the form below, to speed up the answering process. Required fields are marked *.