DROPS Air
DROPS Air
65% Alpaca, 28% Polyamide, 7% Wool
from 4.80 £ /50g
Get the yarn to make this pattern from 24.00£.

The yarn cost is calculated from the pattern’s smallest size and the yarn’s cheapest product type. Looking for an even better price? You might find it on the DROPS Deals!

DROPS SS24

Clemence

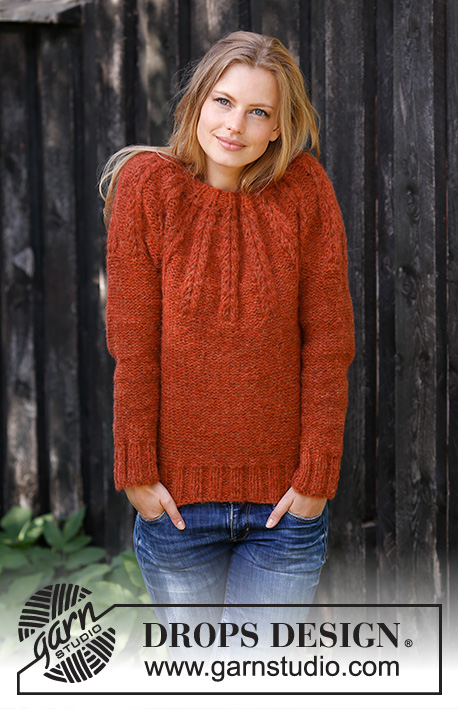
Knitted jumper with round yoke in DROPS Air. The piece is worked top down with textured border. Sizes S - XXXL.

DROPS 197-8
DROPS Design: Pattern no ai-167
Yarn group C or A + A
-----------------------------------------------------------

Sizes: S - M - L - XL - XXL - XXXL
Materials:
DROPS AIR from Garnstudio (belongs to yarn group C)
250-250-250-300-300-350 g colour 13, orange

-------------------------------------------------------
ACCESSORIES FOR THE PIECE:

KNITTING TENSION:
13 stitches in width and 17 rows in height with stocking stitch = 10 x 10 cm.

NEEDLES:
DROPS DOUBLE POINTED NEEDLES SIZE 8 MM.
DROPS CIRCULAR NEEDLE SIZE 8 MM: length 40 cm and 80 cm for stocking stitch.
DROPS DOUBLE POINTED NEEDLES SIZE 7 MM.
DROPS CIRCULAR NEEDLE SIZE 7 MM: length 40 cm and 80 cm for rib.
The needle size is only a guide. If you get too many stitches on 10 cm, change to a larger needle size. If you get too few stitches on 10 cm, change to a smaller needle size.

-----------------------------------------------------

-------------------------------------------------------

Alternative Yarn – See how to change yarns here
Yarn Groups A to F – Use the same pattern and change the yarn here
Yarn usage using an alternative yarn – Use our yarn converter here

-------------------------------------------------------

DROPS Air
DROPS Air
65% Alpaca, 28% Polyamide, 7% Wool
from 4.80 £ /50g
Get the yarn to make this pattern from 24.00£.

The yarn cost is calculated from the pattern’s smallest size and the yarn’s cheapest product type. Looking for an even better price? You might find it on the DROPS Deals!

Pattern instructions

NOTE: This pattern is written in British English. All measurements in charts are in cm. For conversion from cm to inches - click here. There are different terms for crocheting in British and American English. If this pattern includes crochet, click for "crochet terms" here. For this pattern in American English, please click here.
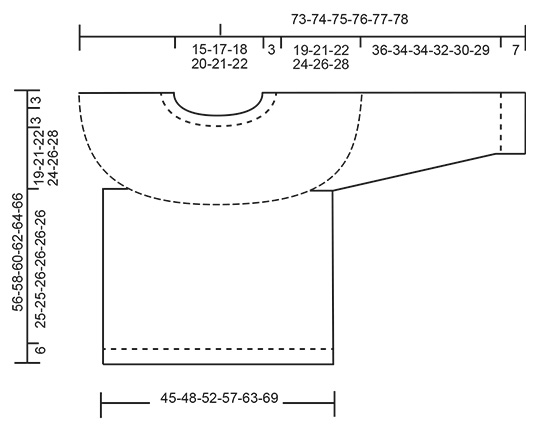
EXPLANATIONS FOR THE PATTERN:

-------------------------------------------------------

PATTERN:
See diagram A.1. Choose diagram for your size.

DECREASE/INCREASE tip (evenly spaced):
To work out how to decrease/increase evenly, count the total number of stitches on the needle (e.g. 180 stitches) and divide by the number of decreases/increases to be made (e.g. 4) = 45.
In this example, decrease by knitting each 44th and 45th stitch together.
Increase by making 1 yarn over after each 45th stitch. On the next round work the yarn overs twisted to avoid holes.

PURLING TIP (for sleeves and body):
When purling from the right side, it is possible to turn the piece inside out and knit from the wrong side. Remember to turn the piece back so that you work from the right side when working rib.

DECREASE TIP (for sleeves):
Decrease 1 stitch on each side of the marker thread as follows: Work until there are 3 stitches left before the marker thread, purl 2 together, purl 2 (the marker thread sits in the middle of these 2 stitches) purl the next 2 stitches together (NOTE! Knit if you have turned the piece inside out).

-------------------------------------------------------
START THE PIECE HERE:

-------------------------------------------------------

JUMPER:
The piece is worked in the round with circular needle, top down. After the yoke the body is worked in the round with circular needle. The sleeves are worked in the round with short circular needle/double pointed needles.

YOKE:
Cast on 54-60-63-66-69-72 stitches with circular needle size 7 mm and Air. Insert 1 marker thread at the beginning of the round (= mid back).
Work A.1a over all stitches – see diagram for your size (= 18-20-21-22-23-24 repeats of 3 stitches). Continue until A.1a has been completed. Change to circular needle size 8 mm and work A.1b over A.1a. REMEMBER THE KNITTING TENSION! When A.1b has been completed there are 180-200-210-242-253-264 stitches on the needle.
Then work A.1c over A.1b. Repeat A.1c in height until the piece measures 22-24-25-27-29-31 cm from the cast-on edge – adjust so that you finish after a round worked in the same way as 1st round in A.1c. Purl 1 round where you decrease 4-4-0-12-11-0 stitches evenly on round – read DECREASE/INCREASE TIP = 176-196-210-230-242-264 stitches.
The next round is purled as follows:
Work the first 26-28-30-33-36-40 stitches (= half back piece), place the next 36-42-45-49-49-52 stitches on a thread for sleeve, cast on 6-6-8-8-10-10 new stitches under the sleeve, work the next 52-56-60-66-72-80 stitches (= front piece), place the next 36-42-45-49-49-52 stitches on a thread for sleeve, cast on 6-6-8-8-10-10 new stitches under the sleeve and work the last 26-28-30-33-36-40 stitches (= half back piece). THE PIECE IS NOW MEASURED FROM HERE!

BODY:
= 116-124-136-148-164-180 stitches. Insert 1 marker thread in the middle of the 6-6-8-8-10-10 stitches cast on under the one sleeve and start the round by this marker. Continue with purl – read PURLING TIP, until the piece measures 25-25-26-26-26-26 cm from the division. Change to circular needle size 7 mm and work rib (= knit 2 / purl 2) for 6 cm. Loosely cast off with knit over knit and purl over purl – to avoid the cast-off edge being tight, you can cast off with a needle size 8 mm. The jumper measures approx. 56-58-60-62-64-66 cm from the shoulder.

SLEEVE:
Place the 36-42-45-49-49-52 stitches from the thread on the one side of the piece on short circular needle/double pointed needles size 8 mm and knit up 1 stitch in each of the 6-6-8-8-10-10 stitches cast on under the sleeve = 42-48-53-57-59-62 stitches. Insert 1 marker thread in the middle of the 6-6-8-8-10-10 stitches under the sleeve and start the round here. Continue with purl – remember PURLING TIP. When the piece measures 3 cm from the division, decrease 2 stitches mid under sleeve – read DECREASE TIP. Decrease like this every 5-3-2½-2-2-1½ cm a total of 7-10-12-13-13-14 times = 28-28-29-31-33-34 stitches. Continue until the sleeve measures 36-34-34-32-30-29 cm from the division (shorter measurements in larger sizes due to longer yoke). Knit 1 round where you increase 0-0-3-1-3-2 stitches evenly on round = 28-28-32-32-36-36 stitches. Change to double pointed needles size 7 mm and work rib (= knit 2 / purl 2) for 6 cm. The sleeve measures approx. 43-41-41-39-37-36 cm from the division. Loosely cast off with knit over knit and purl over purl – to avoid the cast-off edge being tight, you can cast off with a needle size 8 mm. Work the other sleeve in the same way.

Diagram

symbols = knit
symbols = purl
symbols = between 2 stitches make 1 yarn over; the yarn over is worked twisted on the next round to avoid a hole
symbols = knit
symbols = * insert the right needle in the middle of the stitch marked with a circle 4 rounds before this round, pick up the strand and pull the loop 3 cm long *, knit 1, repeat from *-* 1 time (= 3 stitches)
symbols = knit 3 together
symbols = knit 3 twisted together
diagram
diagram

Each of our patterns has specific tutorial videos to help you.

Do you have a question? See a list of frequently asked questions (FAQ)

Knitting tension is what determines the final measurements of your work, and is usually measured per 10 x 10 cm. It is provided like so: number of stitches in width x number of rows in height - eg: 19 stitches x 26 rows = 10 x 10 cm.

The knitting tension is very individual; some people knit/crochet loosely while others work tightly. You adjust the knitting tension with the needle size, which is why the suggested needle size is only meant as a guide! You need to adjust this (up or down) to ensure that YOUR knitting tension matches the knitting tension provided in the pattern. If you work with a different knitting tension than provided you will have a different yarn consumption, and your work will have different measurements than what the pattern suggests.

The knitting tension also determines which yarns can replace each other. As long as you achieve the same knitting tension you can replace one yarn with another.

See DROPS lesson: How to measure your tension/gauge

See DROPS video: How to make a gauge tension swatch

The required amount of yarn is provided in grams, eg: 450 g. To calculate how many balls you’ll need you first need to know how many grams are in 1 ball (25g, 50g or 100g). This information is available if you click on the individual yarn quality on our pages. Divide the amount required with the amount of each ball. For example, if each ball is 50g (the most common amount), the calculation will be as follows: 450 / 50 = 9 balls.

The important thing when changing from one yarn to another is that the knitting/crochet tension remains the same. This is so that the measurements of the finished piece will be the same as on the sketch provided. It is easier to achieve the same knitting tension using yarns from the same yarn group. It is also possible to work with multiple strands of a thinner yarn to achieve the knitting tension of a thicker one. Please try our yarn converter. We recommend you to always work a test swatch.

Please NOTE: when changing yarn the garment might have a different look and feel to the garment in the photo, due to individual properties and qualities of each yarn.

See DROPS lesson: Can I use a different yarn than the one mentioned in the pattern?

All our yarns are categorised into yarn groups (from A to F) according to thickness and knitting tension – group A contains the thinnest yarns and group F the thickest. This makes it easier for you to find alternative yarns to our patterns, should you wish to switch yarn. All yarns within the same group have a similar knitting tension and can easily replace each other. However, different yarn qualities have different structures and properties which will give the finished work a unique look and feel.

Click here for an overview of the yarns in each yarn group

At the top of all our patterns you’ll find a link to our yarn calculator, which is a helpful tool should you wish to use a different yarn than suggested. By filling in the yarn quality you wish to replace, the amount (in your size) and number of strands, the calculator will present good alternative yarns with the same knitting tension. Additionally it will tell you how much you’ll require in the new qualities and whether you’ll need to work with multiple strands. Most skeins are 50g (some are 25g or 100g).

If the pattern is worked with multiple colours, every colour will have to be calculated separately. Similarly, if the pattern is worked with several strands of different yarns (for example 1 strand Alpaca and 1 strand Kid-Silk) you will have to find alternatives for each, individually.

Click here to see our yarn calculator

Since different yarns have different qualities and textures we have chosen to keep the original yarn in our patterns. However, you can easily find options among our available qualities by using our yarn calculator, or simply pick a yarn from the same yarn group.

It is possible that some retailers still have discontinued yarns in stock, or that someone has a few skeins at home that they would like to find patterns for.

The yarn calculator will provide both alternative yarn as well as required amount in the new quality.

If you think it's hard to decide what size to make, it can be a good idea to measure a garment you own already and like the size of. Then you can pick the size by comparing those measures with the ones available in the pattern's size chart.

You'll find the size chart at the bottom of the pattern.

See DROPS lesson: How to read size chart

The needle size provided in the pattern serves only as a guide, the important thing is to follow the knitting tension. And since knitting tension is very individual, you will have to adjust the needle size to ensure that YOUR tension is the same as in the pattern – maybe you’ll have to adjust 1, or even 2 needle sizes, up or down to achieve the correct tension. For this, we recommend that you work test swatches.

Should you work with a different knitting tension than the one provided, the measurements of the finished garment might deviate from the measurement sketch.

See DROPS lesson: How to measure your tension/gauge

See DROPS video: How to make a tension/gauge swatch

Working a garment top-down provides more flexibility and room for personal adjustment. For example it is easier to try the garment on while working, as well as making adjustments to length of yoke and shoulder caps.

The instructions are carefully explaining every step, in the correct order. Diagrams are adjusted to the knitting direction and are worked as usual.

The diagram depicts all rows/rounds, and every stitch seen from the right side. It is read from bottom to top, from right to left. 1 square = 1 stitch.

When working back and forth, every other row is worked from the right side and every other row is worked from the wrong side. When working from the wrong side, the diagram will have to be worked reversed: from left to right, knit stitches are purled, purl stitches are knit etc.

When working in the round every round is worked from the right side and the diagram are worked from right to left on all rounds.

See DROPS lesson: How to read knitting diagrams

The diagram depicts all rows/rounds, and every stitch seen from the right side. It is worked from bottom to top, from right to left.

When working back and forth every other row is worked from the right side: from right to left and every other row is worked from the wrong side: from left to right.

When working in the round, every row in the diagram are worked from the right side, from right to left.

When working a circular diagram you start in the middle and work your way outwards, counter clockwise, row by row.

The rows usually start with a given number of chain stitches (equivalent to the height of the following stitch), this will either be depicted in the diagram or explained in the pattern.

See DROPS lesson: How to read crochet diagrams

Instructions for working several diagrams after each other on the same row/round, will often be written like so: “work A.1, A.2, A.3 a total of 0-0-2-3-4 times". This means you work A.1 once, then A.2 is worked once, and A.3 is repeated (in width) the number of times provided for your size – in this case like so: S = 0 times, M = 0 times, L=2 times, XL= 3 times and XXL = 4 times.

The diagrams are worked as usual: begin with the first row in A.1, then work the first row in A.2 etc.

See DROPS lesson: How to read knitting diagrams

See DROPS lesson: How to read crochet diagrams

The total width of the garment (from wrist-to-wrist) will be larger in the larger sizes, despite the actual sleeves being shorter. The larger sizes have longer sleeve caps and wider shoulders, so there will be a good fit in all sizes.

The measurement sketch/schematic drawing provides information regarding the full length of the garment. If it’s a jumper or a jacket the length is measured from the highest point on the shoulder closest to the neckline, and straight down to the bottom of the garment. It is NOT measured from the tip of shoulder. Similarly, the length of yoke is measured from the highest point on the shoulder and down to where yoke is split into body and sleeves.

On a jacket measures are never taken along bands, unless specifically stated. Always measure inside band stitches when measuring the length.

See DROPS lesson: How to read a schematic drawing

Diagrams are often repeated on the round or in height. 1 repeat is the diagram the way it appears in the pattern. If it says to work 5 repeats of A.1 in the round, then you work A.1 a total of 5 times after/next to each other in the round. If it says to work 2 repeats of A.1 vertically/in height you work the entire diagram once, then begin again at the start and work the entire diagram one more time.

Chain stitches are slightly narrower than other stitches and to avoid working the cast-on edge too tight, we simply chain more stitches to begin with. The stitch count will be adjusted on the following row to fit the pattern and measurement sketch.

The rib edge is more elastic and will contract slightly compared to, for example, stocking stitch. By increasing before the rib edge, you avoid a visible difference in width between the rib edge and the rest of the body.

It’s very easy to cast off too tightly, and by making yarn overs while casting off (and simultaneously casting these off) you avoid a too tight cast off edge.

See DROPS video: How to bind off with yarn overs (yo)

To achieve an even increase (or decrease) you can increase on, for example: every 3rd and 4th row alternately, like so: work 2 rows and increase on the 3rd row, work 3 rows and increase on the 4th. Repeat this until the increase is complete.

See DROPS lesson: Increase or decrease 1 st on every 3rd and 4th row alternately

Should you prefer to work in the round instead of back and forth, you may of course adjust the pattern. You’ll need to add steeks mid-front (usually 5 stitches), and follow the instructions. When you would normally turn and work from the wrong side, simply work across the steek and continue in the round. At the end you’ll cut the piece open, pick up stitches to work bands, and cover the cut edges.

See DROPS video: How to knit steeks and cut open

Should you prefer to work back and forth instead of in the round, you may of course adjust the pattern so you work the pieces separately and then assemble them at the end. Divide the stitches for the body in 2, add 1 edge stitch in each side (for sewing) and work the front and back pieces separately.

See DROPS lesson: Can I adapt a pattern for circular needles into straight needles?

Pattern repeats can vary slightly in the different sizes, in order to get the correct proportions. If you’re not working the exact same size as the garment in the photo, yours might deviate slightly. This has been carefully developed and adjusted so that the complete impression of the garment is the same in all sizes.

Make sure to follow instructions and diagrams for your size!

If you have found a pattern you like which is available in women’s size it’s not very difficult to convert it to men’s size. The biggest difference will be the length of sleeves and body. Start working on the women size that you think would fit across the chest. The additional length will be worked right before you cast off for the armhole/sleeve cap. If the pattern is worked top-down you can add the length right after the armhole or before the first decrease on sleeve.

Regarding additional yarn amount, this will depend on how much length you add, but it is better with a skein too many than too few.

All yarns will have excess fibres (from production) that might come off as lint or shedding. Brushed yarns (ie hairier yarns) have more of these loose, excess fibres, causing more shedding.

Shedding also depends on what is worn under or over the garment, and whether this pulls at the yarn fibres. It’s therefore not possible to guarantee that there will be no shedding

Below are some tips on how to get the best result when working with hairier yarns:

1. When the garment is finished (before you wash it) shake it vigorously so the looser hairs come off. NOTE: do NOT use a lint roller, brush or any method that pulls at the yarn.

2. Place the garment in a plastic bag and put it in your freezer - the temperature will cause the fibres to become less attached to each other, and excess fibres will come off easier.

3. Leave in the freezer for a few hours before taking it out and shaking it again.

4. Wash the garment according to the instructions on the yarn label.

Pilling is a natural process that happens to even the most exclusive of fibers. It's a natural sign of wear and tear that is hard to avoid, and that is most visible in high friction areas of your garment like a sweater's arms and cuffs.

You can make your garment look as new by removing the pilling, using a fabric comb or a pill/lint remover.

Still can't find the answer you need? Then scroll down and leave your question so one of our experts can try to help you. This will be done normally within 5 to 10 working days.
In the meantime, you can read the questions and answers that others have left to this pattern or join the DROPS Workshop on Facebook to get help from fellow knitters/crocheters!

You might also like...

Clemence

Ene-Ly

Clemence

Svetlana, United States

Post a comment to pattern DROPS 197-8

We would love to hear what you have to say about this pattern!

If you want to leave a question, please make sure you select the correct category in the form below, to speed up the answering process. Required fields are marked *.

Comments / Questions (60)

country flag Patricia Olivia Fuchs wrote:

Stricktipp für Glatt links: Bedeutet das, dass ich praktisch nach dem Stilllegen der Ärmel einen Anfangsfaden beim halben Rückenteil habe, jedoch die Runde beim Arm mit einem neuen Faden beginne? Wäre es nicht klüger, wenn ich die Runde weiterhin am halben Rückenteil beginne und mit einer Wendemasche (für verkürzte Reihen) die Arbeit auf rechts wende? Ich hoffe, Sie wissen, was ich meine... Das geht sicher auch - richtig?

16.04.2019 - 18:38

DROPS Design answered:

Liebe Frau Fuchs, wahrscheinlich können Sie auch die Runden beim halben Rückenteil auch anfangen, beim Rumpfteil stricken Sie jetzt glatt links bis zum Bündchen. Viel spaß beim stricken!

23.04.2019 - 10:42

country flag Sagrario López Palmero wrote:

Tip.para tejer de revés. Cuando se vira la.pieza no se queda hueco en ese punto ya que se vá en sentido contrario de cómo se estaba haciendo?? Gracias y Saludos.

22.03.2019 - 08:09

DROPS Design answered:

Hola Sagrario. No queda ningún hueco en la labor. Si estás más cómoda trabajando en punto jersey ( todos los puntos de derecho trabajando en redondo), puedes darle la vuelta a la labor y trabajar por el lado revés del jersey en punto jersey. No olvides darle otra vez la vuelta cuando tengas que empezar el punto elástico.

13.04.2019 - 20:50

country flag Mariapaola wrote:

...quindi le 6+6 nuove maglie avviate si lavoreranno con il corpo fino a diventare 116; è esatto? Grazie per la pazienza e la velocità della risposta!

11.01.2019 - 13:14

DROPS Design answered:

Buongiorno Mariapaola. Sì esatto. Mette in sospeso le maglie per le maniche, avvia le 6 + 6 maglie e prosegue in tondo sulle 116 m che sono il davanti e il dietro. Buon lavoro!

11.01.2019 - 13:36

country flag Mariapaola wrote:

Buonasera, ho realizzato lo sprone trovandomi esattamente con le 176 previste ma nel suddividere le maglie per il corpo e le maniche non capisco come avviare 6 nuove maglie SOTTO LA MANICA ( avviarle sul ferro?) e poi per la manica riprendere UNA MAGLIA IN OGNUNA DELLE 6 avviate sotto la manica. Grazie!

10.01.2019 - 20:59

DROPS Design answered:

Buongiorno Mariapaola. le alleghiamo due video: il primo può aiutarla per avviare le maglie; il secondo per riprendere le maglie nel bordo delle maglie avviate. Buon lavoro!

11.01.2019 - 09:26

country flag Susanne Damgaard wrote:

Hej. Kan I hjælpe med omgangene med xox. Jeg kan ikke finde ud af, hvad jeg skal gøre med de vrangmasker der ikke er markeret i diagrammet.

18.12.2018 - 20:55

DROPS Design answered:

Hei Susanne. Hvilke vrangmasker sikter du til? Du strikker etter diagram og alle m er markert i diagrammet. Den første omg med med xox (omg 10) begynner med 1 kast, så stikker du pinnen ned i rettmasken markert med O, 4 rader nedenfor (= omgang 6), henter tråden og drar den over de 3 radene opp til den raden du er på. Så strikker du 1 m rett som vanlig (= ruten med x), før du igjen strikker i m 4 rader nedenfor – den første m med X er nå ferdig strikket og du har strikket 3 m i denne. Videre strikker du 1 rett, en X igjen (= 3 m) og avslutter med 1 vrang. God fornøyelse.

19.12.2018 - 08:31

Melanie wrote:

I really don't understand this pattern where the x stitches begin. What happens to the purl stitches? Why don't they show up in the chart? I'm pretty good at following charts, but I really can't make heads or tails of this one. I've read through the previous comments and haven't found a better explanation. Thanks for any clarifications you can give.

18.12.2018 - 16:41

DROPS Design answered:

Dear Melanie, this video is showing how to work the first pattern row (with xox): the first P on row is the stitch worked K between the 2 loops you are picking 4 rounds below. Happy knitting!

19.12.2018 - 08:51

country flag Lene wrote:

Øv....må opgive mønstret. Kan, på trods af hjælp, slet ikke få x og o i diagrammet til det ønskede resultat. Mvh Lene

17.12.2018 - 17:24

country flag Lene wrote:

Hej! Jeg kan simpelthen ikke forstå hvordan jeg strikker x i diagrammet. Mvh Lene

15.12.2018 - 20:09

DROPS Design answered:

Hei Lene. Når du kommer til en x skal du strikke i masken som er markert med sirkel 4 rader nedenfor. Du stikker nålen inn i midten av denne masken (4 rader ned) og henter tråden opp slik at den går over de 3 radene mellom den med masken du strikker i (4 rader nedenfor) og den raden som strikkes. Så strikker du 1 vanlig rettmaske (= masken med x - på raden som strikkes) før du på nytt strikker i masken 4 rader under. Begge x-ene i samme diagram (med 1 maske mellomrom) strikkes i den samme masken (med sirkel) 4 rader ned. Masken mellom de 2 x-ene er også en sirkel, og denne strikkes i 4 rader lenger opp. God fornøyelse.

17.12.2018 - 11:20

Liudmila wrote:

Will you plese help me to convert my yarn? It's Bergere Aran that requires 5 mm needles, it's 50 gramms, 85 metres

08.12.2018 - 14:55

DROPS Design answered:

Hi Liudmila! You can use yarn converter (link under materials) and choose DROPS yarn with a similar thickness to yours. Happy knitting!

09.12.2018 - 19:15

country flag Judy Bekink wrote:

Bonjour, je vous signale que la site boutiquelucelainetricot.com ne répond plus aux appels téléphoniques, mail etc. Les commandes ne sont pas livrées mais les payements sont bien acceptés. Sur Google il y a déjà plusieurs avis négatives. Personnellement j'ai fait une commande et payé 40.86 euro et aucune nouvelle depuis 5 nov.

26.11.2018 - 11:16

DROPS Design answered:

Bonjour Mme Bekink, nous sommes désolés de ce désagrément, et allons transmettre votre message au magasin.

27.11.2018 - 11:52