
Looking for a yarn?


Comments / Questions (9)
![]() Jennifer wrote:
Jennifer wrote:
How many yards or meters or skiens of yarn for the sizes? Not a range of yards or meters. The purpose is to budget the money to purchase exact amounts to keep dye batch lots consistent.
10.07.2024 - 14:53DROPS Design answered:
Dear Jennifer, the sizes are shown in the header of the pattern and the required amount of yarn in the same order. Click on the size you want to see all the data for that size highlighted (circled) - so you can see the total number of grams needed for that size. DROPS Muskat is available in 50 g balls of 100 m - divide the total number of grams by 50 to get the number of balls (e.g. for size M you need 350 g, i.e. 350 : 50 = 7 balls = 700 m). Happy crocheting!
13.07.2024 - 21:21
![]() Palina Wendel wrote:
Palina Wendel wrote:
Väldigt otydligt i beskrivningen vad det gäller om man ska virka runt eller fram och tillbaka. Ordvalet är otydlig. Samt NÄR man ska minska. Och om man kan gissa sig fram till när man ska virka fram och tillbaka och när man ska virka runt, så är det väldigt svårt att gissa sig fram när det gäller minskning. När man virkar första 10cm så ska man följa A1 där det står minskning redan på 4e raden. Det står inte hur många maskor. Otydlig instruktion!
06.07.2022 - 13:23
![]() Cecilia Espinosa Rebolledo wrote:
Cecilia Espinosa Rebolledo wrote:
Hola!!! Si quisiera hacer una falda larga, hasta los tobillos, que me recomienda hacer para calcular numero de cadenas para el ruedo?
27.11.2019 - 01:17DROPS Design answered:
Hola Cecilia. Esta falda se trabaja de abajo arriba. Para hacerla más larga solo tienes que trabajar según el patrón hacia arriba hasta la largura deseada, no tienes que montar más puntos.
30.11.2019 - 19:36
![]() Eija wrote:
Eija wrote:
Missä kerrotaan kavennusten määrä?
12.08.2019 - 14:32DROPS Design answered:
Hei kavennusten määrä löytyy ohjeesta: "Kun työn pituus on n. 13-14-15-16-17-18 cm ja seuraavaksi virkattava kerros on pylväs tai kiinteä silmukka -kerros (merkitty piirrokseen tähdellä), kavenna tasavälein 6 silmukkaa (lue KAVENNUSVINKKI ja KAVENNUSVINKKI (kaventaminen tasavälein)). Toista tällaiset kavennukset yhteensä 6 kertaa, piirrokseen nuolilla merkityillä pylväs- tai kiinteä silmukka -kerroksilla = 120-132-144-156-180-204 silmukkaa pylväs- tai kiinteä silmukka -kerroksella." Eli työstä kapenee yhteensä 36 silmukkaa.
15.08.2019 - 14:28
![]() Eija wrote:
Eija wrote:
Edelliseen liittyen: huomasin videon, kun olin aikani yrittänyt ohjeen mukaan. Hyvin vaikeasti oli selitetty.
10.08.2019 - 07:55
![]() Eija wrote:
Eija wrote:
Uskomattomat käännökset! Esim. tuo 2. rivi: "= jätä 1 silmukka väliin, 1 pylväs seuraavaan kiinteään silmukkaan/seuraavan ketjusilmukan ympäri, 1 pylväs väliin jätettyyn silmukkaan/väliin jätetyn silmukan ympäri "
10.08.2019 - 07:32
![]() Ortuno Catherine wrote:
Ortuno Catherine wrote:
Je voudrais commander des pelotes Muskat rouge 12 avec un bain particulier 574. Comment faire? Je n'ai pas assez de laine pour finir mon ouvrage. Merci d'avance
03.08.2019 - 08:06DROPS Design answered:
Bonjour Catherine! Vous devez vous adresser à votre magasin DROPS qui saura vous aider. Bon tricot!
03.08.2019 - 19:58
![]() Elke wrote:
Elke wrote:
In anderen Anleitungen steht aber: Maschenprobe 18 Stb = 10 cm (s.o. 17 Stb = 10 cm= Druckfehler?) Und, da A.1 zuerst in Reihen gehäkelt wird, beginnt Häkelschrift dann "rechts" bzw. beginnt die R immer abwechselnd einmal rechts und einmal links? und werden dann am Ende die Wende-Luftmaschen nicht gehäkelt, d.h. ausgelassen? (s. Häkeltipp: Am Anfang jeder Reihe mit Stb 3 Lm häkeln (ersetzen nicht das erste Stäbchen) Sorry, ich versteh's nicht richtig. Danke für Info!
04.06.2019 - 12:59DROPS Design answered:
Liebe Elke, für dieses Modell muss Ihre Maschenprobe 17 M = 10 cm in der Breite sein. Häkelnadel ist nur einen Vorschlag, passen Sie die Größe an, damit die Maschenprobe richtig ist. Die Wende-Lufmaschen (= A.2) werden zusätzlich zu A.1 gehäkelt, dh sie werden nicht am Ende der Reihe gearbeitet. Viel Spaß beim häkeln!
04.06.2019 - 14:23
![]() Elke wrote:
Elke wrote:
Warum wird in vielen von euren Anleitungen die Maschenprobe NUR mit der Breite angegeben? Ist die Höhe nicht relevant? s.o. : 17 Stäbchen = 10 cm in der Breite.
03.06.2019 - 14:33DROPS Design answered:
Liebe Elke, bei solchen Anleitungen ist die Länge immer in cm gegeben - und dann wird auch dazu geschrieben z.B. daran angepasst, dass die nächste Runde eine Runde mit Stäbchen oder festen Maschen. Bei den ählinchen Modellen (= mit der selben Häkelnadeln - können Sie auch dann eine Maschenprobe in der Reihen finden - hier zum Beispiel. Viel Spaß beim häkeln!
03.06.2019 - 15:23
|
|||||||||||||||||||||||||||||||||||||
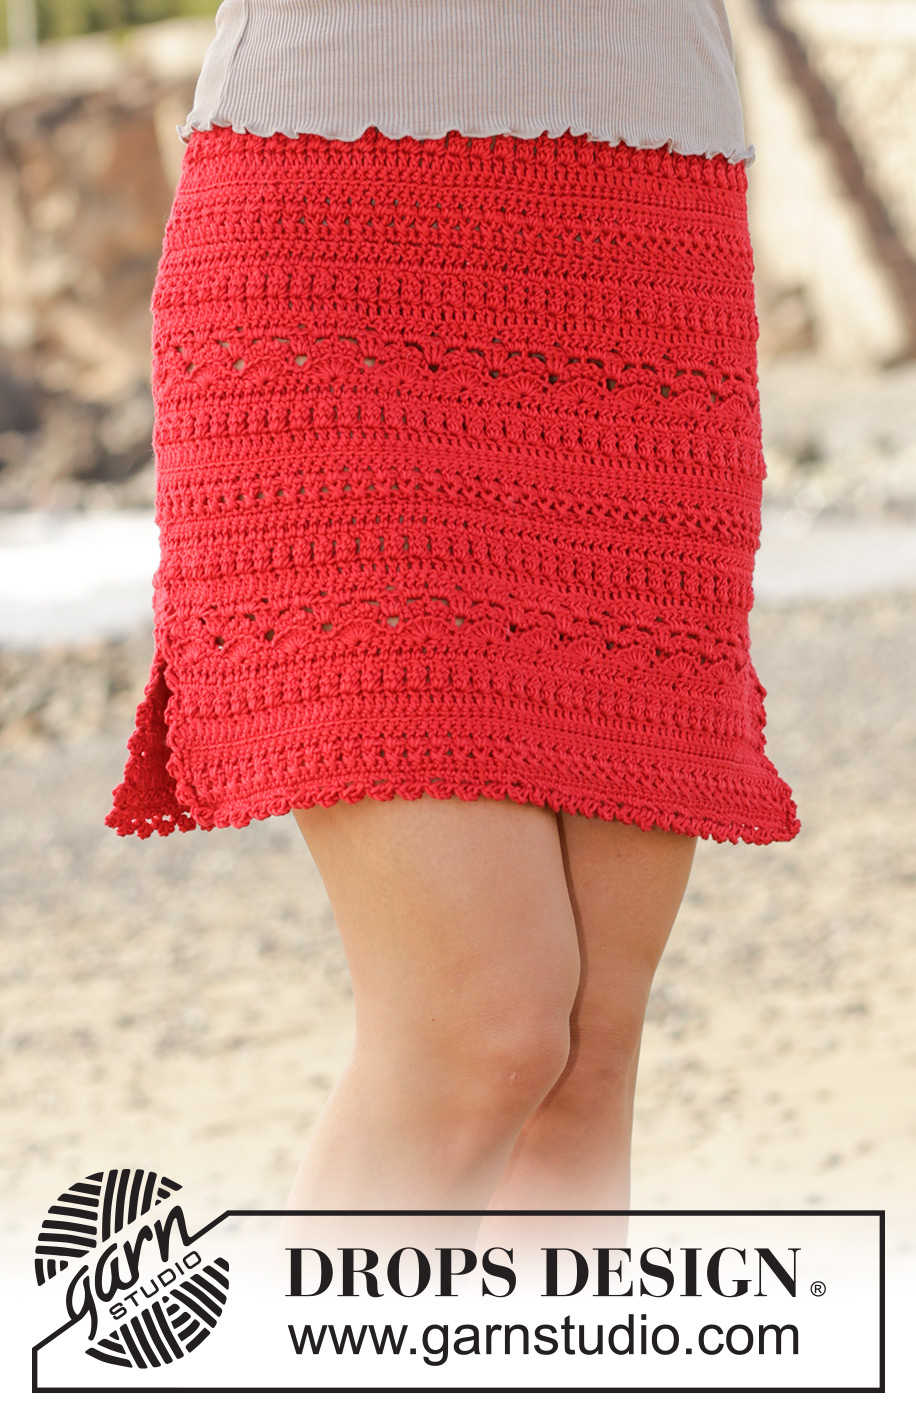
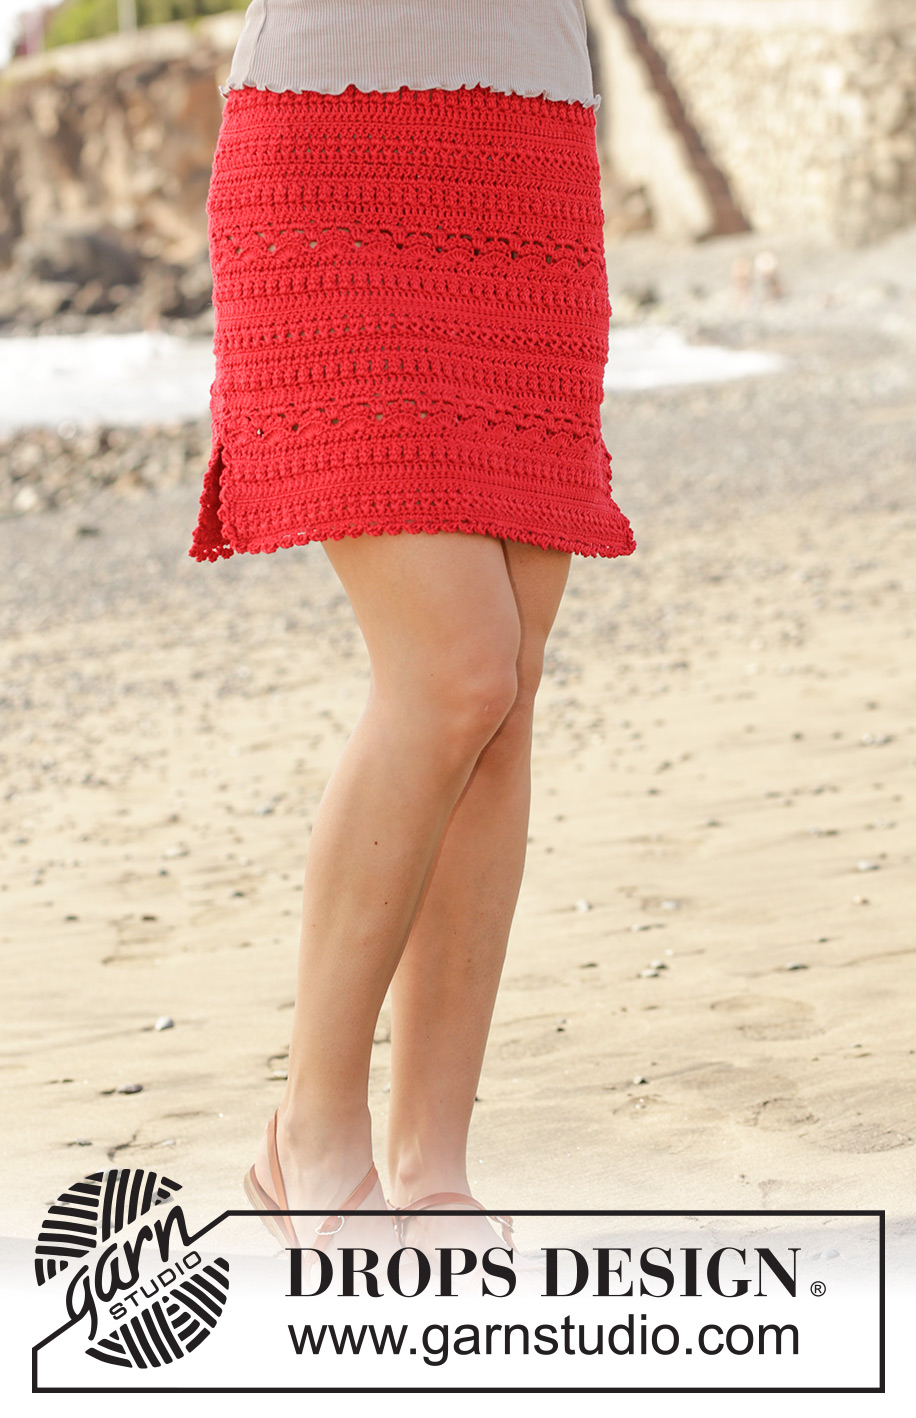
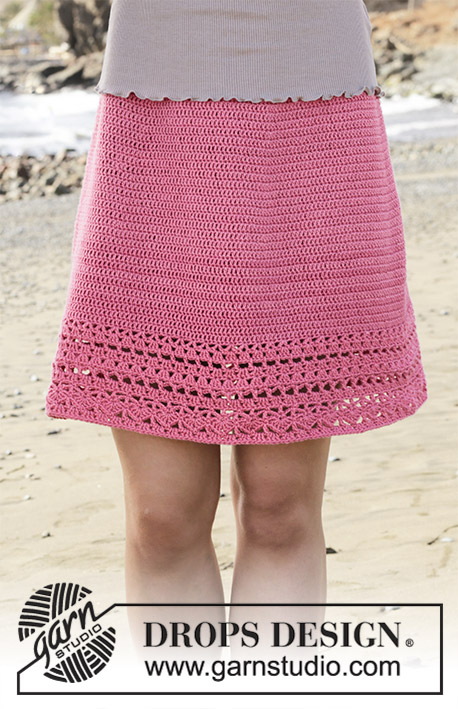
Belladonna Skirt#belladonnaskirt |
|||||||||||||||||||||||||||||||||||||
 |
 |
||||||||||||||||||||||||||||||||||||
Crochet skirt with texture pattern. Sizes S - XXXL. Piece is crocheted in DROPS Muskat.
DROPS 190-26 |
|||||||||||||||||||||||||||||||||||||
|
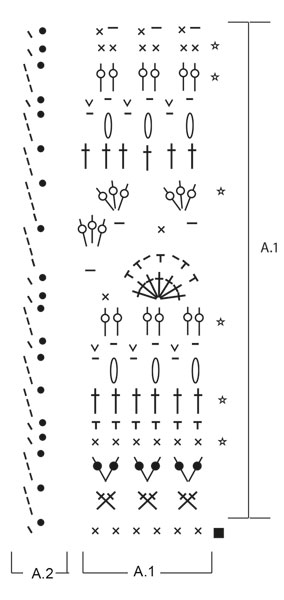
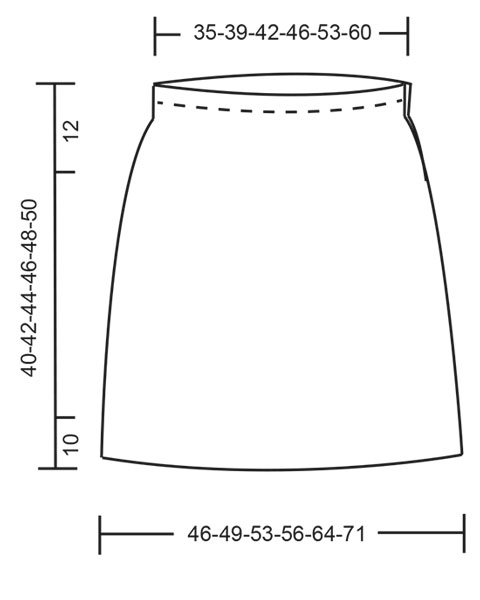
INFORMATION FOR PATTERN: PATTERN: See diagrams A.1 and A.2. A.2 shows how round begins/ends when working in the round. CROCHET TIP – when working back and forth: Work 3 chain stitches at the beginning of rows starting with double crochets (does not replace first double crochet). Work 1 chain stitch at the beginning of rows starting with single crochets (Does not replace first single crochet). DECREASE TIP: DOUBLE CROCHETS: Decrease 1 double crochet by working 2 double crochets together as follows: Work 1 double crochet in first stitch, but wait with the last yarn over and pull through (= 2 loops on hook), work 1 double crochet in next stitch/around the chain stitch, pull the thread through all 3 loops on hook when making the last pull through (= 1 double crochet decreased). SINGLE CROCHETS: Decrease 1 single crochet by working 2 single crochets together as follows: Work 1 single crochet, but wait with the last yarn over and pull through (= 2 loops on hook), then work next single crochet, pull through all 3 loops on hook when making the last pull through (= 1 single crochet decreased). DECREASE TIP (evenly): To calculate how to evenly decrease, use the total number of stitches (e.g. 156 stitches) and divide with the number of decreases to be made (e.g. 6) = 26. In this example every 25th and 26th stitches are worked together. ------------------------------------------------------- SKIRT: The skirt has 10 cm / 4" vent in each side at the bottom, the piece is first worked back and forth in 2 pieces until the vents is finished, then work in the round, but turn every round and work back and forth on the round to make sure the texture is the same all the way. When the piece is divided to make the button front band, work back and forth again, but over both the front and back piece (to make a vent in one side). FRONT PIECE: Work 90-97-104-111-125-139 chain stitches with Muskat on hook size 4 mm / G/6. Continue with 1 single crochet in the 2nd chain stitch from hook, then work 1 single crochet in each of the next 4 chain stitches, * skip 1 chain stitch, 1 single crochet in each of the next 6 chain stitches *, repeat from *-* the entire row = 78-84-90-96-108-120 single crochets (chain stitch used to turn with are also counted as 1 single crochet). Turn and work 1 single crochet in every single crochet. Now work according to diagram A.1 (A.1 is repeated in height until finished measurement) – read CROCHET TIP! REMEMBER THE CROCHET GAUGE! After 10 cm / 4" put piece aside and work back piece. BACK PIECE: Work 90-97-104-111-125-139 chain stitches with Muskat on hook size 4 mm / G/6. Continue with 1 single crochet in the 2nd chain stitch from hook, then work 1 single crochet in each of the next 4 chain stitches, * skip 1 chain stitch, 1 single crochet in each of the next 6 chain stitches *, repeat from *-* the entire row = 78-84-90-96-108-120 single crochets (chain stitch used to turn with are also counted as 1 single crochet). Turn and work 1 single crochet in every single crochet. Now work according to diagram A.1. Continue until the piece measures 10 cm / 4" – end at the same round as the front piece. SKIRT after vent: Continue with pattern as follows - work stitches from the front piece first, then work stitches from the back piece, then the round is worked together with a slip stitch in 1st /3rd stitch on the round, work stitches in A.2, turn work. Continue like this with pattern according to diagrams A.1 and A.2. On the rounds with double crochets or single crochets there are now 156-168-180-192-216-240 stitches on the round (A.2 is not included in the number of stitches). When the piece measures approx. 13-14-15-16-17-18 cm / 5⅛"-5½"-6"-6¼"-6¾"-7" – make sure the next round is a round with double crochets or single crochets (marked in diagram with a star), evenly decrease 6 stitches – read DECREASE TIP and DECREASE TIP (evenly). Repeat decreases a total of 6 times on the marked 6 rounds with double crochets or single crochets = 120-132-144-156-180-204 stitches on a round with double crochets or single crochets. Continue with A.1 and A.2. When the piece measures 28-30-32-34-36-38 cm / 11"-11¾"-12½"-13⅜"-14¼"-15", continue working back and forth, afterward a button front band shall be worked over the 12 cm / 4¾" at the top. Now the piece is not turned with A.2, but work back and forth in rows to make an opening in one side at the top – use CROCHET TIP! Continue back and forth according to A.1 until the piece measures 40-42-44-46-48-50 cm / 15¾"-16½"-17¼"-18"-19"-19¾", end with a round marked with a star in the diagram. Cut and fasten the thread. BUTTONHOLE LOOPS: Work buttonhole loops along the side of the opening that is a part of the front piece as follows: (start from the bottom): 2 single crochets on a row with double crochets/single crochets, 3 chain stitches, skip 1 cm / ⅜", * work 2 single crochets around the next double crochet/single crochet row, 3 chain stitches, skip 1 cm / ⅜" *, repeat from *-* 3 times more and end with 2 single crochets around the last double crochet/single crochet row on top, turn and work as follows: 1 single crochet in each single crochet and 3 single crochets around every chain stitch space. Cut and fasten the thread. BUTTON FOLDING EDGE: Work 5 rows with single crochets back and forth on the other side of the opening (Work 2 single crochets around every double crochet and 1 single crochet around every single crochet row on the 1st round), cut thread. Sew buttons on button folding edge. DECORATIVE BORDER: The decorative border is worked around the skirt’s bottom hem – work up and down the vents as well. Work decorative border as follows: 1 single crochet, * 3 chain stitches, 1 double crochet in 3rd chain stitch from hook, skip forward approx. 1 cm / ⅜" and make 1 single crochet *. Repeat from *-* entire round and finish with 1 slip stitch in first single crochet from the start of the round. |
|||||||||||||||||||||||||||||||||||||
Diagram explanations |
|||||||||||||||||||||||||||||||||||||
|
|||||||||||||||||||||||||||||||||||||
|
|||||||||||||||||||||||||||||||||||||
|
|||||||||||||||||||||||||||||||||||||
Have you finished this pattern?Tag your pictures with #dropspattern #belladonnaskirt or submit them to the #dropsfan gallery. Do you need help with this pattern?You'll find 11 tutorial videos, a Comments/Questions area and more by visiting the pattern on garnstudio.com. © 1982-2025 DROPS Design A/S. We reserve all rights. This document, including all its sub-sections, has copyrights. Read more about what you can do with our patterns at the bottom of each pattern on our site. |
|||||||||||||||||||||||||||||||||||||


With over 40 years in knitting and crochet design, DROPS Design offers one of the most extensive collections of free patterns on the internet - translated to 17 languages. As of today we count 314 catalogs and 11822 patterns - 11812 of which are translated into English (US/in).
We work hard to bring you the best knitting and crochet have to offer, inspiration and advice as well as great quality yarns at incredible prices! Would you like to use our patterns for other than personal use? You can read what you are allowed to do in the Copyright text at the bottom of all our patterns. Happy crafting!
Post a comment to pattern DROPS 190-26
We would love to hear what you have to say about this pattern!
If you want to leave a question, please make sure you select the correct category in the form below, to speed up the answering process. Required fields are marked *.