
Popular categories
Looking for a yarn?


|
||||||||||||||||||||||
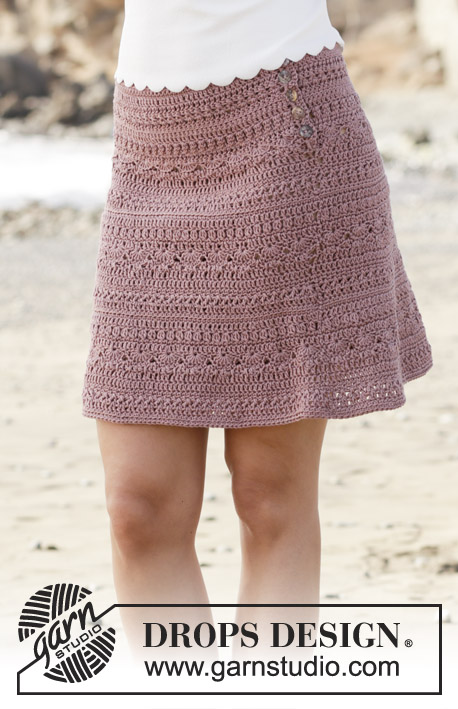
Primrose Skirt |
||||||||||||||||||||||
|
|
||||||||||||||||||||||
Skirt with lace pattern, crocheted top down. Size: S - XXXL Piece is crocheted in DROPS Muskat.
DROPS 190-27 |
||||||||||||||||||||||
|
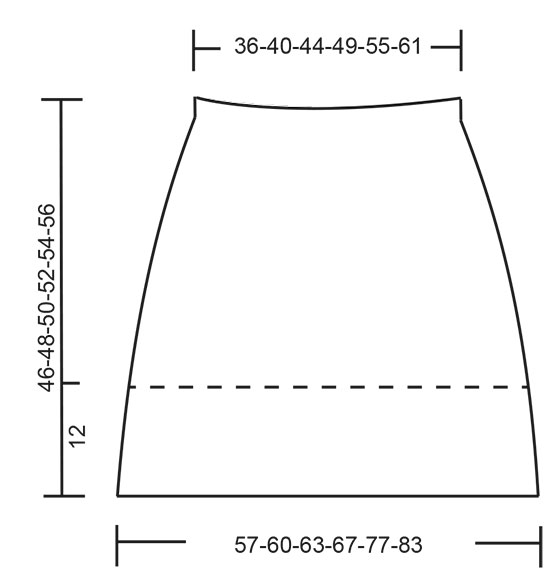
INFORMATION FOR PATTERN: PATTERN: See diagrams A.1 and A.2. Diagram A.1 shows how round begins and ends. Begin and end 2nd and 6th round as follows: Begin round with 1 slip stitch in each of the first 2 double crochets and 3 chain stitch (replace first double crochet), finish round with 1 slip stitch in 3rd chain stitch at beginning of round. On 8th round do not replace the 3 chain stitches in A.1 with first double crochet in A.2. On the remaining rounds first stitch in A.2 is replaced with A.1. CROCHET INFO: When working back and forth, work as follows: Begin every double crochet row with 3 chain stitches (replaces first double crochet). Begin every single crochet row with 1 chain stitch (does not replace first single crochet). When working in the round, work as follows: At beginning of every round with double crochet replace first double crochet with 3 chain stitches. Finish round with 1 slip stitch in 3rd chain stitch at beginning of round. On every round with single crochets replace first single crochet with 1 chain stitch. Finish round with 1 slip stitch in first chain stitch at beginning of round. INCREASE TIP: Work 1 double crochet in first double crochet, work 2 double crochets in next double crochet (= 1 double crochet increased), work 1 double crochet in every double crochet until 2 double crochets remain before marker thread, work 2 double crochets in next double crochet (= 1 double crochet increased), work 1 double crochet in each of the next 2 double crochets (marker thread is in the middle of these stitches), work 2 double crochets in next double crochet (= 1 double crochet increased), work until 2 double crochets on row/round, work 2 double crochets in next double crochet (= 1 double crochet increased) and 1 double crochet in next double crochet (= 4 double crochets increased in total on row/round). ---------------------------------------------------------- SKIRT: Work top down. First work back and forth from vent in the side, then work in the round. Work 153-169-186-207-232-258 chain stitches (including 3 chain stitches to turn with) on hook size 4 mm / G/6 with Muskat. Work 1 double crochet in 4th chain stitch from hook (= 2 double crochets) - read CROCHET INFO, work 1 double crochet in each of the next 2-4-0-0-4-2 chain stitches, * skip 1 chain stitch, 1 double crochet in each of the next 6 chain stitches *, repeat from *-* = = 130-144-158-176-198-220 double crochets. Insert 1 marker thread after 65-72-79-88-99-110 stitches (= the side). Continue with 1 double crochet in every double crochet. REMEMBER THE CROCHET GAUGE! When piece measures 5 cm / 2", increase 1 double crochet at beginning of row/round, 1 double crochet on each side of marker thread and 1 double crochet at the end of row/round (= 4 double crochets increased) – read INCREASE TIP. Increase like this every 1½ cm 18-18-17-16-19-20 times in total = 202-216-226-240-274-300 double crochets. AT THE SAME TIME when 9 rows with double crochets have been worked, work in the round. When piece measures 33-35-37-39-41-43 cm / 13"-13¾"-14½"-15¼"-16⅛"-17", increase 2-0-2-0-2-0 double crochets evenly on next round = 204-216-228-240-276-300 double crochets. When piece measures 34-36-38-40-42-44 cm / 13⅜"-14¼"-15"-15¾"-16½"-17 ¼" / 13⅜"-14¼"-15"-15¾"-16½"-17 ¼", work A.2 over all stitches (= 34-36-38-40-46-50 times in width). Diagram A.1 shows how every round begins and ends. When A.2 has been worked 1 time vertically, piece measures approx. 46-48-50-52-54-56 cm / 18"-19"-19¾"-20½"-21¼"-22". Fasten off. BUTTONHOLE LOOPS: Along the opening on front piece work buttonhole loops as follows (begin at the bottom): Fasten yarn with 1 slip stitch in first double crochet, 1 chain stitch (does not replace first single crochet - remember crochet info), work 2 single crochets around first double crochet, 3 chain stitches, skip 1 double crochet, * work 2 single crochets around next double crochet, 3 chain stitches, skip 1 double crochet *, work from *-* 2 more times and finish with 2 single crochets around last double crochet at the top, turn and work back as follows: 1 single crochet in every single crochet and 3 single crochets around every chain space. Fasten off. BUTTON FOLDING EDGE: Along the other side of the opening work 5 rows with single crochets back and forth (on 1st row work 2 single crochets around every double crochet = 18 single crochets), fasten off. Sew the buttons on to the button folding edge. EDGE: Work an edge at top of waist on skirt as follows from right side: Fasten yarn with 1 slip stitch at the edge of button folding edge, 1 chain stitch, * 1 chain stitch, skip 1 chain stitch, 1 single crochet in next chain stitch *, work *-* along the entire waist, adjust to finish with 1 single crochet in last stitch. Fasten off. |
||||||||||||||||||||||
Diagram explanations |
||||||||||||||||||||||
|
||||||||||||||||||||||

|
||||||||||||||||||||||
|
||||||||||||||||||||||
|
Have you made this or any other of our designs? Tag your pictures in social media with #dropsdesign so we can see them! Do you need help with this pattern?You'll find tutorial videos, a Comments/Questions area and more by visiting the pattern on garnstudio.com. © 1982-2024 DROPS Design A/S. We reserve all rights. This document, including all its sub-sections, has copyrights. Read more about what you can do with our patterns at the bottom of each pattern on our site. |
||||||||||||||||||||||


With over 40 years in knitting and crochet design, DROPS Design offers one of the most extensive collections of free patterns on the internet - translated to 17 languages. As of today we count 304 catalogs and 11422 patterns - 11417 of which are translated into English (US/in).
We work hard to bring you the best knitting and crochet have to offer, inspiration and advice as well as great quality yarns at incredible prices! Would you like to use our patterns for other than personal use? You can read what you are allowed to do in the Copyright text at the bottom of all our patterns. Happy crafting!
Comments / Questions (12)
Wie soll es funktionieren alle, alle 1,5 cm die 4 Maschen zu Zunehmen? Eine Reihe ist 1,1 cm hoch, das heißt man kann nicht alle 1,5 cm zunehmen, entweder in jeder Reihe zunehmen , das wären alle 1,1 cm oder jede 2. Reihe, das wären 2,2 cm?
10.08.2023 - 19:36DROPS Design answered:
Liebe Alexia, dann können Sie abwechslungsweise in jeder Runde und in jeder 2. Runde zunehmen. Viel Spaß beim häkeln!
11.08.2023 - 09:41Ich habe Probleme mit der Beschreibung Rundenbeginn 2. Und 6. Runde. Sollen wirklich erst zwei Kettmaschen gehäkelt werden und dann erst die 3 Luftmaschen, die der Rundenbeginn sein sollen? Wenn das so ist welches ist das erste der zwei Stäbchen, in das die Kettmaschen sollen, zählen die 3 Luftmaschen der Vorrunde als erstes Stäbchen oder erst das erste “richtige” Stäbchen nehmen?
10.08.2023 - 19:33DROPS Design answered:
Liebe Alexia, die Luftmaschen in A.1 ersetzen die 1. Masche, so am Anfang der 2. Reihe häkeln Sie 1 Kettmasche in jeder vom 2. ersten Stäbchen, dann 3 Luftmaschen (= 1. Stäbchen), und dann 1 Luftmasche, 1 Stäbchen in dieselbe Masche, usw. Genauso wird bei der 6. Reihe gehäkelt, so häkeln Sie in das 1. Stäbchen der Runde: 3 Luftmaschen (=1. Stäbchen) + 2 Stäbchen. Viel Spaß beim häkeln!
11.08.2023 - 09:40Hola Hermosa falda. ¿Tendrían algún patrón de un top con los mismos puntos para combinar con esta falda y hacer un conjunto? Gracias
21.10.2022 - 17:34DROPS Design answered:
Hola Flor, este modelo no dispone de un top a conjunto y no hacemos patrones personalizados.
22.10.2022 - 18:36This is 1st time trying to crochet a clothing item. I have no clue how to follow this written pattern. I'm used to reading R1, R2, R3 etc. Have no idea how to do this. I would need a XL or XXL. I have a big butt. This is the 1st skirt I have really liked, with all the ones I've looked at.
25.04.2022 - 16:24Buonasera, non sono sicura di aver capito come fare gli aumenti nei giri successivi. Vanno fatti in corrispondenza degli aumenti delle righe sottostanti o devo lasciare costanti le due maglie alte tra le coppie di aumenti? Grazie Iride
13.05.2020 - 21:23DROPS Design answered:
Buongiorno Iride. Deve lasciare costanti le 2 maglie alte tra gli aumenti. Buon lavoro!
13.05.2020 - 22:34Buonasera, non sono sicura di aver capito come fare gli aumenti nei giri successivi. Vanno fatti in corrispondenza degli aumenti delle righe sottostanti o devo lasciare costanti le due maglie alte tra le coppie di aumenti? Grazie
13.05.2020 - 21:14Thank you for your response. On the Rav--- website, this pattern (and other DROPS design patterns) are in the category for teens aged 13-17 years old. The S size on your patterns is still too big for many teenagers though. How is the pattern converted to fit a 13 year old?
09.12.2019 - 11:18DROPS Design answered:
Dear Mrs Davidson, this pattern can be made/worn for a teenager, but pattern starts with size S. We are unfortunately not able to adapt every pattern to every single request; should you need any assistance to adapt this pattern, please contact your DROPS store - even par mail or telephone. Happy crocheting!
09.12.2019 - 11:33I would like to crochet a skirt for waist measurement of 60cm or 23.6 inches and hips 70cm or 27.5 inches. The size S waist measurement on the Primrose pattern is 36 inches and, for example, size S hip on Rosalina is 47 inches . Can you please clarify the sizing of your patterns for teenagers? Thanks so much.
08.12.2019 - 11:05DROPS Design answered:
Dear Tamsin, the measurement in chart are given in cm - convert here into inches - compare a similar garment the girl has and likes the shapes and compare these to the measurements in chart. Happy crocheting!
09.12.2019 - 09:14I am trying to ask a question about your skirt sizing for teenagers, but I receive an error "Your comment contains links or forbidden words!" - which it doesn't. I'm not sure why the error appears. Can I email you my question instead perhaps? Thanks for your help.
08.12.2019 - 10:57Lovely skirt!
08.12.2019 - 10:54