
Popular categories
Looking for a yarn?


Comments / Questions (62)
![]() Lisa Haislip wrote:
Lisa Haislip wrote:
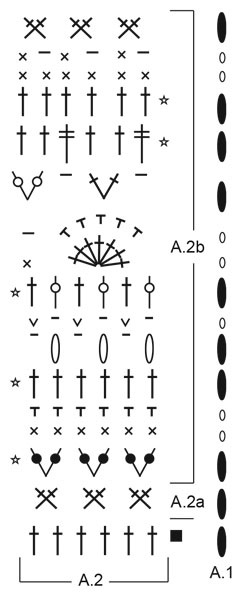
I consider myself experienced with crocheting. I am very confused at one part of this pattern. "Work A.2a 20-22-24-26-30-33 times in total in width" does not make sense to me. I have a total of 132 stitches, but I only do 22 when I work A.2a?? Please help me understand this part. Thank you! Lisa
25.05.2025 - 23:31DROPS Design answered:
Dear Mrs Haslip, each repeat of A.2a is worked over 6 stitches, so that you will repeat the 6 stitches in A.2a a total of 22 times in the round (22x6=132) starting/ending with A.1. Happy crocheting!
26.05.2025 - 10:07
![]() Patricia McDonald wrote:
Patricia McDonald wrote:
First row of A2b shows large V's with dots but doesn't give an explanation in the diagram as to what it means. Also row 10 in A2b - what are those large V's?
07.05.2025 - 23:17DROPS Design answered:
Dear Mrs McDonald, you work here the 6th symbol in the same stitch (the one where these symbols are pointing to), this means you will crochet 2 double crochets (US-crochet terminology) between the 2 double crochets from previous row. Again on 10th row, you will work the symbol twice in the same stitch. Happy crocheting!
08.05.2025 - 09:43
![]() Mae wrote:
Mae wrote:
Hallo, ich wollte noch einmal fragen wie genau man zunehmen soll ? Bei der ersten Zunahmereihe habe ich wie in der Angabe 246 Maschen (Größe L). Muss dann bei der nächsten Zunahmereihe auch 17× zugenommen werden ? Oder häkelt man einen zunehmenden Rapport von A2b und dann einen "normalen"? Bei der zweiten Zunahmereihe habe ich nun 366 Maschen, stimmt das ?
08.04.2025 - 18:55DROPS Design answered:
Liebe Mae, vor Zunahmen sind es 144 Maschen in L, dann nehmen Sie jeweils 6 Maschen pro Zunahmenrunde insgesamt 17 Mal, so nach der 1. Zunahmen-Runde sind es 144+6=150 M, nach der 2. 150+6=156 M, nach der 3. 156+6= 162 M usw bis nach der 17. Zunahmenrunde sind es 246 M. Die Zunahmen werden gehäkelt, wenn man die Runden mit dem Sternchen häkelt (es sind 5 Reihen mit je 1 Sternchen in A.2b: 1., 4., 7., 11. und 12. Reihen). Viel Spaß beim Häkeln!
09.04.2025 - 08:20
![]() Mae wrote:
Mae wrote:
Toller Rock! Nur leider verstehe ich einiges nicht. Zunächst verstehe ich nicht das erste (wird nicht in der Legende erwähnt) und vierte symbol von A2b (wie soll man die häkeln)? Das zunehmen verwirrt mich auch, wenn ich pro Rapport 6 mal zunehmen soll ist das dann nicht in jeder Masche ?
02.04.2025 - 18:31DROPS Design answered:
Liebe Mae, bei der 1. Reihe A.2b häkelt man das 6. Symbol= 1 Stäbchen zwischen 2 Stäbchen und zwar bei der 1. Reihe A.2b wird man 2 Stäbchen zwischen 2 Stäbchen der vorigen Reihe häkeln. Welches 4. Symbol meinen Sie für A2b? Die Zunahmen werden dann regelmäßig verteilt, wenn man 6 Maschen zunehmen soll, wird man 6 x 2 Stäbchen in 1 Masche (anstatt nur 1 Stäbchen) häkeln, so hat man genügende Maschen für 1 extra Rapport in der Runde. Kann das Ihnen helfen?
03.04.2025 - 08:24
![]() Sharon wrote:
Sharon wrote:
In the Rosalina skirt pattern, it says work a to a 20 times in total in width. Can you please tell me what that means?
18.02.2025 - 21:33DROPS Design answered:
Hi Sharon, Each repeat of A.2a is worked across 6 stitches - each symbol works2 stitches as follows: skip 1 stitch, work 1 treble crochet in next stitch, then 1 treble crochet in the skipped stitch, and there are 3 symbols in each repeat. These 3 symbols (6 stitches) are repeated x 20 = 120 stitches, the number of stitches you have on the row. Happy crocheting!
19.02.2025 - 06:45
![]() Stefanie Messerschmitt wrote:
Stefanie Messerschmitt wrote:
Der Rock ist wunderschön! Ich häkle ihn schon zum dritten Mal. Ich mag gar nichts anderes mehr tragen. Oben hab ich zusätzlich eine Luftmaschenschnur eingezogen. Dann kann er nicht rutschen. Danke für eure tollen Anleitungen.
29.08.2024 - 07:27
![]() Gaby Sprotte wrote:
Gaby Sprotte wrote:
Sehr hilfreich wäre es, wenn das ReihenENDE (bei den Musterreichen) beschrieben würde!
06.07.2024 - 14:34
![]() Gaby Sprotte wrote:
Gaby Sprotte wrote:
Ich handarbeite/häkle seit vielen Jahrzehnten und habe nach dutzenden Anleitungen gearbeitet, doch diese Anleitung bereit mir Kopfzerbrechen und ich bin noch am rätseln . . .
06.07.2024 - 14:22
![]() MonaK wrote:
MonaK wrote:
Kan du lage en video «hvordan hekle en dobbeltstav i første/siste fastmaske i viften 2 rader under (pass på samtidig hekle om luftmaske på raden midt i mellom. Jeg tror jeg har gjort som beskrevet, men får da store «hull» mellom viftene. Det virker feil i forhold til bildet.
26.06.2024 - 18:21
![]() Charisse wrote:
Charisse wrote:
Hallo , met Charisse ik wilde graag weten bij rokpatroon Rosalina wat wordt bedoeld met: haak a2B over a2A Bij voorbaat hartelijk dank
05.06.2024 - 15:13DROPS Design answered:
Dag Charisse,
Als je A.2a hebt gehaakt, dan haak je daarna A.2b precies boven de steken van A.2a.
04.07.2024 - 19:57
|
|||||||||||||||||||||||||||||||||||||||||||
Rosalina#rosalinaskirt |
|||||||||||||||||||||||||||||||||||||||||||
 |
 |
||||||||||||||||||||||||||||||||||||||||||
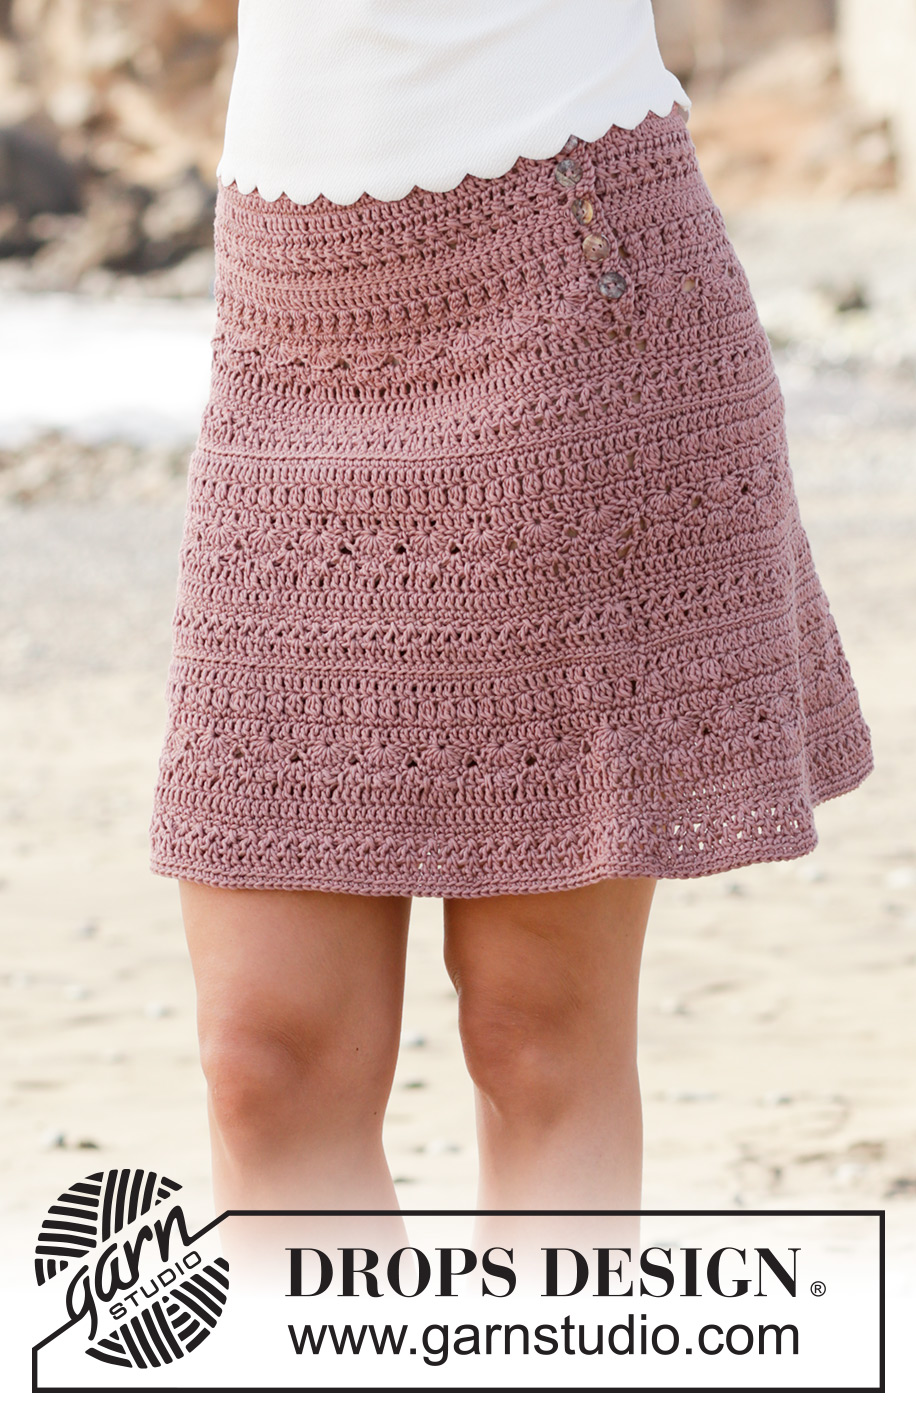
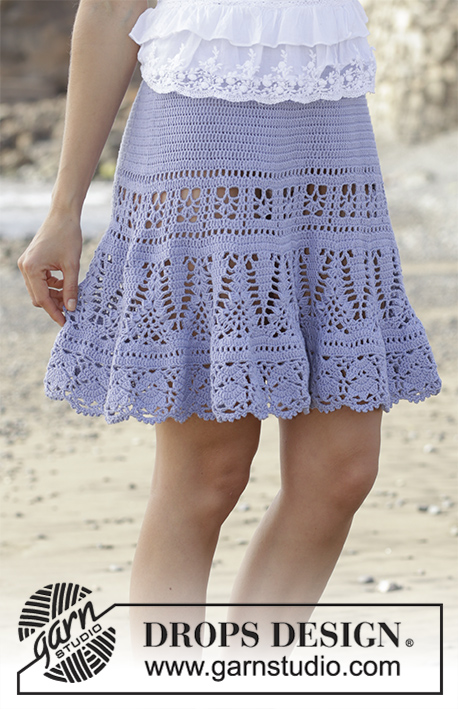
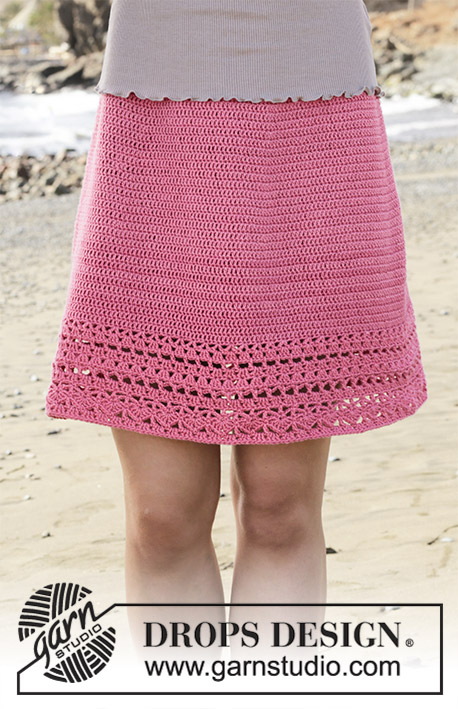
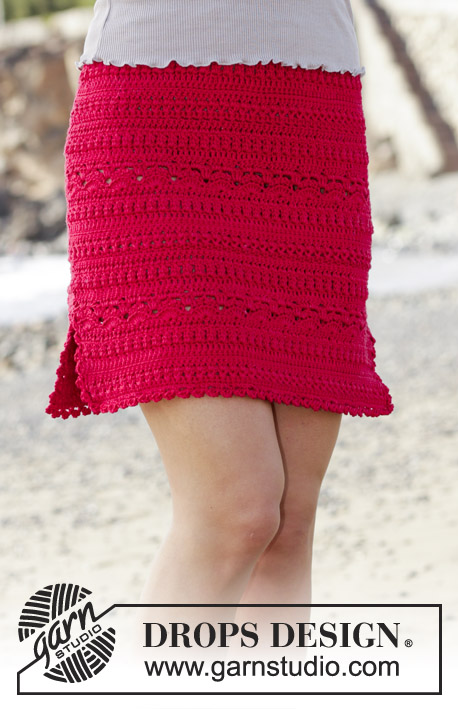
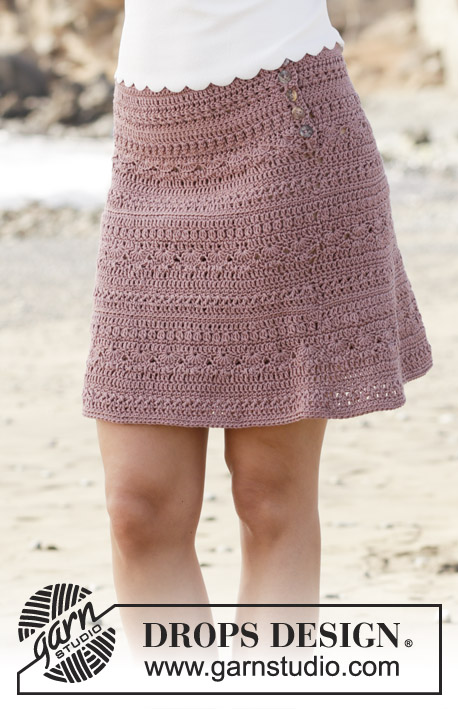
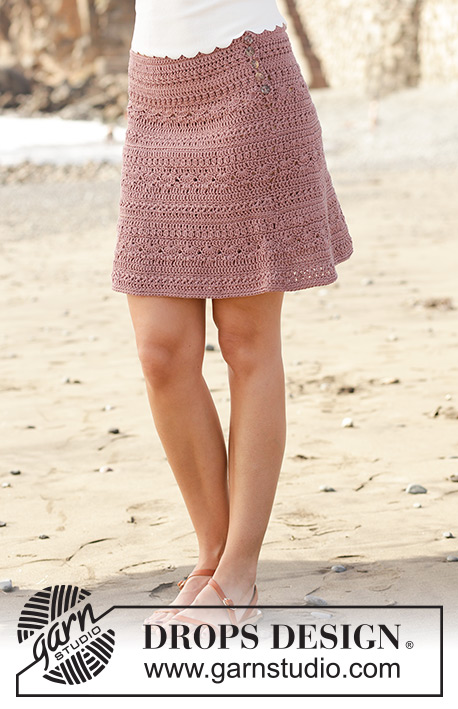
Skirt with fan pattern, crocheted top down. Size: S - XXXL Piece is crocheted in DROPS Muskat.
DROPS 190-28 |
|||||||||||||||||||||||||||||||||||||||||||
|
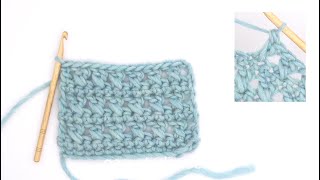
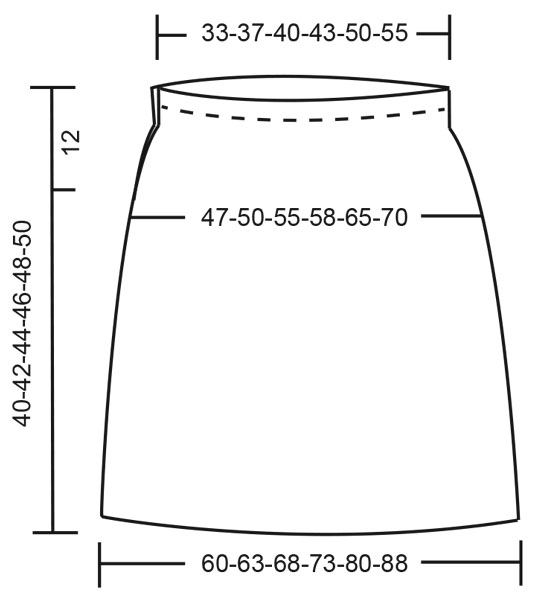
INFORMATION FOR PATTERN: PATTERN: See diagrams A.1 and A.2. Diagram A.1 shows how every row/round begins and ends (i.e. when working back and forth do not work 1 slip stitch in chain stitch at beginning of row). CROCHET INFO: At beginning of every row with double crochets work 3 chain stitches (do not replace first double crochet). At beginning of every row with single crochets work 1 chain stitch (does not replace first single crochet). INCREASE TIP: Increase on row/round 1, 4, 7, 11 and 12 in pattern A.2b (i.e. increase 6 stitches evenly 5 times in total per repetition of A.2b in height). Increase by working 2 double crochets in/around in same stitch. To calculate how often increase should be done on round, use the total number of stitches on row/round (e.g. 132 double crochets) and divide by number of increases to be done (e.g. 6) = 22. I.e. in this example increase 1 double crochet in/around/between every 22nd stitch. ---------------------------------------------------------- SKIRT: Work top down. Work back and forth until vent in the side is done, then work in the round. Work 142-156-170-184-212-233 chain stitches (including 3 chain stitches to turn with) on hook size 4 mm / G/6 with Muskat. Work first row as follows: Work 1 double crochet in 4th chain stitch from hook (= 1 double crochet) - read CROCHET INFO, 1 double crochet in each of the next 5 chain stitches, * skip 1 chain stitch, 1 double crochet in each of the next 6 chain stitches *, work from *-* = 120-132-144-156-180-198 double crochets. Work 1 row with 1 double crochet in every double crochet. Work A.2a 20-22-24-26-30-33 times in total in width. When A.2a has been worked, work A.2b over A.2a (first row in A.2b is from wrong side) and increase as follows (i.e. increase on first round and A.2b is repeated in height): REMEMBER THE CROCHET GAUGE! Increase 6 double crochets evenly - read INCREASE TIP - 16-16-17-18-18-20 times in total = 216-228-246-264-288-318 stitches. For every increase work 1 more repetition of A.2b in width AT THE SAME TIME when piece measures 11 cm, end the vent in the side and continue piece in the round, begin round in the side. Fasten off when piece measures 38-40-42-44-46-48 cm / 15"-15¾"-16½"-17¼"-18"-19", finish neatly according to pattern. EDGE AT THE TOP: Work 1 single crochet in every chain stitch where double crochets were worked in on first row = 120-132-144-156-180-198 single crochets. Work 3 rows in total with single crochets. Fasten off. BUTTONHOLE LOOPS: Along the opening on front piece work buttonhole loops (start at the bottom). Work 2 single crochets around every double crochet row and 1 single crochet around every single crochet row as follows: Work 1 slip stitch around first row, 3 chain stitches, skip 1 cm / ⅜", * work single crochets around next double crochet/single crochet row, 3 chain stitches, skip approx. 1 cm / ⅜" *, work from *-* 4 times in total and finish with 2 single crochets around the last 2 single crochet rows at the top, turn and work back as follows: 1 single crochet in every single crochet and 3 single crochets in every chain space. Fasten off. BUTTON FOLDING EDGE: Along the other side of opening work 5 rows with 1 single crochet in every single crochet back and forth (on 1st row work 2 single crochet around every double crochet row and 1 single crochet around every single crochet row), fasten off. Sew the buttons on to the button folding edge. |
|||||||||||||||||||||||||||||||||||||||||||
Diagram explanations |
|||||||||||||||||||||||||||||||||||||||||||
|
|||||||||||||||||||||||||||||||||||||||||||
|
|||||||||||||||||||||||||||||||||||||||||||
|
|||||||||||||||||||||||||||||||||||||||||||
Have you finished this pattern?Tag your pictures with #dropspattern #rosalinaskirt or submit them to the #dropsfan gallery. Do you need help with this pattern?You'll find 12 tutorial videos, a Comments/Questions area and more by visiting the pattern on garnstudio.com. © 1982-2025 DROPS Design A/S. We reserve all rights. This document, including all its sub-sections, has copyrights. Read more about what you can do with our patterns at the bottom of each pattern on our site. |
|||||||||||||||||||||||||||||||||||||||||||


With over 40 years in knitting and crochet design, DROPS Design offers one of the most extensive collections of free patterns on the internet - translated to 17 languages. As of today we count 314 catalogs and 11822 patterns - 11812 of which are translated into English (US/in).
We work hard to bring you the best knitting and crochet have to offer, inspiration and advice as well as great quality yarns at incredible prices! Would you like to use our patterns for other than personal use? You can read what you are allowed to do in the Copyright text at the bottom of all our patterns. Happy crafting!
Post a comment to pattern DROPS 190-28
We would love to hear what you have to say about this pattern!
If you want to leave a question, please make sure you select the correct category in the form below, to speed up the answering process. Required fields are marked *.