
Popular categories
Looking for a yarn?


|
|||||||||||||||||||||||||
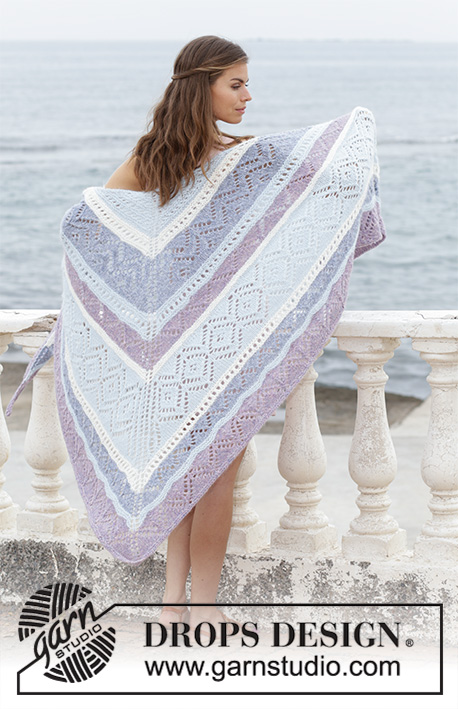
Seaside Dreamer |
|||||||||||||||||||||||||
 |
 |
||||||||||||||||||||||||
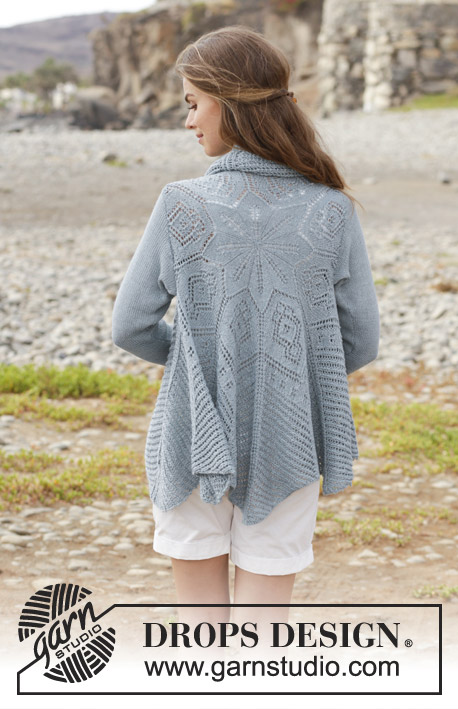
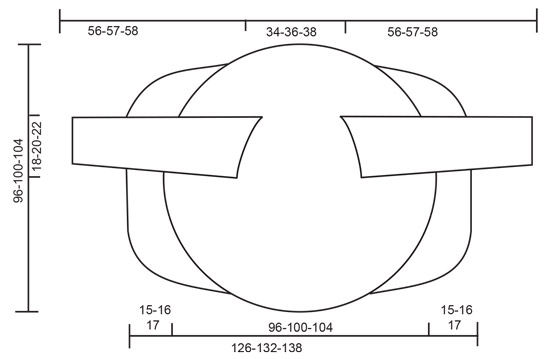
Knitted circle jacket with lace pattern. Sizes S - XXXL. The piece is worked in DROPS BabyAlpaca Silk.
DROPS 191-6 |
|||||||||||||||||||||||||
|
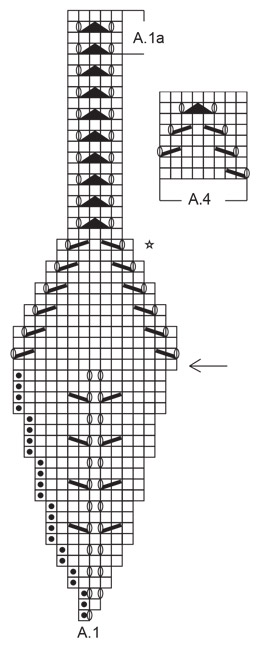
INFORMATION FOR THE PATTERN: PATTERN: See diagrams A.1 to A.4. The diagrams show all the rows in the pattern seen from the right side. RIDGE/GARTER STITCH (worked in the round): 1 ridge = 2 rounds. Knit 1 round and purl 1 round. INCREASE TIP: Start 1 stitch before the marker thread. Make 1 yarn over, knit 2 (the marker thread sits in the middle of these 2 stitches), 1 yarn over. On the next round knit the yarn overs twisted to avoid holes. ---------------------------------------------------------- CIRCLE JACKET: The jacket is worked in the round from the middle of the motif (the back), then back and forth in each side. The sleeves are worked separately and sewn on to finish. Cast on 8 stitches with BabyAlpaca Silk and divide them between 4 double pointed needles size 3 mm / US 2.5. Work according to A.1 (= 8 repeats of A.1 on the round). Insert a marker thread at the beginning of the round. Work up to and including the round before the arrow in A.1= 128 stitches on the needle. From the round with the arrow, work A.2 after each A.1 as follows: Work * A.1 over the first/next 15 stitches as before, work A.2 over the next stitch *, work from *-* a total of 8 times. Continue the pattern like this. The stitches in A.1 are worked into A.2 at the same time as you increase on each side of A.2 (the increases are drawn in the diagram). Work up to and including the round with a star in A.1. Now all the stitches in A.1, apart from the middle 5, have been worked into A.2. Cut the strand and begin the next round 5 stitches to the left, so that the first stitch in A.2 is the beginning of the round. Continue with A.1 and A.2; when A.1 has been worked 1 time in height, repeat A.1a to finished length. Change to circular needle when you have enough stitches. Continue until the piece measures a total of 34-36-38 cm / 13⅜"-14⅛"-14⅞" in diameter, adjust so that next round is a round with increases. Now work armholes as follows (there are approx. 256-272-288 stitches on the needle): Increase as before, i.e. when binding off for armholes increase over these stitches, i.e. make yarn overs that are to be bind off. On next round cast on for the armhole, cast on the same amount of stitches as where bind off for armhole (including the increases), i.e count the stitches that where bind off. Work pattern as before over the first 37-39-42 stitches, bind off the next 44-48-52 stitches for armhole (the number of stitches is without the increases, these increases come in addition to the stitches), work pattern as before until there are 81-87-94 stitches left, bind off the next 44-48-52 stitches for armhole (the number of stitches is without the increases, these increases come in addition to the stitches), work pattern over the last 37-39-42 stitches. On the next round cast on the same amount of stitches that was bind off for armhole (i.e. 44-48-52 stitches + increases that come in addition to the stitches) over the bind-off stitches. Continue with pattern as before. When A.2 has been worked 1 time in height (there are now 352 stitches on the needle), continue with A.3 over A.2 (A.1a continued as before). When A.3 has been worked 1 time in height, repeat the top 12 rounds of A.3; you increase as before every 4th round and you continue working rows of holes and garter stitch. Continue with A.3 and A.1a until the piece measures 96-100-104 cm / 37 ¾"-39⅜"-40⅞", there are approx. 672-696-720 stitches on the needle. Now divide for the front pieces as follows: bind off the first 54-56-58 stitches, work the next 162-168-174 stitches (= left front piece), bind off stitches until you have 216-224-232 stitches left, work the next 162-168-174 stitches (= right front piece), place these stitches on a thread and bind off the last 54-56-58 stitches. Cut and fasten the strand. LEFT FRONT PIECE: Continue with pattern back and forth over the 162-168-174 stitches; adjust on row 1 so that the purled stitches in the ridges are now knitted from the wrong side. AT THE SAME TIME as the first 2 stitches at the beginning of each row are bind off (= 2 stitches bind off on each row). Continue the pattern and to bind off like this until the piece measures a total of 63-66-69 cm / 24 ¾"-26"-27⅛" from the middle of the circle (i.e. the front piece measures approx. 15-16-17 cm / 5⅞"-6 ¼"-6⅝"). Bind off the remaining stitches. RIGHT FRONT PIECE: Work as for the left front piece. SLEEVE: The sleeve is worked in the round with double pointed needles/short circular needle. Cast on 48-56-64 stitches with double pointed needles size 3 mm / US 2.5 and BabyAlpaca Silk. Work 3 RIDGES – see description above, then work A.4 over all stitches (= 6-7-8 repeats in width). When A.4 has been worked 1 time in height continue with stockinette stitch over all stitches. Insert 1 marker thread at the beginning of the round (= mid under sleeve). When the piece measures 5 cm / 2" increase 1 stitch on each side of the marker thread - read INCREASE TIP. Increase every 6th round a total of 18-19-20 times = 84-94-104 stitches. When the piece measures 43-43-42 cm / 16⅞"-16⅞"-16 ½" bind off 4 stitches on each side of the marker thread and continue working back and forth on circular needle = 76-86-96 stitches. Bind off for the sleeve cap at the beginning of each row in each side as follows: 2 stitches 7-7-8 times, 1 stitch 5-7-9 times and 2 stitches in each side until the piece measures 56-57-58 cm / 22"-22⅜"-22 ¾". Bind off the remaining stitches and work the other sleeve in the same way. ASSEMBLY: Gather together the 8 stitches at the beginning of the piece. Sew in the sleeves. |
|||||||||||||||||||||||||
Diagram explanations |
|||||||||||||||||||||||||
|
|||||||||||||||||||||||||
|
|||||||||||||||||||||||||

|
|||||||||||||||||||||||||

|
|||||||||||||||||||||||||
|
|||||||||||||||||||||||||
|
Have you made this or any other of our designs? Tag your pictures in social media with #dropsdesign so we can see them! Do you need help with this pattern?You'll find tutorial videos, a Comments/Questions area and more by visiting the pattern on garnstudio.com. © 1982-2024 DROPS Design A/S. We reserve all rights. This document, including all its sub-sections, has copyrights. Read more about what you can do with our patterns at the bottom of each pattern on our site. |
|||||||||||||||||||||||||


With over 40 years in knitting and crochet design, DROPS Design offers one of the most extensive collections of free patterns on the internet - translated to 17 languages. As of today we count 304 catalogs and 11422 patterns - 11417 of which are translated into English (US/in).
We work hard to bring you the best knitting and crochet have to offer, inspiration and advice as well as great quality yarns at incredible prices! Would you like to use our patterns for other than personal use? You can read what you are allowed to do in the Copyright text at the bottom of all our patterns. Happy crafting!
Comments / Questions (39)
Ich möchte diese Jacke aus einem Farbverlaufsgarn Stricken. Gibt es eine Möglichkeit zu errechnen wie viel Garn ich für einen Ärmel brauche, damit das Garn den passenden Verlauf zum Rest der Jacke hat?
12.01.2019 - 20:50DROPS Design answered:
Liebe Esther, Sie können also entweder DROPS Fabel oder DROPS Delight verwenden - benutzen Sie unseren Garnumrechner um die neue Garnmenge zu kalkulieren. Viel Spaß beim stricken!
14.01.2019 - 10:25Bonjour, Je souhaiterais réaliser ce modèle avec des points NON ajourés. Que me conseillez vous pour la partie tricoter en rond partie milieu dos? Et pour les côtés tricoter en aller retour? Merci Bonne journée
15.10.2018 - 17:05DROPS Design answered:
Bonjour Evelyne, si vous voulez tricoter ce modèle sans le point ajouré, vous obtiendrez un résultat similaire à ce modèle dont vous pouvez vous inspirer. Nous ne sommes pas en mesure de pouvoir ajuster chacun de nos modèles à chaque demande individuelle, n'hésitez pas à demander conseil à votre magasin - même par mail ou téléphone - pour toute assistance complémentaire. Bon tricot!
16.10.2018 - 08:59Bonjour, je rencontre une petite difficulté j en suis au diagramme 3 à peu près au 23 ième rangs et là les motifs ne sont plus alignés du côté gauche j ai le bon nombre de mailles .mais à l oeil ça n est pas alignés et à droite tout va bien es ce normal ou es ce moi le problème ?? Merci d avance de votre réponse
20.07.2018 - 17:44DROPS Design answered:
Bonjour Mme Deligne, il est difficile de trouver ce qui ne va pas ainsi, vérifiez qu'à gauche de A.3 vous avez toujours bien vos 2 m ens à l'end, 1 jeté les uns au-dessus des autres en diagonale comme pour la diminution du début de A.3. Dans le doute, apportez votre ouvrage à votre magasin (ou envoyez-lui une photo par mail) afin qu'il puisse vous aider. Bon tricot!
23.07.2018 - 07:25I love this pattern and I'm to where you move the beginning 5 stitches to the left . When moving the marker it is now the beginning of A.2 not A.1 . Do you start A.2 then put A.1 in ? You were already at start of A.1 so when you move 5 stitches to the left it now moves the beginning to the start of A 2 . I'm confused , please help so I can continue on . Thank you
18.07.2018 - 18:08DROPS Design answered:
Dear Jris, it looks like you are right, you will now start with first st in A.2 - pattern will be edited, thank you. Happy knitting!
19.07.2018 - 10:02Bonjour je reviens vers vous. Tout d abord merci pour vous 1iere explications qui m ont étaient d une grande aide J en suis aux emmenchures j ai rabattu mes mailles mais je ne comprends pas comment je dois les remonter dois je prendre une autre pelotes ou y a t il une technique merci d avance
28.06.2018 - 06:32DROPS Design answered:
Bonjour Mme Deligne, vous montez les mailles au-dessus des mailles rabattues pour la 1ère emmanchure au rang suivant - cf vidéo ci-dessous, puis tricotez les mailles suivantes jusqu'à la 2ème emmanchure et terminez le tour. Bon tricot!
28.06.2018 - 08:56Je me lance c'est la 1ere fois que je fais un de vos modèles (superbe ) j'ai un problème avec le diagramme : je monte 2 mailles par aiguille. 1er rang je fais un jeté donc =3 mailles et sur le diagramme 2ieme ligne je ne retrouve que 2 mailles pouvez vous me donner une explication car je voudrais vraiment réaliser cette magnifique veste merci d avance
14.06.2018 - 23:32DROPS Design answered:
Bonjour Mme Deligne, on monte 8 mailles et on répète 8 fois A.1 tout le tour, c'est-à-dire que vous allez répéter 8 fois: (1 jeté, 1 m env) au 1er tour = vous aurez ainsi 16 m et 2 m par motif de A.1, n'hésitez pas à ajouter un marqueur entre chaque A.1 pour bien repérer le nombre de mailles de chaque motif à chaque tour. Bon tricot!
15.06.2018 - 08:32Très beau et original Je recherche ce type de modèle pour l’hiver tricoté en Népal avec pièce dos et empiècement autour en rangs raccourcis avec motifs (losanges, torsades...) J'essaye de le faire sans modèle mais je galère... Pour le prochain catalogue d'hiver ? peut-être
08.01.2018 - 19:41Superbe
05.01.2018 - 14:58Northern Star Shawl
12.12.2017 - 19:59