
Looking for a yarn?


Comments / Questions (24)
![]() Lucie wrote:
Lucie wrote:
Bonjour, Je suis désolée d'insister mais je n'ai pas compris votre réponse. Si je ne décale pas 1 maille vers la gauche aux rangs 29 - 31... du A1 les trous ne partent pas en biais. Pouvez-vous me confirmer ?
02.07.2025 - 06:53DROPS Design answered:
Bonjour Lucie, j'ai dû mal m'exprimer, désolée. Au rang avec la flèche-1, vous décalez le début comme indiqué de 2 mailles à droite, le début des tours sera là jusqu'à la flèche -2 (et plus au niveau des tours précédents). Lorsque vous arrivez à la flèche -2, vous décalez le début du tour d'1 m, le début des tours est maintenant (et jusqu'à la fin du diagramme) ici. Changez votre marqueur qui vous sert de repère pour le début des tours aux 2 rangs avec la flèche d'abord -1 puis la flèche-2; les tours commencent à ce marqueur; en espérant avoir été plus claire. Bon tricot!
02.07.2025 - 16:08
![]() Lucie wrote:
Lucie wrote:
Bonjour, Quand vous dites de décaler les rangs de chaque diagramme. Je decale à chaque motif ?: 2 mailles décalées- 5m endroit - 1 jeté- 1m endroit - 5m endroit - 1 m glissée- 3 m ensemble- maille glissée par dessus les 3m - 2m décalées...Parce que ça ne tombe plus en face des trous du milieu du rang 23. Mais quand je ne decale que le rang 27 de 2 mailles, Au rang 29 les trous ne partent en biais que pour les premiers trous mais les seconds restent alignés.
29.06.2025 - 20:34DROPS Design answered:
Bonjour Lucie, décalez uniquement les rangs avec la flèche, ceux avec le décalage aux rangs suivants, mais jusqu'à la prochaine flèche, les tours continueront comme au rang avec la flèche. Bon tricot!
30.06.2025 - 09:25
![]() Lucie Clavel wrote:
Lucie Clavel wrote:
Bonjour \r\nIl me semble avoir bien suivi le diagramme. Toutefois les seconds trous à partir du rang 27 du diagramme A1 sont aligné verticalement au lieu d\'être en diagonales. Je tricote en rond. Est-ce que je dois décaler chaque rang de 2 mailles ou chaque motif A1 ? Je n'ai décalé que le rang indiqué par la flèche. \r\nMerci pour votre retour. \r\nLucie
11.06.2025 - 22:57DROPS Design answered:
Bonjour Mme Clavel, Au rang avec la flèche, on décale le début des tours de chaque diagramme, ainsi, les jetés du point ajouré (à partir de la flèche 1), vont automatiquement s'aligner de biais car on ne tricote pas le même nombre de mailles avant/entre/après ces jetés, autrement dit, au 1er rang (avec la flèche), vous tricotez: 5 m end, 1 jeté, 1 m end, 1 jeté, etc.. Au 3ème rang, vous tricoterez 4 m end, 1 jeté, 3 m end, 1 jeté, etc.. vos jetés vont ainsi se mettre naturellement en diagonale. Bon tricot!
12.06.2025 - 09:39
![]() Veronica Elm wrote:
Veronica Elm wrote:
På 5:e varvet på A1 ska jag ju sticka 2 omslag på stickan för hål. Varvet efter ska stickas avigt men det står att jag ska sticka 1 RÄT på första omslaget och släppa ner det andra. Stämmer det? Ska inte alla maskor stickas avigt?
22.05.2025 - 21:33DROPS Design answered:
Hej Veronica, varvet efter omslagen stickas avigt om du stickar runt från rätsiden. Och det stickas rät om du stickar från avigsidan (fram och tillbaka) :)
27.05.2025 - 09:49
![]() HannaV wrote:
HannaV wrote:
Hei, en saa kuviota täsmäämään\r\nkuviossa A1, rivistä 29 eteenpäin, vaikka olen siirtänyt aloituskohtaa kaksi merkkiä vasemmalle.Mitä pitäisi tehdä?
12.03.2023 - 15:13
![]() Magda wrote:
Magda wrote:
Robię tę sukienkę i utknęłam na rzędzie 27. Robię 5 oczek prawych, podwójny narzut, oczko prawe, podwójny narzut, 5oczek prawych, przekładam 1 oczko na prawy drut, przerabiam 3 oczka razem i przekładam oczko zdjęte ponad oczkami przerobionymi razem. Wzoru powinny być zamknięte 2 oczka, żeby pozostało 15 oczek na motyw, z moich obliczeń wynika, że zamykam 3 oczka, więc zostaje mi 14 oczek na motyw... Co robię źle? 21.09.2022 - 19:50
22.09.2022 - 09:51DROPS Design answered:
Witaj Magdo, wyjściowo masz 15 oczek na każdy motyw zanim zaczniesz przerabiać rząd 27. Po przerobieniu rz. 27 będziesz miała o 1 oczko mniej w każdym motywie, czyli 14 oczek > dodasz 2 oczka wykonując narzuty i zamkniesz 3 oczka (+2-3 = -1). Tak więc po przerobieniu rz. 27 zostanie Ci 14 oczek na każdy motyw, czyli dokładnie jak u Ciebie. Powodzenia!
22.09.2022 - 11:50
![]() Isabel wrote:
Isabel wrote:
Guten Tag, für die Vorderteile soll laut Anleitung 3 Reihen hin- und zurückgestrickt werden, dann für den Armausschnitt in der nächsten Hin-Reihe abnehmen. Ist damit gemeint, dass jeweils 3 Reihen hin und 3 Reihen rück gestrickt werden soll oder soll insg. 3 Reihen gestrickt werden bis zum Abnehmen? Danke für die Hilfe!
06.03.2022 - 10:28DROPS Design answered:
Liebe Isabel, es sind insgesamt 3 Reihen gemeint. Viel Spaß beim stricken!
07.03.2022 - 08:59
![]() Debay JOCELNE wrote:
Debay JOCELNE wrote:
Bonjour, vous avez toujours des beaux modèles mais malheureusement, il me faut me contenter chaque fois du dessin du patron parce que vous ne mettez plus que des tricots faits avec les aiguilles circulaires. c'est pour ça que je ne peut essayer vos laine, mes machines à tricoter ne se prêtant pas volontiers au tricots circulaire. Je suis triste de ne plus comme avant tricoter vos propositions !
13.12.2021 - 12:52DROPS Design answered:
Bonjour Mme Debay, peut-être que cette leçon pourrait vous donner quelques pistes pour adapter nos explications sur des aiguilles droites/machine à tricoter?
14.12.2021 - 07:57
![]() Therese wrote:
Therese wrote:
I A1 er det pil 1 og 2. Hvordan forskyver jeg disse maskene? Har prøvd, men blir feil. Et eller annet jeg ikke forstår.
09.07.2021 - 23:03DROPS Design answered:
Hej Therese, jo hvis du sørger for at de 2 midterste kast havner lige over de 2 midterste kast fra tidligere pinde, så vil du få 5 retmasker på hver side af omslagene ved pil 1 og 4 retmasker ved pil 2. God fornøjelse!
13.07.2021 - 14:51
![]() TinaP wrote:
TinaP wrote:
3 st kantmaskor vid ärmhålan, hur ska jag göra de?
20.04.2021 - 18:17DROPS Design answered:
Hej Tina. Du stickar 3 kantmaskor i rätstickning, dvs du stickar de räta på varje varv när du stickar fram och tillbaka. Mvh DROPS Design
21.04.2021 - 07:10
|
||||||||||||||||||||||||||||
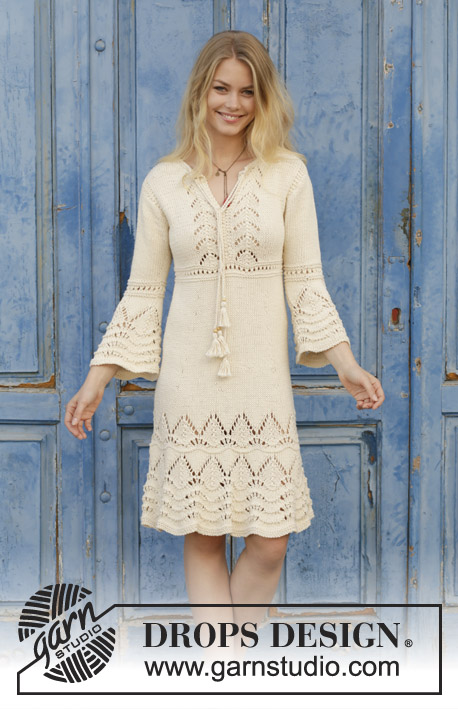
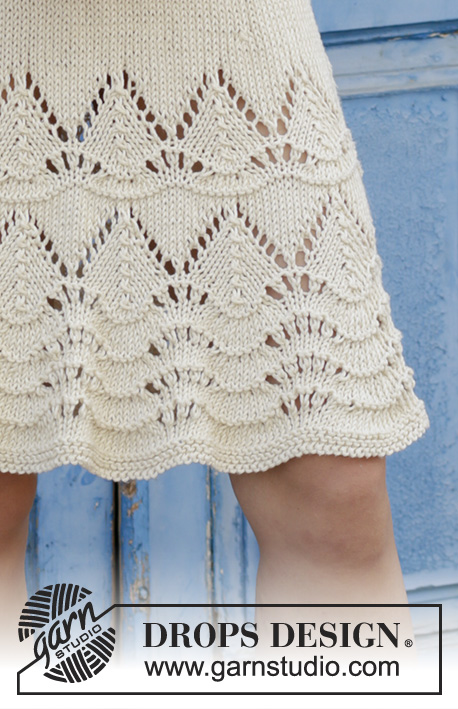
Love Letter#loveletterdress |
||||||||||||||||||||||||||||
 |
 |
|||||||||||||||||||||||||||
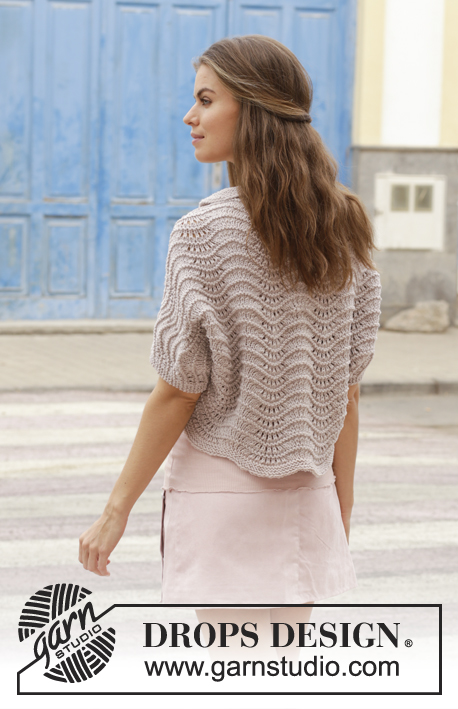
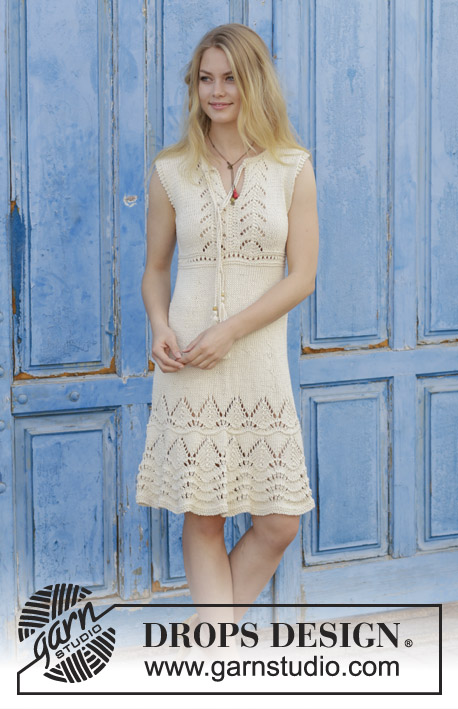
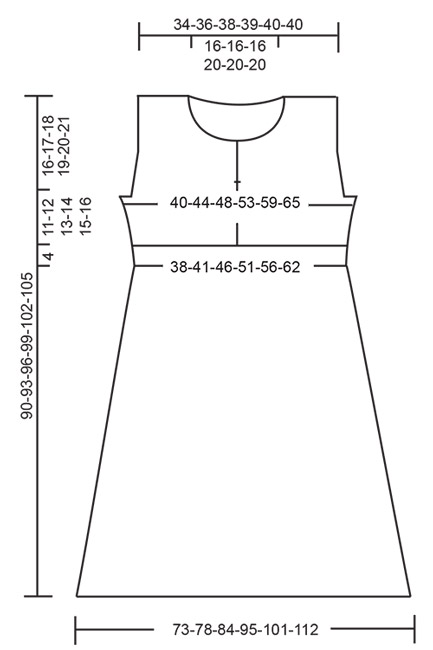
Knitted dress with lace pattern. Size: S - XXXL Piece is knitted in DROPS Paris.
DROPS 188-31 |
||||||||||||||||||||||||||||
|
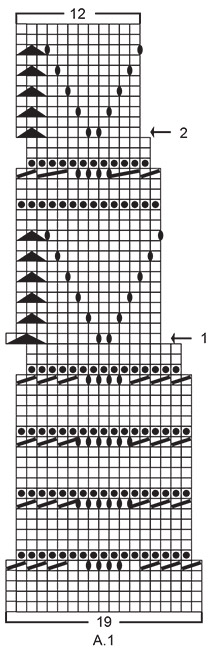
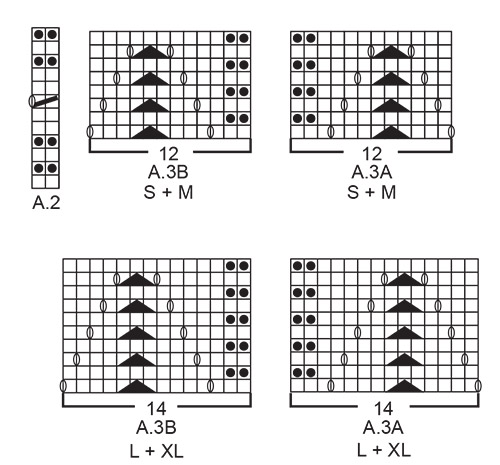
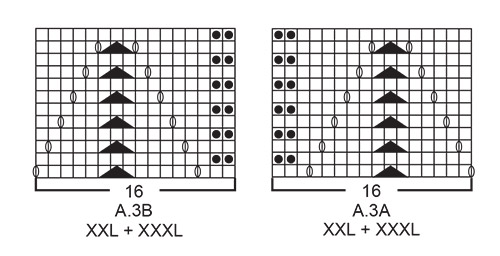
INFORMATION FOR PATTERN: GARTER STITCH (worked in the round): 1 ridge = 2 rounds. Knit 1 round and purl 1 round. GARTER STITCH (back and forth): 1 ridge = knit 2 rows. PATTERN: See diagrams A.1 to A.3. Choose diagram for your size (applies to A.3). Diagrams show all rows in pattern seen from the right side. MEASURING TIP: When working wave pattern, the piece will curl in bottom edge. All length measurements are done from where curl is shortest. DECREASE TIP-1 (applies to skirt part on dress): Decrease as follows after marker thread: Slip 1 stitch knitwise, knit 1, pass slipped stitch over stitch worked (= 1 stitch decreased). Decrease as follows before marker thread: Begin 2 stitches before marker thread, knit 2 together (= 1 stitch decreased). DECREASE TIP-2 (applies to armholes): All decreases are done from the right side. Decrease inside 3 edge stitches in garter stitch. Decrease after 3 edge stitches as follows: Slip 1 stitch knitwise, knit 1, pass slipped stitch over (= 1 stitch decreased). Decrease before 3 edge stitches as follows: Begin 2 stitches before the 3 edge stitches and knit 2 together (= 1 stitch decreased). DECREASE TIP-3: To calculate how to decrease evenly, use the total number of stitches on row (e.g. 180 stitches) and divide stitches by number of decreases to be done (e.g. 8) = 22.5. In this example work alternately every 21st and 22nd stitch and every 22nd and 23rd stitch together. INCREASE TIP (applies to sides of dress): All increases are done from the right side! Increase on each side of marker thread in the sides on dress as follows: Work until 2 stitches remain before marker, make 1 yarn over, knit 4 (marker thread is in the middle of these 4 stitches), make 1 yarn over (= 2 stitches increased). On next row/round work yarn overs twisted to avoid holes. ---------------------------------------------------------- DRESS: Work in the round on circular needle from bottom edge and up until vent begins mid front, then work piece back and forth from mid front. After decrease for armholes work front and back piece back and forth separately. SKIRT: Cast on somewhat loosely 247-266-285-323-342-380 stitches on circular needle size 5 mm / US 8 with Paris. Work 2 ridges in GARTER STITCH in the round - see explanation above. Then work A.1 (= 13-14-15-17-18-20 repetitions of 19 stitches). REMEMBER THE GAUGE! NOTE! On round marked with arrow-1 in A.1 displace beginning of round 2 stitches to the left to make the pattern fit. On round marked with arrow-2 in A.1 displace beginning of round 1 stitch to the left. When A.1 has been worked, there are 156-168-180-204-216-240 stitches on needle. Then work in stockinette stitch. When piece measures 28 cm - read MEASURING TIP, insert 4 marker threads in piece as follows: Insert 1st marker thread after the first 18-21-24-30-32-38 stitches, insert 2nd marker thread after the next 42-42-42-42-44-44 stitches, insert 3rd marker thread after the next 36-42-48-60-64-76 stitches and insert 4th marker thread after the next 42-42-42-42-44-44 stitches. 18-21-24-30-32-38 stitches remain on round after last marker thread. Move marker threads upwards when working. On next round, decrease after 1st and 3rd marker thread and before 2nd and 4th marker thread – read DECREASE TIP-1 (= 4 stitches decreased). Decrease like this every 4½-4½-5½-5½-6-6 cm 7-7-6-6-6-6 times in total at every marker thread = 128-140-156-180-192-216 stitches. Remove all marker threads. When piece measures 59-60-61-62-63-64 cm / 23¼"-23⅝"-24"-24⅜"-24¾"-25¼" (decreases are now done), knit 1 round while decreasing 0-0-0-8-0-4 stitches evenly = 128-140-156-172-192-212 stitches. Switch to circular needle size 4 mm / US 6 and work A.2 in the round. When A.2 has been done, insert 1 marker thread at the beginning of round (= in the side), insert 1 marker after 32-35-39-43-48-53 stitches (= mid front) and 1 marker thread after 32-35-39-43-48-53 stitches (= in the side), there are 64-70-78-86-96-106 stitches between marker threads on back piece. Switch back to circular needle size 5 mm / US 8. Cut the yarn. Now work piece back and forth on circular needle from marker mid front. Begin first row from right side at marker mid front and work as follows: A.3B (= 12-12-14-14-16-16 stitches), 40-46-50-58-64-74 stitches in stockinette stitch (marker thread in the side is in the middle of these 40-46-50-58-64-74 stitches), work A.3A (= 12-12-14-14-16-16 stitches), A.3B (= 12-12-14-14-16-16 stitches), 40-46-50-58-64-74 stitches in stockinette stitch (marker thread in the side is in the middle of these 40-46-50-58-64-74 stitches) and finish with A.3A (= 12-12-14-14-16-16 stitches). Continue pattern back and forth like this. When piece measures 3 cm / 1" from division, increase 1 stitch on each side of marker threads in the sides - read INCREASE TIP (= 4 stitches increased). Repeat increase when piece measures 8-8-9-9-10-10 cm / 3⅛"-3⅛"-3½"-3½"-4"-4" from division = 136-148-164-180-200-220 stitches. When piece measures 73-75-77-79-81-83 cm / 28¾"-29½"-30⅜"-31"-32"-32¾", work 2 ridges over the middle 12-12-14-18-22-26 stitches in each side (i.e. work 6-6-7-9-11-13 stitches in garter stitch on each side of both marker threads – work the other stitches as before). On first row from right side after ridges bind off 6-6-8-12-16-20 stitches in each side for armholes (bind off 3-3-4-6-8-10 stitches on each side of both marker threads). Finish front pieces and back piece separately. LEFT FRONT PIECE (when garment is worn): = 31-34-37-39-42-45 stitches. Continue back and forth with A.3A towards mid front, stockinette stitch and 3 edge stitches in garter stitch towards armhole (work first row from wrong side). When 3 rows have been worked back and forth, decrease for armhole on next row from right side - read DECREASE TIP-2. Decrease like this on every other row (i.e. every row from right side) 2-3-5-6-8-11 times in total = 29-31-32-33-34-34 stitches. Continue pattern back and forth as before with 3 edge stitches in garter stitch towards armhole, stockinette stitch and A.3A towards mid front until piece measures approx. 84-87-90-93-96-99 cm / 33"-34¼"-35⅜"-36⅝"-37¾"-39" (adjust so that next row is worked from wrong side and adjust to finish after one whole repetition vertically if possible). Now slip the first 7-8-8-9-10-10 stitches on 1 stitch holder for neck but to avoid cutting the yarn work them before slipping them on the stitch holder. Continue to bind off for neck at beginning of every row from mid front (i.e. at beginning of each row from wrong side) as follows: bind off 2 stitches 2 times and 1 stitch 3 times = 15-16-17-17-17-17 stitches remain on shoulder. Work until 1 row remains before piece measures 90-93-96-99-102-105 cm / 35⅜"-36⅝"-37¾"-39"-40⅛"-41¼", knit 1 row from wrong side and bind off by knitting from right side. RIGHT FRONT PIECE: = 31-34-37-39-42-45 stitches. Continue back and forth with 3 edge stitches in garter stitch towards armhole, stockinette stitch and A.3B towards mid front (work first row from wrong side). When 3 rows have been worked back and forth, decrease for armhole on next row from right side - read DECREASE TIP-2. Decrease like this on every other row (i.e. every row from right side) 2-3-5-6-8-11 times in total = 29-31-32-33-34-34 stitches. Continue pattern back and forth as before with A.3B towards mid front, stockinette stitch and 3 edge stitches in garter stitch towards armhole until piece measures approx. 84-87-90-93-96-99 cm / 33"-34 ¼"-35⅜"-36⅝"-37 ¾"-39" (adjust so that next row is worked from right side and finish on the same row in A.3 as on left front piece). Now slip the first 7-8-8-9-10-10 stitches on 1 stitch holder for neck but to avoid cutting the yarn work them before slipping them on the stitch holder. Continue to bind off for neck at beginning of every row from mid front (i.e. at beginning of each row from right side) as follows: bind off 2 stitches 2 times and 1 stitch 3 times = 15-16-17-17-17-17 stitches remain on shoulder. Work until 1 row remains until piece measures 90-93-96-99-102-105 cm / 35⅜"-36⅝"-37¾"-39"-40⅛"-41¼", knit 1 row from wrong side and bind off by knitting from right side. BACK PIECE: = 62-68-74-78-84-90 stitches. Continue back and forth with 3 edge stitches in garter stitch in each side, stockinette stitch and A.3A/A.3B mid back (work first row from wrong side). When 3 rows have been worked back and forth, decrease for armhole in each side on next row from right side - read DECREASE TIP-2 (= 2 stitches decreased). Decrease like this on every other row (i.e. every row from right side) 2-3-5-6-8-11 times in total = 58-62-64-66-68-68 stitches. Continue pattern back and forth as before with A.3A/A.3B mid back, stockinette stitch and 3 edge stitches in garter stitch in each side towards armholes until piece measures 88-91-94-97-100-103 cm / 34⅝"-35¾"-37"-38⅛"-39⅜"-40½". Now bind off the middle 26-28-28-30-32-32 stitches for neck and finish each shoulder separately. Continue as before over shoulder stitches and bind off 1 stitch for neck on next row from the neck = 15-16-17-17-17-17 stitches remain on shoulder. Work until 1 row remains until piece measures 90-93-96-99-102-105 cm / 35⅜"-36⅝"-37¾"-39"-40⅛"-41¼", knit 1 row from wrong side and bind off by knitting from right side. Work the other shoulder the same way. ASSEMBLY: Sew the shoulder seams. Sew the opening at the mid front, start at the bottom and sew up until 10 cm / 4" remain before the neckline (or desired length) – sew in the outermost loop of the outermost stitch so that the seam is flat. NECK EDGE: Begin mid front and pick up from right side approx. 72 to 88 stitches around the neck (including stitches on stitch holders at the front) on circular needle size 4 mm / US 6. Knit 1 row from wrong side, knit 1 row from right side and knit 1 row from wrong side. Bind off knitting from right side. TWINED STRING: Cut 2 strands Paris of 3 metres each. Twine the strands tog until they resist, fold the string double so that it twines again. Make a knot at each end. Fasten a small wooden bead in each end of the tie. Make 2 tassels and fasten one tassel in each end of string, under wooden bead in each side. 1 tassel = cut 12 strands Paris of 11 cm each. Cut 1 strand of approx. 25 cm to fasten tassel with and place this strand in the middle of the 12 strands. Fold the thread double and tie a new thread around the tassel (approx. 1 cm / ⅜" from the top), fasten tightly and sew tassel to string as explained below. Make the other tassel the same way. Place string with tassels double and thread loop through a stitch at the top of vent at the front on dress, pull string ends through loop. Make a similar string with wooden beads and tassels and fasten it at the top of vent on the other side. |
||||||||||||||||||||||||||||
Diagram explanations |
||||||||||||||||||||||||||||
|
||||||||||||||||||||||||||||
|
||||||||||||||||||||||||||||
|
||||||||||||||||||||||||||||
|
||||||||||||||||||||||||||||
|
||||||||||||||||||||||||||||
Have you finished this pattern?Tag your pictures with #dropspattern #loveletterdress or submit them to the #dropsfan gallery. Do you need help with this pattern?You'll find 31 tutorial videos, a Comments/Questions area and more by visiting the pattern on garnstudio.com. © 1982-2025 DROPS Design A/S. We reserve all rights. This document, including all its sub-sections, has copyrights. Read more about what you can do with our patterns at the bottom of each pattern on our site. |
||||||||||||||||||||||||||||


With over 40 years in knitting and crochet design, DROPS Design offers one of the most extensive collections of free patterns on the internet - translated to 17 languages. As of today we count 314 catalogs and 11822 patterns - 11812 of which are translated into English (US/in).
We work hard to bring you the best knitting and crochet have to offer, inspiration and advice as well as great quality yarns at incredible prices! Would you like to use our patterns for other than personal use? You can read what you are allowed to do in the Copyright text at the bottom of all our patterns. Happy crafting!
Post a comment to pattern DROPS 188-31
We would love to hear what you have to say about this pattern!
If you want to leave a question, please make sure you select the correct category in the form below, to speed up the answering process. Required fields are marked *.