DROPS Muskat
DROPS Muskat
100% Cotton
from 2.80 $ /50g
Get the yarn to make this pattern from 19.60$.

The yarn cost is calculated from the pattern’s smallest size and the yarn’s cheapest product type. Looking for an even better price? You might find it on the DROPS Deals!

DROPS SS24

Rosalina

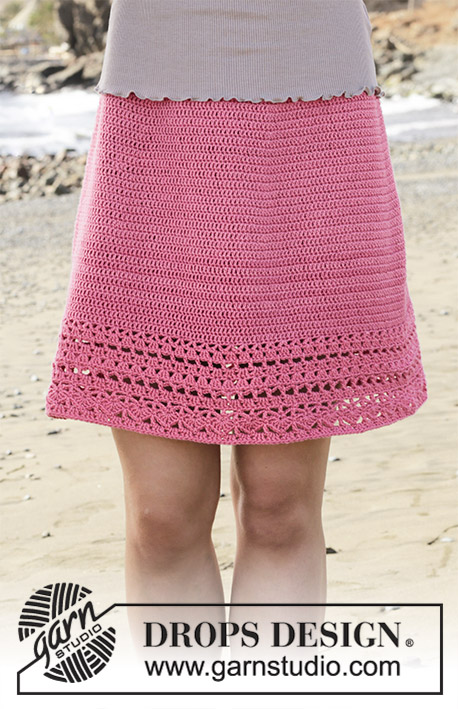
Skirt with fan pattern, crocheted top down. Size: S - XXXL Piece is crocheted in DROPS Muskat.

DROPS 190-28
DROPS design: Pattern r-729
Yarn group B
----------------------------------------------------------
Size: S - M - L - XL - XXL - XXXL
Materials:
DROPS MUSKAT from Garnstudio (belongs to yarn group B)
350-400-450-500-550-600 g color 09, light brown

Piece can also be crocheted with yarn from:
"Alternative yarn (yarn group B)" - see link below.

DROPS CROCHET Hook size 4 mm / G/6 - or size needed to get 18 double crochets x 9 rows = 10 cm / 4" in width and 10 cm / 4" vertically.

DROPS MOTHER-OF-PEARL BUTTON ARCHED (white), NO 521: 5 pieces for all sizes

-------------------------------------------------------

Alternative Yarn – See how to change yarns here
Yarn Groups A to F – Use the same pattern and change the yarn here
Yarn usage using an alternative yarn – Use our yarn converter here

-------------------------------------------------------

DROPS Muskat
DROPS Muskat
100% Cotton
from 2.80 $ /50g
Get the yarn to make this pattern from 19.60$.

The yarn cost is calculated from the pattern’s smallest size and the yarn’s cheapest product type. Looking for an even better price? You might find it on the DROPS Deals!

Pattern instructions

NOTE: This pattern is written in American English. All measurements in charts are in cm. For conversion from inches to cm - click here. There are different terms for crocheting in American and British English. If this pattern includes crochet, click for "crochet terms" here. For this pattern in British English, please click here.
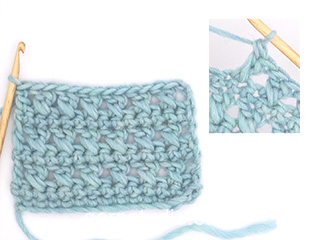
INFORMATION FOR PATTERN:

PATTERN:
See diagrams A.1 and A.2. Diagram A.1 shows how every row/round begins and ends (i.e. when working back and forth do not work 1 slip stitch in chain stitch at beginning of row).

CROCHET INFO:
At beginning of every row with double crochets work 3 chain stitches (do not replace first double crochet).
At beginning of every row with single crochets work 1 chain stitch (does not replace first single crochet).

INCREASE TIP:
Increase on row/round 1, 4, 7, 11 and 12 in pattern A.2b (i.e. increase 6 stitches evenly 5 times in total per repetition of A.2b in height).
Increase by working 2 double crochets in/around in same stitch. To calculate how often increase should be done on round, use the total number of stitches on row/round (e.g. 132 double crochets) and divide by number of increases to be done (e.g. 6) = 22. I.e. in this example increase 1 double crochet in/around/between every 22nd stitch.
----------------------------------------------------------

SKIRT:
Work top down. Work back and forth until vent in the side is done, then work in the round.
Work 142-156-170-184-212-233 chain stitches (including 3 chain stitches to turn with) on hook size 4 mm / G/6 with Muskat. Work first row as follows: Work 1 double crochet in 4th chain stitch from hook (= 1 double crochet) - read CROCHET INFO, 1 double crochet in each of the next 5 chain stitches, * skip 1 chain stitch, 1 double crochet in each of the next 6 chain stitches *, work from *-* = 120-132-144-156-180-198 double crochets. Work 1 row with 1 double crochet in every double crochet. Work A.2a 20-22-24-26-30-33 times in total in width. When A.2a has been worked, work A.2b over A.2a (first row in A.2b is from wrong side) and increase as follows (i.e. increase on first round and A.2b is repeated in height): REMEMBER THE CROCHET GAUGE! Increase 6 double crochets evenly - read INCREASE TIP - 16-16-17-18-18-20 times in total = 216-228-246-264-288-318 stitches. For every increase work 1 more repetition of A.2b in width AT THE SAME TIME when piece measures 11 cm, end the vent in the side and continue piece in the round, begin round in the side. Fasten off when piece measures 38-40-42-44-46-48 cm / 15"-15¾"-16½"-17¼"-18"-19", finish neatly according to pattern.

EDGE AT THE TOP:
Work 1 single crochet in every chain stitch where double crochets were worked in on first row =
120-132-144-156-180-198 single crochets. Work 3 rows in total with single crochets. Fasten off.

BUTTONHOLE LOOPS:
Along the opening on front piece work buttonhole loops (start at the bottom). Work 2 single crochets around every double crochet row and 1 single crochet around every single crochet row as follows: Work 1 slip stitch around first row, 3 chain stitches, skip 1 cm / ⅜", * work single crochets around next double crochet/single crochet row, 3 chain stitches, skip approx. 1 cm / ⅜" *, work from *-* 4 times in total and finish with 2 single crochets around the last 2 single crochet rows at the top, turn and work back as follows: 1 single crochet in every single crochet and 3 single crochets in every chain space. Fasten off.

BUTTON FOLDING EDGE:
Along the other side of opening work 5 rows with 1 single crochet in every single crochet back and forth (on 1st row work 2 single crochet around every double crochet row and 1 single crochet around every single crochet row), fasten off. Sew the buttons on to the button folding edge.

Diagram

All measurements in charts are in cm.

symbols = chain stitch
symbols = single crochet in stitch
symbols = single crochet in back loop of stitch from right side and in front loop of stitch from wrong side
symbols = single crochet around chain stitch
symbols = double crochet in stitch
symbols = double crochet between 2 double crochets
symbols = double crochet around chain stitch
symbols = skip 1 double crochet, work 1 double crochet in/around next double crochet/chain stitch, 1 double crochet in stitch that was skipped
symbols = double crochet group: Work 1 double crochet in next double crochet but wait with last pull through (= 2 loops on hook), work 2 double crochets in same double crochet the same way, pull yarn through all 4 loops on hook
symbols = 1 treble crochet in first/last single crochet in the fan 2 rows down (make sure to at the same time work around the chain stitch on the row in the middle)
symbols = increase evenly - see pattern
symbols = first row is not worked, it has already been worked, it only shows how next row should be worked in stitches
symbols = row begins with 3 chain stitches, round begins with 3 chain stitches and ends with 1 slip stitch in first stitch in A.2
symbols = row begins with 1 chain stitch, round begins with 1 chain stitch and ends with 1 slip stitch in first stitch in A.2
diagram
diagram
Do you have a question? See a list of frequently asked questions (FAQ)

Knitting tension is what determines the final measurements of your work, and is usually measured per 10 x 10 cm. It is provided like so: number of stitches in width x number of rows in height - eg: 19 stitches x 26 rows = 10 x 10 cm.

The knitting tension is very individual; some people knit/crochet loosely while others work tightly. You adjust the knitting tension with the needle size, which is why the suggested needle size only serve as a guide! You need to adjust this (up or down) to ensure that YOUR knitting tension matches the knitting tension provided in the pattern. If you work with a different knitting tension than provided you will have a different yarn consumption, and your work will have different measurements than what the pattern suggests.

The knitting tension also determines which yarns can replace each other. As long as you achieve the same knitting tension you can replace one yarn with another.

See DROPS lesson: How to measure your tension/gauge

See DROPS video: How to make a gauge tension swatch

The required amount of yarn is provided in grams, eg: 450 g. To calculate how many balls you’ll need you first need to know how many grams are in 1 ball (25g, 50g or 100g). This information is available if you click on the individual yarn quality on our pages. Divide the amount required with the amount of each ball. For example, if each ball is 50g (the most common amount), the calculation will be as follows: 450 / 50 = 9 balls.

The important thing when changing from one yarn to another is that the knitting/crochet tension remains the same. This is so that the measurements of the finished piece will be the same as on the sketch provided. It is easier to achieve the same knitting tension using yarns from the same yarn group. It is also possible to work with multiple strands of a thinner yarn to achieve the knitting tension of a thicker one. Please try our yarn converter. We recommend you to always work a test swatch.

Please NOTE: when changing yarn the garment might have a different look and feel to the garment in the photo, due to individual properties and qualities of each yarn.

See DROPS lesson: Can I use a different yarn than the one mentioned in the pattern?

All our yarns are categorised into yarn groups (from A to F) according to thickness and knitting tension – group A contains the thinnest yarns and group F the thickest. This makes it easier for you to find alternative yarns to our patterns, should you wish to switch yarn. All yarns within the same group have a similar knitting tension and can easily replace each other. However, different yarn qualities have different structures and properties which will give the finished work a unique look and feel.

Click here for an overview of the yarns in each yarn group

At the top of all our patterns you’ll find a link to our yarn converter, which is a helpful tool should you wish to use a different yarn than suggested. By filling in the yarn quality you wish to replace, the amount (in your size) and number of strands, the converter will present good alternative yarns with the same knitting tension. Additionally it will tell you how much you’ll require in the new qualities and whether you’ll need to work with multiple strands. Most skeins are 50g (some are 25g or 100g).

If the pattern is worked with multiple colours, every colour will have to be converted separately. Similarly, if the pattern is worked with several strands of different yarns (for example 1 strand Alpaca and 1 strand Kid-Silk) you will have to find alternatives for each, individually.

Click here to see our yarn converter

Since different yarns have different qualities and textures we have chosen to keep the original yarn in our patterns. However, you can easily find options among our available qualities by using our yarn converter, or simply pick a yarn from the same yarn group.

It is possible that some retailers still have discontinued yarns in stock, or that someone has a few skeins at home that they would like to find patterns for.

The yarn converter will provide both alternative yarn as well as required amount in the new quality.

If you think it's hard to decide what size to make, it can be a good idea to measure a garment you own already and like the size of. Then you can pick the size by comparing those measures with the ones available in the pattern's size chart.

You'll find the size chart at the bottom of the pattern.

See DROPS lesson: How to read size chart

The needle size provided in the pattern serves only as a guide, the important thing is to follow the knitting tension. And since knitting tension is very individual, you will have to adjust the needle size to ensure that YOUR tension is the same as in the pattern – maybe you’ll have to adjust 1, or even 2 needle sizes, up or down to achieve the correct tension. For this, we recommend that you work test swatches.

Should you work with a different knitting tension than the one provided, the measurements of the finished garment might deviate from the measurement sketch.

See DROPS lesson: How to measure your tension/gauge

See DROPS video: How to make a gauge tension swatch

Working a garment top-down provides more flexibility and room for personal adjustment. For example it is easier to try the garment on while working, as well as making adjustments to length of yoke and shoulder caps.

The instructions are carefully explaining every step, in the correct order. Diagrams are adjusted to the knitting direction and are worked as usual.

The diagram depicts all rows/rounds, and every stitch seen from the right side. It is read from bottom to top, from right to left. 1 square = 1 stitch.

When working back and forth, every other row is worked from the right side and every other row is worked from the wrong side. When working from the wrong side, the diagram will have to be worked reversed: from left to right, knit stitches are purled, purl stitches are knit etc.

When working in the round every round is worked from the right side and the diagram are worked from right to left on all rounds.

See DROPS lesson: How to read knitting diagrams

The diagram depicts all rows/rounds, and every stitch seen from the right side. It is worked from bottom to top, from right to left.

When working back and forth every other row is worked from the right side: from right to left and every other row is worked from the wrong side: from left to right.

When working in the round, every row in the diagram are worked from the right side, from right to left.

When working a circular diagram you start in the middle and work your way outwards, counter clockwise, row by row.

The rows usually start with a given number of chain stitches (equivalent to the height of the following stitch), this will either be depicted in the diagram or explained in the pattern.

See DROPS lesson: How to read crochet diagrams

Instructions for working several diagrams after each other on the same row/round, will often be written like so: “work A.1, A.2, A.3 a total of 0-0-2-3-4 times". This means you work A.1 once, then A.2 is worked once, and A.3 is repeated (in width) the number of times provided for your size – in this case like so: S = 0 times, M = 0 times, L=2 times, XL= 3 times and XXL = 4 times.

The diagrams are worked as usual: begin with the first row in A.1, then work the first row in A.2 etc.

See DROPS lesson: How to read knitting diagrams

See DROPS lesson: How to read crochet diagrams

The total width of the garment (from wrist-to-wrist) will be larger in the larger sizes, despite the actual sleeves being shorter. The larger sizes have longer sleeve caps and wider shoulders, so there will be a good fit in all sizes.

The measurement sketch/schematic drawing provides information regarding the full length of the garment. If it’s a jumper or a jacket the length is measured from the highest point on the shoulder (usually closest to the neckline), and straight down to the bottom of the garment. It is NOT measured from the tip of shoulder. Similarly, the length of yoke is measured from the highest point on the shoulder and down to where yoke is split into body and sleeves.

See DROPS lesson: How to read a schematic drawing

Diagrams are often repeated on the round or in height. 1 repeat is the diagram the way it appears in the pattern. If it says to work 5 repeats of A.1 in the round, then you work A.1 a total of 5 times after/next to each other in the round. If it says to work 2 repeats of A.1 vertically/in height you work the entire diagram once, then begin again at the start and work the entire diagram one more time.

Chain stitches are slightly narrower than other stitches and to avoid working the cast-on edge too tight, we simply chain more stitches to begin with. The stitch count will be adjusted on the following row to fit the pattern and measurement sketch.

The rib edge is more elastic and will contract slightly compared to, for example, stocking stitch. By increasing before the rib edge, you avoid a visible difference in width between the rib edge and the rest of the body.

It’s very easy to cast off too tightly, and by making yarn overs while casting off (and simultaneously casting these off) you avoid a too tight cast off edge.

See DROPS video: How to bind off with yarn overs (yo)

To achieve an even increase (or decrease) you can increase on, for example: every 3rd and 4th row alternately, like so: work 2 rows and increase on the 3rd row, work 3 rows and increase on the 4th. Repeat this until the increase is complete.

See DROPS lesson: Increase or decrease 1 st on every 3rd and 4th row alternately

Should you prefer to work in the round instead of back and forth, you may of course adjust the pattern. You’ll need to add steeks mid-front (usually 5 stitches), and follow the instructions. When you would normally turn and work from the wrong side, simply work across the steek and continue in the round. At the end you’ll cut the piece open, pick up stitches to work bands, and cover the cut edges.

See DROPS video: How to knit steeks and cut open

Should you prefer to work back and forth instead of in the round, you may of course adjust the pattern so you work the pieces separately and then assemble them at the end. Divide the stitches for the body in 2, add 1 edge stitch in each side (for sewing) and work the front and back pieces separately.

See DROPS lesson: Can I adapt a pattern for circular needles into straight needles?

Pattern repeats can vary slightly in the different sizes, in order to get the correct proportions. If you’re not working the exact same size as the garment in the photo, yours might deviate slightly. This has been carefully developed and adjusted so that the complete impression of the garment is the same in all sizes.

Make sure to follow instructions and diagrams for your size!

If you have found a pattern you like which is available in women’s size it’s not very difficult to convert it to men’s size. The biggest difference will be the length of sleeves and body. Start working on the women size that you think would fit across the chest. The additional length will be worked right before you cast off for the armhole/sleeve cap. If the pattern is worked top-down you can add the length right after the armhole or before the first decrease on sleeve.

Regarding additional yarn amount, this will depend on how much length you add, but it is better with a skein too many than too few.

All yarns will have excess fibres (from production) that might come off as lint or shedding. Brushed yarns (ie hairier yarns) have more of these loose, excess fibres, causing more shedding.

Shedding also depends on what is worn under or over the garment, and whether this pulls at the yarn fibres. It’s therefore not possible to guarantee that there will be no shedding

Below are some tips on how to get the best result when working with hairier yarns:

1. When the garment is finished (before you wash it) shake it vigorously so the looser hairs come off. NOTE: do NOT use a lint roller, brush or any method that pulls at the yarn.

2. Place the garment in a plastic bag and put it in your freezer - the temperature will cause the fibres to become less attached to each other, and excess fibres will come off easier.

3. Leave in the freezer for a few hours before taking it out and shaking it again.

4. Wash the garment according to the instructions on the yarn label.

Pilling is a natural process that happens to even the most exclusive of fibers. It's a natural sign of wear and tear that is hard to avoid, and that is most visible in high friction areas of your garment like a sweater's arms and cuffs.

You can make your garment look as new by removing the pilling, using a fabric comb or a pill/lint remover.

Still can't find the answer you need? Then scroll down and leave your question so one of our experts can try to help you. This will be done normally within 5 to 10 working days.
In the meantime, you can read the questions and answers that others have left to this pattern or join the DROPS Workshop on Facebook to get help from fellow knitters/crocheters!

You might also like...

Rosalina

Kaderus, Czech Republic

Rosalina

Shweta Kongari, India

Handmade work

Enza, Italy

Post a comment to pattern DROPS 190-28

We would love to hear what you have to say about this pattern!

If you want to leave a question, please make sure you select the correct category in the form below, to speed up the answering process. Required fields are marked *.

Comments / Questions (52)

country flag Charlotte wrote:

Bonjour, J’ai commencé la jupe mais je bloque pour le motif À.2a : on doit faire 20 motifs ? Car si j’en fais 20, ça me fait que la moitié de la jupe ! Je ne comprend pas, merci de votre réponse

10.01.2021 - 15:27

DROPS Design answered:

Bonjour Charlotte, vous avez 120 mailles et crochetez 20 fois les 6 mailles de A.2a = si votre échantillon est juste (18 brides = 10 cm) vous devez bien avoir vos 66 cm de largeur. Bon crochet!

11.01.2021 - 09:38

country flag Ulrike wrote:

In der anleitung runde 9 mit den stäbchen gruppe fängt es an sich zuwellen die nächste runde ist eine feste masche in das hintere machen glied und die runde dann runde 11 luftmasche zweistäbchen in die selbe masche und luftmasche macht das ganze ztück zu eng was mache ich falsch? gibt es zufällig für diese häkelschrift eine viedeoanleitung das wäre fantastisch

06.05.2020 - 01:13

DROPS Design answered:

Liebe Ulrike, ja bei der 11. Reihe häkeln Sie das Stäbchen in das hintere Glied vom festen Maschen (damit das vordere Glied siehtbar wird). Viel Spaß beim häkeln!

06.05.2020 - 10:44

country flag Ellery Gillen wrote:

Beautiful pattern. I'm not understanding the increase. (Using size small and 2b2) row 1 has 120 stitches. Increase 6 (120/6= every 20 stitches) next row 4 126/6= every 21 stitches) throughout 2b2 (so 5 increaaes). How is 16 increases reached? Working 2b2 three times is only 15 times. Also, do you work those 5 rows as increaes in 2b2 every time the pattern is repeated (or asked another way, will the final stitch count be greater than 216)?

24.04.2020 - 02:28

DROPS Design answered:

Hi Ellery, You increase 6 treble crochets evenly spaced a total of 16 times. 6 x 16 = 96 and you have 120 stitches to begin with. This means a total of 216 stitches when the increases are finished. Each time you increase the 6 stitches, you then have room for 1 more repeat of A.2b in width. Happy crocheting!

24.04.2020 - 08:10

country flag Gwenaelle wrote:

Bonjour! Je suis en train de faire cette jupe en taille xxxl et je ne sais pas si je comprends bien l'augmentation du 1er rang de A2b. Dois je faire 20 augmentations de 6 brides? Et ce sur chaque rang où il y a des augmentations? Merci de prendre le temps de me répondre ! Bonne journée

21.04.2020 - 17:42

DROPS Design answered:

Bonjour Gwenaelle, Vous augmentez aux tours indiqués sous AUGMENTATIONS dans A.2b (= 5 rangs d'augmentations pour chaque motif A.2b en hauteur), et vous augmentez 6 mailles à chacun de ces rangs, vous aurez donc 198+6= 204 brides après le 1er rang de A.2b puis 204+6=210 brides après le 2ème rang d'augmentations etc. Vous devez crocheter 20 fois ce rang d'augmentations, ce qui correspond 4 motifs de A.2b en hauteur à raison de 5 rangs d'augmentations par motif. Voici comment répartir les augmentations. Bon crochet!

22.04.2020 - 08:23

country flag Alice wrote:

Ik heb het juiste garen en de juiste haaknaald (4), maar toch is de rok 36 cm te wijd in de taille. De bedoeling was 90-95 cm, maar het is 120 cm nu. Hoe is dat mogelijk? Ik haak niet heel los.

02.04.2020 - 00:56

DROPS Design answered:

Dag Alice,

Heb je een proeflapje gemaakt en komt de stekenverhouding overeen zoals aangegeven in het patroon? Misschien haak je wat te los en wordt het daardoor te wijd. Als dat het geval is zou je een kleinere haaknaald moeten nemen.

04.04.2020 - 18:55

country flag Sham Jay wrote:

I love this skirt and i want to make it for my daughter...but i dont seem to understand the pattern ..could u please get me more clear one so that i can understand.as i am not a professional just an intermediate if u send me the pattern will be so grateful thank you.looking forward to hearing from you.

08.11.2019 - 15:05

DROPS Design answered:

Dear Sham Jay, you will find how to read crochet diagrams here in our FAQ - where you can find further assistance; should you have any question, please feel free to ask here or contact your DROPS store - even per mail or telephone -for any individual assistance. Happy crocheting!

08.11.2019 - 15:56

country flag Marianne wrote:

Jeg er ret ny i hækling, men har kastet mig over denne fine nederdel. Jeg er i tvivl om, hvad følgende betyder:hækl A.2a total 20-22-24-26-30-33 gange i bredden. jeg hækler en str. S. Jeg har hæklet en række ifht. diagrammet - det giver mig 30 krydsende stangmaskepar på rækken. Er det meningen, jeg skal gentage den række 20 gange? samtidig vil jeg gerne vide, hvad 1 rapport er? MVH Marianne

19.07.2019 - 21:47

DROPS Design answered:

Hej, når du hækler den mindste størrelse, så vælger du det første tal i rækken (altså 20 gange). Se her hvordan du hækler efter diagram og hvad en rapport er Hvordan læses et hæklediagram

30.09.2019 - 09:47

country flag Jára wrote:

Prosím, můžete doplnit chybějící nákres schéma A1 a A2. Děkuji

11.07.2019 - 20:29

DROPS Design answered:

Milá Járo, díky za upozornění - nákres je doplněný. Příjemné háčkování! Hana

11.07.2019 - 22:06

country flag Nardya wrote:

Hello, thank you for this pattern, I think it is very beautiful. I am wondering if you can help me understand the instruction 1 treble crochet in the first/last chain of fan 2 rows down (make sure to work around chain st in the middle). Do I put a put a treble st in the fan row over the top of the 2 other rows (it does not appear this way in the pic) so can you help me understand how to stitch this line if possible as I couldn’t see a tutorial for it. Deepest gratitude.

11.05.2019 - 13:54

DROPS Design answered:

Dear Nardya, on this row work the treble crochet inserting the crochet hook in the 1st /last sc on fan below (the chain stitch from previous row should be automatically worked with the treble crochet). Happy crocheting!

13.05.2019 - 08:56

country flag ROSELYNE MOUTHON wrote:

Bonsoir, Quel est l intérêt d une double- bride au milieu de brides au rang 11? Merci de me répondre

31.03.2019 - 18:02

DROPS Design answered:

Bonjour Mme Mouthon, au rang 11, on crochète 1 double bride en piquant dans la ms 2 rangs plus bas et autour de la maille en l'air du rang précédent (on a ainsi la hauteur d'une bride normale). Bon crochet!

01.04.2019 - 13:56