
Looking for a yarn?


Comments / Questions (10)
![]() Louise Désilets wrote:
Louise Désilets wrote:
Tout de suite après la séparation sous les manches, on tricote 42 m., on monte 8 m., ensuite 77 m. mais ensuite, après 77 + 8 m. , ça ne peut plus arriver vu que les77 m. sont impaires, je suis rendue à une m. endroit alors que je dois tricoter envers.
12.05.2022 - 03:20DROPS Design answered:
Bonjour Mme Désilets, lors de la séparation, tricotez les mailles de A.1 comme avant de part et d'autre des 71 mailles du dos, au rang suivant (= sur l'envers), tricotez toutes les mailles au point de blé, même celles de A.1. Bon tricot!
12.05.2022 - 09:09
![]() Zofia wrote:
Zofia wrote:
Czy można w tym wzorze zastąpić podwójny ryż pojedynczym?
29.10.2021 - 12:05DROPS Design answered:
Witaj Zofio! Oczywiście, że tak. Zrób tylko próbkę i ważne aby zgadzała się również na wysokość, z uwagi na reglany. Pozdrawiamy!
29.10.2021 - 12:19
![]() Patricia wrote:
Patricia wrote:
Bonjour, doit-on continuer à faire le diagramme A1 lorsqu'on arrive au dos et devant merci Il est bien dommage que les photos misent en ligne ne soit pas autant exploitable on ne voit que rarement des photos de dos, ni le tricot vraiment porté dans toute sa longueur (les personnes sont souvent assise pliée ) en fait on ne peut pas avoir un vrai rendu de ce que cela va donné au final cordialement
26.10.2020 - 08:30DROPS Design answered:
Bonjour Patricia, après la division de l'ouvrage, on tricote au point de blé sur toutes la mailles, avec 4 m de bordure devant au point mousse comme avant, autrement dit, on ne tricote plus A.1 sur la partie basse du gilet. Bon tricot!
26.10.2020 - 09:37
![]() Katrīne Kļaviņa wrote:
Katrīne Kļaviņa wrote:
For this pattern, I don't quite understand how to start and how stiches should I cast on for the beginning. Where can I read on how to understand your pattern information?
13.03.2020 - 17:17
![]() Sari wrote:
Sari wrote:
Hei, kun minulla on 161 silmukkaa työssä ja alan neuloa etu- ja takakappaletta (hihat apulangalla), niin en saa helmineuletta oikein: jälkimmäisen hihan kohdalle päädyttyäni huomasin, että kuuden luodun silmukan tienoilla joutuisin tekemään peräkkäin kaksi oikeaa tai nurjaa silmukkaa, jotta kerroksen loppu helmineule menisi oikein. Miten tämä pitäisi tehdä oikeaoppisesti?
28.09.2018 - 15:49DROPS Design answered:
Hei, helmineuleen pitäisi jatkua rikkoutumattomana, koska apulangalle siirretään parillinen määrä silmukoita ja tilalle luodaan myös parillinen määrä silmukoita.
19.11.2018 - 17:25Maria Francisca wrote:
Buenas, estoy iniciando las mangas y no se cómo disminuir para que no me queden dos puntos de derecho juntos. Por favor su ayuda. Les saluda. Francisca Gracias y saludos.
13.09.2018 - 04:41Maria Francisca wrote:
Buenas, estoy iniciando las mangas y no se cómo disminuir para que no me queden dos puntos de derecho juntos. Por favor si ayuda. Gracias y saludos.
13.09.2018 - 04:39
![]() Lonni Eriksen wrote:
Lonni Eriksen wrote:
Jeg vil gerne strikke denne cardigan ensfarvet i 1tråd Alpaca Silk uni colour + 1 tråd Alpaca uni colour ?
13.08.2018 - 12:47DROPS Design answered:
Hej Lonne, for at få samme strikkefasthed (for rigtige mål) som der står i opskriften skal du bruge 3 tråde fra garngruppe A (se link i opskriften). God fornøjelse!
14.08.2018 - 13:06
![]() Mercedes wrote:
Mercedes wrote:
¡Hola! Muchas gracias por los patrones que comparten. Acabo de empezar esta chaqueta. Tengo el escote, el primer ojal y la primera fila de aumentos para el canesú tal y como se indica en el patrón, pero no puedo avanzar porque no se explica cómo van los aumentos en las siguientes vueltas del canesú (es imposible que sean iguales a la primera). ¿Podrían especificarlo, por favor? Muchas gracias.
08.04.2018 - 00:04DROPS Design answered:
Hola Mercedes, las siguientes filas del canesú se trabajan como la primera fila del canesú- fíjate en el RAGLÁN.
08.04.2018 - 19:12
![]() Tianna Stokes wrote:
Tianna Stokes wrote:
Very nice patterns I've been using for a few years now as love Drops Alpaca Yarns but just lately I can not print or use the patterns off line in iBooks as all the diagrams don't show.
02.03.2018 - 17:08DROPS Design answered:
Dear Mrs Stokes, make sure your browser is updated, you should see all diagrams/measurement chart. Happy knitting!
05.03.2018 - 07:50
|
|||||||
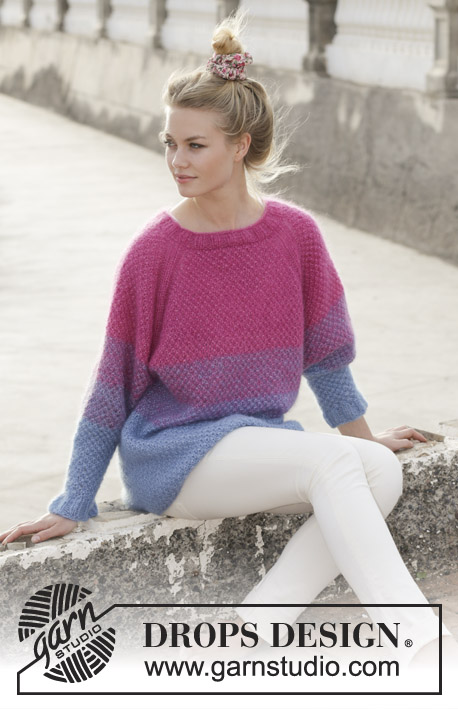
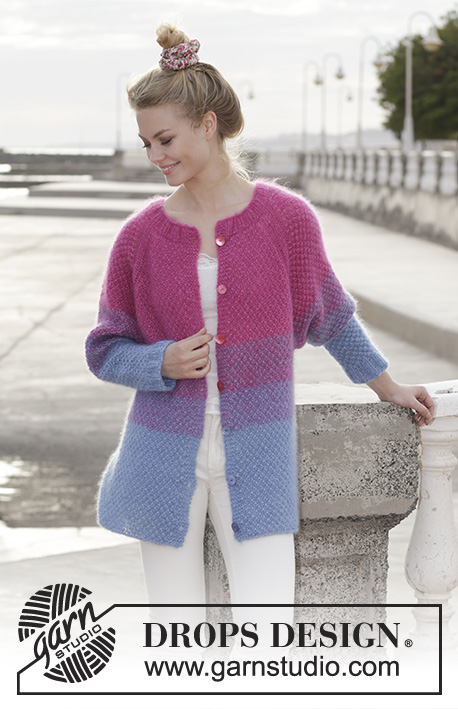
Blackberry Crush Cardigan#blackberrycrushcardigan |
|||||||
 |
 |
||||||
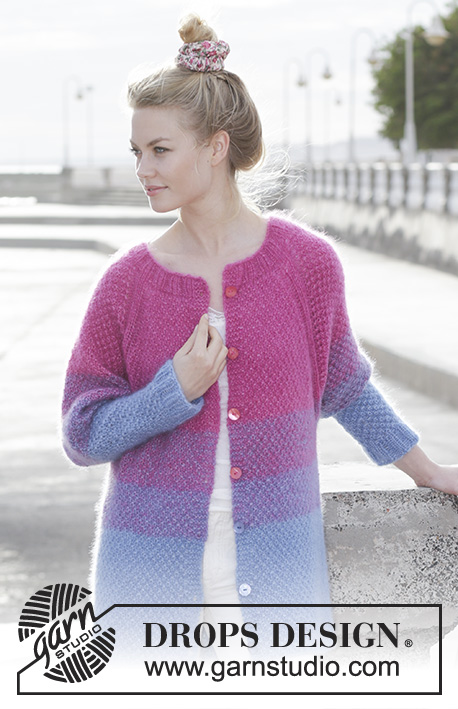
Knitted jacket with raglan, stripes and seed stitch (double vertically), worked top down. Size: S - XXXL Piece is knitted in 3 strands DROPS Kid-Silk.
DROPS 187-39 |
|||||||
|
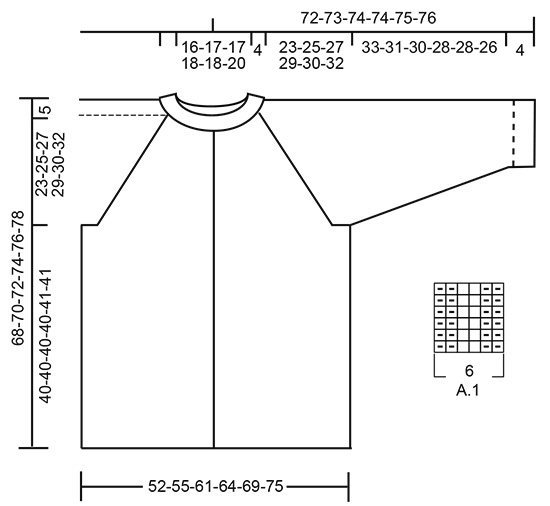
INFORMATION FOR PATTERN: GARTER STITCH (back and forth): 1 ridge = knit 2 rows. PATTERN: See diagram A.1. Diagrams show all rows in pattern seen from the right side. SEED STITCH (double vertically): ROUND/ROW 1: * Knit 1, purl 1 *, repeat from *-*. ROUND/ROW 2: Knit over knit and purl over purl. ROUND/ROW 3: Purl over knit and knit over purl. ROUND/ROW 4: Repeat 2nd round. Repeat rounds/rows 1 to 4. STRIPES (yoke and body): STRIPE 1: 3 strands pink for 23-23-24-25-25-26 cm / 9⅛"-9⅛"-9½"-10"-10"-10⅜" STRIPE 2: 2 strands pink + 1 strand gray blue (= 3 strands) for 8-9-9-9-10-10 cm / 3⅛"-3½"-3½"-3½"-4"-4" STRIPE 3: 1 strand pink + 2 strands gray blue (= 3 strands) for 8-9-9-9-10-10 cm / 3⅛"-3½"-3½"-3½"-4"-4" STRIPE 4: 3 strands gray blue for 24-24-25-26-26-27 cm / 9½"-9½"-10"-10⅜"-10⅜"-10¾" STRIPES (sleeve): STRIPE 1: Continue with 2 strands pink + 1 strand gray blue (= 3 strands) until 8-9-9-9-10-10 cm / 3⅛"-3½"-3½"-3½"-4"-4" in total have been worked (i.e. approx. 0-2-3-4-5-6 cm / 0"-¾"-1⅛"-1½"-2"-2⅜" /on yoke and approx. 8-7-6-5-5-4 cm / 3⅛"-2¾"-2⅜"-2"-2"-1½" on sleeve). STRIPE 2: 1 strand pink + 2 strands gray blue (= 3 strands) for 8-9-9-9-10-10 cm / 3⅛"-3½"-3½"-3½"-4"-4" STRIPE 3: 3 strands gray blue until finished measurements (approx. 21-19-19-18-17-16 cm / 8⅜"-7½"-7½"-7⅛"-6¾"-6⅜"). RAGLAN: Increase 1 stitch on each side of every A.1 (= 8 stitches increased on row): Increase 1 stitch by making 1 yarn over. On next row work yarn over twisted to avoid holes Then work the new stitches in seed stitch (double vertically). DECREASE TIP-1 (evenly): To calculate how to decrease evenly, use the total number of stitches on row (e.g. 86 stitches), minus bands (e.g. 8 stitches) and divide the remaining stitches by number of decreases to be done (e.g. 5) = 15.6. In this example knit approx. every 15th and 16th stitch together and do not decrease of bands. DECREASE TIP-2 (applies to sleeves): Work until 4 stitches remain before marker and knit 2 together, work 4 stitches in seed stitch (= marker thread is between these stitches), slip 1 stitch knitwise, knit 1, pass slipped stitch over stitch worked. BUTTONHOLES (top down): Decrease for buttonholes on right band (when garment is worn). Decrease from right side when 3 stitches remain on row as follows: Make 1 yarn over, knit the next 2 stitches together, knit last stitch. On next row knit yarn over to make holes. Decrease first buttonhole when rib in neck measures approx. 4 cm / 1½". Then decrease the next 6 approx. 10 cm / 4" between each. ---------------------------------------------------------- JACKET: Worked back and forth on circular needle, top down. Work sleeves in the round on a short circular needle/double pointed needles. Piece is knitted in 3 strands Kid-Silk. NECK EDGE: Cast on 86-90-94-94-98-106 stitches with 3 strands pink on circular needle SIZE 5.5 mm/US 9. Purl 1 row from wrong side. Now work rib from right side as follows: 4 band stitches in GARTER STITCH - see explanation above, (knit 2/purl 2) until 6 stitches remain on needle, knit 2, 4 band stitches in garter stitch. Continue rib like this until piece measures 4 cm / 1½". Knit 1 row from right side while decreasing 5 stitches evenly (but not over bands) - read DECREASE TIP-1 (evenly) = 81-85-89-89-93-101 stitches. Work 1 row from wrong side. REMEMBER BUTTONHOLES! Insert a marker thread mid front on band. NOW MEASURE PIECE FROM HERE! Switch to circular needle size 6 mm / US 10. YOKE: Now work STRIPES (yoke and body) – see explanation above, and pattern from right side as follows: 4 band stitches in garter stitch, 8-9-10-10-11-13 stitches SEED STITCH (double vertically) – see explanation above, (= left front piece), make 1 yarn over, A.1 (= 6 stitches), make 1 yarn over, 8 stitches seed stitch (= sleeve), make 1 yarn over, A.1, make 1 yarn over, 17-19-21-21-23-27 stitches in seed stitch (= back piece), make 1 yarn over, A.1, make 1 yarn over, 8 stitches in seed stitch (= sleeve), make 1 yarn over, A.1, make 1 yarn over, 8-9-10-10-11-13 stitches in seed stitch (= right front piece), 4 band stitches in garter stitch. REMEMBER THE GAUGE! First increase for RAGLAN - see explanation above, is now done. Continue like this and increase every other row 22-23-25-27-29-31 times in total = 257-269-289-305-325-349 stitches. Continue until piece measures 23-25-27-29-30-32 cm / 9⅛"-10"-10¾"-11½"-12"-12¾" from marker thread on band mid front and down. Work next row from right side as follows: Work as before over the first 37-39-42-44-47-51 stitches (= left front piece), cast on 6-6-8-8-10-10 new stitches on row (= in the side under sleeve), and slip the next 58-60-64-68-72-76 stitches on a stitch holder (= sleeve), work the next 67-71-77-81-87-95 stitches (= back piece), cast on 6-6-8-8-10-10 new stitches on row (= in the side under sleeves), slip the next 58-60-64-68-72-76 stitches on a stitch holder (= sleeve), work the remaining 37-39-42-44-47-51 stitches (= right front piece). NOW MEASURE PIECE FROM HERE! BODY: = 153-161-177-185-201-217 stitches. Continue with 4 band stitches in garter stitch, seed stitch (double vertically) and stripes as before until piece measures 40-40-40-40-41-41 cm / 16"-16"-16"-16"-16⅜"-16⅜". Bind off stitches with knit over knit and purl over purl. Make a yarn over after approx. every 4th stitch while binding off (bind off yarn over as stitch) to make the bind-off edge more elastic. Piece measures approx. 68-70-72-74-76-78 cm / 26¾"-27½"-28⅜"-29⅛"-30"-30¾" from shoulder and down. SLEEVES: Slip the 58-60-64-68-72-76 stitches from stitch holder in one side of piece on a short circular needle/double pointed needles size 6 mm / US 10 and pick in addition up 1 stitch in each of the 6-6-8-8-10-10 stitches mid under sleeve = 64-66-72-76-82-86 stitches. Insert a marker thread in the middle of the new stitches in the side under the sleeve. Continue with seed stitch (double vertically) and STRIPES (sleeve) - see explanation above. When piece measures 3 cm / 1⅛" / 1", decrease 2 stitch mid under sleeve – read DECREASE TIP-2. Decrease like this every 3rd-3rd-3rd-2nd-2nd-2nd round 18-18-21-22-25-26 times in total = 28-30-30-32-32-34 stitches. Continue to work until piece measures 33-31-30-28-28-26 cm / 13⅛"-12⅜"-12"-11⅛"-11⅛"-10⅜". Knit 1 round while increasing 4-6-6-8-8-10 stitches evenly = 32-36-36-40-40-44 stitches. Switch to double pointed needles SIZE 5.5 mm/US 9 and work rib = knit 2/purl 2 for 4 cm / 1½". Switch back to double pointed needles size 6 mm / US 10 and bind off with knit over knit and purl over purl. Make sure that the bind-off edge is not too tight. Sleeve measures approx. 37-35-34-32-32-30 cm / 14¾"-14"-13½"-12¾"-12¾"-11¾". Work the other sleeve the same way. |
|||||||
Diagram explanations |
|||||||
|
|||||||
|
|||||||
Have you finished this pattern?Tag your pictures with #dropspattern #blackberrycrushcardigan or submit them to the #dropsfan gallery. Do you need help with this pattern?You'll find 27 tutorial videos, a Comments/Questions area and more by visiting the pattern on garnstudio.com. © 1982-2025 DROPS Design A/S. We reserve all rights. This document, including all its sub-sections, has copyrights. Read more about what you can do with our patterns at the bottom of each pattern on our site. |
|||||||


With over 40 years in knitting and crochet design, DROPS Design offers one of the most extensive collections of free patterns on the internet - translated to 17 languages. As of today we count 314 catalogs and 11822 patterns - 11812 of which are translated into English (US/in).
We work hard to bring you the best knitting and crochet have to offer, inspiration and advice as well as great quality yarns at incredible prices! Would you like to use our patterns for other than personal use? You can read what you are allowed to do in the Copyright text at the bottom of all our patterns. Happy crafting!
Post a comment to pattern DROPS 187-39
We would love to hear what you have to say about this pattern!
If you want to leave a question, please make sure you select the correct category in the form below, to speed up the answering process. Required fields are marked *.