
Looking for a yarn?


|
|||||||||||||||||||||||||||||||||||||||||||||||||||||||
Christmas Brew#dropschristmasbrew |
|||||||||||||||||||||||||||||||||||||||||||||||||||||||
 |
 |
||||||||||||||||||||||||||||||||||||||||||||||||||||||
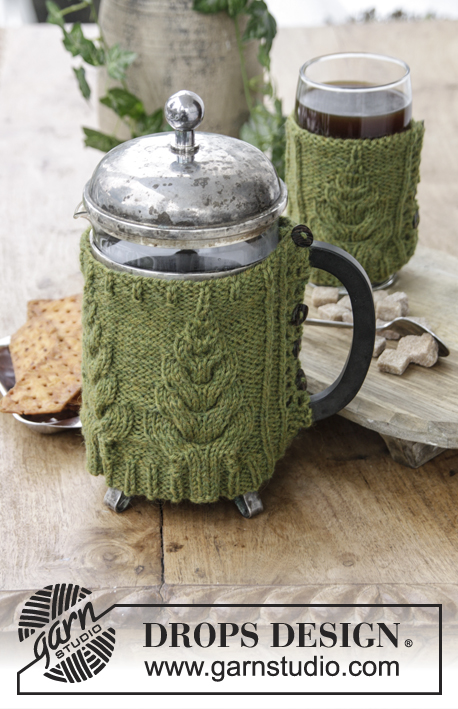
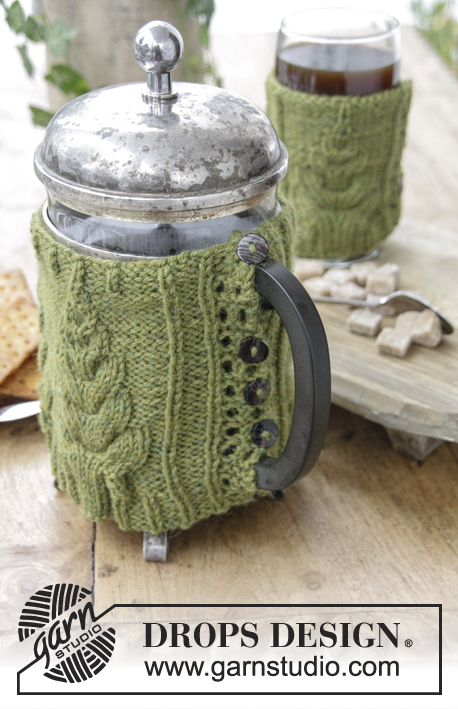
DROPS Christmas: Knitted cover with cables for press pot and cup. Piece is knitted in DROPS Lima.
DROPS Extra 0-1402 |
|||||||||||||||||||||||||||||||||||||||||||||||||||||||
|
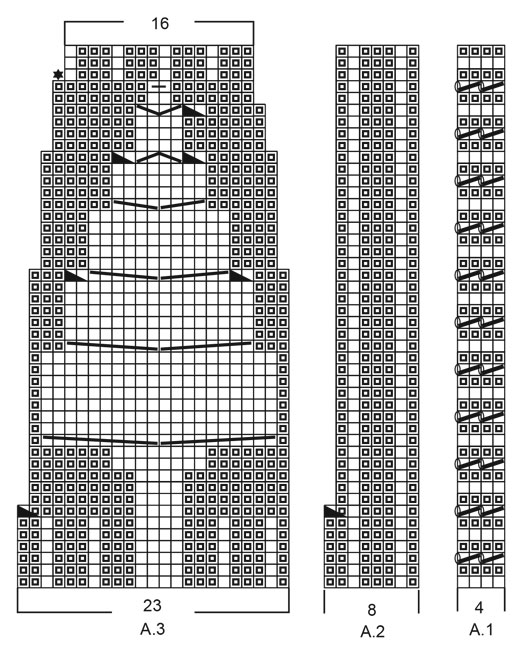
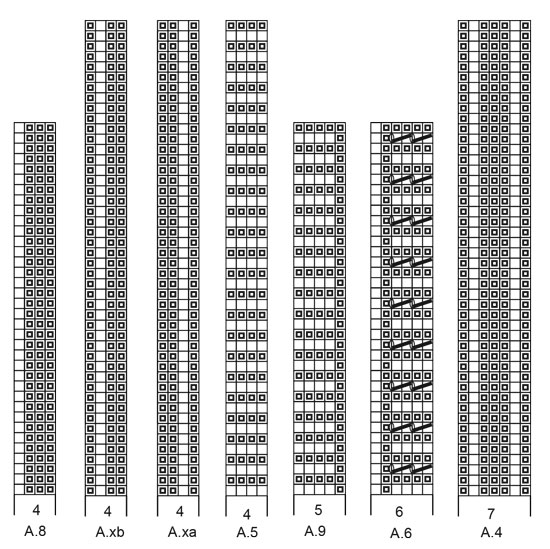
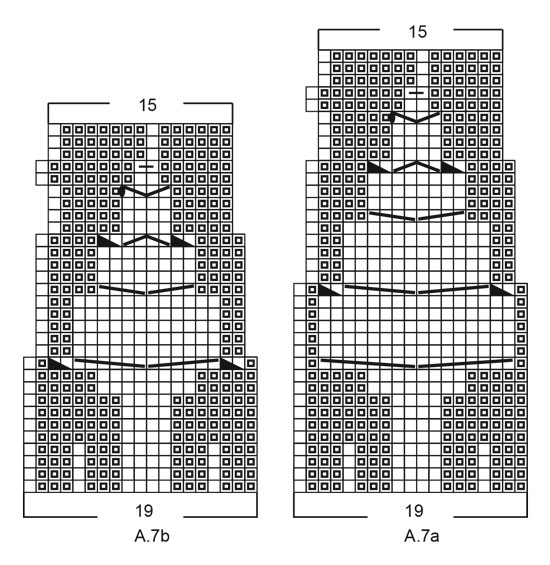
INFORMATION FOR PATTERN: CHOOSING SIZE (applies to press pot): Measure the press pot and see if it has the same measurements as a large or small press pot. If the circumference does not fit any of the sizes you can choose the size that fits best and add 1 repetition (or more) of A.Xa (= 4 stitches = 2 cm / ¾") after the first band (= A.1) from right side and possible 1 repetition (or more) after A.Xb (= 4 stitches = 2 cm / ¾") before the last band (= A.5) - so that the circumference gets bigger. I.e. when casting on stitches at the beginning of piece, cast on 4 stitches more than what is stated in pattern for every A.Xa/A.Xb added. CHOOSING SIZE (applies to cup): Measure the cup and see if it has the same measurements as a large or small cup. If the circumference does not fit any of the sizes you can choose the size that fits the best and add 1 repetition (or more) A.8 (= 4 stitches = 2 cm / ¾") before the last band (= A.9) from right side for every extra 2 cm / ¾" needed in circumference. I.e. when casting on stitches at the beginning of piece, cast on 4 stitches more than what is stated in pattern for every A.8 added. PATTERN: Cover for press pot: See diagrams A.1 to A.5. Add if needed A.Xa/A.Xb to get a bigger circumference on cover. Cover for cup: See diagram A.6, A.7a (large cup), A.7b (small cup) A.8 and A.9. Add if needed A.8 to get a bigger circumference on cover. Diagrams show all rows in pattern seen from the right side. ---------------------------------------------------------- COVER FOR PRESS POT: Work piece back and forth on circular needle. To choose the correct size for press pot - read CHOOSING SIZE (applies to press pot). LARGE PRESS POT: Cast on 115 stitches (possibly + 4 stitches for every A.Xa or A.xb added) on circular needle size 2.5 mm / US 1.5 with Lima. Work pattern as follows: A.1 (= 4 stitches band), (add possibly a A.Xa here for bigger circumference), A.2 (= 8 stitches), A.3 (= 23 stitches) 4 times, A.4 (= 7 stitches), (add possibly A.Xb here for bigger circumference), A.5 (= 4 stitches band). Continue back and forth like this. When the first 6 rows in diagram have been worked, switch to circular needle size 3 mm / US 2.5. REMEMBER THE GAUGE! Continue to work. When 3 rows remain in diagrams, switch to circular needle size 2.5 mm / US 1.5 and work as follows: On row marked with black star in A.3 decrease 1 stitch on needle so that the rib is symmetrical in each side. bind off stitches with knit over knit and purl over purl. Sew button on band without holes - adjust according to handle on press pot. Button through holes in band. Piece measures approx. 15 cm / 6" vertically and 36 cm / 14¼" in circumference when buttoned. SMALL PRESS POT: Cast on 92 stitches (possibly + 4 stitches for every A.Xa or A.xb added) on circular needle size 2.5 mm / US 1.5 with Lima. Work pattern as follows: A.1 (= 4 stitches band), (add possibly a A.Xa here for bigger circumference), A.2 (= 8 stitches), A.3 (= 23 stitches) 3 times, A.4 (= 7 stitches), (add possibly A.Xb here for bigger circumference), A.5 (= 4 stitches band). Continue back and forth like this. When the first 6 rows in diagram have been worked, switch to circular needle size 3 mm / US 2.5. REMEMBER THE GAUGE! Continue to work. When 3 rows remain in diagrams, switch to circular needle size 2.5 mm / US 1.5 and work as follows: On row marked with black star in A.3 decrease 1 stitch on needle so that the rib is symmetrical in each side. bind off stitches with knit over knit and purl over purl. Sew button on band without holes - adjust according to handle on press pot. Button through holes in band. Piece measures approx. 15 cm / 6" vertically and 29 cm / 11½" in circumference when buttoned. ---------------------------------------------------------- COVER FOR CUP: Work piece back and forth on circular needle. To choose the correct size for the cover - read CHOOSING SIZE (applies to cup). LARGE CUP: Work piece back and forth on circular needle. Cast on 58 stitches (possibly + 4 stitches for every A.8 added) on circular needle size 2.5 mm / US 1.5 with Lima. Work pattern as follows: A.6 (= 6 stitches), A.7a (= 19 stitches), A.8 (= 4 stitches) 7 time in width, (add possibly more repetitions of A.8 here for bigger circumference), A.9 (= 5 stitches). Continue back and forth like this. When the first 4 rows in diagram have been worked, switch to circular needle size 3 mm / US 2.5. REMEMBER THE GAUGE! Continue as follows. When 3 rows remain in diagrams, switch to circular needle size 2.5 mm / US 1.5. Work the remaining rows in diagrams. Bind off stitches with knit over knit and purl over purl. Sew button on band without holes - adjust according to handle on cup. Button through holes in band. Piece measures approx. 11 cm / 4½" vertically and 20 cm / 8" in circumference when buttoned. SMALL CUP: Work piece back and forth on circular needle. Cast on 54 stitches (possibly + 4 stitches for every A.8 added) on circular needle size 2.5 mm / US 1.5 with Lima. Work pattern as follows: A.6 (= 6 band stitches), A.7b (= 19 stitches), A.8 (= 4 stitches) 6 time in width, (add possibly more repetitions of A.8 here for bigger circumference), A.9 (= 5 band stitches). Continue back and forth like this. When the first 4 rows in diagram have been worked, switch to circular needle size 3 mm / US 2.5. REMEMBER THE GAUGE! Continue as follows. When 3 rows remain in diagram A.7b, switch to circular needle size 2.5 mm / US 1.5. When diagram A.7 is finished in height the cover is done. Bind off stitches with knit over knit and purl over purl. Sew button on band without holes - adjust according to handle on cup. Button through holes in band. Piece measures approx. 9 cm / 3½" vertically and 18 cm / 7" in circumference when buttoned. |
|||||||||||||||||||||||||||||||||||||||||||||||||||||||
Diagram explanations |
|||||||||||||||||||||||||||||||||||||||||||||||||||||||
|
|||||||||||||||||||||||||||||||||||||||||||||||||||||||
|
|||||||||||||||||||||||||||||||||||||||||||||||||||||||
|
|||||||||||||||||||||||||||||||||||||||||||||||||||||||
|
|||||||||||||||||||||||||||||||||||||||||||||||||||||||
Have you finished this pattern?Tag your pictures with #dropspattern #dropschristmasbrew or submit them to the #dropsfan gallery. Do you need help with this pattern?You'll find 17 tutorial videos, a Comments/Questions area and more by visiting the pattern on garnstudio.com. © 1982-2025 DROPS Design A/S. We reserve all rights. This document, including all its sub-sections, has copyrights. Read more about what you can do with our patterns at the bottom of each pattern on our site. |
|||||||||||||||||||||||||||||||||||||||||||||||||||||||


With over 40 years in knitting and crochet design, DROPS Design offers one of the most extensive collections of free patterns on the internet - translated to 17 languages. As of today we count 314 catalogs and 11822 patterns - 11812 of which are translated into English (US/in).
We work hard to bring you the best knitting and crochet have to offer, inspiration and advice as well as great quality yarns at incredible prices! Would you like to use our patterns for other than personal use? You can read what you are allowed to do in the Copyright text at the bottom of all our patterns. Happy crafting!
Post a comment to pattern DROPS Extra 0-1402
We would love to hear what you have to say about this pattern!
If you want to leave a question, please make sure you select the correct category in the form below, to speed up the answering process. Required fields are marked *.