
Looking for a yarn?


Comments / Questions (86)
![]() Larisa wrote:
Larisa wrote:
I have just finished it and I can say that following instructions does not result in the hat that is pictured. Decreasing every 1 cm resulted, at least in my case, in a very abrupt ending, and the hat does not look nice and elongated at the end as in the picture but rather rounded as if smashed on top. Also, I think there is an error in the instructions - if you decrease 5 times, you end up having 42 stitches and not 56. You can get 56 stitches if you only decrease 4 times (6->5->4->3->2)
22.06.2025 - 00:05
![]() Larisa wrote:
Larisa wrote:
Thanks for such a prompt answer. Now that I got my braid going, it is not as neat as in the picture, and the hole in the middle is pretty big. The middle part of the braid, where you pass the stitch over in the first row of A2, is almost parallel to the edge of knitting, instead of going up at a nice angle like in the picture. I am noticing that the pattern calls attention to the knitting tension, could this be a problem? Should I try to knit super tight? Thanks
11.06.2025 - 22:20DROPS Design answered:
Dear Larisa, you are right, tension is very important for you to get the final result and the correct finished measurements, but you might have also to make sure that the yarn overs are not that tight; maybe this video could help you, we show how to work such a small cable. Happy knitting!
12.06.2025 - 09:25
![]() Larisa wrote:
Larisa wrote:
Hi, when you say, in diagram A1, knit 2 stitches in the next stitch, do you mean knit 2 stitches together (making them into 1 stitch)? Also, do I have to have both double pointed and circular stitches in size 4mm? I only have circular and do not see where it says switch to double pointed. Thanks!
10.06.2025 - 21:36DROPS Design answered:
Hi Larisa, When you knit 2 stitches in 1 stitch, you increase by knitting first in the front loop of the stitch, then in the back loop (1 stitch becomes 2). You use double pointed needles when the stitch count decreases and the number of stitches on the circular needle is too few to reach around the circular needle. Regards, Drops Team.
11.06.2025 - 06:37
![]() FERHOUNE DANIELE wrote:
FERHOUNE DANIELE wrote:
Je suis intéressé par ce modèle pour ma petite fille. Je veux savoir si tout y est pour que je puisse le confectionner. Je vous en remercir
01.05.2025 - 16:02
![]() Daniele FERHOUNE wrote:
Daniele FERHOUNE wrote:
Bonjour je voudrais confectionner ce modèle et je voudrais savoir si je peux avoir les informations pour le faire. Est-ce possible s'il vous plaît . JE VOUS REMERCIE
01.05.2025 - 15:48DROPS Design answered:
Bonjour Mme Ferhoune, tout à fait, retrouvez les explications de ce modèle en français ici - vous trouverez sous l'onglet "Explications" les tailles, les quantités et l'échantillon; vous trouverez des vidéos et des leçons pouvant possiblement vous aider dans les 2 onglets suivants. Bon tricot!
02.05.2025 - 09:08
![]() Tove Andersen wrote:
Tove Andersen wrote:
Hej, jeg er ved at lave A1, og skal høre, hvor mange masker, der er mellem hvert omslag, mellem 2 masker. Strikker jeg 1 maske og omslag, og så omslag igen. Hvor meget øger jeg med i alt. Hilsen Tove
03.03.2025 - 16:10DROPS Design answered:
Hei Tove. Strikker du lue eller hals, og hvilken størrelse strikker du? Under LUE står det: * A.1 (= 2 masker), 6 masker vrang *, strikk fra *-* totalt 14-14-15 ganger. Altså 6 masker vrang mellom hver A.1. Det er nesten det samme under HALS = * A.1 (= 2 masker), 6 masker vrang *, strikk fra *-* totalt 11-12-13 ganger. I A.1 strikker du 1 rettmasker - 1 kast - 1 rett maske, og så 6 vrangmasker, så gjentar du dette så mange ganger det står i oppskriften i den str. du strikker, enten det er lue eller hals. mvh DROPS Design
10.03.2025 - 09:49
![]() Mandy wrote:
Mandy wrote:
I am knitting the small size with 112 stitches. I am having an issue with the first row of A1. I think I am reading the chart wrong. Row 1 is advising S1, k2 in the same stitch, slip stitch over = 2 stitches, purl 6 x 14 times. If I S1, knit 2 and slip over, that is 3 stitches? What am I reading wrong?
18.02.2025 - 11:55DROPS Design answered:
Dear Mandy, after 1st row in A.1 you still have 2 sts in each A.1, but on 2nd round you will work (K1, YO, K1) so that you will get 3 sts in each A.1. Then work A.2, on first round (slip 1, K2, psso) = 2 sts remain in each A.2, on 2nd round (K1, YO, K1) = 3 sts again in each A.2. Hope it can help. Happy knitting!
20.02.2025 - 14:13
![]() Emma wrote:
Emma wrote:
Jag undrar också om jag ska fortsätta med 6 avigmaskor mellan varje del i diagrammet när jag kommer till rad 2 i diagrammet A1? Ska jag alltså göra ett omslag mellan två maskor och sedan sticka 6 aviga eller ska jag öka mellan varje maska på det varvet?
25.01.2025 - 20:58DROPS Design answered:
Hei Emma. Du strikker bare A.2 istedenfor A.1. Det som er mellom diagrammene (6 vrangmasker) strikkes for før, om du skal øke eller minske kommer an på om du strikker luen eller halsen. I halsen økes det 1 maske på begynnelsen av hvert vrangparti, øk 1 maske ved å lage et kast om pinnen, kastet strikkes vridd vrang på neste omgang slik at det ikke blir hull. Fortsett økningen på hver 3.omgang, men øk på vekselvis slutten og begynnelsen av vrangpartiene totalt 5 ganger. mvh DROPS Design
27.01.2025 - 11:56
![]() Emma wrote:
Emma wrote:
Hej! Jag förstår inte ” När A.1 har stickats en gång på höjden stickas det på samma sätt med A.2 över varje A.1” betyder det att jag ska sticka hela A1-diagrammet och sedan hela A2 efter det? Eller vad menas med ”över varje A1”?
25.01.2025 - 20:49DROPS Design answered:
Hei Emma. Lue. Det betyr at du skal strikke A.2 istedenfor A.1. Om du ser på diagram A.1 så bestod den av 2 masker når du begynte og i str. 3/5 år strikket du A.1 14 ganger med 6 vrangmasker mellom hvert diagram. Når A.1 er strikket 1 gang i høyden har du økt med 1 maske pr gang A.1 er blitt strikket, så nå består A.1 av 3 masker. Nå skal du strikke A.2 over A.1 (A.1 strikkes da ikke mer) og A.2 strikkes også 14 ganger med 6 vrangmasker mellom hvert diagram. mvh DROPS Design
27.01.2025 - 11:29
![]() Carielle wrote:
Carielle wrote:
When the pattern says “knit 2 stitches into the next stitch” does that mean “knit front and back”?
21.12.2024 - 18:42DROPS Design answered:
Dear Carielle, yes, that's correct. Happy knitting!
22.12.2024 - 23:21
|
||||||||||||||||
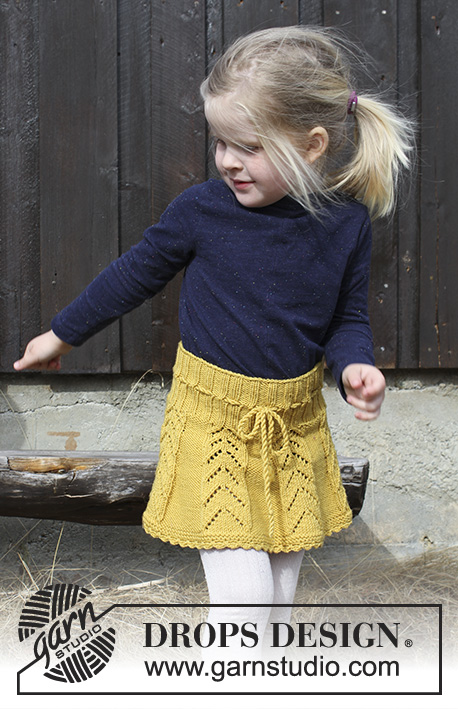
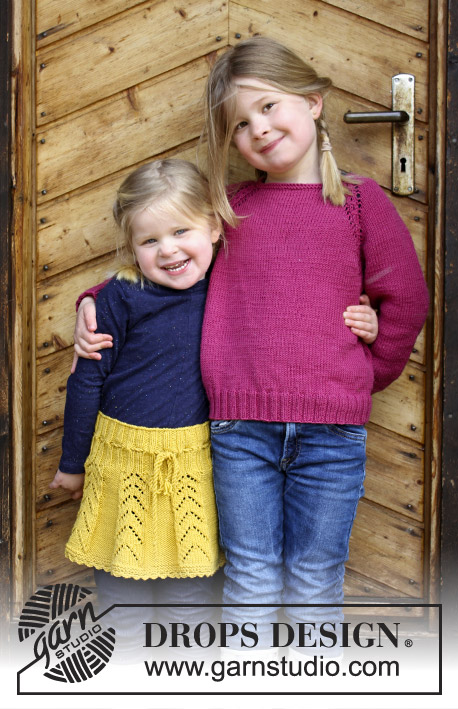
Lille Lisa#lillelisaset |
||||||||||||||||
 |
 |
|||||||||||||||
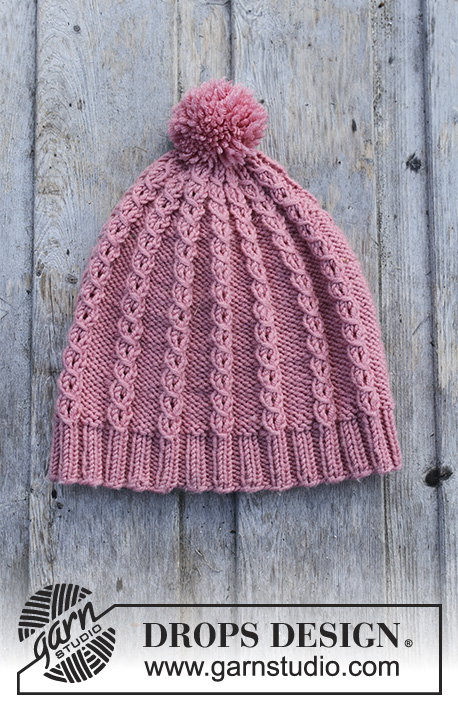
The set consists of: Children’s knitted hat and neck warmer with small cables. Sizes 3 - 12 years. The set is worked in DROPS Merino Extra Fine.
DROPS Children 30-15 |
||||||||||||||||
|
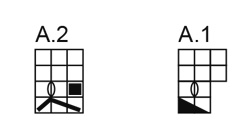
INFORMATION FOR THE PATTERN: RIDGE/GARTER STITCH (worked in the round): 1 ridge = 2 rounds. Knit 1 round and purl 1 round. PATTERN: See diagrams A.1 and A.2. ---------------------------------------------------------- HAT: The piece is worked in the round with circular needle, bottom up. Change to double pointed needles when necessary. Cast on 112-112-120 stitches with circular needle size 3.5 mm / US 4 and Merino Extra Fine. Work rib (= knit 2 / purl 2) for 4 cm / 1½". Change to circular needle size 4 mm / US 6 and work as follows: * A.1 (= 2 stitches), purl 6 *, work from *-* a total of 14-14-15 times. Continue the pattern in this way. When A.1 has been completed one time in height, continue working in the same way with A.2 over each A.1 = 126-126-135 stitches. REMEMBER THE GAUGE! When the piece measures 16-17-18 cm / 6 3/4-7" decrease 1 stitch at the beginning of each purl section, by purling 2 stitches together = 112-112-120 stitches. Continue the decreases every cm / ⅜", but decrease alternately at the end and beginning of the purl section a total of 5 times upwards = 56-56-60 stitches. On the next round, knit all stitches together 2 and 2 = 28-28-30 stitches. Knit 1 round, then knit all stitches together again, 2 and 2 = 14-14-15 stitches. Cut the strand, pull it through the remaining stitches, tighten and fasten well. The hat measures approx. 21-22-23 cm / 8¼"-8¾"-9" in height. POM POM: Make a pom pom of approx. 4-6 cm / 1½"-2¼" in diameter and fasten to top of hat. ---------------------------------------------------------- NECK WARMER: The piece is worked in the round with circular needle, top down. Cast on 88-96-104 stitches with circular needle size 3.5 mm / US 4 and Merino Extra Fine. Work rib (= knit 2 / purl 2) for 11-12-13 cm / 4½"-4¾"-5". Change to circular needle size 4 mm / US 6 and work as follows: * A.1 (= 2 stitches), purl 6 *, work from *-* a total of 11-12-13 times. When A.1 has been completed one time in height, continue in the same way with A.2 over each A.1 = 99-108-117 stitches. REMEMBER THE GAUGE! When the piece measures 14-15-16 cm / 5½"-6"-6¼" increase 1 stitch at the beginning of each purl section, increase 1 stitch by making a yarn over, the yarn over is purled twisted on the next round so you do not get a hole. Continue the increases every 3rd round, but increase alternately at the end and beginning of the purl section a total of 5 times = 154-168-182 stitches. When the piece measures 20-22-24 cm / 8"-8¾"-9½" work 2 RIDGES over all stitches, then bind off with knit. CROCHET EDGE: Crochet an edge around the bottom of the neck warmer with hook size 3.5 mm/E/4 and Merino Extra Fine as follows: Work 1 single crochet in the first stitch, * 3 chain stitches, work 1 double crochet in the first chain stitch worked, skip approx. 1½ cm / ½", work 1 single crochet in the next stitch *, work from *-* to end of round, finish with 1 slip stitch in the first single crochet. |
||||||||||||||||
Diagram explanations |
||||||||||||||||
|
||||||||||||||||
|
||||||||||||||||
Have you finished this pattern?Tag your pictures with #dropspattern #lillelisaset or submit them to the #dropsfan gallery. Do you need help with this pattern?You'll find 26 tutorial videos, a Comments/Questions area and more by visiting the pattern on garnstudio.com. © 1982-2025 DROPS Design A/S. We reserve all rights. This document, including all its sub-sections, has copyrights. Read more about what you can do with our patterns at the bottom of each pattern on our site. |
||||||||||||||||


With over 40 years in knitting and crochet design, DROPS Design offers one of the most extensive collections of free patterns on the internet - translated to 17 languages. As of today we count 314 catalogs and 11822 patterns - 11812 of which are translated into English (US/in).
We work hard to bring you the best knitting and crochet have to offer, inspiration and advice as well as great quality yarns at incredible prices! Would you like to use our patterns for other than personal use? You can read what you are allowed to do in the Copyright text at the bottom of all our patterns. Happy crafting!
Post a comment to pattern DROPS Children 30-15
We would love to hear what you have to say about this pattern!
If you want to leave a question, please make sure you select the correct category in the form below, to speed up the answering process. Required fields are marked *.