
Looking for a yarn?


Comments / Questions (170)
![]() Kristine wrote:
Kristine wrote:
Hei. Jeg lurer på størrelsen. Jeg er usikker på om jeg skal hekle s/m eller l/xl. Hvordan og hvor skal jeg måle på meg selv for å finne riktig størrelse?
01.04.2025 - 17:21DROPS Design answered:
Hei Kristine. Alle mål til jakken finner du på målskissen, den finner du nederst på oppskriften. mvh DROPS Design
07.04.2025 - 10:54
![]() Sophia (Sonja) Stoddart wrote:
Sophia (Sonja) Stoddart wrote:
Can i Buy the video ??? Love your patterns i have some just add this to message send already i need help to Finnish this i like tbut i need help visual please \r\nthank you request please
08.07.2024 - 23:36
![]() Sophia (Sonja) Stoddart wrote:
Sophia (Sonja) Stoddart wrote:
I finish up so start all sizes i don\'t understand what you mean by Starting A 5 and the rest what is 76_76_78 etc from the rest of the pattern I\'m very confused
08.07.2024 - 23:22
![]() Lia Bogerd wrote:
Lia Bogerd wrote:
Is dit patroon ook te verkrijgen met dun garen voor haaknaald 1,5. Wil graag een fijn vest ( dus dun garen)van dit patroon maken. Al vast bedankt
15.05.2024 - 12:59DROPS Design answered:
Dag Lia,
Nee, helaas alleen voor naald 4,5 mm. Sowieso is het dunste garen (garencategorie A) dat we hebben voor aanbevolen naalddikte 3mm.
15.05.2024 - 18:57
![]() Cindy Haesevoets wrote:
Cindy Haesevoets wrote:
Het patroon vanaf a3 is niet duidelijk, moet ik de ganse toer haken of de helft en hoe moet a4 gehaakt?
06.11.2023 - 16:04DROPS Design answered:
Dag Cindy,
Je haakt eerst de eerste helft van A.3, deze begint bij het pijnt waar je het eerste stokje vervangt door 3 lossen. Dan haak je A.4 12 keer in de breedte en tot slot haakje het laatste stukje van A.3.
13.11.2023 - 06:51
![]() Åsa Loord wrote:
Åsa Loord wrote:
Hej! Har fastnat i början. Har gjort första stycket och har mycket riktigt 156 stolpar. Men när jag ska fortsätta med A.3 och A.4 ser det ut som jag ska öka 24 eller 26 maskor och då ska jag ha 202 stolpar? Hur går det till! Dessutom ska arbetet ökat med 10 cm i diameter och det handlar bara om 2 varv. Vad är det jag inte förstår?
15.06.2023 - 21:17DROPS Design answered:
Hei Åsa. Jo, du har 156 staver når du starter å hekle A.3 / A.4. På siste omgang er det 15 masker i A.3 og 15 masker i A.4 (som hekles 12 ganger = 15 x 12 = 180 masker). Så da har du 15+180 = 195 masker, og på siste omgang skal det økes 7 masker jevnt fordelt = 195 +7 = 202 staver på omgangen. Omgangene i A.3 / A.4 består av dobbeltstaver og staver = arbeidet strekker seg godt i høyden. mvh DROPS Design
19.06.2023 - 08:23
![]() Sandra Riedmeier wrote:
Sandra Riedmeier wrote:
Hallo zusammen, ich bin bei A6 und habe von Muster her zum Schluss ein leeres Dreieck =2 Stäbchen.. Nun soll ich in der 2. Reihe A6 24 Rapporte und 1x 7 Stäbchen häkeln wie soll ich das machen? Wenn ich das Muster häkel incl Zunahmen bleiben zum Schluss nur die 2 Luftmaachen übrig wo ich 2 Stäbchen häkeln kann...??? Ich habe dann nur 317 Maschen...
07.05.2023 - 18:57DROPS Design answered:
Liebe Frau Riedmeier, über die 294 Maschen wird A.6 24,5 Mal wiederholt, über die ersten 24 Rapporte nehmen Sie jeweils 1 Stäbchen zu und über die letzten 6 Maschen nehmen Sie 1 Stäbchen zu = 25 Zunahmen insgesamt + 294 = 319 Stäbchen. Viel Spaß beim häkeln!
08.05.2023 - 08:21
![]() Delorme wrote:
Delorme wrote:
Je désire réaliser la veste au crochet modèle w632. Comment définir la taille car les mesures données sur le diagramme sont difficiles à rapprocher d un tour de poitrine. Pour un tour de poitrine de 95 cm quelle taille dois je choisir ? Merci pour votre réponse. Très cordialement
15.03.2023 - 14:18DROPS Design answered:
Bonjour Mme Delorme, mesurez un vêtement similaire que vous avez et dont vous aimez la forme pour comparer ainsi la largeur dos (entre les emmanchures) soit 38-40-42 cm, ainsi que les différentes autres longueurs et largeurs. Retrouvez ici plus d'infos sur les schémas. Bon crochet!
15.03.2023 - 16:00
![]() Nicole wrote:
Nicole wrote:
DROPS 177-10 Ich bin jetzt mit den Runden soweit durch und möchte nun die Seitenteile häkeln. In der Anleitung steht, das man 30 Maschen frei lassen soll, bevor man mit dem Seitenteil anfängt. Leider hat sich mein Rundenbeginn, aufgrund der Luftmaschenbögen, so verschoben, das ich jetzt gar nicht weiß, wo die Mitte liegt. Was habe ich falsch gemacht? LG Nicole
23.02.2023 - 14:09DROPS Design answered:
Liebe Nicole, falten Sie die Arbeit in der Mitte, so daß die Armausschnitte einander gegenüberliegen, setzen Sie oben und unten (in der Mitte) je eine Markierung ein, Legen Sie die Arbeit wieder flach hin, und so können Sie die 30 Luftmaschenbogen oben und die 31 Luftmaschenbogen unten zählen - schneiden Sie den Faden ab wenn nötig ist. Viel Spaß beim häkeln!
23.02.2023 - 14:52
![]() Suzanne CARION wrote:
Suzanne CARION wrote:
Je vies de commencer ce modèle aïs je bloque pcq je ne comprends plus à partir de A3 ET A4. MERCI de m'aider g vraiment besoin de vous
02.06.2022 - 20:30DROPS Design answered:
Bonjour Mme Carion, tout comme pour A.1, les tours commencent et se terminent avant la fin de A.3, autrement dit, vous commencez le tour par les 3 mailles en l'air, puis terminez A.3, répétez A.4 tout le tour et terminez par les premières mailles de A.3. Au 2ème (dernier) tour des diagrammes, augmentez en même temps 7 brides à intervalles réguliers (cf cette leçon). Bon crochet!
03.06.2022 - 07:14
|
|||||||||||||||||||||||||||||||||||||||||||||||||||||||||||||
A Flair for Spring#aflairforspringjacket |
|||||||||||||||||||||||||||||||||||||||||||||||||||||||||||||
 |
 |
||||||||||||||||||||||||||||||||||||||||||||||||||||||||||||
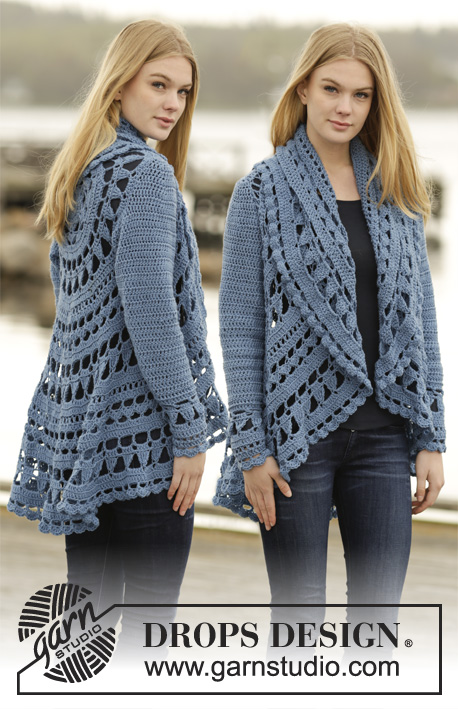
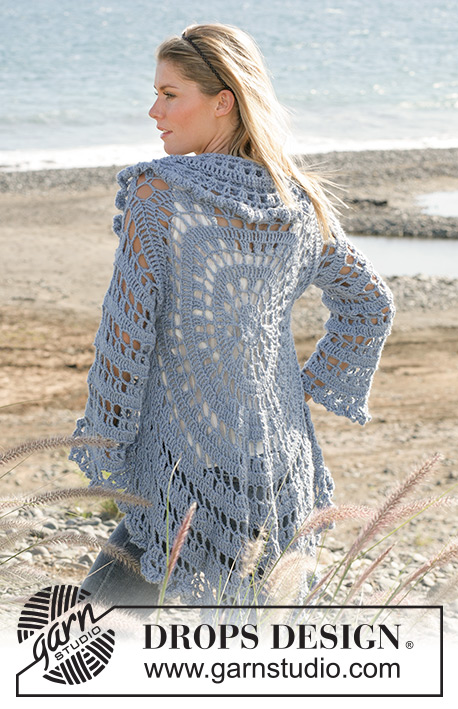
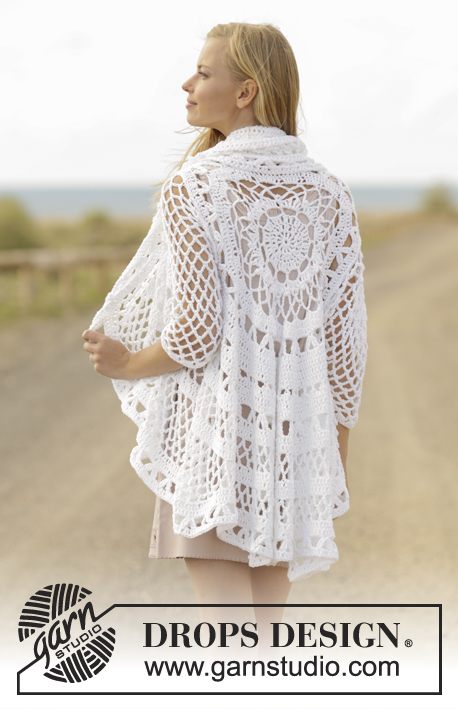
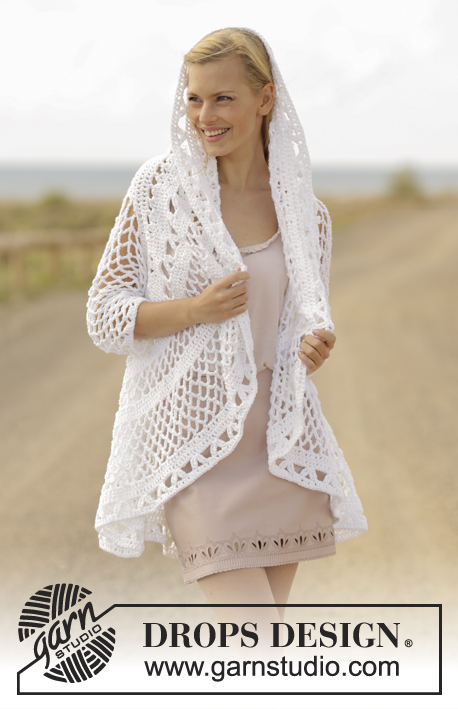
Crochet jacket worked in a circle with lace pattern in DROPS Paris. Size: S - XXXL
DROPS 177-10 |
|||||||||||||||||||||||||||||||||||||||||||||||||||||||||||||
|
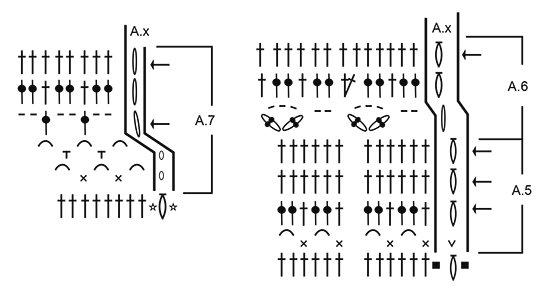
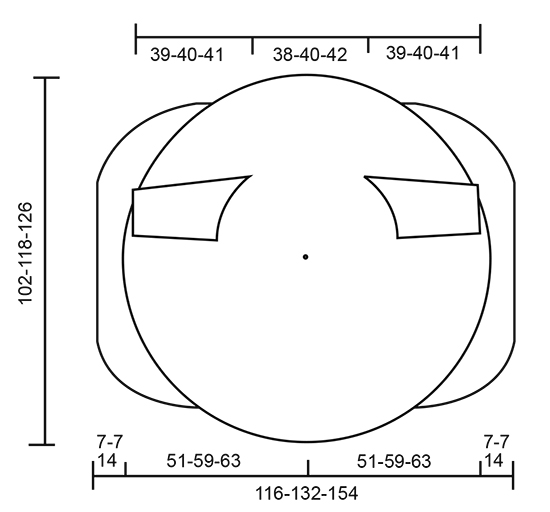
PATTERN: See diagrams A.1 to A.7. A.1 shows beginning and end of every round, work A.2 5 times in total on round. A.3 shows beginning and end of every round, work A.4 12 times in total on round. Work A.5/A.6/A.7 in the round - A.x shows beginning and end of every round. CROCHET INFO: Replace first double crochet at beginning of round with 3 chain stitches, finish with 1 slip stitch in 3rd chain stitch at beginning of round. CROCHET TIP (applies to sleeve): After last single crochet on round work 6 chain stitches and continue on to next round with 1 single crochet around next chain space (= first chain space on next round). NOTE: Mark beginning of round with 1 marker thread between last chain stitch and first single crochet on next round, move the marker thread upwards. NOTE: BE CAREFUL NOT TO DISPLACE THE MARKER THREAD. DECREASE TIP: Work 1 single crochet around next chain space but wait with last pull through, work next single crochet around next chain space (do not work 6 chain stitches between single crochets), on last pull through, pull yarn through all 3 loops on hook. ---------------------------------------------------------- JACKET WORKED IN A CIRCLE: Chain 5 on hook size 4.5 mm/US 7 with Paris and form a ring with 1 slip stitch in first chain stitch. Then work as follows: Work A.1 (the middle of A.1 shows beginning and end of every round, i.e. work from middle of A.1), A.2 5 times in total, finish with the other half of A.1. REMEMBER THE CROCHET GAUGE! When A.1/A.2 have been worked vertically, there are 156-156-156 double crochet on last round. Piece measures approx. 30 cm / 11¾" in diameter. Then work as follows: Work A.3 (the middle of A.3 shows beginning and end of every round, i.e. work from middle of A.3), A.4 12 times in total, finish with the other half of A.3 - AT THE SAME TIME on last round increase 7 double crochet evenly (increase by working 2 double crochet in same double crochet) = 202 double crochet on round. When A.3/A.4 have been worked vertically, piece measures approx. 40 cm / 15¾" in diameter. Work 1 slip stitch in each of the first 2 double crochet, next round begin from here (i.e. mid back of neck). Now work differently in the different sizes. SIZE S-M: ROUND 1: READ CROCHET INFO! Work 1 double crochet in each of the first 30 double crochet, work 32 loose chain stitches for armhole, skip the next 32 double crochet, work 1 double in each of the next 78 double crochet, work 32 loose chain stitches for armhole, skip the next 32 double crochet, work 1 double crochet in each of the last 30 double crochet = 202 stitches. ROUND 2: Work 1 double crochet in every double crochet and 32 double crochet around each chain space - AT THE SAME TIME increase 14 stitches evenly = 216 double crochet. ROUND 3: Work 1 double crochet in every double crochet while AT THE SAME TIME increasing 12 double crochet evenly = 228 double crochet. SIZE L/XL: ROUND 1: READ CROCHET INFO! Work 1 double crochet in every double crochet while AT THE SAME TIME increasing 14 double crochet evenly = 216 stitches. ROUND 2: Work 1 double crochet in each of the first 32 double crochet, work 35 loose chain stitches for armhole, skip the next 35 double crochet, work 1 double crochet in each of the next 82 double crochet, work 35 loose chain stitches for armhole, skip the next 35 double crochet, work 1 double crochet in each of the last 32 double crochet = 216 double crochet. ROUND 3: Work 1 double crochet in every double crochet and 35 double crochet around each chain space - AT THE SAME TIME increase 12 stitches evenly = 228 double crochet. SIZE XXL/XXXL ROUND 1: READ CROCHET INFO! Work 1 double crochet in every double crochet while AT THE SAME TIME increasing 14 double crochet evenly = 216 double crochet. ROUND 2: Work 1 double crochet in every double crochet while AT THE SAME TIME increasing 24 double crochet evenly = 240 stitches. ROUND 3: Work 1 double crochet in each of the first 34 double crochet, work 38 loose chain stitches for armhole, skip the next 38 double crochet, work 1 double crochet in each of the next 96 double crochet, work 38 loose chain stitches for armhole, skip the next 38 double crochet, work 1 double crochet in each of the last 34 double crochet = 240 double crochet. ROUND 4: Work 1 double crochet in every double crochet and 38 double crochet around each chain space - AT THE SAME TIME increase 12 stitches evenly = 252 double crochet. ROUND 5: Work 1st round in A.5 = 84 chain spaces. ROUND 6: Work 2nd round in A.5 while AT THE SAME TIME increasing 12 double crochet evenly = 264 double crochet. ALL SIZES: = 228-228-264 double crochet. Now work in the round according to A.5 (A.x shows how rounds begin and end), AT THE SAME TIME increase (increase on rounds with arrow) as follows: ROUND 1 (no increase): = 76-76-88 chain spaces. ROUND 2: Increase 33-33-33 double crochet evenly (NOTE: increase in single crochets, not around chain spaces) = 261-261-297 double crochet. ROUND 3: Increase 15-15-15 double crochet evenly = 276-276-312 double crochet. ROUND 4: Increase 18-18-18 double crochet evenly = 294-294-330 double crochet. When A.5 has been worked vertically, circle measures approx. 29-29-33 cm / 11½"-11½"-13" from middle (= 58-58-66 cm / 22¾"-22¾"-26" in diameter). Now work in the round according to diagram A.6 (A.x shows how rounds begin and end), AT THE SAME TIME increase (increase on round with arrow) as follows: ROUND 1 (no increase): = 49-49-55 fans. ROUND 2 (increase in diagram): (24-24-27 repetitions of 13 double crochet and 1 repetition of 7 double crochet) = 319-319-358 double crochet. ROUND 3: Increase 23-23-23 double crochet evenly = 342-342-381 double crochet. When A.6 has been worked vertically, circle measures approx. 34-34-38 cm / 13½"-13½"-15" from middle (= 68-68-76 cm / 26¾"-26¾"-30" in diameter). Now work in the round according to A.7 (A.x shows how rounds begin and end), AT THE SAME TIME increase (increase on rounds with arrow) as follows: ROUND 1 (no increase): = 114-114-127 chain spaces. ROUND 2 (no increase): = 114-114-127 chain spaces. ROUND 3: Increase 20-20-20 chain spaces evenly (increase by working 1 double crochet, 2 chain stitches, 1 double crochet and 2 chain stitches around same chain space = 1 chain space increased) = 134-134-147 chain spaces. ROUND 4 (no increase): = 402-402-441 double crochet. ROUND 5: Increase 15-15-15 double crochet evenly = 417-417-456 double crochet. Repeat 1st and 2nd round in A.7 (without increases) = 139-139-152 chain spaces. In size S/M cut the yarn. Continue in size L-XXXL as follows: SIZE L/XL - XXL/XXXL: Repeat 2nd round in A.7 AT THE SAME TIME increase as follows: ROUND 6: Increase 6-6 chain spaces evenly (increase by working 1 single crochet, 6 chain stitches, 1 single crochet and 2 chain stitches around same chain space = 1 chain space increased) = 145-158 chain spaces. ROUND 7 (no increase): = 145-158 chain spaces. ROUND 8: Increase 5-6 chain spaces evenly = 150-164 chain spaces. ROUND 9 (no increase): = 150-164 chain spaces. Cut the yarn. ALL SIZES: = 139-150-164 chain spaces. Continue working only over 39-42-45 chain spaces in each side – i.e. do not work over 30-33-37 chain spaces at the top by neck and 31-33-37 chain spaces at bottom of back. Continue with explanation under left front piece. LEFT FRONT PIECE: = 39-42-45 chain spaces. Continue back and forth as follows: ROW 1: Work slip stitches until middle of the first chain space, 1 single crochet, * work 6 chain stitches, 1 single crochet around next chain space *, repeat from *-* and finish with 1 single crochet around last chain space = 38-41-44 chain spaces. Repeat 1st row 3-3-7 more times. 35-38-37 chain spaces remain at the edge of front piece. Cut the yarn. RIGHT FRONT PIECE: Work same way as on left front piece over 39-42-45 chain spaces in the right side. Cut the yarn. FINISHING EDGE: Work an edge around the entire circle as follows: Repeat 3rd-5th round in A.7 (and A.x) with increases as follows: ROUND 3 (no increase): I.e. around every chain space work 1 double crochet and 2 chain stitches = 147-158-180 chain spaces. ROUND 4: Increase 15-27-18 double crochet evenly = 456-501-558 double crochet. ROUND 5: Increase 12-27-18 double crochet evenly = 468-528-576 double crochet. Now repeat 1st and 2nd round in A.6 (and A.x) as follows: ROUND 1 (no increase): = 78-88-96 fans. ROUND 2 (no increase): (39-44-48 repetitions of 13 double crochet) = 507-572-624 double crochet. Fasten off. Circle measures approx. 51-59-63 cm / 20"-23 1/4-24¾" from middle mid back (= 102-118-126 cm / 40"-46 ½"-49½" in diameter in height), and approx. 58-66-77 cm / 22¾"-26"-30½" from middle out to the side (= 116-132-154 cm / 45¾"-52"-60½" in diameter in width). SLEEVE: Worked in the round from armhole and down, begin mid under sleeve (= 64-70-76 double crochet on armhole). ROUND 1: READ CROCHET TIP! Work * 1 single crochet in double crochet, 6 chain stitches, skip approx. 4 double crochet *, repeat from *-* around entire armhole, there should be 15-18-21 chain spaces around armhole. Continue to work 6 chain stitches and 1 single crochet around every chain space. When piece measures 4 cm / 1½", decrease 1 chain space before marker thread - READ DECREASE TIP! Repeat decrease alternately on each side of marker thread every 4 cm / 1½" 4-5-6 more times = 10-12-14 chain spaces. When piece measures 38-39-40 cm / 15"-15¼"-15¾", work next round as follows: Work 3 chain stitches (= 1 double crochet), work 4 double crochet around every chain space, finish with 1 slip stitch in 3rd chain stitch at beginning of round = 40-48-56 double crochet. Sleeve measures approx. 39-40-41 cm / 15¼"-15¾"-16⅛". Fasten off. Work another sleeve the same way. |
|||||||||||||||||||||||||||||||||||||||||||||||||||||||||||||
Diagram explanations |
|||||||||||||||||||||||||||||||||||||||||||||||||||||||||||||
|
|||||||||||||||||||||||||||||||||||||||||||||||||||||||||||||

|
|||||||||||||||||||||||||||||||||||||||||||||||||||||||||||||
|
|||||||||||||||||||||||||||||||||||||||||||||||||||||||||||||
|
|||||||||||||||||||||||||||||||||||||||||||||||||||||||||||||
Have you finished this pattern?Tag your pictures with #dropspattern #aflairforspringjacket or submit them to the #dropsfan gallery. Do you need help with this pattern?You'll find 12 tutorial videos, a Comments/Questions area and more by visiting the pattern on garnstudio.com. © 1982-2025 DROPS Design A/S. We reserve all rights. This document, including all its sub-sections, has copyrights. Read more about what you can do with our patterns at the bottom of each pattern on our site. |
|||||||||||||||||||||||||||||||||||||||||||||||||||||||||||||


With over 40 years in knitting and crochet design, DROPS Design offers one of the most extensive collections of free patterns on the internet - translated to 17 languages. As of today we count 314 catalogs and 11821 patterns - 11811 of which are translated into English (US/in).
We work hard to bring you the best knitting and crochet have to offer, inspiration and advice as well as great quality yarns at incredible prices! Would you like to use our patterns for other than personal use? You can read what you are allowed to do in the Copyright text at the bottom of all our patterns. Happy crafting!
Post a comment to pattern DROPS 177-10
We would love to hear what you have to say about this pattern!
If you want to leave a question, please make sure you select the correct category in the form below, to speed up the answering process. Required fields are marked *.