
Looking for a yarn?


Comments / Questions (304)
![]() Myrna Mills wrote:
Myrna Mills wrote:
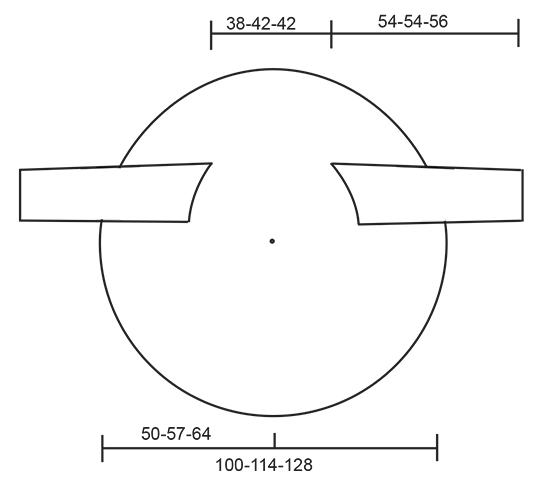
I have a question? I am new to reading patterns this way and am having a problem getting this pattern started. You state that A1 to should measure 13 ins across but there is no instructions for A1. In my mind and following the chart, it should be the ring followed by 17 Dc could you confirm that this is correct please . Kind regards Myrna Mills UK
11.06.2025 - 09:03DROPS Design answered:
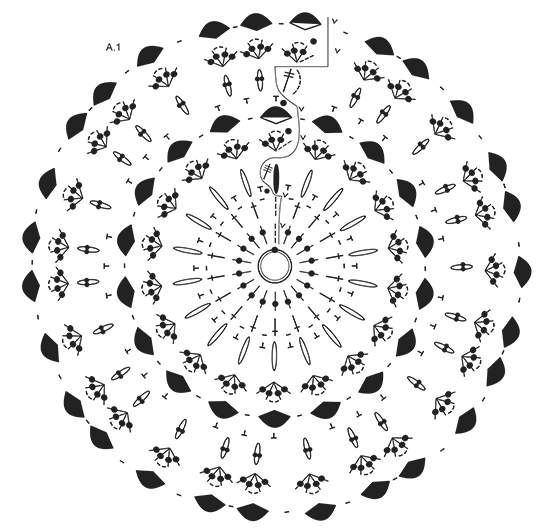
Dear Mrs Mills, diagram A.1 is the circle diagram just below symbol descpritions - all stitches/groups of stitches are represented with a symbol described just above this diagram A.1; read each round from the right towards the left starting from the black dot in the middle. Read more about diagrams here. Happy crocheting!
11.06.2025 - 13:23
![]() Jis wrote:
Jis wrote:
Na het haken van de armsgaten raak ik de weg kwijt. Om uiteindelijk voor maat L 82 dstk-groepen te krijgen, haak je ook de armsgaten mee, klopt dat? Beginnen je mouwen pas nadat je 82 dstk-groepen op je toer hebt?
26.05.2025 - 15:45DROPS Design answered:
Dag Jis,
De armsgaten worden gemaakt door 33 lossen te haken en verderop het patroon weer op te pakken. Je hebt nu een gat gemaakt in de cirkel. Dit doe je een stukje verderop weer voor het andere armsgat. De eerstvolgende toer pak je het patroon gewoon weer op en haak je ook in de 33 lossen. Nadat de hele cirkel klaar is haak je de mouwen door in de rondte te haken vanaf de gecreëerde armsgaten.
27.05.2025 - 20:05
![]() Eva wrote:
Eva wrote:
Hallo, in der Anleitung ist nur die Farbe Grün angegeben, aber die Jacke ist ja verschiedenfarbig. Woher weiß ich denn, wieviel ich von den abgebildeten Farben jeweils benötige?
19.05.2025 - 17:24DROPS Design answered:
Liebe Eva, die fotografierte Jacke war mit Big Delight gehäkelt, diese Wolle ist jetzt ausgelaufen, wir geben dann ja einen Vorschlag, mit Fabel und Flora zusammen zu häkeln, Fabel 542 ist eine Print-Farbe (siehe Farbkarte. Viel Spaß beim Häkeln!
20.05.2025 - 09:04
![]() Inga A Odenwald wrote:
Inga A Odenwald wrote:
Is there any suggestion to make this pattern using your yarns to get the same striping effect?
28.02.2025 - 16:30DROPS Design answered:
Dear Mrs Odenwald, use the yarn converter to find all possible alternatives, use Fabel to get the same kind of stripping effect but you will have to choose another shade as the one shown is not available in Fabel. You can then add another yarn group A to get the correct thickness, your store will help you choosing the best matching colours, even per mail. Happy crocheting!
28.02.2025 - 17:22
![]() Inga A Odenwald wrote:
Inga A Odenwald wrote:
I SO want to make this!! You no longer carry this yarn and I love the striping that is shown. What yarn can I use to make something very similar.
26.02.2025 - 02:00
![]() Melody Tricco wrote:
Melody Tricco wrote:
Hello, This pattern is being sold on another website. lolycraft .com
22.02.2025 - 19:10
![]() Marja Noordzij wrote:
Marja Noordzij wrote:
Ik maak S/M en heb na A1 gehaakt te hebben 27 dstk groepen. De volgende toer waarin je de armsgaten moet maken klopt niet volgens mij. Ik haak 30 lossen, sla 5 groepjes over, vaste in het volgende groepje, dan 12 lossen en steeds een v in het volgende groepje en dat 8x totaal. En dit moet 2x totaal. Alleen eindig ik met 7 12lossenlussen ipv 8. Ik heb 27 dstk groepjes en doe ipv een v een hv in het begin van het eerste armsgat. Hoe ik ook tel en wat ik ook doe, ik kom een lus tekort.
21.02.2025 - 12:30
![]() Simone wrote:
Simone wrote:
I have had a brain freeze and do not understand how to crochet the arm holes x
03.12.2024 - 12:55DROPS Design answered:
Dear Simone, work as follows: 1 dc around ch-space in the middle of dtr-group, work 30-33-36 loose ch, skip 5-6-7 dtr-groups, 1 dc around ch-space in the middle of next dtr-group (armhole has been worked). So you work 1 dc around th chain space. That is, when working the chart, you work 1 dc around the chain space in the middle of the black fan in the last round of A.2, then work some loose stitches and skip over as many dtr-groups (black fans) as indicated for your size, lock the chain in place by working 1 dc around the ch-space in the middle of the next dtr-group (black fan). Then work over the body as indicated and repeat the other armhole in the same way. Happy crochetting!
07.12.2024 - 23:50
![]() Paula wrote:
Paula wrote:
I am struggling with the second part where it says size L/XL-XXL/XXL when I do as according to rnd 6 I end up with 40 as it says =36-36ch-spaces. Also how do you work A 2 one time vertically do u have a video please. Thank you
21.09.2024 - 04:35DROPS Design answered:
Dear Paula, you should increase as you ddid on 6th round in A.1 but only 9 times in the round so that you get 27+9=36 chain-spaces. Happy crocheting!
23.09.2024 - 07:48
![]() Diane St-Amand wrote:
Diane St-Amand wrote:
Est-ce normal qu'en faisant les 30 ml pour les emmanchures que j'aille dun côté 8 fois 12 ml et de l'autre 7 fois 12 ml.?
14.08.2024 - 15:24DROPS Design answered:
Bonjour Mme St-Amand, il est normal que vous n'ayez pas le même nombre d'arceaux entre les emmanchures, il y en aura davantage en bas de la veste qu'en haut (côté haut du dos). Bon crochet!
16.08.2024 - 07:09
|
||||||||||||||||||||||||||||||||||||||||||||||
Fall Festival#fallfestivaljacket |
||||||||||||||||||||||||||||||||||||||||||||||
 |
 |
|||||||||||||||||||||||||||||||||||||||||||||
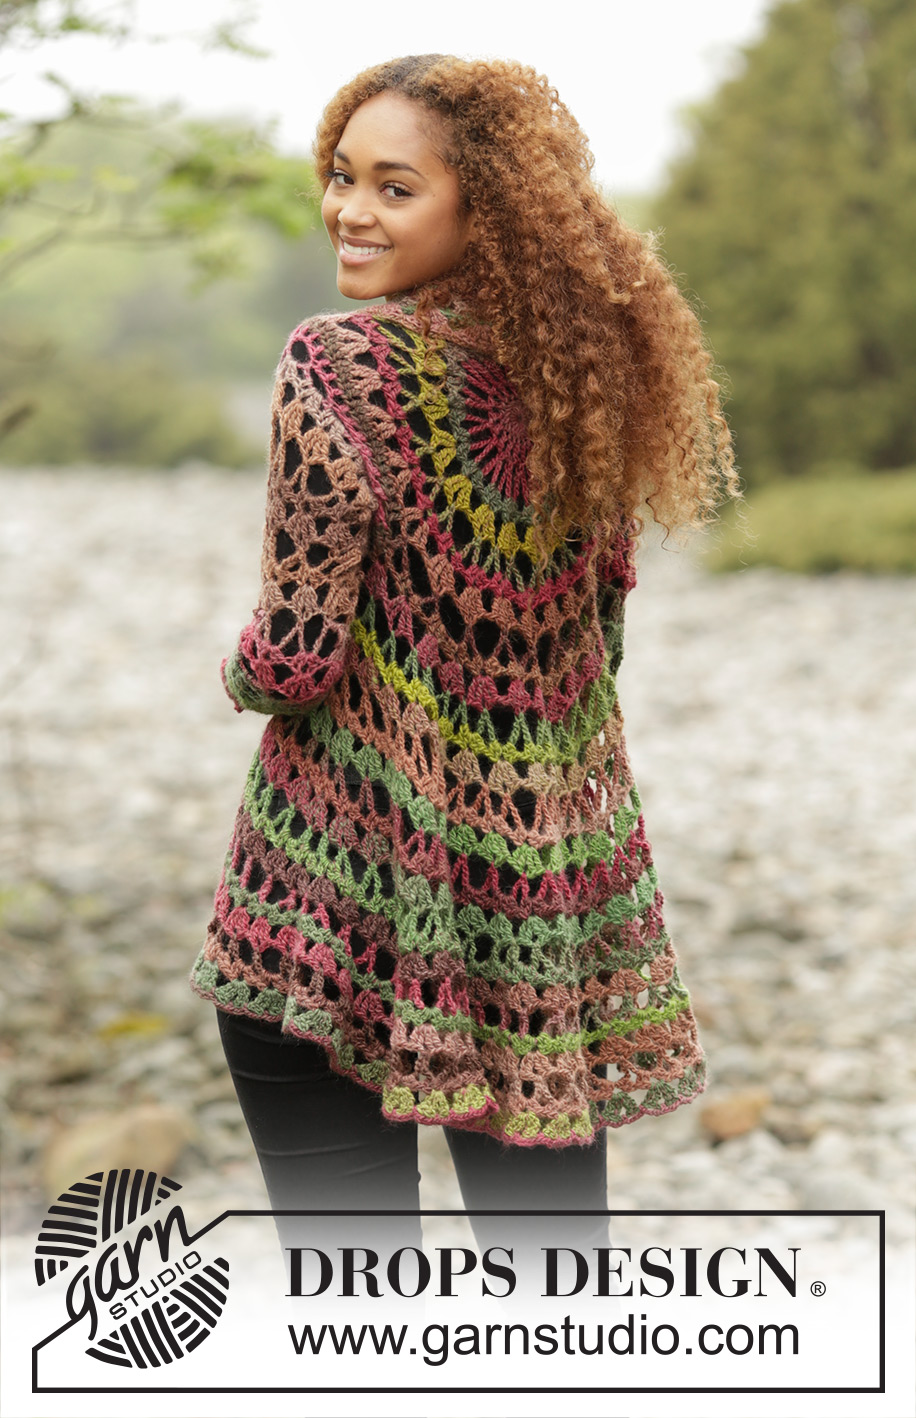
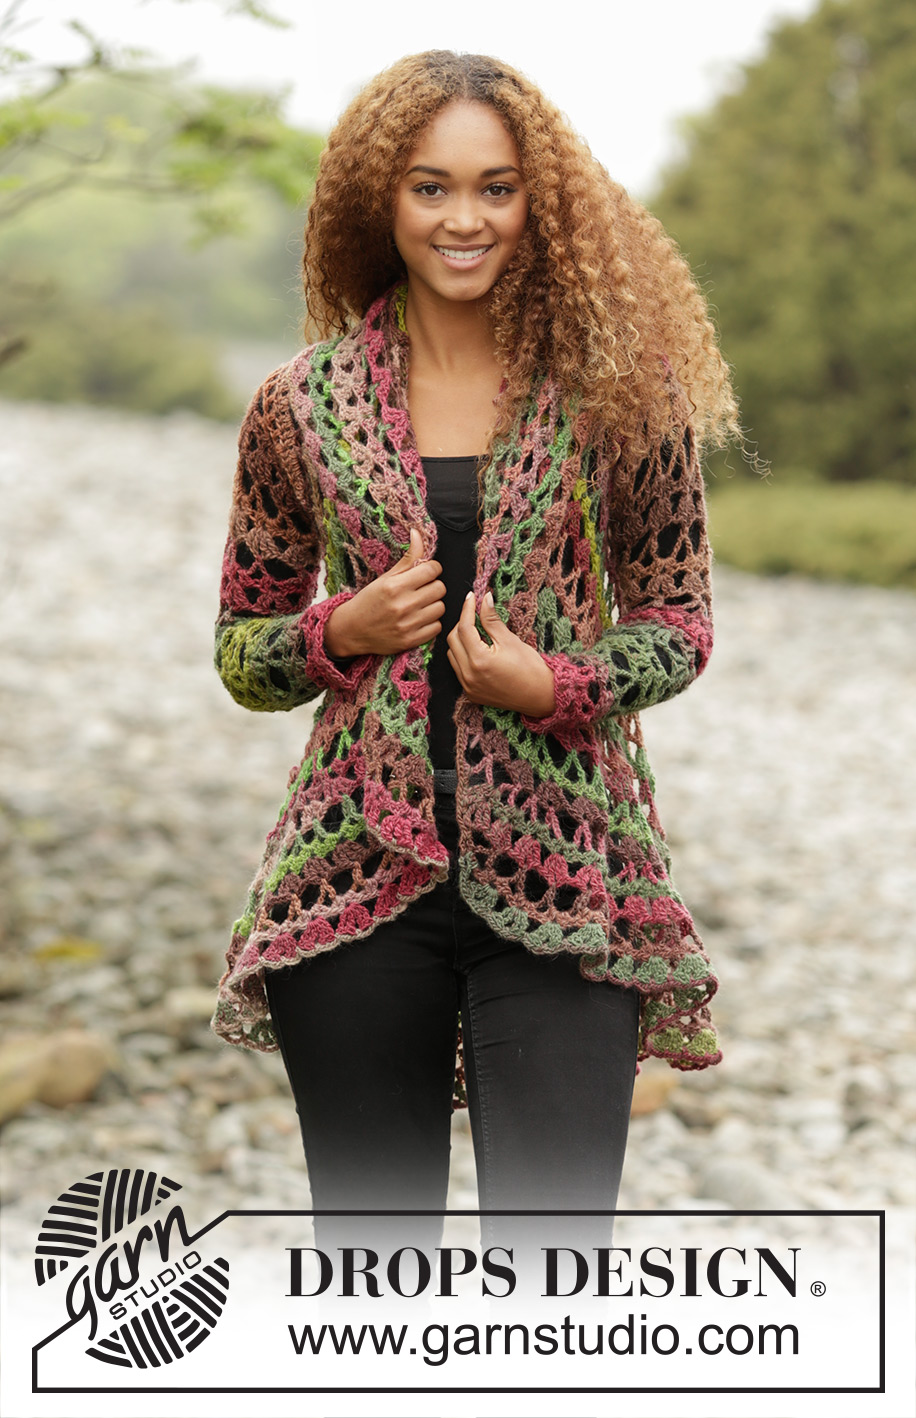
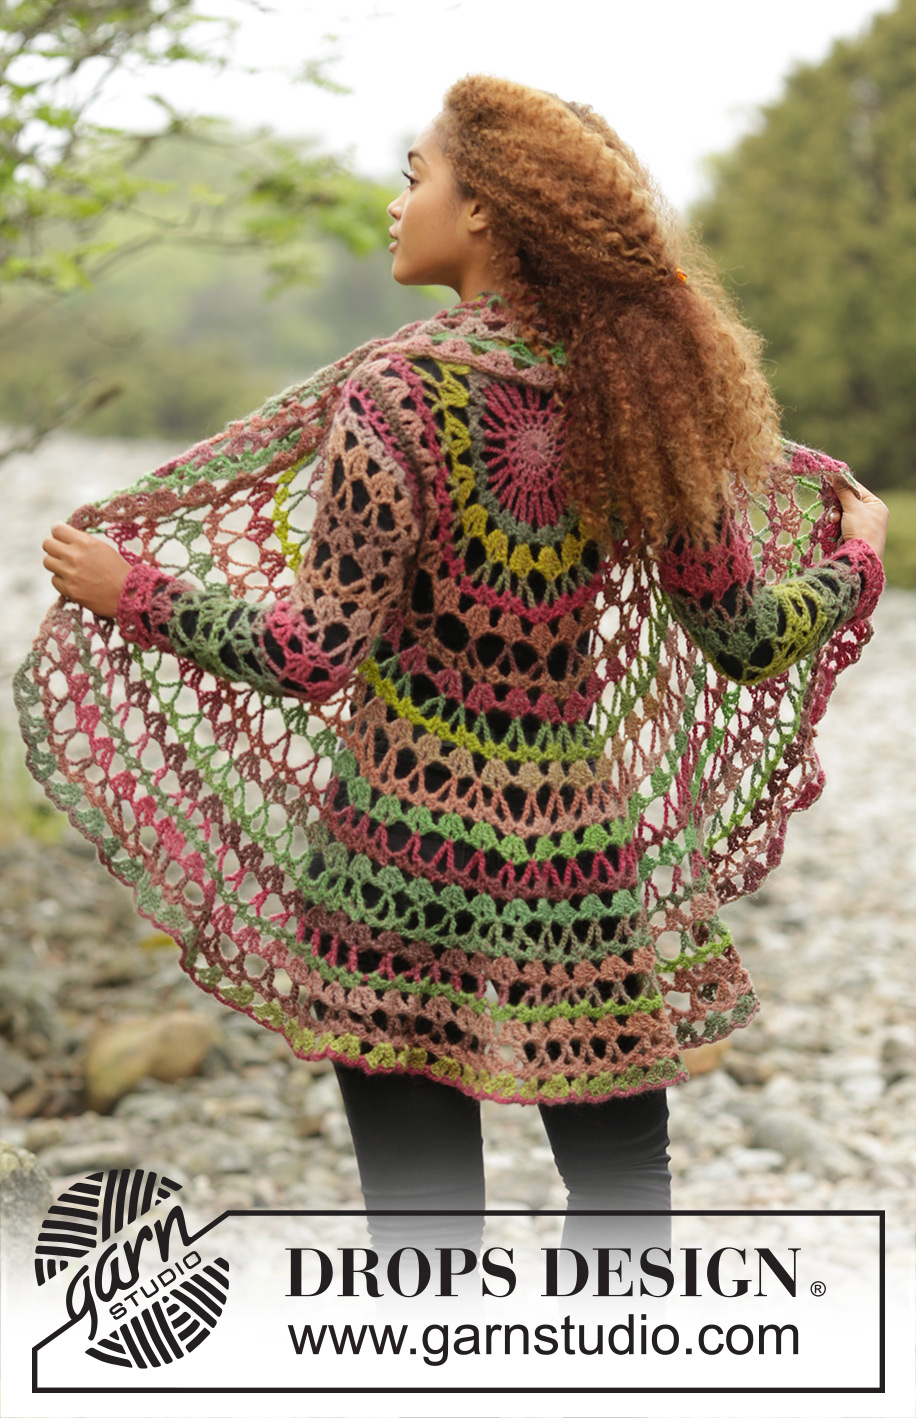
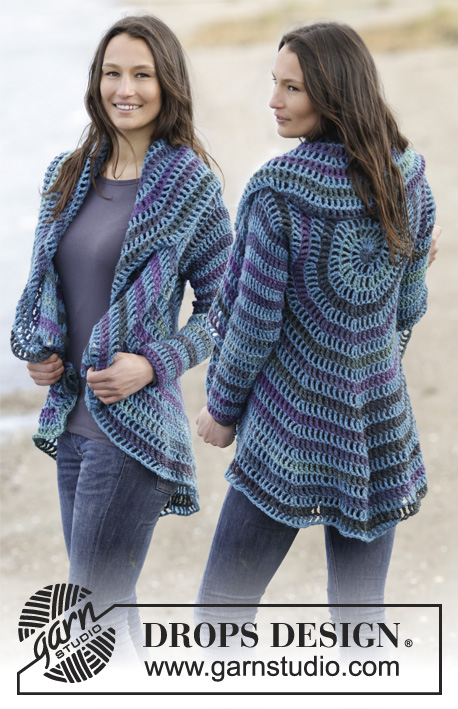
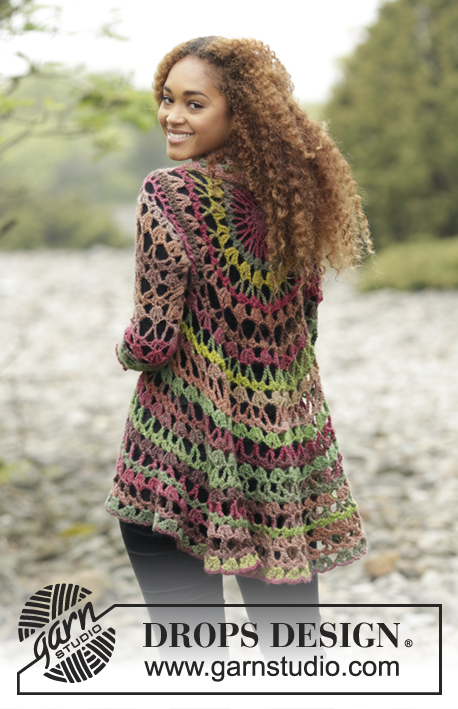
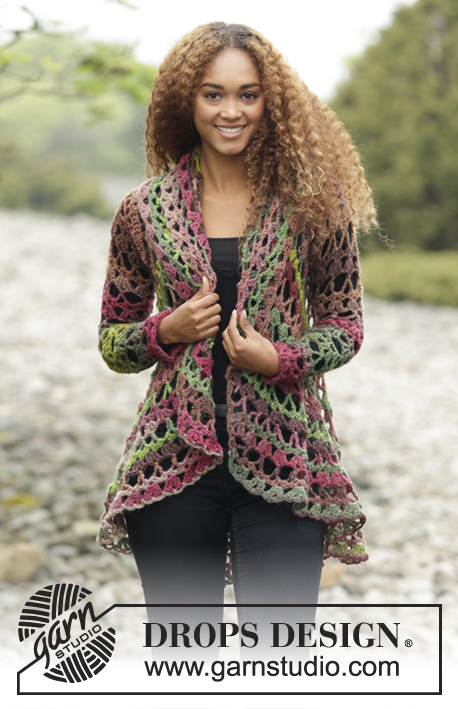
Crochet jacket worked in a circle in 1 strand DROPS Big Delight or 1 strand DROPS Fabel together with 1 strand DROPS Flora. Size: S - XXXL.
DROPS 171-21 |
||||||||||||||||||||||||||||||||||||||||||||||
|
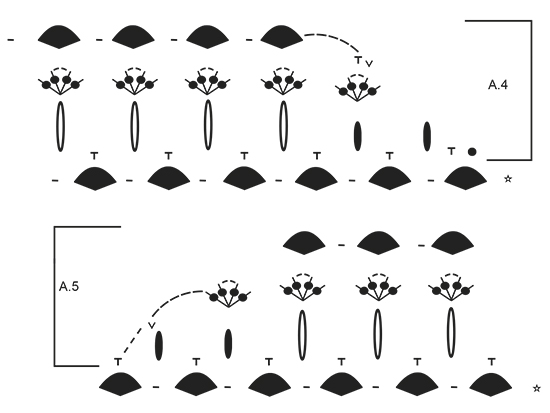
PATTERN: See diagrams A.1 to A.5. CROCHET INFO: Replace first sc at beg of round with ch 1, finish round with 1 sl st in 1st ch at beg of round. Replace first dc at beg of round with ch 3, finish round with 1 sl st in 3rd ch from beg of round. Replace first tr at beg of round with ch 4, finish round with 1 sl st in 4th ch from beg of round. ---------------------------------------------------------- JACKET WORKED IN A CIRCLE: Crochet 4 ch on hook SIZE 5.5 mm/US 9 with Big Delight (or DROPS Fabel and DROPS Flora) and form a ring with 1 sl st in first ch. Then work according to A.1. READ CROCHET INFO! REMEMBER THE CROCHET GAUGE! When A.1 has been worked, circle measures approx. 33 cm / 13" in diameter and there are 27 tr-groups on round. Size L/XL-XXL/XXXL: Work according to A.2, on first round in A.2 inc 9 ch-spaces evenly (inc the same way as on 6th round in A.1, inc 1 ch-space as follows: Work 1 sc around ch-space in the middle of tr-group, 9 ch, 1 sc around ch between tr-groups, 9 ch, 1 sc around ch-space in the middle of next tr-group) = 36-36 ch-spaces. Work A.2 1 time vertically. ALL SIZES: = 27-36-36 tr-groups. Work next round as round 1 in A.3, AT THE SAME TIME work armholes as follows: 1 sc around ch-space in the middle of tr-group, work 30-33-36 loose ch, skip 5-6-7 tr-groups, 1 sc around ch-space in the middle of next tr-group (armhole has been worked), * 12 ch, 1 sc around ch-space in the middle of next tr-group *, repeat from *-* 8-14-12 times in total, work 30-33-36 loose ch, skip 5-6-7 tr-groups, 1 sc around ch-space in the middle of next tr-group (another armhole has been worked), * 12 ch, 1 sc around ch-space in the middle of next tr-group *, repeat from *-* the entire round and finish with 1 sl st in first sc at beg of round (instead of 1 sc around next ch-space). Work next round as round 2 in A.3 as follows: Work the same way as before with 2 dc + 2 ch + 2 dc around every ch-space, around every ch-space for armhole work 6-7-8 dc-groups, AT THE SAME TIME inc 9 dc-groups evenly on round, inc 1 dc-group by working 2 dc + 2 ch + 2 dc + 2 dc + 2 ch + 2 dc around 1 ch-space = 36-45-45 dc-groups. ROUND 3: Work 2 tr + 2 ch + 2 tr around ch-space in the middle of every dc-group and 1 ch between every tr-group = 36-45-45 tr-groups with 1 ch between each. Continue to work according to A.3, AT THE SAME TIME inc 9 ch-spaces evenly every time 1st round is worked, as follows: ROUND 1: Work sl sts until middle of first ch-space (in the middle of a tr-group), 1 sc, * 12 ch, 1 sc around next ch-space in the middle of a tr-group *, repeat from *-* the entire round AT THE SAME TIME inc 9 ch-spaces evenly on round = 45-54-54 ch-spaces (finish round with 6 ch and 1 dtr in first sc at beg of round). ROUND 2: Work 2 dc + 2 ch + 2 dc around every ch-space the entire round = 45-54-54 dc-groups. ROUND 3: Work 2 tr + 2 ch + 2 tr around every ch-space in dc-group and 1 ch between every tr-group the entire round = 45-54-54 tr-group with 1 ch between each. Repeat 1st-3rd round 3-3-4 more times, AT THE SAME TIME inc 9 ch-spaces every time 1st round is worked = 72-81-90 tr-group. To get an oval shape on jacket work back and forth only over the bottom 47-54-61 tr-groups, do not work over the middle 25-27-29 tr-groups at the top of neck. Beg from RS and repeat 1st-3rd row in A.3 as before 2 times in total (i.e. back is 6 rows longer vertically), to get a nice transition on every turn work as shown in A.4 and A.5, AT THE SAME TIME inc 7 ch-spaces every time 1st row is worked (= 86-95-104 tr-groups in total on round incl tr-groups towards the neck). Finish with 1 round ch-spaces around the entire jacket (from RS) as follows: * ch 4, 1 sc around ch-space in the middle of a tr-group, ch 4, 1 sc before next tr-group *, repeat from *-* the entire round, fasten off. SLEEVE: Work 60-66-72 dc around armhole (approx. 5 dc in every tr-group and approx. 30-33-36 dc around ch-space – beg mid under sleeve). Work next round as follows: * 1 dc in first/next dc, ch 1, skip 1 dc *, repeat from *-* the entire round = 30-33-36 dc + 30-33-36 ch. Continue to work as follows: ROUND 1: * ch 6, skip 5 sts, 1 sc in next st *, repeat from *-* the entire round = 10-11-12 ch-spaces. ROUND 2: Work 2 dc + 2 ch + 2 dc around every ch-space the entire round = 10-11-12 dc-groups. ROUND 3: Work 2 tr + 2 ch + 2 tr around every ch-space in dc-group and 1 ch between every tr-group the entire round = 10-11-12 tr-group with 1 ch between each. ROUND 4: * 12 ch, 1 sc around ch-space in the middle of tr-group *, repeat from *-* the entire round = 10-11-12 ch-spaces but at the same time dec 1 ch-space on round mid under sleeve as follows: 1 sc around ch-space in the middle of next to last tr-group on round, ch 6, 1 dc around ch-space in the middle of tr-group to be skipped, ch 6, 1 sc around ch-space in the middle of next tr-group). On new round work dc-group mid under sleeve in dc between the 2 ch-spaces with 6 ch = 9-10-11 dc-groups. Repeat 2nd-4th round and dec at the same time 1 ch-space every 3rd round so that there is 1 tr-group/ch-space less on round. When there are 5-6-7 tr-groups/ch-spaces on round, work without dec until piece measures 54-54-56 cm / 21¼"-21¼"-22", or desired measurements, try the jacket while working. Fasten off and repeat on the other sleeve. |
||||||||||||||||||||||||||||||||||||||||||||||
Diagram explanations |
||||||||||||||||||||||||||||||||||||||||||||||
|
||||||||||||||||||||||||||||||||||||||||||||||
|
||||||||||||||||||||||||||||||||||||||||||||||

|
||||||||||||||||||||||||||||||||||||||||||||||
|
||||||||||||||||||||||||||||||||||||||||||||||
|
||||||||||||||||||||||||||||||||||||||||||||||
Have you finished this pattern?Tag your pictures with #dropspattern #fallfestivaljacket or submit them to the #dropsfan gallery. Do you need help with this pattern?You'll find 7 tutorial videos, a Comments/Questions area and more by visiting the pattern on garnstudio.com. © 1982-2025 DROPS Design A/S. We reserve all rights. This document, including all its sub-sections, has copyrights. Read more about what you can do with our patterns at the bottom of each pattern on our site. |
||||||||||||||||||||||||||||||||||||||||||||||


With over 40 years in knitting and crochet design, DROPS Design offers one of the most extensive collections of free patterns on the internet - translated to 17 languages. As of today we count 314 catalogs and 11822 patterns - 11812 of which are translated into English (US/in).
We work hard to bring you the best knitting and crochet have to offer, inspiration and advice as well as great quality yarns at incredible prices! Would you like to use our patterns for other than personal use? You can read what you are allowed to do in the Copyright text at the bottom of all our patterns. Happy crafting!
Post a comment to pattern DROPS 171-21
We would love to hear what you have to say about this pattern!
If you want to leave a question, please make sure you select the correct category in the form below, to speed up the answering process. Required fields are marked *.