
Looking for a yarn?


Comments / Questions (26)
![]() Pernilla wrote:
Pernilla wrote:
Hej jag behöver hjälp med detta mönster, jag är framme till att virka armen men jag förstår inte hur jag ska göra , vet inte om jag gjort fel jag gjorde luftmassorna sedan fortsatte jag med rundeln men nu funderar jag om jag har gjort fel för nu är det luftmassorna som ligger på en sida å sedan rundeln
17.08.2023 - 17:53DROPS Design answered:
Hej Pernilla, jo du virkar runt i ärmhålet :)
18.08.2023 - 11:53
![]() Pernilla wrote:
Pernilla wrote:
Hej jag håller på å virka cirkel koftan men jag förstår inte hur jag skall göra armen ? Jag har ju luftmassorna jag gjorde tidigare men efter att jag har gjort 40 dubbelstolpar hur går jag vidare
08.08.2023 - 19:39DROPS Design answered:
Hej Pernilla, de 40 dubbelstolpar hækles rundt om hele ærmet, og du fortsætter rundt med dubbelstolpar. VIRKTIPS: Första dubbelstolpen på varvet ersätts av 4 luftmaskor. Avsluta med 1 smygmaska i fjärde luftmaskan i början av varvet.
18.08.2023 - 10:17
![]() Rosen Tamara wrote:
Rosen Tamara wrote:
Hallo was versteht man unter Luftmaschen für den Armausschnitt anschlagen ?\r\nDanke Tamara
17.12.2022 - 16:26DROPS Design answered:
Liebe Tamara, für die Ärmel wird man Maschen vom Kreis überspringen und diese Maschen durch Luftmaschen ersetzen, so gibt es ein Loch bzw 2 Löcher um die die Ärmel später gehäkelt werden. Viel Spaß beim häkeln!
19.12.2022 - 08:55
![]() Lilly wrote:
Lilly wrote:
Gibt es ein Video, wie man wo mit den Ärmeln anfängt und wie man die Ausspahrungen dafür häkeln muss? Das ist das erste mal, dass ich nach einer Anleitung häkele und hier bin ich ein wenig verloren...
24.05.2022 - 16:48DROPS Design answered:
Liebe Lilly, es gibt dazu kein Video, bei der 1. Runde beginnen Sie an der unteren Ärmelmitte = legen Sie den Kreis flachliegen und beginnen Sie an der Vorderseite nach oben bis unten am Kreis/Rückenteil (rechte Ärmel) und unten am Rückenteil bis oben und dann wieder unten am Vorderteil. Viel Spaß beim häkeln!
24.05.2022 - 16:53
![]() Anne wrote:
Anne wrote:
Super :-) Ich freue mich, dass alles wieder funktioniert!!!
14.10.2021 - 18:59
![]() Anne wrote:
Anne wrote:
Warum können gewisse Anleitungen nicht mehr angeklickt werden?
12.10.2021 - 12:56DROPS Design answered:
Liebe Anne, Wir hatten einige Probleme mit der Anzeige der Bilder, aber jetzt ist alles behoben. Vielen Dank für Ihre Geduld, viel Spaß beim häkeln!
14.10.2021 - 09:12
![]() Manuela Rüede wrote:
Manuela Rüede wrote:
Ich habe den Kreis gehäkelt...bei welchen Durchmesser etwa fange ich mit den Luftmaschen für die Armausschnitte an? Ich verstehe das nicht mit den Armausschnitten...Hilfe....Danke!
24.08.2021 - 09:03DROPS Design answered:
Liebe Frau Rüde, die Armlöcher werden gearbeitet, wenn es 112-112-126-126-140-140 Doppelstäbchen + 112-112-126-126-140-140 Luftmaschen in der Runde sind, und die Arbeit soll ca 40-40-46-46-50-50 cm Durchmesser sein. Viel Spaß beim häkeln!
03.01.2022 - 08:06
![]() Amanda Allander wrote:
Amanda Allander wrote:
Jag undrar när det kommer till ärmen och minskningen. Är det 1 minskning per varv och 7cm längst armen eller är det med 7cm mellan på varvet? Mvh
11.08.2021 - 14:32DROPS Design answered:
Hei Amanda. Det felles midt under ermet /nedover langs ermet. Det felles på ca hver 7 cm. mvh DROPS design
18.08.2021 - 09:39
![]() Martha wrote:
Martha wrote:
Hi there! I love this jacket, I was wondering if you have a complete video tutorial on how to crochet the entire jacket on UTube. I don't quiet understand the written instructions and the short videos do not show how to make the entire jacket. Looking forward to hearing back from you! Regards, Noller
09.06.2021 - 05:45DROPS Design answered:
Dear Martha, to help you understanding the pattern you will find this lesson about crochet diagram and this video showing how to crochet the beginning of this jacket. Happy crocheting!
09.06.2021 - 07:35
![]() Menna wrote:
Menna wrote:
Ik ben bezig met dit patroon, maar er is een stukje dat ik niet snap: "als A.2 helemaal is gehaakt, ga dan verder met het patroon en meerder op dezelfde manier in de hoogte, maar voor elke gehaakte toer wordt er 1 dubbel stokje + 1 losse meer tussen elke meerdering = 14 dubbele stokjes + 14 lossen gemeerderd op elke toer." betekend dit dat ik per toer eigenlijk 28 moet meerderen ipv. 14? en waar moet ik dat precies doen?
05.08.2020 - 10:51DROPS Design answered:
Dag Menna,
Op elke toer haak je 14 lossen + stokjes meer. Dus er komen elke toer 14 lossen en 14 stokjes bij. Deze meerderingen maak je steeds tussen de meerderingen op de toer ervoor.
31.08.2020 - 09:57
|
|||||||||||||||||||||||||
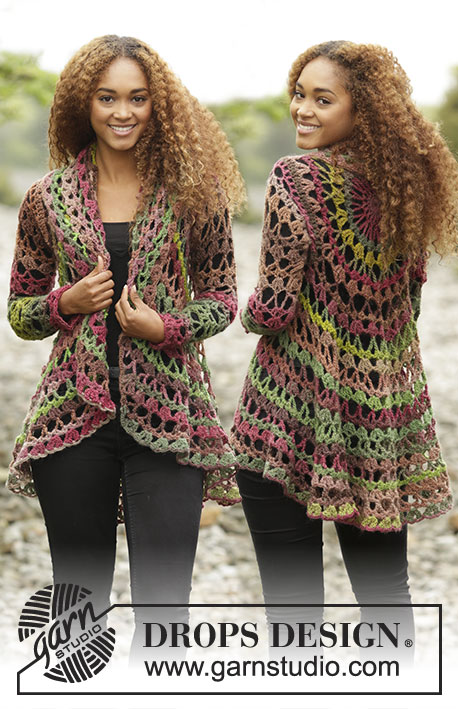
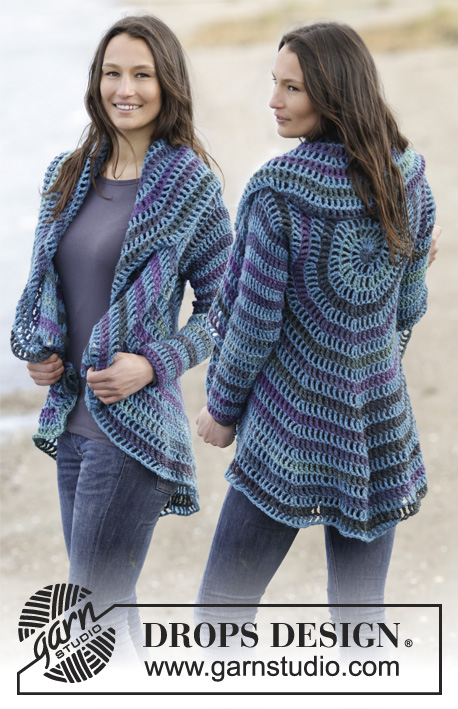
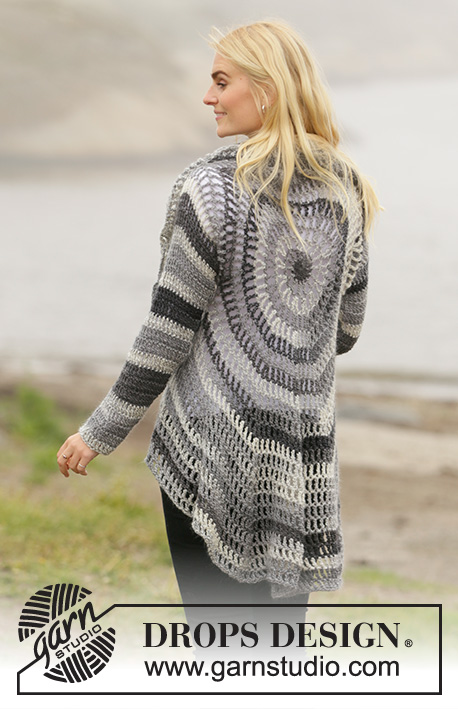
Stone Circle Jacket#stonecirclejacket |
|||||||||||||||||||||||||
 |
 |
||||||||||||||||||||||||
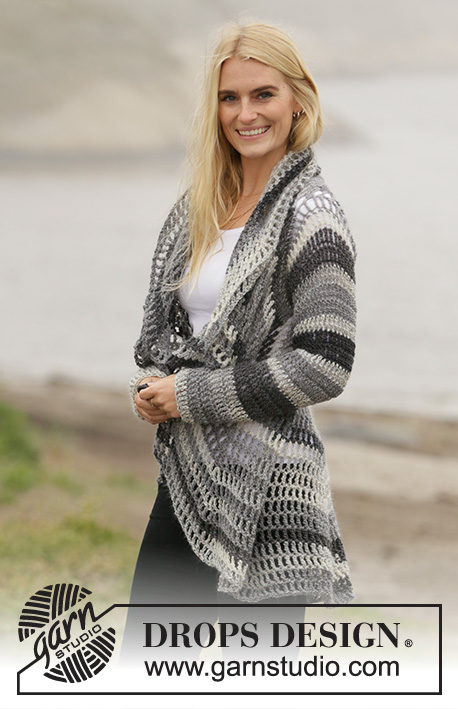
Crocheted circle jacket in DROPS Big Delight. The piece is worked from the middle outwards in a circle. Sizes S - XXXL.
DROPS 206-36 |
|||||||||||||||||||||||||
|
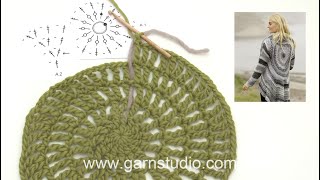
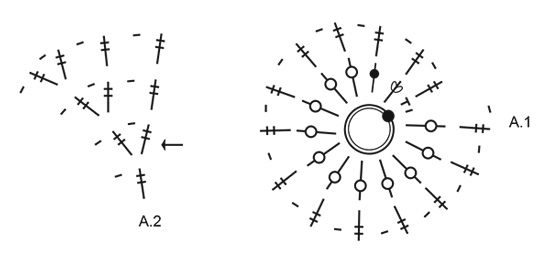
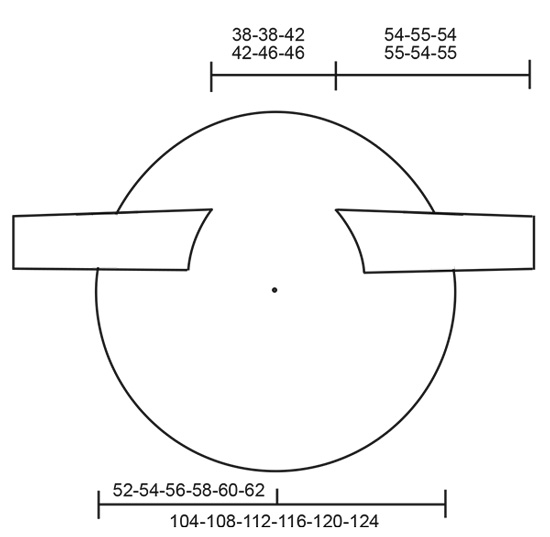
------------------------------------------------------- EXPLANATIONS FOR THE PATTERN: ------------------------------------------------------- CHAIN STITCH: If you work outermost on the hook, the chain stitch will often be too tight; 1 chain stitch should be as long as 1 single crochet is wide. CROCHET TIP: The first treble crochet on the round is replaced by 4 chain stitches. Finish with 1 slip stitch in the 4th chain stitch at the beginning of the round. DECREASE TIP (for sleeve): 2 treble crochets are worked together to 1 treble crochet as follows: Work 1 treble crochet but wait with the last yarn over and pull through, work 1 treble crochet in the next stitch and then pull the last yarn over through all 3 loops on the hook. ------------------------------------------------------- START THE PIECE HERE: ------------------------------------------------------- CIRCLE JACKET – SHORT OVERVIEW OF THE PIECE: The piece is worked in the round from the middle and outwards. The sleeves are worked from the armhole down. CIRCLE: Work 4 CHAIN STITCHES – read description above, with Big Delight and hook size 6 mm = US 10 and form them into a ring with 1 slip stitch in the first chain stitch. Work pattern in the round according to diagram A.1. When the whole of A.1 has been completed in height insert 1 marker thread at the beginning of the round; allow the thread to follow your work onwards. Now work pattern in a spiral as follows: Work A.2 a total of 14 times on the round. REMEMBER THE CROCHET GAUGE! When the whole of A.2 has been worked continue the pattern and increase in the same way upwards, but for each round worked there is 1 treble crochet + 1 chain stitch more between each increase = 14 treble crochets + 14 chain stitches increased on each round. Continue until there are 112-112-126-126-140-140 treble crochets + 112-112-126-126-140-140 chain stitches on the round, the circle measures approx. 20-20-23-23-25-25 cm = 8"-8"-9"-9"-9¾"-9¾" from the middle (= 40-40-46-46-50-50 cm = 15¾"-15¾"-18"-18"-19¾"-19¾" in diameter). The next round is worked (without increases) as follows: Work 1 treble crochet + 1 chain stitch in each of the first 16-16-18-18-20-20 treble crochets, work 24-24-28-28-32-32 loose chain stitches for the armhole, skip the next 16-16-18-18-20-20 treble crochets, work 1 treble crochet + 1 chain stitch in each treble crochet until there are 32-32-36-36-40-40 treble crochets left on the round, work 24-24-28-28-32-32 loose chain stitches for the armhole, skip the next 16-16-18-18-20-20 treble crochets, work 1 treble crochet + 1 chain stitch in each of the last 16-16-18-18-20-20 treble crochets. The next round is worked as follows: * Work 1 treble crochet + 1 chain stitch in each of the next 7-7-8-8-9-9 treble crochets, work 1 treble crochet + 1 chain stitch + 1 treble crochet + 1 chain stitch in the next treble crochet *, work from *-* 2 times, work 18-18-20-20-22-22 treble crochets with 1 chain stitch between each around the chain-space, * work 1 treble crochet + 1 chain stitch in each of the next 7-7-8-8-9-9 treble crochets, work 1 treble crochet + 1 chain stitch + 1 treble crochet + 1 chain stitch in the next treble crochet *, work from *-* 6 times, work 18-18-20-20-22-22 treble crochets with 1 chain stitch between each around the chain-space, work * 1 treble crochet + 1 chain stitch in each of the next 7-7-8-8-9-9 treble crochets, work 1 treble crochet + 1 chain stitch + 1 treble crochet + 1 chain stitch in the next treble crochet *, repeat from *-* 2 times = 126-126-140-140-154-154 treble crochets + 126-126-140-140-154-154 chain stitches on the round. Now work as follows: * 1 treble crochet + 1 chain stitch in each of the next 8-8-9-9-10-10 treble crochets, then work 1 treble crochet + 1 chain stitch + 1 treble crochet + 1 chain stitch in the next stitch *, work from *-* to end of round = 14 treble crochets + 14 chain stitches increased on the round. Continue with pattern and increase as before, but on each round there is 1 more treble crochet + 1 chain stitch between each increase = 14 treble crochets + 14 chain stitches increased on each round. When the circle measures 52-54-56-58-60-62 cm = 20½"-21¼"-22"-22¾"-23⅝"-24⅜" from the middle (= 104-108-112-116-120-124 cm = 41"-42½"-44"-45¾"-47¼"-48¾" in diameter), finish as follows: Work 1 treble crochet + 1 chain stitch in each of the next 2 treble crochets, 1 treble crochet + 1 chain stitch in each of the next 2 treble crochet, 1 half treble crochet + 1 chain stitch in each of the next 2 treble crochets, 1 single crochet + 1 chain stitch in the next treble crochet and 1 slip stitch in the next treble crochet. Cut and fasten the strand. SLEEVE: Start with crochet hook size 6 mm = US J/10 and Big Delight - read CROCHET TIP. Work 36-38-40-42-44-46 treble crochets around the armhole; the beginning of the round should be under the sleeve. Then work 3 rounds with 1 treble crochet in each treble crochet. Continue with 1 treble crochet in each treble crochet – AT THE SAME TIME as you decrease 2 treble crochets mid under sleeve – read DECREASE TIP. Decrease like this every 7 cm = 2¾" a total of 7 times = 22-24-26-28-30-32 treble crochets. Continue working until the sleeve measures 54-55-54-55-54-55 cm = 21¼"-21⅝"-21¼"-21⅝"-21¼"-21⅝". Cut and fasten the strand. Work the other sleeve in the same way. |
|||||||||||||||||||||||||
Diagram explanations |
|||||||||||||||||||||||||
|
|||||||||||||||||||||||||
|
|||||||||||||||||||||||||
|
|||||||||||||||||||||||||
Have you finished this pattern?Tag your pictures with #dropspattern #stonecirclejacket or submit them to the #dropsfan gallery. Do you need help with this pattern?You'll find 10 tutorial videos, a Comments/Questions area and more by visiting the pattern on garnstudio.com. © 1982-2025 DROPS Design A/S. We reserve all rights. This document, including all its sub-sections, has copyrights. Read more about what you can do with our patterns at the bottom of each pattern on our site. |
|||||||||||||||||||||||||


With over 40 years in knitting and crochet design, DROPS Design offers one of the most extensive collections of free patterns on the internet - translated to 17 languages. As of today we count 314 catalogs and 11822 patterns - 11812 of which are translated into English (US/in).
We work hard to bring you the best knitting and crochet have to offer, inspiration and advice as well as great quality yarns at incredible prices! Would you like to use our patterns for other than personal use? You can read what you are allowed to do in the Copyright text at the bottom of all our patterns. Happy crafting!
Post a comment to pattern DROPS 206-36
We would love to hear what you have to say about this pattern!
If you want to leave a question, please make sure you select the correct category in the form below, to speed up the answering process. Required fields are marked *.