DROPS Fabel
DROPS Fabel
75% Wool, 25% Polyamide
from 3.00 $ /50g
Get the yarn to make this pattern from 27.00$.

The yarn cost is calculated from the pattern’s smallest size and the yarn’s cheapest product type. Looking for an even better price? You might find it on the DROPS Deals!

DROPS Super Sale

At Sundown

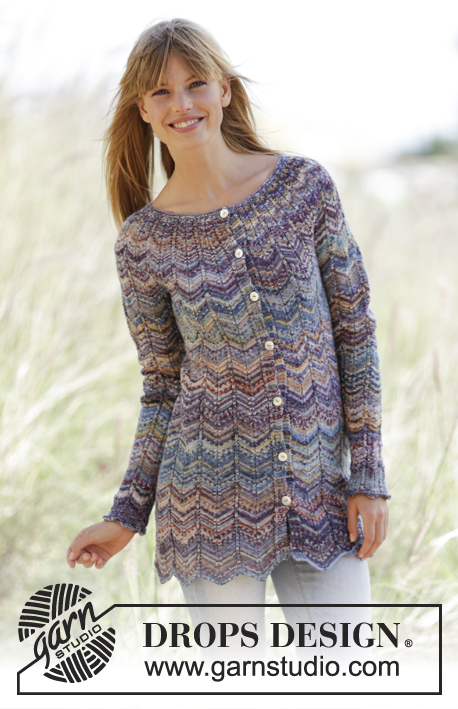
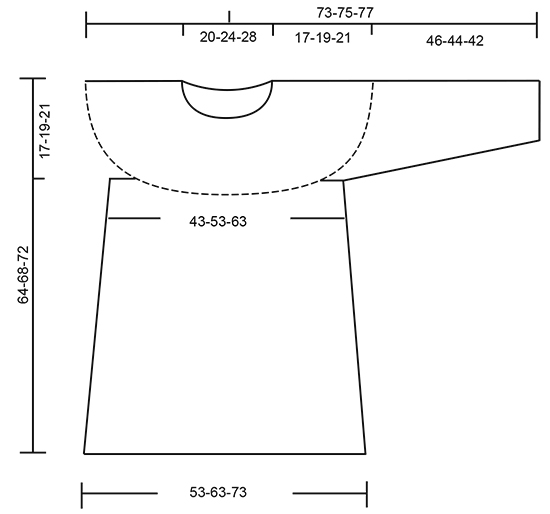
Knitted DROPS jumper with zig-zag and round yoke in “Fabel”. Size: S - XXXL.

DROPS 168-19
DROPS design: Pattern no fa-332
Yarn group A
----------------------------------------------------------
Size: S/M – L/XL – XXL/XXXL
Materials:
DROPS FABEL from Garnstudio
150-150-200 g color no 522, turquoise/blue
150-150-200 g color no 904, lavender
150-150-200 g color no 910, sea mist

NOTE: Jumper worked with one color = 350-400-500 g Fabel.

DROPS DOUBLE POINTED NEEDLES AND CIRCULAR NEEDLE (60 or 80 cm / 24'' or 32'') SIZE 3 mm/US 2.5 - or size needed to get 28 sts x 30 rows with zig-zag = 4'' x 4'' (10 x 10 cm).

-------------------------------------------------------

Alternative Yarn – See how to change yarns here
Yarn Groups A to F – Use the same pattern and change the yarn here
Yarn usage using an alternative yarn – Use our yarn converter here

-------------------------------------------------------

DROPS Fabel
DROPS Fabel
75% Wool, 25% Polyamide
from 3.00 $ /50g
Get the yarn to make this pattern from 27.00$.

The yarn cost is calculated from the pattern’s smallest size and the yarn’s cheapest product type. Looking for an even better price? You might find it on the DROPS Deals!

DROPS Super Sale

SAVE 30% on 6 cotton favorites!
Valid until 04.12.2024

Pattern instructions

NOTE: This pattern is written in American English. All measurements in charts are in cm. For conversion from inches to cm - click here. There are different terms for crocheting in American and British English. If this pattern includes crochet, click for "crochet terms" here. For this pattern in British English, please click here.
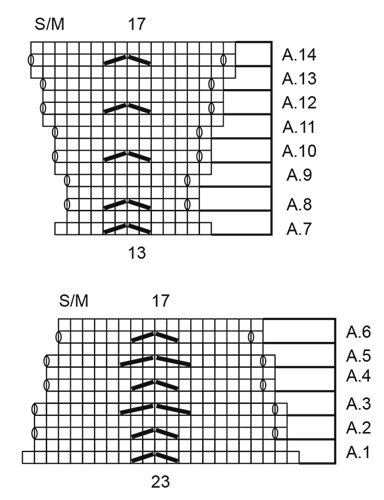
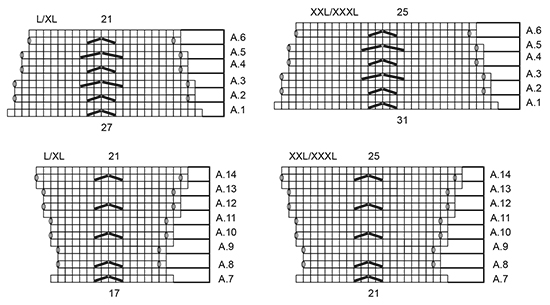
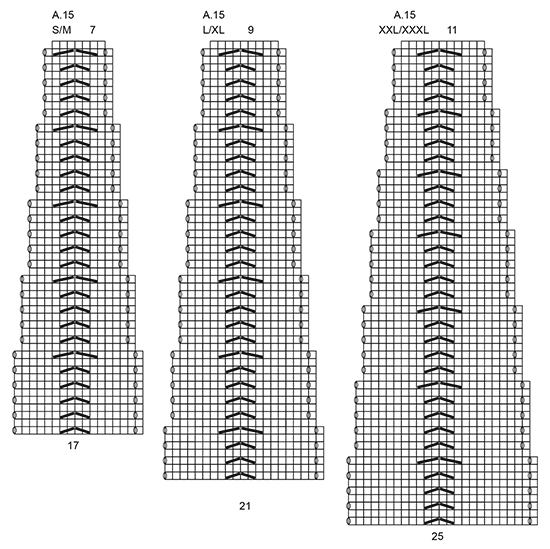
GARTER ST (worked in the round):
1 ridge = 2 rounds. * K 1 round and P 1 round *, repeat from *-*.

PATTERN:
See diagrams A.1 to A.15. See diagram for size!

STRIPES BODY: Work as follows:
* 2 rounds turquoise/blue, 2 rounds lavender *, repeat from *-* for 8-8-9 cm / 3"-3"-3½".
* 2 rounds lavender, 2 rounds sea mist *, repeat from *-* for 8-8-8 cm / 3"-3"-3".
* 2 rounds sea mist, 2 rounds turquoise/blue *, repeat from *-* for 7-8-8 cm / 2 3/4"-3"-3".
Repeat these 23-24-25 cm / 9"-9½"-9 3/4" upwards.

STRIPES SLEEVE:
* 2 rounds turquoise/blue, 2 rounds lavender *, repeat from *-* for 8-8-7 cm / 3"-3"-2 3/4".
* 2 rounds lavender, 2 rounds sea mist *, repeat from *-* for 8-7-7 cm / 3"-2 3/4"-2 3/4".
* 2 rounds sea mist, 2 rounds turquoise/blue *, repeat from *-* for 7-7-7 cm / 2 3/4"-2 3/4"-2 3/4".
Repeat these 23-22-21 cm / 9"-8 3/4"-8 1/4" 1 more time.
----------------------------------------------------------

BODY:
Worked in the round from mid back. Cast on 322-378-434 sts on circular needle size 3 mm / US 2.5 with turquoise/blue. Work STRIPES BODY - see explanation above. Work 1 ridge in GARTER ST - then work A.1 over all sts (= 14 repetitions in width). REMEMBER THE KNITTING GAUGE When A.1 has been worked one time vertically, there are 294-350-406 sts on needle. Continue with A.2 over A.1. When piece measures 13-14-15 cm / 5"-5½"-6", work A.3 over all A.2, when A.3 has been worked one time vertically there are 266-322-378 sts on needle. Continue with A.4 over all A.3. When piece measures 29-31-33 cm / 11½"-12 1/4"-13", work A.5 over all A.4. When A.5 has been worked one time vertically, there are 238-294-350 sts on needle. Continue with A.6 over A.5 until piece measures 47-49-51 cm / 18½"-19 1/4"-20". Now work as follows: Work the first 51-63-75 sts (= half back piece), bind off the next 17-21-25 sts, work the next 102-126-150 sts (= front piece), bind off the next 17-21-25 sts, work the last 51-63-75 sts (= half back piece). Put piece aside and knit the sleeves.

SLEEVE:
Worked in the round on double pointed needles. Cast on 65-85-105 sts on double pointed needles size 3 mm / US 2.5 with turquoise/blue. Work STRIPES SLEEVE. Work 1 ridge in GARTER ST – see explanation above, then work A.7 over all sts (= 5 repetitions in width). When A.7 has been worked one time vertically, there are 55-75-95 sts on round. Continue with A.8 over all sts. When piece measures 11-11-11 cm / 4½"-4½"-4½", work A.9 over all sts. When A.9 has been worked one time vertically, there are 65-85-105 sts on round. Continue with A.10 over all sts. When piece measures 22-24-26 cm / 8 3/4"-9½"-10 1/4", work A.11 over all sts. When A.11 has been worked one time vertically, there are 75-95-115 sts on round. Continue with A.12 over all sts. When piece measures 34-33-32 cm / 13½"-13"-12½", work A.13 over all sts. When A.13 has been worked one time vertically, there are 85-105-125 sts on round. Continue with A.14 over all sts. When piece measures 46-44-42 cm / 18"-17 1/4"-16½" (shorter measurements in the larger sizes because of longer yoke), bind off the first 17-21-25 sts (= one repetition of A.14) = 68-84-100 sts. Make another sleeve the same way.

YOKE:
Slip sleeves on to same circular needle 3 mm as body = 340-420-500 sts. Then work according to A.15 (= 20 repetitions in width), continue with STRIPES BODY work and dec according to A.15. When A.15 has been worked one time vertically, there are 140-180-220 sts on needle. Work 2 ridges in garter st, on first round in first ridge dec 35-55-75 sts evenly = 105-125-145 sts. Bind off. Piece measures approx. 64-68-72 cm / 25 1/4"-26 3/4"-28½".

ASSEMBLY:
Sew the openings under the sleeves.

Diagram

All measurements in charts are in cm.

symbols = K
symbols = 1 YO between 2 sts
symbols = slip 1 st as if to K, K 1, psso
symbols = K 2 tog
symbols = slip 1 st as if to K, K 2 tog, psso
symbols = K 3 tog
diagram
diagram
diagram
diagram

Each of our patterns has specific tutorial videos to help you.

Do you have a question? See a list of frequently asked questions (FAQ)

Knitting tension is what determines the final measurements of your work, and is usually measured per 10 x 10 cm. It is provided like so: number of stitches in width x number of rows in height - eg: 19 stitches x 26 rows = 10 x 10 cm.

The knitting tension is very individual; some people knit/crochet loosely while others work tightly. You adjust the knitting tension with the needle size, which is why the suggested needle size only serve as a guide! You need to adjust this (up or down) to ensure that YOUR knitting tension matches the knitting tension provided in the pattern. If you work with a different knitting tension than provided you will have a different yarn consumption, and your work will have different measurements than what the pattern suggests.

The knitting tension also determines which yarns can replace each other. As long as you achieve the same knitting tension you can replace one yarn with another.

See DROPS lesson: How to measure your tension/gauge

See DROPS video: How to make a gauge tension swatch

The required amount of yarn is provided in grams, eg: 450 g. To calculate how many balls you’ll need you first need to know how many grams are in 1 ball (25g, 50g or 100g). This information is available if you click on the individual yarn quality on our pages. Divide the amount required with the amount of each ball. For example, if each ball is 50g (the most common amount), the calculation will be as follows: 450 / 50 = 9 balls.

The important thing when changing from one yarn to another is that the knitting/crochet tension remains the same. This is so that the measurements of the finished piece will be the same as on the sketch provided. It is easier to achieve the same knitting tension using yarns from the same yarn group. It is also possible to work with multiple strands of a thinner yarn to achieve the knitting tension of a thicker one. Please try our yarn converter. We recommend you to always work a test swatch.

Please NOTE: when changing yarn the garment might have a different look and feel to the garment in the photo, due to individual properties and qualities of each yarn.

See DROPS lesson: Can I use a different yarn than the one mentioned in the pattern?

All our yarns are categorised into yarn groups (from A to F) according to thickness and knitting tension – group A contains the thinnest yarns and group F the thickest. This makes it easier for you to find alternative yarns to our patterns, should you wish to switch yarn. All yarns within the same group have a similar knitting tension and can easily replace each other. However, different yarn qualities have different structures and properties which will give the finished work a unique look and feel.

Click here for an overview of the yarns in each yarn group

At the top of all our patterns you’ll find a link to our yarn converter, which is a helpful tool should you wish to use a different yarn than suggested. By filling in the yarn quality you wish to replace, the amount (in your size) and number of strands, the converter will present good alternative yarns with the same knitting tension. Additionally it will tell you how much you’ll require in the new qualities and whether you’ll need to work with multiple strands. Most skeins are 50g (some are 25g or 100g).

If the pattern is worked with multiple colours, every colour will have to be converted separately. Similarly, if the pattern is worked with several strands of different yarns (for example 1 strand Alpaca and 1 strand Kid-Silk) you will have to find alternatives for each, individually.

Click here to see our yarn converter

Since different yarns have different qualities and textures we have chosen to keep the original yarn in our patterns. However, you can easily find options among our available qualities by using our yarn converter, or simply pick a yarn from the same yarn group.

It is possible that some retailers still have discontinued yarns in stock, or that someone has a few skeins at home that they would like to find patterns for.

The yarn converter will provide both alternative yarn as well as required amount in the new quality.

If you think it's hard to decide what size to make, it can be a good idea to measure a garment you own already and like the size of. Then you can pick the size by comparing those measures with the ones available in the pattern's size chart.

You'll find the size chart at the bottom of the pattern.

See DROPS lesson: How to read size chart

The needle size provided in the pattern serves only as a guide, the important thing is to follow the knitting tension. And since knitting tension is very individual, you will have to adjust the needle size to ensure that YOUR tension is the same as in the pattern – maybe you’ll have to adjust 1, or even 2 needle sizes, up or down to achieve the correct tension. For this, we recommend that you work test swatches.

Should you work with a different knitting tension than the one provided, the measurements of the finished garment might deviate from the measurement sketch.

See DROPS lesson: How to measure your tension/gauge

See DROPS video: How to make a gauge tension swatch

Working a garment top-down provides more flexibility and room for personal adjustment. For example it is easier to try the garment on while working, as well as making adjustments to length of yoke and shoulder caps.

The instructions are carefully explaining every step, in the correct order. Diagrams are adjusted to the knitting direction and are worked as usual.

The diagram depicts all rows/rounds, and every stitch seen from the right side. It is read from bottom to top, from right to left. 1 square = 1 stitch.

When working back and forth, every other row is worked from the right side and every other row is worked from the wrong side. When working from the wrong side, the diagram will have to be worked reversed: from left to right, knit stitches are purled, purl stitches are knit etc.

When working in the round every round is worked from the right side and the diagram are worked from right to left on all rounds.

See DROPS lesson: How to read knitting diagrams

The diagram depicts all rows/rounds, and every stitch seen from the right side. It is worked from bottom to top, from right to left.

When working back and forth every other row is worked from the right side: from right to left and every other row is worked from the wrong side: from left to right.

When working in the round, every row in the diagram are worked from the right side, from right to left.

When working a circular diagram you start in the middle and work your way outwards, counter clockwise, row by row.

The rows usually start with a given number of chain stitches (equivalent to the height of the following stitch), this will either be depicted in the diagram or explained in the pattern.

See DROPS lesson: How to read crochet diagrams

Instructions for working several diagrams after each other on the same row/round, will often be written like so: “work A.1, A.2, A.3 a total of 0-0-2-3-4 times". This means you work A.1 once, then A.2 is worked once, and A.3 is repeated (in width) the number of times provided for your size – in this case like so: S = 0 times, M = 0 times, L=2 times, XL= 3 times and XXL = 4 times.

The diagrams are worked as usual: begin with the first row in A.1, then work the first row in A.2 etc.

See DROPS lesson: How to read knitting diagrams

See DROPS lesson: How to read crochet diagrams

The total width of the garment (from wrist-to-wrist) will be larger in the larger sizes, despite the actual sleeves being shorter. The larger sizes have longer sleeve caps and wider shoulders, so there will be a good fit in all sizes.

The measurement sketch/schematic drawing provides information regarding the full length of the garment. If it’s a jumper or a jacket the length is measured from the highest point on the shoulder (usually closest to the neckline), and straight down to the bottom of the garment. It is NOT measured from the tip of shoulder. Similarly, the length of yoke is measured from the highest point on the shoulder and down to where yoke is split into body and sleeves.

See DROPS lesson: How to read a schematic drawing

Diagrams are often repeated on the round or in height. 1 repeat is the diagram the way it appears in the pattern. If it says to work 5 repeats of A.1 in the round, then you work A.1 a total of 5 times after/next to each other in the round. If it says to work 2 repeats of A.1 vertically/in height you work the entire diagram once, then begin again at the start and work the entire diagram one more time.

Chain stitches are slightly narrower than other stitches and to avoid working the cast-on edge too tight, we simply chain more stitches to begin with. The stitch count will be adjusted on the following row to fit the pattern and measurement sketch.

The rib edge is more elastic and will contract slightly compared to, for example, stocking stitch. By increasing before the rib edge, you avoid a visible difference in width between the rib edge and the rest of the body.

It’s very easy to cast off too tightly, and by making yarn overs while casting off (and simultaneously casting these off) you avoid a too tight cast off edge.

See DROPS video: How to bind off with yarn overs (yo)

To achieve an even increase (or decrease) you can increase on, for example: every 3rd and 4th row alternately, like so: work 2 rows and increase on the 3rd row, work 3 rows and increase on the 4th. Repeat this until the increase is complete.

See DROPS lesson: Increase or decrease 1 st on every 3rd and 4th row alternately

Should you prefer to work in the round instead of back and forth, you may of course adjust the pattern. You’ll need to add steeks mid-front (usually 5 stitches), and follow the instructions. When you would normally turn and work from the wrong side, simply work across the steek and continue in the round. At the end you’ll cut the piece open, pick up stitches to work bands, and cover the cut edges.

See DROPS video: How to knit steeks and cut open

Should you prefer to work back and forth instead of in the round, you may of course adjust the pattern so you work the pieces separately and then assemble them at the end. Divide the stitches for the body in 2, add 1 edge stitch in each side (for sewing) and work the front and back pieces separately.

See DROPS lesson: Can I adapt a pattern for circular needles into straight needles?

Pattern repeats can vary slightly in the different sizes, in order to get the correct proportions. If you’re not working the exact same size as the garment in the photo, yours might deviate slightly. This has been carefully developed and adjusted so that the complete impression of the garment is the same in all sizes.

Make sure to follow instructions and diagrams for your size!

If you have found a pattern you like which is available in women’s size it’s not very difficult to convert it to men’s size. The biggest difference will be the length of sleeves and body. Start working on the women size that you think would fit across the chest. The additional length will be worked right before you cast off for the armhole/sleeve cap. If the pattern is worked top-down you can add the length right after the armhole or before the first decrease on sleeve.

Regarding additional yarn amount, this will depend on how much length you add, but it is better with a skein too many than too few.

All yarns will have excess fibres (from production) that might come off as lint or shedding. Brushed yarns (ie hairier yarns) have more of these loose, excess fibres, causing more shedding.

Shedding also depends on what is worn under or over the garment, and whether this pulls at the yarn fibres. It’s therefore not possible to guarantee that there will be no shedding

Below are some tips on how to get the best result when working with hairier yarns:

1. When the garment is finished (before you wash it) shake it vigorously so the looser hairs come off. NOTE: do NOT use a lint roller, brush or any method that pulls at the yarn.

2. Place the garment in a plastic bag and put it in your freezer - the temperature will cause the fibres to become less attached to each other, and excess fibres will come off easier.

3. Leave in the freezer for a few hours before taking it out and shaking it again.

4. Wash the garment according to the instructions on the yarn label.

Pilling is a natural process that happens to even the most exclusive of fibers. It's a natural sign of wear and tear that is hard to avoid, and that is most visible in high friction areas of your garment like a sweater's arms and cuffs.

You can make your garment look as new by removing the pilling, using a fabric comb or a pill/lint remover.

Still can't find the answer you need? Then scroll down and leave your question so one of our experts can try to help you. This will be done normally within 5 to 10 working days.
In the meantime, you can read the questions and answers that others have left to this pattern or join the DROPS Workshop on Facebook to get help from fellow knitters/crocheters!

You might also like...

168-19 At Sundown

Jette, Denmark

Cape At Sundown

Sonja, Germany

Inga's Handicrafts

At Sundown, Drops 168-19, Estonia

Post a comment to pattern DROPS 168-19

We would love to hear what you have to say about this pattern!

If you want to leave a question, please make sure you select the correct category in the form below, to speed up the answering process. Required fields are marked *.

Comments / Questions (25)

country flag Marianne Colpaert wrote:

Ik wil de trui korter maken. Op welke hoogte in de telpatronen begin ik dan met de minderingen? Van onder de arm gemeten wil ik een maximum lengte van 45 cm. En kan ik de mouwen ook breien op een korte rondbreinaald ipv op Naalden zonder knop? Alvast bedankt voor een antwoord van jullie. Ik ben maar een beginnende breister op rondbreinaalden.

08.11.2023 - 00:43

DROPS Design answered:

Dag Marianne,

Je breit 14 patroonherhalingen in de breedte. Om de trui korter te maken zou je kunnen starten met een patroon later in de beschrijving en je zet dan minder steken op, afhankelijk van hoeveel steken er in de breedte zitten in de patroonherhaling op dat moment en afhankelijk van welke maat je breit.

13.11.2023 - 06:42

country flag Anette wrote:

Hvis jeg gerne vil strikke den flotte bluse et nr./lidt større, hvordan gøres det så nemmest i forhold til maskeantal/mønster? Jeg vil rigtig gerne i gang med at strikke den, så håber på hurtigt svar, ved godt at I sikkert har ganske travlt.

26.06.2021 - 03:26

DROPS Design answered:

Hei Anette. Design avd. har dessverre ikke anledning til å omregne denne til en større størrelse. Det er ikke bare å legge til flere masker, denne genseren har flere diagrammer man også må ta hensyn til. mvh DROPS design

28.06.2021 - 13:43

country flag Anna wrote:

Jag undrar över storlekarna. I S/M är måttet över bysten 43 cm, det verkar smått även för en ren storlek S?

27.03.2021 - 09:12

DROPS Design answered:

Hej Anna, de 43 cm er bredden, så når du ganger med 2 får du omkredsen :)

07.04.2021 - 10:18

country flag Edeltraut wrote:

Hallo, ich stricke diesen wunderschönen Pullover und habe jetzt festgestellt das sich die Spitzen der Zacken nach oben klappen. Was habe ich verkehrt gemacht? Die Maschen habe ich locker mit 2 Nadeln angeschlagen. Vielen Dank für eine Antwort

27.01.2021 - 08:02

DROPS Design answered:

Liebe Edeltraut, Sie können den Pullover mit Stecknadeln auf einer geeigneten Unterlage spannen, anfeuchten (z.B. mit einer Sprühflasche für Blumen) und trocknen lassen, danach entfernen Sie die Stecknadeln, dann sollte sich der Rand nicht mehr rollen.

27.01.2021 - 08:09

country flag Babeth wrote:

Bonjour Je mes suis tricotée c e pull et je l'adore Il est très confortable et chaud Je souhaite en refaire d'une autre couleur mais hélas Fabel disparaît peu à peu et les couleurs restantes ne me plaisent pas du tout Par quel laine le remplacer Merci

17.12.2020 - 11:32

DROPS Design answered:

Bonjour Babeth, vous avez de nombreuses couleurs DROPS Fabel à votre disposition, mais vous pouvez également utiliser une autre laine du groupe A (essayez notre convertisseur), comme DROPS Delight qui propose des dégradés permettant de rester dans le même esprit - et pour éviter des couleurs unies. Votre magasin saura vous aider à choisir et vous renseignera sur les disponibilités. Bon tricot!

17.12.2020 - 16:59

country flag Anita Siikala wrote:

Hei! Olen jonkin verran kutonut Dropsin ohjeista, mutta nyt en ymmärrä. Etu- ja takakappaleen ohjeessa neuvotaan alussa ainaoikean jälkeen neulomaan mallineuletta piirroksen A1 mukaan. Mikä kuvista on A1? Kiitos vastauksesta! terv. Anita Siikala

20.03.2020 - 11:32

DROPS Design answered:

Hei, piirroksen A.1 mallineuleen 2 kerrosta löytyvät samasta piirroksesta, jossa ovat piirrosten A.2, A.3, A.4, A.5 ja A.6 mallikerrat.

22.09.2020 - 17:30

country flag Dagmar wrote:

I am knitting size med. on A 1 I am knitting 10 sts. and then slip one knit one and slip over, knit two together so far so good, am I then knit 19 sts. and do slip yarn over and knit 2 together? I should then have 9 sts left on the end of the row. I tried twice and it’s not adding up, what do I do wrong?

16.09.2019 - 03:22

DROPS Design answered:

Hi Dagmar, Yes, the first line in A.1 from bottom right to left is K10, slip 1, knit 1 and pass the slipped stitch over, K2 together, knit 9. This is repeated 14 times and 14 x 23 = 322 stitches, which is the number of stitches cast on in size S/M. So you should have 9 stitches left after the last decrease at the end of the round. I hope this helps and happy knitting!

16.09.2019 - 07:22

country flag Corinna wrote:

Mit welchem Rapport wurde die Maschen Probe im Zackenmuster erstellt?

02.09.2019 - 21:18

DROPS Design answered:

Liebe Corinna, die Maschenprobe soll die gleiche in jedem Rapport sein, Sie können aber z.B. A.2 stricken (= keine Abnahme). Viel Spaß beim stricken!

03.09.2019 - 08:50

country flag Joke wrote:

Ik Ben bij A6 Dan Moet je 350 Steken hebben ik heb er 294 over maat L/ XL hoe kan dat?

22.08.2019 - 14:01

DROPS Design answered:

Dag Joke,

Het klopt; je moet 294 steken hebben voor maat L/XL (350 steken is voor maat XXL/XXXL).

01.09.2019 - 11:39

country flag Heidi wrote:

Hei! Jeg har begynt å strikke på armen til den største str, og den ser altfor stor ut? 105 masker er vel ganske mye? Burde jeg velge str under? Mvh Heidi

17.01.2019 - 00:12

DROPS Design answered:

Hei Heidi. Det er ganske stor størrelsesforskjell på ermene, og dette er for at mønsteret skal gå opp i hele rapporter med zik-zak mønster. Om du strikker ermene i en størrelse mindre vil du ha for få masker når du skal sette ermene inn på bolen, og bærestykket vil bli for lite (i forhold til målskissen). Vi anbefaler deg derfor ikke å gjøre dette. Du kan selvfølgelig selv tilpasse slik at du ender opp med maskeantallet til den størset størrelsen på slutten av ermene, men da vil mønsteret ikke gå opp i hele rapporter rundt på ermet. God fornøyelse.

23.01.2019 - 14:29