
Looking for a yarn?


Comments / Questions (22)
![]() Martine Leewis wrote:
Martine Leewis wrote:
Beste mensen, Ik heb het lijf gebreid, aan de goede kant de steken geminderd. De mouwen zijn ook af, daarbij heb ik ook 25 steken geminderd. Nu moet ik ‘de mouwen op de rondbreinaald zetten’. Maar hoe doe ik dat? Terugbreiend aan de verkeerde kant tot de eerste set afgehaakte steken van het lijf en dan doorbreien aan de eerste mouw? Volgens mij komt de mouw dan binnenste buiten. Ik heb het idee dat ik iets fout doe. Hulp wordt gewaardeerd! Vriendelijke groet, Martine
10.01.2025 - 22:56DROPS Design answered:
Dag Martine,
De mouwen en de panden komen allemaal samen op de rondbreinaald te staan, waarbij de afgekante steken onder de mouw tegen de afgekante steken op het lijf (dus zeg maar bij de oksel) komen. In een van de video's die bij het patroon staan wordt uitgelegd hoe je dit doet. Zie deze link naar de video.
11.01.2025 - 11:37
![]() Britta Bolton wrote:
Britta Bolton wrote:
Var mäter man längden? Det är stor skillnad mellan att mäta i framkanten eller spetsen av en av uddarna.
29.07.2024 - 10:57DROPS Design answered:
Hej Britta, mål langs med forkanten :)
02.08.2024 - 09:20
![]() June wrote:
June wrote:
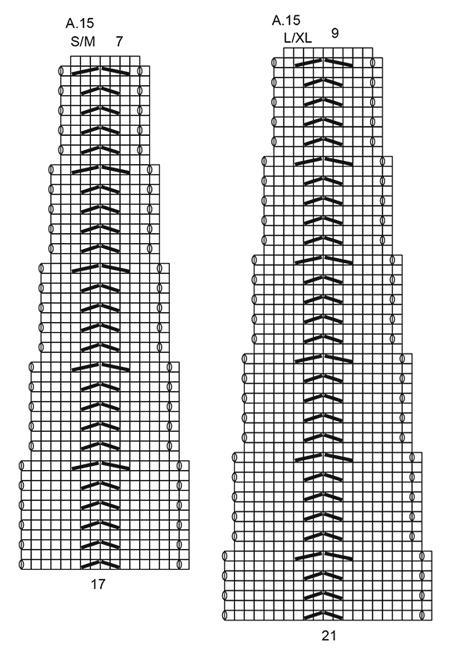
Only charts A.15 are included? Where are the other charts referenced in the pattern?
23.04.2023 - 16:24DROPS Design answered:
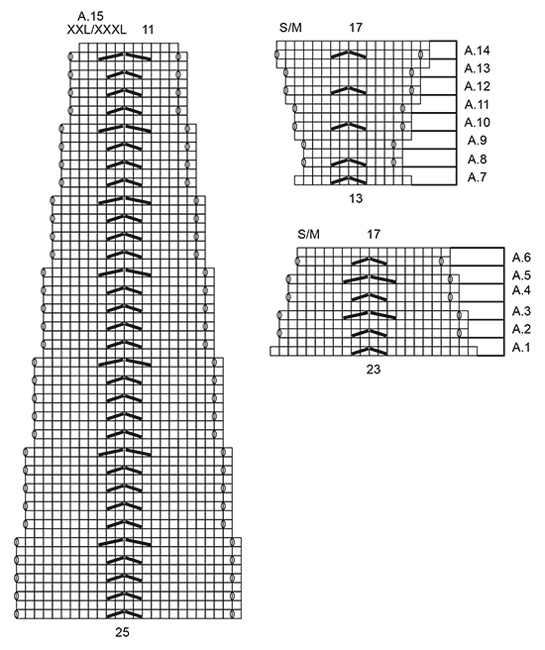
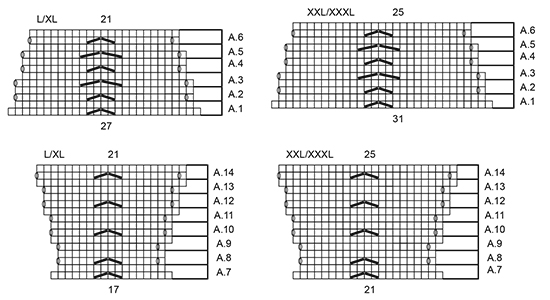
Dear June, the other charts are drawn together in two smaller charts, which are also separated by size. You can find charts A.1-A.6 and A.7-A.14 for sizes S/M next to A.15 for the largest sizes. The other charts A.1-A.6 and A.7-A.14 (for larger sizes) are located under them. Happy knitting!
23.04.2023 - 18:08
![]() Lene wrote:
Lene wrote:
Jeg vil strikke denne jakke i str.M, men kan ikke få maskeantallet til at passe. A1 er på 23 m. 23x16=368 m +11 kantmasker = 379 m. I opskriften står 389 m?
26.11.2022 - 12:08DROPS Design answered:
Hej Lene, 389 er til størrelse L/XL. Du har 333 masker i den mindste størrelse :)
30.11.2022 - 14:29
![]() Gila wrote:
Gila wrote:
Als ik de mouw met 85 steken start en A7 brei, dan minder ik elke oneven naald 2 steken per rapport. Na 6 naalden heb ik nog maar 5 rapporten van 11 steken. Bij A8 zie ik dat je ook 2 steken meerdert per rapport. Maar als ik dat zou doen blijf ik op 85 steken na 8 cm en ik moet naar 75. Wat gaat er mis?
03.03.2022 - 12:42DROPS Design answered:
Dag Gila,
Na het opzetten brei je A.7 één keer in de hoogte. Je hebt dan 10 steken geminderd. Daarna brei je steeds A.8 in de hoogte tot 11 cm. Bij A.8 blijft het totaal aantal steken hetzelfde. In de eerste naald van A.8 2 omslagen in één herhaling in de breedte en daarnaast 2 minderingen in het midden.
07.03.2022 - 12:23
![]() Bérita wrote:
Bérita wrote:
Welke is A 1 en A 2 en verder. Dit staat er niet bij
06.02.2022 - 15:56DROPS Design answered:
Dag Bérita,
Bij de 4 onderste telpatronen zie je rechts naast de telpatronen A.1, A.2 enzovoorts staan (dus naast de naalden in het telpatroon).
11.02.2022 - 15:03
![]() Miriam wrote:
Miriam wrote:
Ich habe diese wunderschöne Jacke in XXXL gestrickt. Mir gefällt sie sehr. Allerdings ist die angegebene Maschenanzahl beim Ende der Rundpasse vieeeel zu hoch. Dabei rutscht die Jacke von den Schultern. Ich habe weiter Maschen reduziert bis zu 7Maschen/Mustersatz. Da das Muster sich auch noch sehr dehnt, zusätzlich außerdem einen Abschluß mit Mausezähnchen gemacht (5R glatt re, 1R je 1Umschl.+2M zusammen stricken, 5R glatt re. Umschlagen und festnähen). Jetzt ist top.
21.12.2020 - 23:10
![]() Lise Renaud wrote:
Lise Renaud wrote:
Bonjour, Je veux vous remercier d'avoir répondu à mes questions aussi rapidement c'est rare. Encore merci Lise Renaud
08.06.2020 - 16:00
![]() Lise Renaud wrote:
Lise Renaud wrote:
Je viens du Québec (en français), jet je ne comprends pas très bien 1 côte mousse et le point mousse, pour moi, le point mousse c'est chaque rang à l'endroit mais les explications me disent le contraire. C'est écrit: tricoter 1 côte au point mousse , puis tricoter ainsi: 5 m point mousse!! Merci de pouvoir me répondre Lise Renaud
07.06.2020 - 18:20DROPS Design answered:
Bonjour Mme Renaud, quand on tricote du point mousse en allers et retours (= rangs), on va tricoter 1 rang endroit sur l'endroit + 1 rang endroit sur l'envers et ces 2 rangs vont former 1 côte mousse. Quand on tricote du point mousse en rond, on va tricoter 1 tour endroit + 1 tour envers pour former 1 côte mousse. les 5 m de bordure point mousse se tricotent ainsi à l'endroit sur l'endroit et à l'endroit sur l'envers. Bon tricot!
08.06.2020 - 09:01
![]() Nele wrote:
Nele wrote:
Hallo in der Arm anleitung steht wenn A7 gestrickt ist dann A8 stricken wo finde ich das?
18.02.2019 - 19:07DROPS Design answered:
Liebe Nele, je nach der Grösse gibt es unterschiedliche Diagramme für A.7-A.14 dh 1 Diagram für Grösse S/M, 1 für Grösse L/XL und 1 für Grösse XXL/XXXL. Viel Spaß beim stricken!
19.02.2019 - 09:13
|
|||||||||||||||||||
At Sundown Cardigan#atsundowncardigan |
|||||||||||||||||||
|
|
|||||||||||||||||||
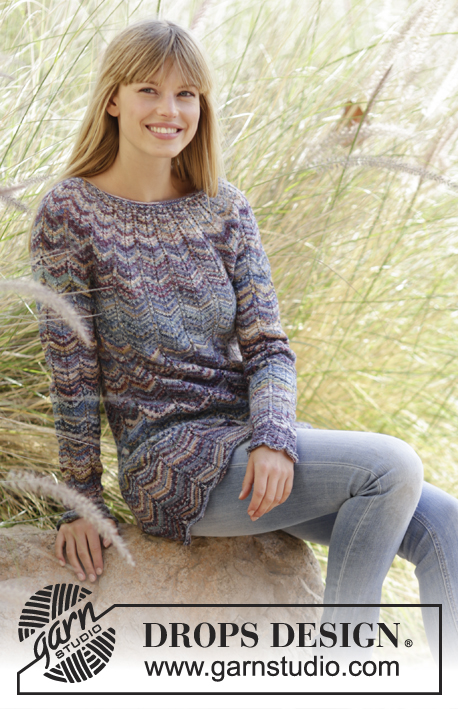
Knitted DROPS jacket with zig-zag and round yoke in “Fabel”. Size: S - XXXL.
DROPS 168-20 |
|||||||||||||||||||
|
GARTER ST (worked in the round): 1 ridge = 2 rounds. * K 1 round and P 1 round *, repeat from *-*. GARTER ST (back and forth): K all rows. 1 ridge = K2 rows. PATTERN: See diagrams A.1 to A.15. The diagrams show all rows in pattern seen from RS. See diagram for size! STRIPES BODY: Work as follows: * 2 rows turquoise/blue, 2 rows lavender *, repeat from *-* for 8-8-9 cm / 3"-3"-3½". * 2 rows lavender, 2 rows sea mist *, repeat from *-* for 8-8-8 cm / 3"-3"-3". * 2 rows sea mist, 2 rows turquoise/blue *, repeat from *-* for 7-8-8 cm / 2 3/4"-3"-3". Repeat these 23-24-25 cm / 9"-9½"-9 3/4" upwards. NOTE: Switch color inside 5 sts in garter st so that yarn can follow upwards on the wrong side of piece. STRIPES SLEEVE: * 2 rounds turquoise/blue, 2 rounds lavender *, repeat from *-* for 8-8-7 cm / 3"-3"-2 3/4". * 2 rounds lavender, 2 rounds sea mist *, repeat from *-* for 8-7-7 cm / 3"-2 3/4"-2 3/4". * 2 rounds sea mist, 2 rounds turquoise/blue *, repeat from *-* for 7-7-7 cm / 2 3/4"-2 3/4"-2 3/4". Repeat these 23-22-21 cm / 9"-8 3/4"-8 1/4" 1 more time. BUTTONHOLES: Dec for buttonholes on right band. Work tog second and third st from edge and make 1 YO. Dec for buttonholes when piece measures: SIZE S/M: 12, 20, 28, 36, 44, 53 and 62 cm / 4 3/4",8",11",14 1/4",17 1/4",21",24½" SIZE L/XL: 14, 22, 30, 39, 48, 57 and 66 cm / 5½",8 3/4",11 3/4",15 1/4",19",22½",26" SIZE XXL/XXXL: 16, 25, 34, 43, 52, 61 and 70 cm / 6 1/4",9 3/4",13½",17",20½",24",27½" ---------------------------------------------------------- BODY: Worked back and forth on circular needle from mid front. Cast on 333-389-445 sts on circular needle size 3 mm / US 2.5 with turquoise/blue. Work STRIPES BODY - see explanation above. Dec for BUTTONHOLES on right band - see explanation above. Work 1 ridge in GARTER ST, then work as follows: 5 sts in garter st, A.1 until 6 sts remain (= 14 repetitions in width), work 1 st in stockinette st, 5 sts in garter st. REMEMBER THE KNITTING GAUGE When A.1 has been worked one time vertically, there are 305-361-417 sts on needle. Continue with 5 sts in garter st, A.2 until 6 sts remain, 1 st in stockinette st and 5 sts in garter st. When piece measures 13-14-15 cm / 5"-5½"-6 1/4", work A.3 over all A.2, when A.3 has been worked one time vertically there are 277-333-389 sts on needle. Continue with A.4 over all A.3. When piece measures 29-31-33 cm / 11½"-12 1/4"-13", work A.5 over all A.4. When A.5 has been worked one time vertically, there are 249-305-361 sts on needle. Continue with A.6 over A.5 until piece measures 47-49-51 cm / 18½"-19 1/4"-20". Now work as follows from RS: Work the first 56-68-80 sts (= right front piece), bind off the next 17-21-25 sts, work the next 102-126-150 sts (= back piece), bind off the next 17-21-25 sts, work the last 57-69-81 sts (= left front piece). Put piece aside and knit the sleeves. SLEEVE: Worked in the round on double pointed needles. Cast on 65-85-105 sts on double pointed needles size 3 mm / US 2.5 with turquoise/blue. Work STRIPES SLEEVE. Work 1 ridge in GARTER ST – see explanation above, then work A.7 over all sts (= 5 repetitions in width). When A.7 has been worked one time vertically, there are 55-75-95 sts on round. Continue with A.8 over all sts. When piece measures 11-11-11 cm / 4½"-4½"-4½", work A.9 over all sts. When A.9 has been worked one time vertically, there are 65-85-105 sts on round. Continue with A.10 over all sts. When piece measures 22-24-26 cm / 8 3/4"-9½"-10 1/4", work A.11 over all sts. When A.11 has been worked one time vertically, there are 75-95-115 sts on round. Continue with A.12 over all sts. When piece measures 34-33-32 cm / 13½"-13"-12½", work A.13 over all sts. When A.13 has been worked one time vertically, there are 85-105-125 sts on round. Continue with A.14 over all sts. When piece measures 46-44-42 cm / 18"-17 1/4"-16½" (shorter measurements in the larger sizes because of longer yoke), bind off the first 17-21-25 sts (= one repetition of A.14) = 68-84-100 sts. Make another sleeve the same way. YOKE: Slip sleeves on to same circular needle 3 mm as body = 351-431-511 sts. Then work as follows: 5 sts in garter st, A.15 (= 20 repetitions in width), finish with 1 st in stockinette st and 5 sts in garter st, continue with STRIPES BODY Work and dec according to A.15. When A.15 has been worked one time vertically, there are 151-191-231 sts on needle. Work 2 ridges in garter st, on first row in first ridge dec 35-55-75 sts evenly = 116-136-156 sts. Bind off. Piece measures approx. 64-68-72 cm / 25 1/4"-26 3/4"-28½". ASSEMBLY: Sew the openings under the sleeves. Sew the buttons on to the left band. |
|||||||||||||||||||
Diagram explanations |
|||||||||||||||||||
|
|||||||||||||||||||
|
|||||||||||||||||||
|
|||||||||||||||||||
|
|||||||||||||||||||

|
|||||||||||||||||||
Have you finished this pattern?Tag your pictures with #dropspattern #atsundowncardigan or submit them to the #dropsfan gallery. Do you need help with this pattern?You'll find 24 tutorial videos, a Comments/Questions area and more by visiting the pattern on garnstudio.com. © 1982-2025 DROPS Design A/S. We reserve all rights. This document, including all its sub-sections, has copyrights. Read more about what you can do with our patterns at the bottom of each pattern on our site. |
|||||||||||||||||||


With over 40 years in knitting and crochet design, DROPS Design offers one of the most extensive collections of free patterns on the internet - translated to 17 languages. As of today we count 314 catalogs and 11822 patterns - 11812 of which are translated into English (US/in).
We work hard to bring you the best knitting and crochet have to offer, inspiration and advice as well as great quality yarns at incredible prices! Would you like to use our patterns for other than personal use? You can read what you are allowed to do in the Copyright text at the bottom of all our patterns. Happy crafting!
Post a comment to pattern DROPS 168-20
We would love to hear what you have to say about this pattern!
If you want to leave a question, please make sure you select the correct category in the form below, to speed up the answering process. Required fields are marked *.