
Looking for a yarn?


Comments / Questions (80)
![]() Annika wrote:
Annika wrote:
Ich verstehe den schlagkragen nicht. Wo beginnt dieser? 20maschen ab den halsausschnitt oder 20 maschen ab der oberen seite zum halsausschnitt? Danke im vorraus
06.05.2022 - 14:53DROPS Design answered:
Liebe Annika, der rechte Schalkragen beginnt bei einer Hinreihe über die ersten 20 Maschen vom Vorderteil (die letzten Maschen vom Vorderteil gehören zur Schulter). Beim linken Vorderteil häkeln Sie die ersten 20 M einer Rückreihe. Viel Spaß beim häkeln!
06.05.2022 - 16:12
![]() Elisabetta wrote:
Elisabetta wrote:
Il collo si lavora sulle maglie di quale parte? Davanti destro? Davanti sinistro? Dietro? Scusate ma non capisco.... Nello schema non è scritto partire con 22 catenella quindi mi devo attaccare a qualcosa: cosa? Grazie
15.02.2022 - 16:46DROPS Design answered:
Buonasera Elisabetta, deve lavorare il collo come indicato sia sul davanti destro che su quello sinistro, partendo dal centro davanti. Buon lavoro!
16.02.2022 - 23:23
![]() Elisabetta Brandani wrote:
Elisabetta Brandani wrote:
Buongiorno, Vorrei sapere se il collo a scialle va fatto direttamente sul dietro della maglia. I 22 punti vanno fatti al centro ma ci sono solo 14 maglie libere che formano lo scollo...
10.02.2022 - 13:55DROPS Design answered:
Buonasera Elisabetta, il collo si lavora sulle maglie verso il centro davanti, in due metà che poi verranno cucite alla fine. Buon lavoro!
10.02.2022 - 16:24
![]() Marion wrote:
Marion wrote:
Ich verstehe das Zusammennähen des Schalkragens nicht…. Welches ist die hinter Mitte? Das kurze Ende? Das lange Ende? Das schräge Teil? Gar nichts von allem? Und welches muss ich danach an die Jacke nähen? Ich bin völlig verwirrt.
08.08.2021 - 14:28DROPS Design answered:
Liebe Marion, die letzten Reihen vom Schalkragen (rechts und links) nähen Sie zusammen, dann nähen Sie die kurze Seite vom Kragen am Halsausschnitt vom Rückenteil. Dieses Video zeigt so ein Schalkragen, im Video gestrickt aber die Technik wird hier die selbe. Viel Spaß beim häkeln!
09.08.2021 - 08:15
![]() Perret wrote:
Perret wrote:
Bonjour, Je suis enfin arrivée à l'étape de assemblage. Aucun soucis pour les épaules. Par contre les côtés, c'est une autre histoire. Je ne trouve pas le moyen défaire un assemblage discret. Quelle est donc la meilleure méthode pour assembler les côtés ? Merci de votre aide!
14.07.2021 - 18:24DROPS Design answered:
Bonjour Mme Perret, vous trouverez ici deux vidéos montrant l'une comment coudre les côtés d'un ouvrage en mailles serrées, et l'autre pour un ouvrage en brides (ce sera la même technique pour des double-brides). Bon assemblage!
15.07.2021 - 09:41
![]() Marion wrote:
Marion wrote:
Ich verstehe den Anfang des Vorderteils nicht. Erste Hinreihe = was bedeutet das „0-3-6-0-6-0“ hinter den ersten beiden Doppelstäbchen?
09.03.2021 - 23:30DROPS Design answered:
Liebe Marion, jede Anzahl entpricht jede Größe, dh, in die 1. 4. und 6. Größe häkelt man hier kein Doppelstäbchen, in die 2. Größe häkelt man 1 Doppelstäbchen in die 3 nächsten Luftmaschen und in die 3. und 5. Größe häkelt man 1 Doppelstäbchen in die 6 nächsten Luftmaschen. Viel Spaß beim häkeln!
10.03.2021 - 07:33
![]() Monica H wrote:
Monica H wrote:
Ik begrijp niet hoe ik de sjaalkraag moet maken. Moet je iets op elkaar haken? Waar moet ik beginnen? Heb het achterpand en de twee voorpanden af maar alsnog ze op elkaar leg is het voor te breed. Dus ergens moet ik iets omslaan, maar hoe??
24.11.2020 - 22:03DROPS Design answered:
Dag Monica,
De sjaalkraag haak je heen en weer op de voorpanden en aan de kant van de schouder steekt er een stuk uit. Als je de sjaalkraag van beide panden klaar hebt, naai je de kraag midden achter vast en het uitstekende deel wordt langs de halslijn op het achterpand vast genaaid. Je begint met de sjaalkraag in het 20e-21e-22e-22e-22e-22e stokje vanaf de schouder.
30.11.2020 - 20:41
![]() Morin wrote:
Morin wrote:
Bonjour, puis-je faire ce modèle avec le fil Andes de chez Drops ? Cordialement.
04.10.2020 - 16:59DROPS Design answered:
Bonjour Mme Morin, tout à fait, car Andes et Cloud sont du même groupe, vous obtiendrez toutefois une texture différente car ces 2 fils n'ont pas la même composition, raison pour laquelle nous proposons ici 2 fils Air - vous trouverez plus d'infos sur les alternatives ici. Bon crochet!
05.10.2020 - 11:00
![]() Julie D C wrote:
Julie D C wrote:
Hej. Hvad gør man med ærmerne? Der ikke nogen opskrift på ærmerne og er lidt stuck.
10.01.2020 - 22:11DROPS Design answered:
Hej Julie, Jo ærmerne tages ud med luftmasker i hver side ifølge opskriften. God fornøjelse!
15.01.2020 - 15:39
![]() Cynthia Holloway wrote:
Cynthia Holloway wrote:
On the Left Front Piece, I am confused about working as :right front but reversed". You answered me to start with the last item and work backwords, I have no clue how to do that. Can you please explain it me.
12.12.2019 - 01:43DROPS Design answered:
Dear Mrs Holloway, you will start as on right front piece: crochet the same number of chains, work the same number of stitches on first row; continue in pattern until same height as on right front piece/back piece and cast on the new stitches for sleeve at the end of a WS row (instead of a RS row) and continue working from RS (instad of from WS under right font piece) and from WS (instead of from RS under right front piece). If you are doubting, just look at your right front piece, the left one should be reversed/mirrored. Happy crocheting!
12.12.2019 - 09:37
|
|
Loch Ness#lochnessjacket |
|
 |
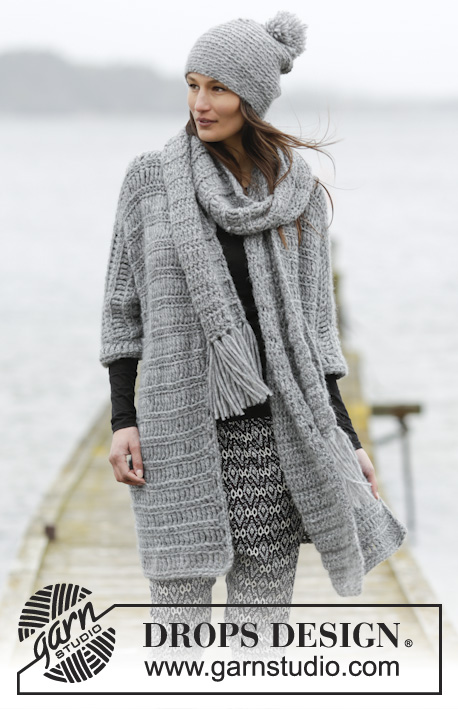 |
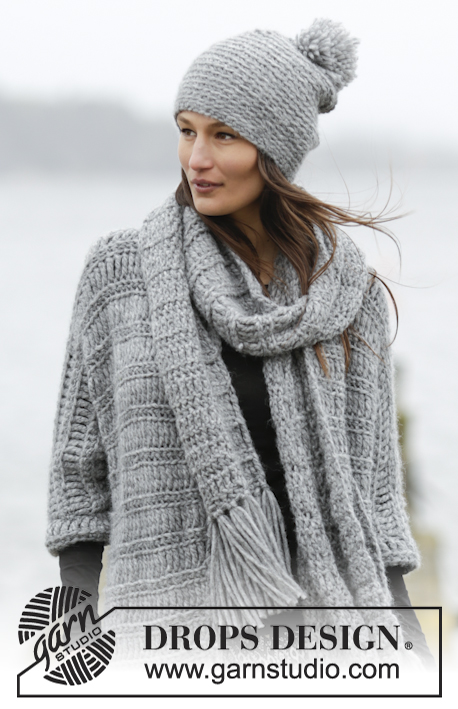
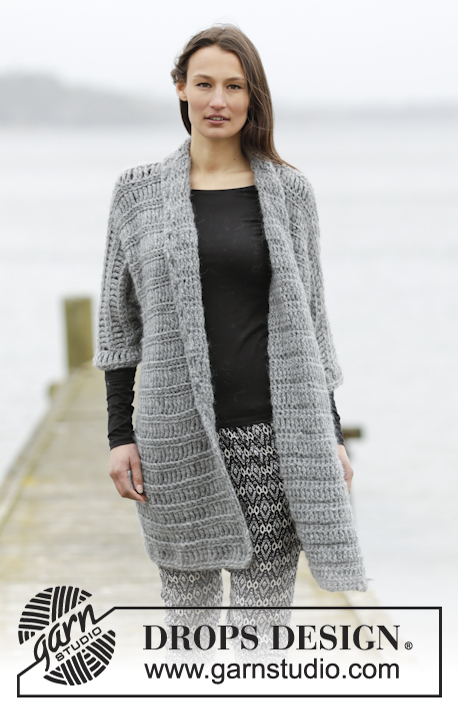
Crochet DROPS jacket with trebles and single crochet in 1 thread Cloud or 2 threads Air. Size: S - XXXL.
DROPS 166-6 |
|
|
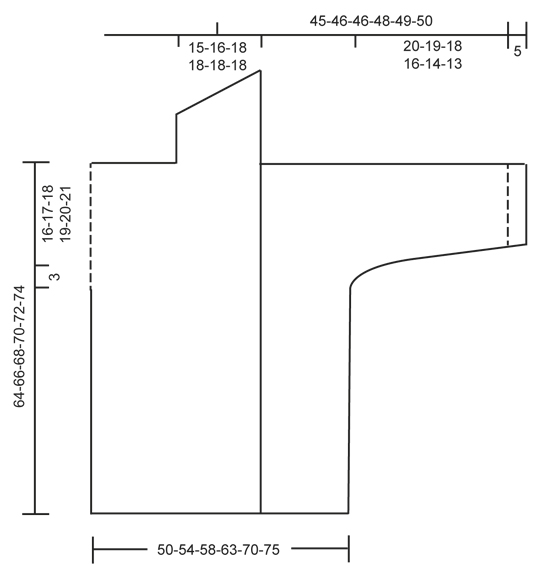
CROCHET INFO: At beg of every round/row with sc work 1 ch. Ch does not replace sc. At beg of every round/row with tr replace first tr with 4 ch. DECREASE TIP: Dec 1 sc by working 2 sc tog as follows: * Insert hook in next st, get yarn *, repeat from *-* one more time, make a YO and pull yarn through all 3 sts on hook = 1 sc dec. PATTERN: ROW 1 (= from WS): Work 1 sc in front loop of every st from previous row. ROW 2 (from RS): Work 1 tr in back loop of every st from previous row. Repeat 1st and 2nd row. ---------------------------------------------------------- JACKET: Worked back and forth in several pieces and sewn tog when finished. BACK PIECE: Work 49-52-55-60-66-71 ch on hook size 9 mm / M/13 with 1 thread Cloud or 2 threads Air . Then work as follows from RS: 1 tr in 5th ch from hook (= 2 tr), 1 tr in each of the next 0-3-6-0-6-0 ch, * skip ch 1, 1 tr in each of the next 10 ch *, repeat from *-* 3-3-3-4-4-5 more times = 42-45-48-52-58-62 tr - READ CROCHET INFO. Now work PATTERN - see explanation above, until finished measurements. REMEMBER THE CROCHET GAUGE! When piece measures 45-46-47-48-49-50 cm / 17¾"-18"-18½"-19"-19¼"-19¾" - adjust so that last row worked is 2nd row in pattern, insert a marker in the outermost st in each side of piece. Work 7-7-6-6-5-5 new ch at the end of row = 49-52-54-58-63-67 sts. Now work as follows: ROW 1 (= WS): Work 1st row in pattern over the 7-7-6-6-5-5 new ch, and continue over back piece, work 7-7-6-6-5-5 new ch at the end of row = 56-59-60-64-68-72 sts. ROW 2: (Remember Crochet info) Work 1 sc in each of the first 3-3-2-2-1-1 ch (4 ch remain before st with marker), work 1 hdc in each of the next ch 2, then 1 dc in each of the next 2 ch. Continue with 2nd row in pattern over back piece until next marker. Work 1 dc in each of the next 2 sc, then 1 hdc in each of the next 2 sc, 1 sc in each of the remaining 3-3-2-2-1-1 sc on row, work 4-4-4-3-3-2 new ch at the end of row = 60-63-64-67-71-74 sts. ROW 3: Work 1st row in pattern over all sts on back piece, work 4-4-4-3-3-2 new ch at the end of row = 64-67-68-70-74-76 sts. ROW 4: Work 1 sc in each of the first 7-7-6-5-4-3 sts (= 4 sts remain before st with marker), work 1 hdc in each of the next 2 sc, then 1 dc in each of the next 2 sc, continue with 2nd row in pattern over back piece until next marker, work 1 dc in each of the next 2 sc, then 1 hdc in each of the next 2 sc, 1 sc in each of the remaining 7-7-6-5-4-3 sc on row, work 5-4-4-4-3-3 new ch at the end of row = 69-71-72-74-77-79 sts. ROW 5: Work 1st row in pattern over all sts on back piece, work 5-4-4-4-3-3 new ch at the end of row = 74-75-76-78-80-82 sts on row. Continue with pattern as before (i.e. work tr from RS and sc from WS). When piece measures 62-64-66-68-70-72 cm / 24⅜"-25¼"-26"-26¾"-27½"-28⅜", adjust so that next row is 2nd row in pattern, work as follows: Work the first 31-31-31-32-33-34 sts. Cut the yarn. Skip the next 12-13-14-14-14-14 sc from previous row (= neck), work the remaining 31-31-31-32-33-34 sts. Cut the yarn. RIGHT FRONT PIECE: Work 41-43-45-47-51-53 ch (includes 4 ch to turn with) on hook size 9 mm / M/13 with Cloud. Then work as follows from RS: Work 1 tr in 5th ch from hook (= 2 tr), 1 tr in each of the next 3-5-7-9-2-4 ch, * skip ch 1, 1 tr in each of the next 10 ch *, repeat from *-* 2-2-2-2-3-3 more times = 35-37-39-41-44-46 tr. Continue with pattern as on back piece until piece measures 45-46-47-48-49-50 cm / 17¾"-18"-18½"-19"-19¼"-19¾", adjust according to back piece and so that last row is 2nd row in pattern. Insert a marker in last st seen from RS, work 7-7-6-6-5-5 new ch at the end of row = 42-44-45-47-49-51 sts. ROW 1 (= WS): Continue with 1st row in pattern over the 7-7-6-6-5-5 new ch, then continue over the remaining sts. ROW 2: Work 2nd row in pattern to st with marker, 1 dc in each of the next ch 2, then 1 hdc in each of the next ch 2, 1 sc in each of the remaining 3-3-2-2-1-1 ch on row, work 4-4-4-3-3-2 new ch at the end of row = 46-48-49-50-52-53 sts. ROW 3: Work 1st row in pattern over all sts. ROW 4: Work 2nd row in pattern over all sts to st with marker, 1 dc in each of the next 2 sc, then 1 hdc in each of the next 2 sc, 1 sc in each of the remaining 7-7-6-5-4-3 sc, work 5-4-4-4-3-3 new ch at the end of row = 51-52-53-54-55-56 sts. ROW 5: Work 1st row in pattern over all sts on row. Continue with pattern over all sts until piece measures 64-66-68-70-72-74 cm / 25¼"-26"-26¾"-27½"-28⅜"-29⅛", adjust so that last row is 2nd row in pattern. Cut the yarn. SHAWL COLLAR: Then work shawl collar in sc over the outermost 20-21-22-22-22-22 sts towards mid front on jacket. NOTE: Work in front loop of sts from WS and back loop of sts from RS. Beg from WS. Work 1 sl st in 20th-21st-22nd-22nd-22nd-22nd tr from mid front, ch 1, 1 sc in same st, 1 sc in each of the remaining sts on row, * turn and work 1 sc in each of the first 10-10-11-11-11-11 sc, turn and work back, turn and work over all the 20-21-22-22-22-22 sc, turn and work back *, repeat from *-* until shawl collar measures 8-8-9-9-9-9 cm / 3"-3"-3½"-3½"-3½"-3½" along the shortest side. Cut the yarn. LEFT FRONT PIECE: Work as right front piece but reversed. I.e. when piece measures 45-46-47-48-49-50 cm / 17¾"-18"-18½"-19"-19¼"-19¾", adjust according to right front piece and so that last row is 2nd row in pattern. ROW 1: Turn piece and work 1st row in pattern over all sts, insert a marker in last st on row (seen from WS), work 7-7-6-6-5-5 new ch. ROW 2: Work 1 sc in each of the first 3-3-2-2-1-1 ch (4 sc remain before st with marker), work 1 dc in each of the next ch 2, 1 hdc in each of the next ch 2, continue with 2nd row in pattern over the remaining sts. Then continue inc for sleeve on every row from WS the same way as on right front piece. Adjust according to right front piece, and work shawl collar reversed, i.e. beg from RS. ASSEMBLY: Sew shoulder seams, sew underarm seams and side seams in one inside 1 tr/sc but leave 20 cm / 8" for vent in each side. Make sure that to avoid a tight seam. Sew the 2 shawl collars tog mid back and sew it to the neck. EDGE AT THE BOTTOM OF JACKET: Beg in first st (seen from RS) on back piece and work as follows: Fasten yarn with 1 sl st, work 1 sc in every dc, cut the yarn. Then work one more row with sc from RS but now work in back loop of st. Repeat on both front pieces. EDGE ALONG BAND: Fasten yarn with 1 sl st in the corner at the bottom of right band and work as follows from RS: Work ch 2, skip until first sc-row and work (1 dc, 1 hdc, ch 1, 1 hdc, 1 dc) around sc-row, ch 1, * skip until next sc-row and work (1 dc, 1 hdc, ch 1, 1 hdc, 1 dc) around next sc-row *, repeat from *-* around the entire band and collar but when working collar, skip approx. 4 cm / 1½" before working a new dc-group. I.e. there are approx. 10 dc-groups over collar. CUFF/SLEEVE EDGE: ROUND 1: Fasten yarn with 1 sl st in sleeve seam and work 4 ch (= 1 tr), work 30 tr around sleeve opening (i.e. approx. 1 tr around every sc-row and 3 tr around every row with tr). Finish round with 1 sl st in 4th ch at beg of round. ROUND 2: Work ch 1, continue with 1 sc in every tr. NOTE: Work in back loop of dc below. Fasten off. Repeat around the other sleeve. ---------------------------------------------------------- Hat and scarf: See DROPS 166-07 or "Related patterns" in pattern on website. ---------------------------------------------------------- |
|
|
|
Have you finished this pattern?Tag your pictures with #dropspattern #lochnessjacket or submit them to the #dropsfan gallery. Do you need help with this pattern?You'll find 12 tutorial videos, a Comments/Questions area and more by visiting the pattern on garnstudio.com. © 1982-2025 DROPS Design A/S. We reserve all rights. This document, including all its sub-sections, has copyrights. Read more about what you can do with our patterns at the bottom of each pattern on our site. |
|


With over 40 years in knitting and crochet design, DROPS Design offers one of the most extensive collections of free patterns on the internet - translated to 17 languages. As of today we count 314 catalogs and 11822 patterns - 11812 of which are translated into English (US/in).
We work hard to bring you the best knitting and crochet have to offer, inspiration and advice as well as great quality yarns at incredible prices! Would you like to use our patterns for other than personal use? You can read what you are allowed to do in the Copyright text at the bottom of all our patterns. Happy crafting!
Post a comment to pattern DROPS 166-6
We would love to hear what you have to say about this pattern!
If you want to leave a question, please make sure you select the correct category in the form below, to speed up the answering process. Required fields are marked *.