
Looking for a yarn?


Comments / Questions (28)
![]() Sylvie Schubnel wrote:
Sylvie Schubnel wrote:
Ma fente aurait 30 cm au lieu de 16 cm puisque je souhaite relier le dos et le devant après la section point mousse au dessus du diagramme a1 lorsque l'on commence le jersey et à poser les marqueurs. Pensez-vous que cela est possible, vous dites probablement?...
16.01.2025 - 10:24DROPS Design answered:
Bonjour Mme Schubnel, oui si vous préférez ainsi pourquoi pas. Notez qu'il vous faudra bien adapter le point mousse (à tricoter alternativement 1 tour endroit, 1 tour envers). Pensez peut-être à adapter le début des tours pour éviter une démarcation au milieu du point mousse d'un côté du poncho. Les coutures apportent aussi une forme de stabilité à l'ouvrage, mais vous pouvez probablement le tricoter en rond. Faute de frappe de ma part, les fentes des côtés sont de 25 cm ici, donc vous n'auriez que 5 cm de plus que vous pouvez même éventuellement coudre si besoin. Bon tricot!
16.01.2025 - 16:45
![]() Sylvie Schubnel wrote:
Sylvie Schubnel wrote:
J'ai tricoté le diagramme et les 5 cm de point mousse. Puis-je laisser en attente, faire de même avec le dos et rejoindre le tricot en rond au-dessus des 5 cm de point mousse, et poser les 6 marqueurs pour éviter des coutures de chaque côté? merci à vous
15.01.2025 - 21:12DROPS Design answered:
Bonjour Mme Schubnel, probablement, notez toutefois que pour le modèle photographié, on a 16 cm de fente de chaque côté (pas juste 5). Bon tricot!
16.01.2025 - 10:01
![]() Maria Teresa wrote:
Maria Teresa wrote:
En el cuello: El aumento es 3 derecho una lazada 2 revés? En el Tip habla de “ tejer el resorte con 4d, 3r.” Gracias por su ayuda
14.08.2020 - 01:22DROPS Design answered:
Hola Maria Teresa. Es una errata de traducción El elástico correcto es 3 d. /3 r., y después de hacer la lazada se convierte en 4d, 3r, como se menciona en los TIPS explicados arriba. Gracias.
16.08.2020 - 14:14
![]() Star wrote:
Star wrote:
Hi, could you please tell me how I can knit the triangle and 12 rows pattern? Many thanks in advance.
16.09.2019 - 16:33DROPS Design answered:
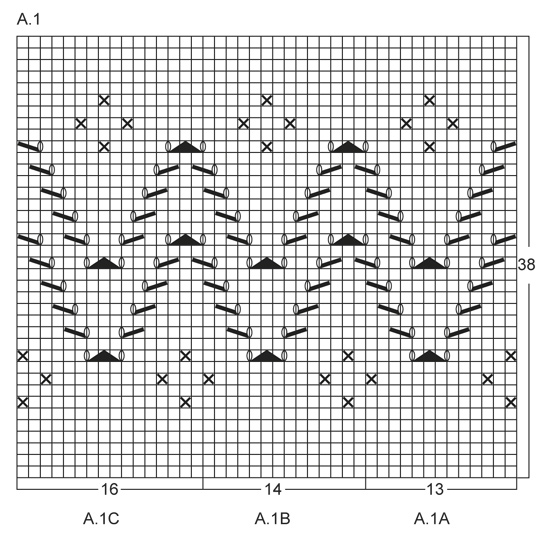
Dear Star, not sure what you mean with 12 rows pattern; the triangle pattern (A.1A, B, C) is worked over 38 rows as shown in diagram. Happy knitting!
17.09.2019 - 10:31
![]() Anke wrote:
Anke wrote:
Dag, een erg leuke poncho. Ik zou hem echter met rechte breinaalden willen breien, heb geen ervaring met een rondbreinaald. Is dat mogelijk? Hartelijk dank. Groet, Anke
05.09.2019 - 19:48DROPS Design answered:
Dag Anke,
Je zou het patroon dan in 2-en kunnen splitsen en achteraf bij de zijnaden in elkaar naaien. Dus je zet dan de helft van de steken op, maar wel 2 kantsteken extra aan beide kanten. Let wel even op hoe dit uitkomt met de boordsteek bij de hals, zodat de boord mooi doorloopt als je hem in elkaar naait.
08.09.2019 - 13:21
![]() Andrée Marin wrote:
Andrée Marin wrote:
Encore moi. je fais le modèle de 111 mailles. je suis rendue au patron - 6 m. au point mousse, POINT FANTAISIE en suivant 1 fois le diagramme A.1A = (13 m.) 5 fois = 65 m., = 71 et non 70 m. comme indiqué dans le patron. C'est quoi que je ne comprend pas.
13.07.2019 - 17:18DROPS Design answered:
Bonjour Mme Marin, vous tricotez les 11 mailles ainsi: 6 m point mousse, les 13 m A.1A, vous répétez 5 x les 14 m de A.1B, tricotez 1 x les 16 m de A.1C et terminez par 6 m point mousse = 6 + 13 + 5x14 + 16 + 6 = 111 mailles. Bon tricot!
15.07.2019 - 09:40
![]() Andrée Marin wrote:
Andrée Marin wrote:
Il est mentionné après un rapport en hauteur (=38 rangs) continuer au point mousse sur toutes les mailles pendant 5 cm. Mais le diagramme n'est pas terminé c'est seulement la moitié du modèle. C'est quoi que je ne comprend pas. Je pense que nous devons faire le diagramme au complet. Merci pour votre attention à mon problème
13.07.2019 - 04:18DROPS Design answered:
Bonjour Mme Marin, les diagrammes se tricotent sur 38 rangs (1 rang du diagramme = 1 rang à tricoter, c'est-à-dire que tous les rangs figurent dans le diagramme, ceux sur l'endroit et ceux sur l'envers), quand ces 38 rangs sont terminés, vous tricotez au point mousse pendant 5 cm. Bon tricot!
15.07.2019 - 09:03
![]() Aurora Pascariu wrote:
Aurora Pascariu wrote:
Bello! lo sto facendo e mi piace tanto.Il mio è turchese.
11.10.2018 - 02:58
![]() M. Stokyte wrote:
M. Stokyte wrote:
Hallo! Ich verstehe nicht, wie der Kragen gestrickt werden muss. Wird der Kragen in Runden oder hin und zurück gestrickt? Wie ist das mit den 12 M und 9M zu verstehen? Ist die Ab- und Zuname der M gleichzeitig? Wo beginne ich das Muster zu stricken? M. Stokyte
26.12.2017 - 19:57DROPS Design answered:
Liebe Frau Stokyte, der Kragen wird in Runden gestrickt. Bei der 1. Reihen nehmen Sie 3 M über die 12 Maschen kraus rechts auf beiden Seiten ab (= 6 M werden insgesammt abgenommen), es sind jetzt nur noch 9 Maschen kraus rechts. Gleichzeitig in der 1. Grösse nehmen Sie 2 M (Vorder- + Rückenteil = 4 neuen Maschen) ab und bei den 2 letzten Größe nehmen Sie 2-4 Maschen zu (= Vorder- + Rückenteil = insgesamt 4-8 Maschen weniger). Viel Spaß beim stricken!
02.01.2018 - 08:36
![]() Maple F wrote:
Maple F wrote:
I don't understand this poncho pattern. Front piece.decrease part. The pattern say, repeat Dec every 10 row. Is this mean, knit 10 row, then decrease ??? And 6 row and other row. Please help....I don't get it...
09.01.2016 - 17:19DROPS Design answered:
Dear Maple, see answer below.
11.01.2016 - 09:50
|
|||||||||||||||||||
Saffron#saffronponcho |
|||||||||||||||||||
 |
 |
||||||||||||||||||
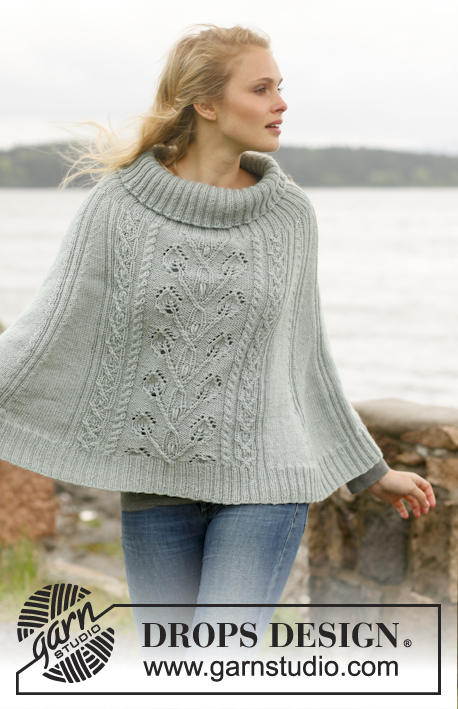
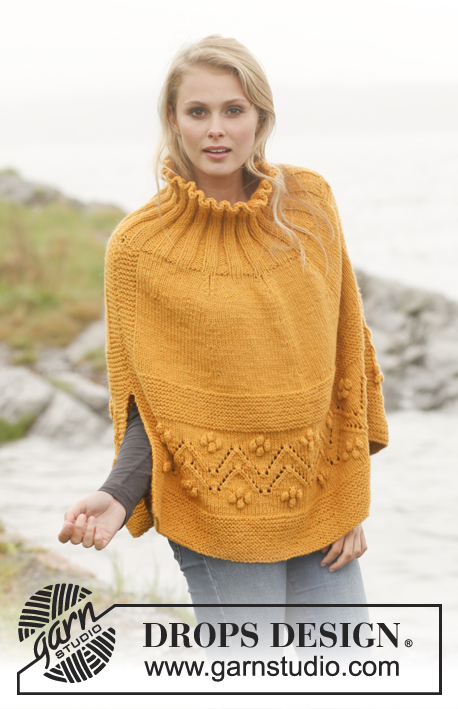
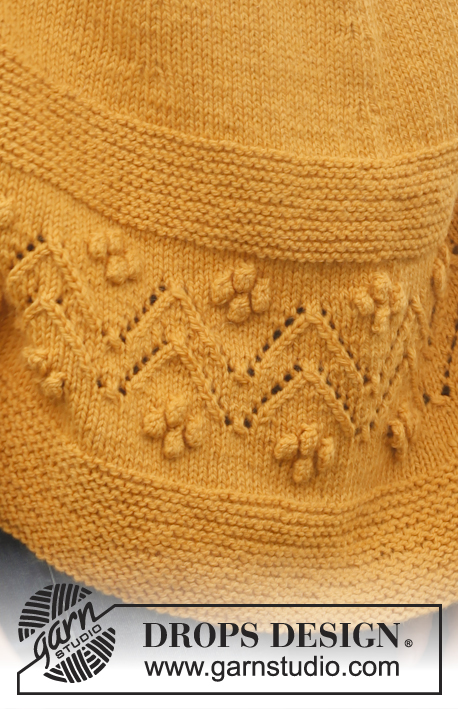
Knitted DROPS poncho with lace pattern and bobbles in ”Nepal”. Size: S - XXXL.
DROPS 149-45 |
|||||||||||||||||||
|
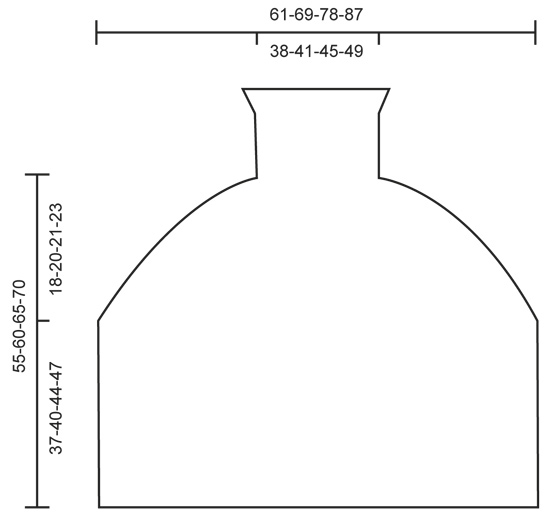
GARTER ST (back and forth on circular needle): K all rows. 1 ridge = K 2 rows. PATTERN: See diagram A.1. The diagram shows all rows in pattern seen from RS. MEASURING TIP: Because of the weight of the yarn all measurements must be done by holding the piece up otherwise the garment will be too long when worn. DECREASE TIP: K 2 tog. All dec are done from RS. KNITTING TIP: To make the neck fold nicely inc 1 st in every K section in rib. Inc as follows from RS: * K 3, 1 YO, P 3 *, repeat from *-* the entire round. K YO twisted on next round and work rib with K 4, P 3. ---------------------------------------------------------- FRONT PIECE: Worked back and forth on circular needle. Cast on 97-111-125-139 sts on circular needle size 5.5 mm / US 9 with Nepal. Work 8-9-10-11 cm / 3"-3½"-4"-4½" in GARTER ST - see explanation above. On next row from RS work as follows: 6 sts in garter st, PATTERN according to diagram A.1A (= 13 sts) 1 time, A.1B (= 14 sts) 4-5-6-7 times (= 56-70-84-98 sts), A.1C (= 16 sts) 1 time and 6 sts in garter st = 97-111-125-139 sts in total on needle. When 1 repetition has been worked vertically (= 38 rows) and piece measures 27-28-29-30 cm / 10½"-11"-11½"-11¾", continue in garter st over all sts for 5 cm / 2" – READ MEASURING TIP! Then work in stockinette st with 6 sts in garter st in each side, AT THE SAME TIME when piece measures 37-40-44-47 cm / 14½"-15¾"-17¼"-18½", insert 3 markers in piece as follows: 6 sts in garter st, 21-25-28-32 sts in stockinette st, insert 1st marker here, 21-25-28-32 sts in stockinette st, insert 2nd marker here, 21-25-28-32 sts in stockinette st, insert 3rd marker here, 22-24-29-31 sts in stockinette st, 6 sts in garter st. On next row from RS, dec 1 st on each side of markers - READ DECREASE TIP (= 6 sts dec). Repeat dec every 10th row 2-2-2-2 more times (= 3-3-3-3 times in total), every 6th row 2-2-2-2 times in total, every 4th row 0-1-1-2 times in total, and every other row 1-1-2-2 times in total (36-42-48-54 sts dec in total) = 61-69-77-85 sts remain on needle. Put piece aside. Piece now measures approx. 55-60-65-70 cm / 21½"-23½"-25½"-27½". BACK PIECE: Cast on and work as front piece. ASSEMBLY: Sew side seams – sew edge to edge in outer loop of edge sts from neck and down, but leave approx. 25 cm / 9¾" at the bottom in each side for vent. NECK: Slip sts from front and back piece tog on circular needle size 5 mm / US 8 = 122-138-154-170 sts. Now measure the piece from here. K 1 round and dec 3 sts evenly over the 12 sts in garter st in each side (= 6 sts dec on round, and there are 9 sts in garter st in each side), AT THE SAME TIME in size S/M inc 2 sts evenly in stockinette st section on front and back piece (= 4 sts inc), and in size XL/XXL - XXXL dec 2-4 sts evenly in stockinette st section on front and back piece (= 4-8 sts dec) – NOTE: Do not inc and dec any sts in size L = 120-132-144-156 sts remain on needle. Beg before the 9 sts in garter st in one side of piece and work as follows: * K 3, P 3 *, repeat from *-* the entire round. Continue rib like this AT THE SAME TIME when piece measures 16 cm / 6¼"", inc 1 st in every K section – READ KNITTING TIP! When neck measures approx. 22 cm / 8¾", loosely bind off K over K and P over P. |
|||||||||||||||||||
Diagram explanations |
|||||||||||||||||||
|
|||||||||||||||||||
|
|||||||||||||||||||
|
|||||||||||||||||||
Have you finished this pattern?Tag your pictures with #dropspattern #saffronponcho or submit them to the #dropsfan gallery. Do you need help with this pattern?You'll find 19 tutorial videos, a Comments/Questions area and more by visiting the pattern on garnstudio.com. © 1982-2025 DROPS Design A/S. We reserve all rights. This document, including all its sub-sections, has copyrights. Read more about what you can do with our patterns at the bottom of each pattern on our site. |
|||||||||||||||||||


With over 40 years in knitting and crochet design, DROPS Design offers one of the most extensive collections of free patterns on the internet - translated to 17 languages. As of today we count 314 catalogs and 11822 patterns - 11812 of which are translated into English (US/in).
We work hard to bring you the best knitting and crochet have to offer, inspiration and advice as well as great quality yarns at incredible prices! Would you like to use our patterns for other than personal use? You can read what you are allowed to do in the Copyright text at the bottom of all our patterns. Happy crafting!
Post a comment to pattern DROPS 149-45
We would love to hear what you have to say about this pattern!
If you want to leave a question, please make sure you select the correct category in the form below, to speed up the answering process. Required fields are marked *.