
Looking for a yarn?


Comments / Questions (79)
![]() Claude Lahaye wrote:
Claude Lahaye wrote:
Très beau modèle et surtout très original . Les explications parfaites et j'ai eu beaucoup de plaisir pour le faire et la joie de le voir prendre forme . Je suis heureuse d'avoir trouvé votre site et j'ai tricoté des toujours beaux pulls . Merci
17.10.2024 - 13:09
![]() Uschi wrote:
Uschi wrote:
Die Anleitung von dem Fächer Davon die Beschreibung ab der 3. Reihe= 2 rechts zusammen, 9 r, Das mein ich. Ich denke, dass dort nur 3 r gemeint ist wie auch am Ende der Beschreibung dieser dritten Reihe
15.01.2024 - 16:53Uschi answered:
Entschuldigung, ich nehme alles zurück 🙈 Es stimmt alles
15.01.2024 - 17:21
![]() Uschi wrote:
Uschi wrote:
Der Fächer 1 a 3. Reihe Kann es sein, daß gleich am Anfang *nicht* 9 R maschen gestrickt werden sollen, sondern nur 3? Pass sonst nicht am Schluss. Liebe Grüße
15.01.2024 - 14:49DROPS Design answered:
Liebe Uschi, ich misvertehe leider Ihre Frage, bei der 3. Reihe ist keinen Fächer 1.A sondern 1.D , der wird wie den Fächer 1.A gestrickt (die Maschen werden schon aufgefassen, mit der 2. Reihe anfangen). Viel Spaß beim stricken!
15.01.2024 - 16:26
![]() Newlyn wrote:
Newlyn wrote:
I would love to knit this pattern but cannot find where I can buy this yarn or an alternative. Has it been discontinued ? If so why are you still showing patterns for this yarn?
01.12.2023 - 11:43DROPS Design answered:
Dear Newlyn, correct, this yarn is now discontinued, but since different yarns have different qualities and textures we have chosen to keep the original yarn in our patterns. However, you can easily find options among our available qualities by using our yarn converter, or simply pick a yarn from the same yarn group. It is possible that some retailers still have discontinued yarns in stock, or that someone has a few skeins at home that they would like to find patterns for. The yarn converter will provide both alternative yarn as well as required amount in the new quality. Happy knitting!
01.12.2023 - 15:34
![]() Ula wrote:
Ula wrote:
Dziekuje. Eureka! ;) To chyba klucz do bledu ktory robilam. Dziekuje!
21.10.2021 - 16:55DROPS Design answered:
Super!! Projekt jest ambitny, już nie możemy się doczekać, aby go zobaczyć. Pozdrawiamy!
21.10.2021 - 17:17
![]() Ula wrote:
Ula wrote:
Dzień dobry. Niestety podazajac za opisem sie nie zgadza. Prosze podazyc za opisem. Wykonujac wszystkie czynnosci zgodnie z opisem po 6 oczkach pod koniec rzedu zostaja 2 o wiec nie mozna zrobic przelozenia. Prosze sprawdzic opis 2go rzedu. Nie moge kontynuowac wiec prosze o pomoc
21.10.2021 - 12:45DROPS Design answered:
Ulu, ten ostatni fragment czyli 'zdjąć 1 o. jak do przerobienia na prawo, 1 o.p., przełożyć oczko zdjęte nad przerobionym oczkiem' wykonujesz na 2 oczkach NASTĘPUJĄCO. Mam nadzieję, że pomogłam. Powodzenia!
21.10.2021 - 14:41
![]() Ula wrote:
Ula wrote:
Dzien dobry. W rzedzie 2 gim wachlarza 1C jest blad. Otoz po przerobieniu zgodnie z zaleceniami 2 razem na prawo,9o.pr, przelozenie,6o.pr,przelozenie: zostaje 8 na lewym drucie wiec gdyby mialo byc zgodnie z opisem to brakuje 1 o zeby zrobic przelozenie. Prosze o pomoc. Pozdrawiam cieplo
19.10.2021 - 23:56DROPS Design answered:
Witaj Ulu, sekwencję: zdjąć 1 o. jak do przerobienia na prawo, 2 o. razem na prawo, przełożyć oczko zdjęte nad przerobionym oczkiem wykonujesz NASTĘPUJĄCO. Z 3 oczek zostaje jedno (a zamknęłaś 2). Na wachlarz 1C nabrałaś 31 oczek. Po wykonaniu rzędu 2 zostanie ich 25. Wszystko się zgadza. Pozdrawiamy!
21.10.2021 - 10:25
![]() Katarzyna wrote:
Katarzyna wrote:
Ile włóczki drops delight potrzebuję, jeżeli chcę z niej zrobić tylko korpus swetra, a rękawy i wykończenia z innej ? Pozdrawiam
08.04.2020 - 15:30DROPS Design answered:
Witaj Kasiu! Potrzebujesz 450-450-550 g włóczki Delight (zależy od tego jaki rozmiar wykonujesz). Pozdrawiamy
12.04.2020 - 16:37
![]() DERAS Marie-Danièle wrote:
DERAS Marie-Danièle wrote:
Bonjour je viens de commencer ce magnifique modèle, , mon premier éventail 1 A est terminé, mais je ne vois aucune explication pour faire l ' éventail 2 A en le racordant a l 'éventail 1 A et comment faire pout les éventails situé juste au dessus marci de ce que vous pourrez me dire bonne journée marie danièle deras entail 2A
28.04.2019 - 15:42DROPS Design answered:
Bonjour Mme Deras, quand l'éventail 1A est terminé, on coupe le fil, on tricote ensuite les éventails 2A, 3A etc de la même façon (= séparément) puis on va tricoter le 2ème rang d'éventails en relevant cette fois les mailles le long des éventails du rang précédent = pour le 1B: 30 m le long du 1A, et 31 m le long du 2A - cf schéma en bas de page pour l'ordre des éventails. Bon tricot!
29.04.2019 - 10:23
![]() Ingrid Van Den Bosch wrote:
Ingrid Van Den Bosch wrote:
Bonjour, existe-t-il un diagramme des différents éventails, car je ne réussis pas avec les explications écrites ? Merci
13.01.2019 - 14:22DROPS Design answered:
Bonjour Mme Van Den Bosch, il n'y a pas de diagramme pour ce motif, suivez bien les explications pas à pas, rang après rang. Bon tricot!
14.01.2019 - 11:33
|
||||
Scallop#scallopsweater |
||||
 |
 |
|||
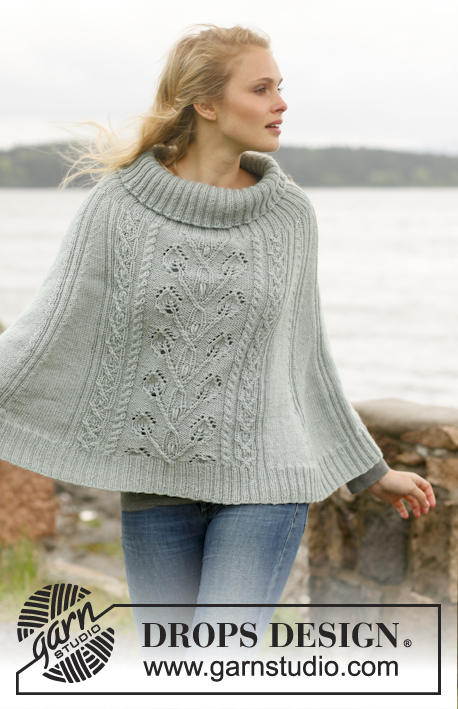
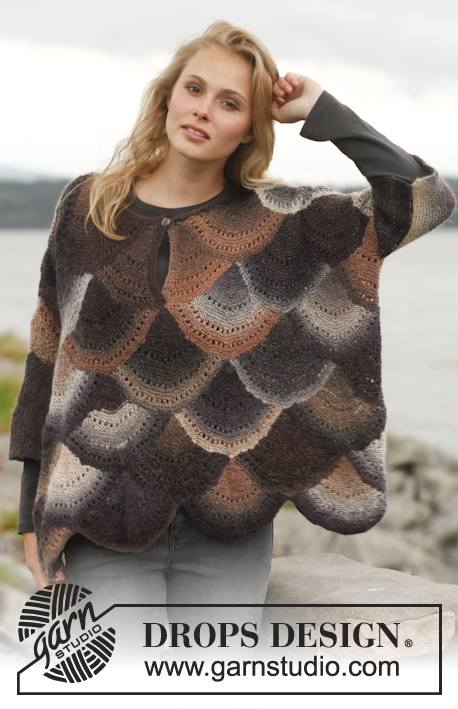
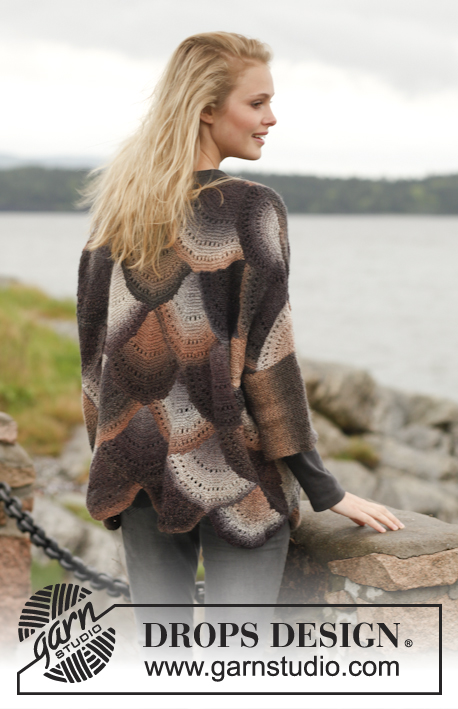
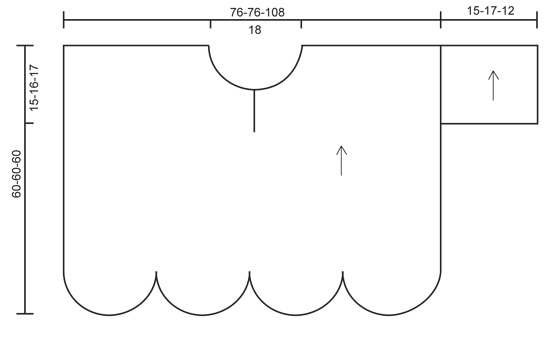
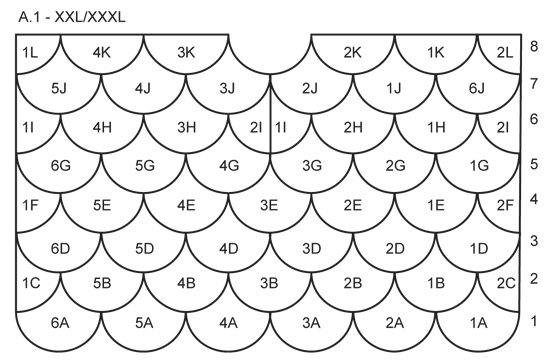
Knitted wide DROPS sweater in garter st with fan pattern in "Delight". Size: S - XXXL.
DROPS 149-42 |
||||
|
GARTER ST (back and forth on needle): K all rows. 1 ridge = K2 rows. KNITTING TIP: If you want the size larger/smaller or shorter/longer adjust by working more/fewer fans in width and more/fewer rows vertically but note that the placement of fans may affect the neckline. ---------------------------------------------------------- SWEATER: Sweater consists of several fans worked together along the way. Beg at the bottom of front piece in the order fans are numbered - see A.1 - (choose diagram for your size). Always pick up new sts from RS. FRONT PIECE: FAN 1A: Cast on 61 sts on circular needle size 4 mm / US 6 with Delight and work as follows: ROW 1 (= RS): K all sts. ROW 2 (= WS): K all sts. ROW 3: K 2 tog, K 9, * slip 1 st as if to K, K 2 tog, psso, K 6 *, repeat from *-* 5 times in total, K 3, K 2 tog = 49 sts. ROW 4-7: K all sts. ROW 8 (= WS): K 1, * 1 YO, P 2 tog *, repeat from *-* the entire row = 49 sts/YOs. ROW 9-10: K all sts. ROW 11: K 2 tog, K 7, * slip 1 st as if to K, K 2 tog, psso, K 4 *, repeat from *-* 5 times in total, K 3, K 2 tog = 37 sts. ROW 12-15: K all sts. ROW 16 (= WS): K 1, * 1 YO, P 2 tog *, repeat from *-* the entire row = 37 sts/YOs. ROW 17-18: K all sts. ROW 19: K 2 tog, K 5, * slip 1 st as if to K, K 2 tog, psso, K 7 *, repeat from *-* 2 times in total, slip 1 st as if to K, K 2 tog, psso, K 5, K 2 tog = 29 sts. ROW 20-26: K all sts. ROW 27: K 2 tog, K 3, * slip 1 st as if to K, K 2 tog, psso, K 5 *, repeat from *-* 2 times in total, slip 1 st as if to K, K 2 tog, psso, K 3, K 2 tog = 21 sts. ROW 28-29: K all sts. ROW 30 (= WS): K 1, * 1 YO, P 2 tog *, repeat from *-* the entire row = 21 sts/YOs. ROW 31-34: K all sts. ROW 35: K 2 tog, K 7, slip 1 st as if to K, K 2 tog, psso, K 7, K 2 tog = 17 sts. ROW 36-42: K all sts. ROW 43: K 2 tog, K 5, slip 1 st as if to K, K 2 tog, psso, K 5, K 2 tog = 13 sts. ROW 44-48: K all sts. ROW 49: K 2 tog, K 3, slip 1 st as if to K, K 2 tog, psso, K 3, K 2 tog = 9 sts. ROW 50-54: K all sts. ROW 55: K 2 tog, K 1, slip 1 st as if to K, K 2 tog, psso, K 1, K 2 tog = 5 sts. ROW 56-58: K all sts. ROW 59: K 1, slip 1 st as if to K, K 2 tog, psso, K 1 = 3 sts. ROW 60: K all sts. ROW 61: Slip 1 st as if to K, K 2 tog, psso = 1 st. Cut the yarn, pull it through st and fasten. Work FAN 2A, 3A and 4A etc. on 1st row the same way. 1st row with fans has now been worked. FAN 1B: Pick up 30 st along FAN 1A's left edge (seen from RS) – i.e. pick up 1 st in every ridge in garter st and approx. 1 st in every row with eyelet holes, and then pick up 31 sts along FAN 2A's right edge (seen from RS) = 61 sts on needle. Then work FAN 1A but from 2nd row (i.e. beg with K from WS). Work FAN 2B, 3B etc. on 2nd row the same way. HALF FAN IN LEFT SIDE OF PIECE (seen from RS when piece is flat) – FAN 1C: Pick up 31 sts along left edge (seen from RS) on last fan on first row. ROW 1 (= WS): K all sts. ROW 2 (= RS): K 2 tog, K 9, * slip 1 st as if to K, K 2 tog, psso, K 6 *, repeat from *-* 2 times in total, slip 1 st as if to K, K 1, psso = 25 sts. ROW 3-6: K all sts. ROW 7 (= WS): K 1, * 1 YO, P 2 tog *, repeat from *-* the entire row = 25 sts/YOs. ROW 8-9: K all sts. ROW 10: K 2 tog, K 7, * slip 1 st as if to K, K 2 tog, psso, K 4 *, repeat from *-* 2 times in total, slip 1 st as if to K, K 1, psso = 19 sts. ROW 11-14: K all sts. ROW 15 (= WS): K 1, * 1 YO, P 2 tog *, repeat from *-* the entire row = 19 sts/YOs. ROW 16-17: K all sts. ROW 18: K 2 tog, K 5, slip 1 st as if to K, K 2 tog, psso, K 7, slip 1 st as if to K, K 1, psso = 15 sts. ROW 19-25: K all sts. ROW 26: K 2 tog, K 3, slip 1 st as if to K, K 2 tog, psso, K 5, slip 1 st as if to K, K 1, psso = 11 sts. ROW 27-28: K all sts. ROW 29 (= WS): K 1, * 1 YO, P 2 tog *, repeat from *-* the entire row = 11 sts/YOs. ROW 30-33: K all sts. ROW 34: K 2 tog, K 7, slip 1 st as if to K, K 1, psso = 9 sts. ROW 35-41: K all sts. ROW 42: K 2 tog, K 5, slip 1 st as if to K, K 1, psso = 7 sts. ROW 43-47: K all sts. ROW 48: K 2 tog, K 3, slip 1 st as if to K, K 1, psso = 5 sts. ROW 49-53: K all sts. ROW 54: K 2 tog, K 1, slip 1 st as if to K, K 1, psso = 3 sts. ROW 55-59: K all sts. ROW 60: Slip 1 st as if to K, K 2 tog, psso = 1 st. Cut the yarn, pull it through st and fasten. HALF FAN IN RIGHT SIDE OF PIECE (seen from RS when piece is flat) – FAN 2C: Pick up 31 sts along FAN 1A's right edge (seen from RS). Then work as FAN 1C but reversed (i.e. on 2nd-10th-18th-26th-34th-42th-48th-54th and 60th row read sentence backwards but beg with K 2 tog and finish with slip 1 st as if to K, K 1, psso – E.g. work 2nd row as follows: K 2 tog, * K 6, slip 1 st as if to K, K 2 tog, psso *, repeat from *-* 2 times in total, K 9, slip 1 st as if to K, K 1, psso = 25 sts). 2nd row with fans has now been worked. FAN 1D: Pick up 30 st along FAN 2C's left edge (seen from RS) – i.e. pick up 1 st in every ridge in garter st and approx. 1 st in every row with eyelet holes, pick up 1 st in the tip at the top of FAN 1A and then pick up 30 sts along FAN 1B's right edge (seen from RS) = 61 sts on needle. Then work FAN 1A but from 2nd row (i.e. beg with K from WS). Work FAN 2D, 3D, 4D etc. the same way. 3rd row with fans has now been worked. Continue with FAN 1E, 2E, 3E etc. the same way. FAN 1F: Work as FAN 1C but pick up 30 sts along left edge on last fan on 3rd row, pick in addition up 1 st in the tip at the top on FAN 1C = 31 sts on needle. Then work as FAN 1C. FAN 2F: Pick up 1 st in the tip at the top on fan 2C, then pick up 30 sts along FAN 1D's right edge (seen from RS) = 31 sts on needle. Then work as FAN 2C. 4th row with fans has now been worked. Continue with FAN 1G, 2G, 3G etc. as before. 5th row with fans has now been worked. On next row (= 6th row) make a vent mid front, i.e. work 2 half fans instead of 1 whole fan. Work FAN 1H, 2H etc. the same way as FAN 1D with placements as shown in A.1, then work HALF FAN 1I the same way as 1F both in left side of piece and on right side of vent mid front. Work HALF FAN 2I in right side of piece and on left side of vent mid front. 6th row with fans has now been worked. On 7th row with fans work fans as on 3rd row. Then work a finishing edge with half circles that evens out the line at the top as follows: HALF CIRCLE BETWEEN EVERY FAN (FAN 1K, 2K etc): Pick up from RS, 61 sts along edge between 2 fans – i.e. pick up 1 st in every ridge and approx. 1 st in every row with eyelet holes + 1 st in the middle of two fans at the tip at the top on fan from row below. Then work as follows: ROW 1 (= WS): K all sts. ROW 2 (= RS): K all sts. ROW 3: K all sts. ROW 4: * K 3, K 2 tog *, repeat from *-* until 1 st remains and finish with K 1 = 49 sts. ROW 5: K 1, * 1 YO, P 2 tog *, repeat from *-* the entire row = 49 sts/YOs. ROW 6: K all sts. ROW 7 (= WS): K 1, * 1 YO, P 2 tog *, repeat from *-* the entire row = 49 sts/YOs. ROW 8-14: K all sts. ROW 15 (= WS): K 1, * 1 YO, P 2 tog *, repeat from *-* the entire row = 49 sts/YOs. ROW 16-17: K all sts. ROW 18: K 2 tog across until 1 st remains, finish with K 1 = 25 sts. ROW 19-25: K all sts. ROW 26: K 2 tog across until 1 st remains, finish with K 1 = 13 sts. ROW 27: K all sts. ROW 28: K 2 tog across until 1 st remains, finish with K 1 = 7 sts. ROW 29: K all sts. ROW 30: K 2 tog across until 1 st remains, finish with K 1 = 4 sts. ROW 31: K all sts. ROW 32: Slip 1 st as if to K, K 3 tog and psso = 1 st. Cut the yarn, pull it through st and fasten. QUARTER CIRCLE ON THE OUTER EDGE IN LEFT SIDE OF PIECE – FAN 1L: Pick up 30 sts along left edge (seen from RS) on last fan on 7th row, pick in addition up 1 st in the tip at the top on FAN 1I = 31 sts on needle. Then work as follows: ROW 1 (= WS): K all sts. ROW 2 (= RS): K all sts. ROW 3: K all sts. ROW 4: * K 3, K 2 tog *, repeat from *-* until 1 st remains and finish with K 1 = 25 sts. ROW 5: K 1, * 1 YO, P 2 tog *, repeat from *-* the entire row = 25 sts/YOs. ROW 6: K all sts. ROW 7 (= WS): K 1, * 1 YO, P 2 tog *, repeat from *-* the entire row = 25 sts/YOs. ROW 8-14: K all sts. ROW 15 (= WS): K 1, * 1 YO, P 2 tog *, repeat from *-* the entire row = 25 sts/YOs. ROW 16-17: K all sts. ROW 18: K 2 tog across until 1 st remains, finish with K 1 = 13 sts. ROW 19-25: K all sts. ROW 26: K 2 tog across until 1 st remains, finish with K 1 = 7 sts. ROW 27-29: K all sts. ROW 30: K 2 tog across until 1 st remains, finish with K 1 = 4 sts. ROW 31: K all sts. ROW 32: Slip 1 st as if to K, K 3 tog and psso = 1 st. Cut the yarn, pull it through st and fasten. QUARTER CIRCLE ON THE OUTER EDGE IN RIGHT SIDE OF PIECE – FAN 2L: Pick up 1 st in the tip at the top on FAN 2I, then pick up 30 sts along right side on first fan on 7th row = 31 sts on needle. Then work as FAN 1L. BACK PIECE: Work as front piece but without vent and neckline mid front. I.e. on 6th row work 1 whole fan mid back instead of 2 half and on 8th row work a half circle mid back so that edge at the top is straight. SLEEVE: Work piece from mid under sleeve and around the sleeve (see knitting direction on chart). Cast on 32-36-26 sts (includes 1 edge st in the side) on circular needle size 4 mm / US 6 with Delight. Work in garter st back and forth until piece measures 30-32-34 cm / 11¾"-12½"-13½", loosely bind off. Make another sleeve. ASSEMBLY: Sew the shoulder seams. Sew in sleeves inside 1 edge st and sew underarm and side seams in one inside 1 edge st. GARTER ST IN VENT MID FRONT: Cast on 4 sts on 1 double pointed needle size 3 mm / US 2.5 with Delight. K 1 row (= WS), turn piece. Beg at the bottom on left vent (when piece is worn), pick up in the outermost st in garter st in vent (with right needle), work first st on left needle, psso, K the rest of row, turn piece, K from WS over the 4 sts, turn piece, * pick up outermost st in garter st in vent (with right needle), work first st on left needle, psso, K the rest of row, turn piece, K from WS over the 4 sts, turn piece, repeat these 2 rows from *-* until 1 st has been picked up in approx. every st in garter st along the entire vent, then bind off. Repeat along right vent but beg at the top from RS. NECK EDGE: Pick up from RS approx. 100 to 110 sts around the neck (also over edges in garter st at the front) on circular needle size 3 mm / US 2.5 with Delight. K 1 row from WS. K 1 row from RS while AT THE SAME TIME dec for 1 buttonhole in the right side as follows: K tog second and third st from edge and make 1 YO. K 2 rows and then bind off with K from WS. |
||||
Diagram explanations |
||||
|
||||
|
||||

|
||||
|
||||
Have you finished this pattern?Tag your pictures with #dropspattern #scallopsweater or submit them to the #dropsfan gallery. Do you need help with this pattern?You'll find 17 tutorial videos, a Comments/Questions area and more by visiting the pattern on garnstudio.com. © 1982-2025 DROPS Design A/S. We reserve all rights. This document, including all its sub-sections, has copyrights. Read more about what you can do with our patterns at the bottom of each pattern on our site. |
||||


With over 40 years in knitting and crochet design, DROPS Design offers one of the most extensive collections of free patterns on the internet - translated to 17 languages. As of today we count 314 catalogs and 11822 patterns - 11812 of which are translated into English (US/in).
We work hard to bring you the best knitting and crochet have to offer, inspiration and advice as well as great quality yarns at incredible prices! Would you like to use our patterns for other than personal use? You can read what you are allowed to do in the Copyright text at the bottom of all our patterns. Happy crafting!
Post a comment to pattern DROPS 149-42
We would love to hear what you have to say about this pattern!
If you want to leave a question, please make sure you select the correct category in the form below, to speed up the answering process. Required fields are marked *.