
Looking for a yarn?


Comments / Questions (15)
![]() Vigdis Johnsen wrote:
Vigdis Johnsen wrote:
Er usikker vedr felletips….når d skal strikkes 2 m sm, skal d da tas 1 m fra hver vott og strikkes sammen ??
07.12.2024 - 12:57DROPS Design answered:
Hei Vigdis. Ja, og da blir masken med merket / den som settes på en hjelpepinne liggenes over de 2 maskene som strikkes sammen. Du får da en flott "linje" mellom vottene. mvh DROPS Design
10.12.2024 - 10:42
![]() Anne Norrie wrote:
Anne Norrie wrote:
Hva er den heklede lange tråden til for, på innsiden av vrangborden i fellesvotten?
30.10.2023 - 16:47DROPS Design answered:
Hei Anne. Jo, om du vil bruke fellesvotten som en muffe er det fint med en snor. Snoren legges rundt halsen og endene festes på innsiden av hver vrangbord på muffen. Så når man ikke har hendene inni muffen, henger den rundt halsen som et lang "smykke". Skal votten/muffen brukes som en kjærlighetsvott, trengs det ingen snor. mvh DROPS Design
31.10.2023 - 09:42
![]() Nina wrote:
Nina wrote:
Jeg forstår ikke hvor meget garn jeg skal bruge til opskriften. Jeg vil gerne lave 1 kærlighedsvante og 2 vanter, så er par kan bruge dem. Hvor meget garn skal jeg bruge til hver af disse dele?
03.10.2022 - 20:04DROPS Design answered:
Hei Nina. I denne oppskriften er det bare opplyst hvor mye garn det går til 1 stk. muffen eller et par kjærlighetsvott. Så om du kjøper 250 gram rød og 100 gram natur, skal du ikke få for lite garn. mvh DROPS Design
09.10.2022 - 13:14
![]() Monika wrote:
Monika wrote:
Zum Pärchenhandschuh noch mal: \r\nWie groß soll das \"Herz\" (in cm ohne die Bündchen gemessen) werden? \r\nBei mir sieht es riesengroß aus.... \r\nVielen Dank für Ihre Hilfe!
03.10.2022 - 15:00DROPS Design answered:
Liebe Monika, diese Maßen haben wir nicht und die Handschuhen haben wir leider nicht mehr, beachten Sie, daß Ihre Maschenprobe genau in der Höhe sowie in der Breite stimmt, so wird der Pärchenhandschuh genauso wie im Foto aussehen. Viel Spaß beim stricken!
03.10.2022 - 15:33
![]() Monika wrote:
Monika wrote:
Hallo mal wieder. :) Oben beim Muff steht "Fäustling siehe DROPS Extra 0-613" - Wo finde ich diese Anleitung? Danke.
29.09.2022 - 23:13DROPS Design answered:
Liebe Monika, die Anleitung für die Fäustlinge finden Sie jetzt auch hier bei dieser Anleitung - danke für den Hinweis. Viel Spaß beim stricken!
30.09.2022 - 09:55
![]() Christiane wrote:
Christiane wrote:
Hallo, Ich möchte die Pärchenhandschuhe gerne stricken und anschließend filzen, so dass kein Wind mehr durch die Maschenlöcher hindurch kommt. Da sich beim Filzen jedoch die Größe in Höhe und Breite unterschiedlich verändert, frage ich nach einer angepassten Anleitung, die zum Filzen geeignet ist. Koennen Sie eine solche bitte bereit stellen oder einen Tipp fuer die eigene Umrechnung mit Wolle Snow geben? Lieben Dank und MfG Christiane
17.02.2022 - 08:12DROPS Design answered:
Liebe Christiane, Hier finden Sie unsere Anleitungen für gefilzte Handschuhe, leider können wir aber nicht jede Anleitung nach jeder Anfrage anpassen. Vielleicht kann Ihnen Ihr DROPS Laden damit weiterhelfen? Viel Spaß beim stricken!
17.02.2022 - 10:39
![]() Trine wrote:
Trine wrote:
Jeg kan ikke finde dit link til opskriften på vanter. Jeg har trykket på linket, du har sendt til Birgitte. Her er det også kun muffedissen, som kommer frem. Mvh Trine
16.12.2021 - 14:23DROPS Design answered:
Hej Trine, Nu ligger opskriften på vanterne lige under kærlighedsvanten "Love Glove" altså i samme opskrift :)
21.12.2021 - 08:39
![]() Maria wrote:
Maria wrote:
Hej, då man ska sticka ihop muddarna hur ska man placera avmaskade maskan? Vart ska man sedan maska av och hur ska man ha stickorna det blir så stelt.
04.02.2021 - 08:04DROPS Design answered:
Hei Maria. Ta en titt på hjelpevideoen: Minska 3 m till 1. Da ser du hvordan du får fellingene til å bli pene når du skal strikke vottene sammen. mvh DROPS design
12.02.2021 - 11:26
![]() Guðrún María Guðmundsdóttir wrote:
Guðrún María Guðmundsdóttir wrote:
Það vantar úrtökuleiðbeiningar efst í uppskriftina eins og kemur fram t.d. í dönsku uppskriftinni
13.11.2020 - 12:37DROPS Design answered:
Blessuð Guðrún María. Takk fyrir það er búið að laga þetta.
26.11.2020 - 13:43
![]() RachelleLoyer wrote:
RachelleLoyer wrote:
Je n'arrive pas à comprendre la diminution, est ce que ça doit être fait en une seul fois, ou une diminution 2 end. Ens. Avant le marqueur et une diminution aille glissé après le marqueur pour réussir à obtenir 4 diminutions par rang. Merci de votre aide.
11.11.2018 - 18:16DROPS Design answered:
Bonjour Mme Loyer, vous diminuez 2 m à chaque marqueur comme expliqué sous DIMINUTIONS (voir aussi vidéo) - vous allez ainsi diminuer 1 m de chaque côté de chaque marqueur, soit 2 m à chaque marqueur et donc 4 m au total sur le tour. Bon tricot!
12.11.2018 - 10:27
|
|||||||
Love Glove#loveglovemittens |
|||||||
 |
 |
||||||
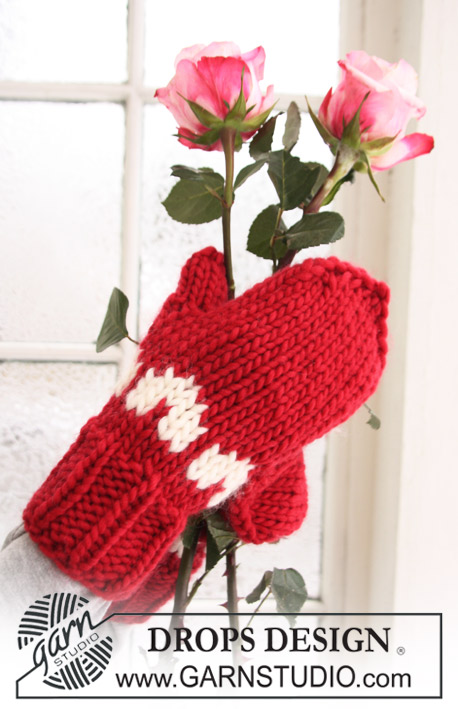
Knitted muff or mitten for women and men in DROPS Snow. Piece is worked with pattern with heart. Size S - L. Theme: Christmas
DROPS Extra 0-610 |
|||||||
|
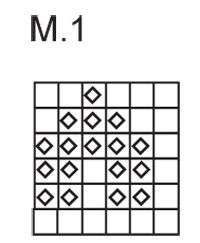
DECREASING TIP: Beg dec 1 st before marker each side: Slip 1 st on cable needle behind piece, slip 1 st as if to K, slip st from cable needle back on left needle, K2 tog, psso = 2 dec sts. Dec 1 time each side = 4 dec sts per round. PATTERN: See diagram M.1 (= 6 sts). -------------------------------------------------------- -------------------------------------------------------- MUFF/LOVE MITTEN: Size S worked in the round on double pointed needles size 6 and 7 mm/US 10 and 10½. Size M/L worked in the round on double pointed needles size 7 and 8 mm/US 10½ and 11. The cuffs are worked separately in the round, they are then put tog and the rest of the muff/mitten is knitted in 1 piece. Cast on 21 sts on double pointed needles size 6-7 mm/US 10-10½ with red. K 1 round and continue in rib K1/ P2. When piece measures 8 cm / 3⅛" K 1 round, AT THE SAME TIME inc 9 sts evenly (inc by making 1 YO between approx every 2nd and 3rd st = 30 sts. On next round K YO into back of loop to avoid a hole). Change to double pointed needles size 7-8 mm/US 10½-11. Now continue in stockinette st and M.1 on all sts - see above! After M.1 K 1 round with red, AT THE SAME TIME bind off the last st = 29 sts. Slip all sts on a stitch holder. Knit 1 more cuff in the same way. Slip both cuffs tog on double pointed needles size 7-8 mm/US 10½-11. Work 1 round stockinette st on all sts = 58 sts. REMEMBER THE GAUGE! Insert 2 markers in piece, 1 in st no 29 and 1 in the last st on round (= mid front and mid back). Continue in stockinette st, AT THE SAME TIME on next round dec each side of both markers – see DECREASING TIP! Repeat the dec on every other round a total of 5 times = 38 sts. Work 1 round without dec. Insert 2 new markers in piece, 1 in st no 10 and 1 in st no 29 from mid front (the sides). On next round dec each side of the new markers – see DECREASING TIP! Repeat the dec on every other round a total of 8 times = 6 sts left. Cut the thread, pull it through remaining sts and fasten. ASSEMBLY: Sew the bind off sts tog edge to edge at the top of rib. CROCHET STRING (for muff only): Crochet a 120 cm / 47" long ch-string with 2 threads red and hook size 10 mm / US15. Sew the string to the inside of each cuff towards the side. _____________________________________________________________________ A pair of DROPS mittens with pattern in "Snow". DROPS design: Pattern no EE-293 -------------------------------------------------------- Size: S-M/L Materials: DROPS SNOW from Garnstudio 100-100 g color no 08, red 50-50 g color no 01, off-white DROPS DOUBLE POINTED NEEDLES size 7 mm / US 10 ½ (for size S) or size 8 mm/US 11 (for size M/L) - or size needed to get 12 sts x 16 rows in stockinette st (size S) or 11 sts x 15 rows in stockinette st (size M/L) = 10 x 10 cm / 4" x 4". DROPS DOUBLE POINTED NEEDLES size 6 mm / US 10 (for size S) or size 7 mm/US 10½ (for size M/L) – for rib. DECREASING TIP: Beg dec 1 st before marker each side: Slip 1 st on cable needle behind piece, slip 1 st as if to K, slip st from cable needle back on left needle, K2 tog, psso = 2 dec sts. Dec 1 time each side = 4 dec sts per round. PATTERN: See diagram M.1 (= 6 sts). -------------------------------------------------------- -------------------------------------------------------- LEFT MITTEN: Size S worked in the round on double pointed needles size 6 and 7 mm/US 10 and 10½. Size M/L worked in the round on double pointed needles size 7 and 8 mm/US 10½ and 11. Cast on 21 sts on double pointed needles size 6-7 mm/US 10-10½ with red. K 1 round and continue in rib K1/P2. When piece measures 8 cm / 3⅛" K 1 round, AT THE SAME TIME inc 3 sts evenly (inc by making 1 YO after every 7th st. On next round K YO into back of loop to avoid a hole) = 24 sts. Change to double pointed needles size 7-8 mm/US 10½-11. REMEMBER THE GAUGE! Now work M.1 on all sts – see above! Insert a marker in st no 9. After 1 vertical repeat of M.1 continue in red stockinette st. When piece measures 14 cm / 5½" inc 1 st each side of st with marker for thumb gusset (inc by making 1 YO and work YO into back of loop on next round to avoid a hole). Repeat the inc on next round = 5 sts in thumb gusset. Work 2-3 rounds without inc. Now slip the 5 thumb-sts on a stitch holder. Cast on 1 new st behind sts on stitch holder = 24 sts. Insert 2 markers in piece, 1 in the first st and 1 in st no 13 (= the sides). Continue in stockinette st. When piece measures 24-26 cm / 9½"-10¼" dec each side of st with marker – see DECREASING TIP! Repeat the dec on every round a total of 5 times = 4 sts left on needle. Cut the thread, pull it through remaining sts and fasten. THUMB: Slip the 5 thumb-sts back on double pointed needles size 7-8 mm/US 10½-11. Pick up 5 sts behind these = 10 sts. Continue in stockinette st in the round until thumb measures 5-6 cm / 2"-2⅜". Insert 2 markers in thumb, 1 in the first st and 1 in st no 6 (= the sides). On next round dec each side of st with marker – see DECREASING TIP! Repeat the dec on next round = 2 sts left. Cut the thread, pull it through remaining sts and fasten. RIGHT MITTEN: Cast on and work like left mitten, but mirrored. Insert marker in st no 4 for inc for thumb gusset. |
|||||||
Diagram explanations |
|||||||
|
|||||||
|
|||||||
Have you finished this pattern?Tag your pictures with #dropspattern #loveglovemittens or submit them to the #dropsfan gallery. Do you need help with this pattern?You'll find 24 tutorial videos, a Comments/Questions area and more by visiting the pattern on garnstudio.com. © 1982-2025 DROPS Design A/S. We reserve all rights. This document, including all its sub-sections, has copyrights. Read more about what you can do with our patterns at the bottom of each pattern on our site. |
|||||||


With over 40 years in knitting and crochet design, DROPS Design offers one of the most extensive collections of free patterns on the internet - translated to 17 languages. As of today we count 314 catalogs and 11822 patterns - 11812 of which are translated into English (US/in).
We work hard to bring you the best knitting and crochet have to offer, inspiration and advice as well as great quality yarns at incredible prices! Would you like to use our patterns for other than personal use? You can read what you are allowed to do in the Copyright text at the bottom of all our patterns. Happy crafting!
Post a comment to pattern DROPS Extra 0-610
We would love to hear what you have to say about this pattern!
If you want to leave a question, please make sure you select the correct category in the form below, to speed up the answering process. Required fields are marked *.