
Looking for a yarn?


Comments / Questions (71)
![]() Mathilde wrote:
Mathilde wrote:
Hej. Jeg har svært ved at forstå afsnittet "DRAGT". Har i mulighed for at skære det mere ud i pap? Lige nu har jeg begge ben på rundpind men det skaber jo et hul mellem benene. Også når I skriver "strik frem og tilbage" hvorfor kan man ikke bare strikke rundt? I forhold til "Sæt 1 mærke 25 m ind fra hver side ( =48 m imellem mærkerne på rygstk)" så kan jeg ikke regne ud hvor de mærker skal være? Håber I kan hjælpe :-) Kh Mathilde
15.10.2023 - 01:24
![]() Maite Fabregat wrote:
Maite Fabregat wrote:
Hello! I have a question regarding the buttonholes. When following the instructions the hole seems to not be centered but moved to the left. Is that correct? To center it i would need to 2nd and 3rd from mid. Thanks for the help!
27.11.2022 - 08:31DROPS Design answered:
Dear Maite, yes, the holes are slightly moved to the left. You could move them towards the center if you want. Happy knitting!
27.11.2022 - 16:06
![]() Marissa Kanewske wrote:
Marissa Kanewske wrote:
Under the instructions for BACK PIECE, for the 1/3 MONTHS size: it says you will have 98 sts after all of the increases. Then you bind off 16 sts in the middle for the neck. Then it says "complete each shoulder/sleeve separately" with no other instructions on how to do so. 98 sts minus 16 sts should equal 82 sts but instead it says to bind off the remaining 41 sts. What happens to the other 41 sts?
16.11.2021 - 05:45DROPS Design answered:
Dear Mrs Kanewske, each shoulder/sleeve will be worked separately means that you will first work one set of 41 sts (one side/shoulder/sleeve) leaving the other set of 41 sts unworked; and after these 2 rows over the first 41 sts on one side, cast off, cut the yarn. Join it to the other set of 41 sts for the other shoulder/sleeve and work the same way. Happy knitting!
16.11.2021 - 09:15
![]() Anne Stecker wrote:
Anne Stecker wrote:
I used twice as much yarn as the pattern called for. I used 2 strands of Cascade 220. Gauge was good, sizzle was good. Anyone else use much more yarn?
12.10.2021 - 02:32
![]() Betty Wagner wrote:
Betty Wagner wrote:
It looks like a pretty pattern
20.08.2020 - 19:58
![]() Ivana wrote:
Ivana wrote:
Hi, I am looking for a crochet pattern for this amazing romper overal.... please, have you got anything similar for the crocheters???
04.06.2020 - 07:45DROPS Design answered:
Dear Ivana, you will find our crocheted overalls for babies here. Happy crocheting!
04.06.2020 - 09:09
![]() Diane Jackson wrote:
Diane Jackson wrote:
Hello, I am interested in knitting the pattern, My First Christmas by DROPS Design. I have a friend who is going to have a baby right before Christmas this year and I was wondering if the smallest size (1-3 mo) would be too large for a brand new baby. I looked at the bust measurement and it said 20 1/2" and I was wondering if that is the measurement for the garment or if that is the infant measurement? Thank you for any assistance you can provide. Kind regards, Diane
02.06.2020 - 00:44DROPS Design answered:
Dear Mrs Jackson, the measurements are the finished one when pieces is laying flat (read more here. This might help you to find out the matching size -or you can find more overall patterns here. Happy knitting!
02.06.2020 - 10:35
![]() Nicole Groß wrote:
Nicole Groß wrote:
Schönen guten Tag, ich habe eine Frage zu den Übergang von bein und Strampler! Da steht das die Beine auf eine rundstricknadel kommen damit man dann mit den Strampler anfangen kann. Die Frage ist jetzt werden die Beine in rund oder als hin und rückgestrickt? Und wenn sie in rund gestrickt werden kommen dann beide Beine auf einer Nadel? LG Nicole
12.08.2019 - 06:47DROPS Design answered:
Liebe Frau Groß, Strampler wird hin und zurück gestrickt, es wird bei der 1. Reihe 3 M angeschlagen, dann die Maschen der 1. Beine gestrickt, dann die Maschen der 2. Beine gestrickt, und schliesslich 3 M angeschlagen. Vile Spaß beim stricken!
12.08.2019 - 08:56
![]() Nancy Crosier wrote:
Nancy Crosier wrote:
Want to print off free knitted patterns do not find any place to be able to do it
20.07.2019 - 12:46DROPS Design answered:
Dear Nancy, you can easily print every our pattern for free whenever you like - see symbol of printer just under the header of pattern and tab with material. Happy knitting!
20.07.2019 - 17:38
![]() Anne wrote:
Anne wrote:
Hej, hvor er beskrivelsen på hvordan ærmerne strikkes? De er slet ikke nævnt i opskriften.
04.07.2018 - 17:31DROPS Design answered:
Hei Anne. Ermene strikkes som en del av forstykkene og bakstykket: det legges opp masker i sidene til ermer. God fornøyelse
06.07.2018 - 08:02
|
|
My First Christmas#myfirstchristmasonesie |
|
|
|
|
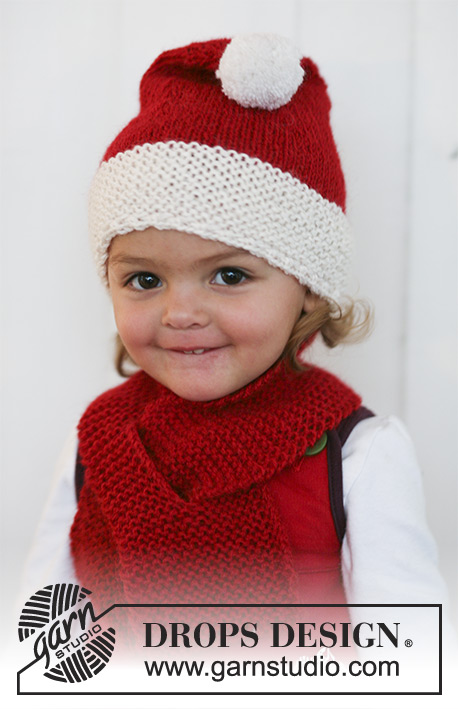
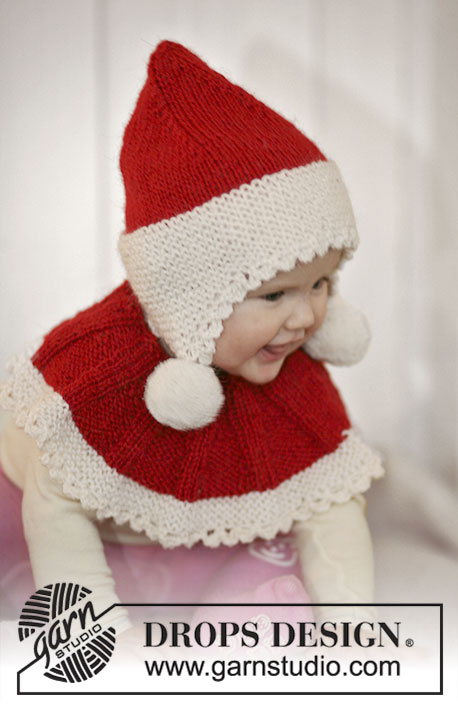
Santa onesie with hood for baby and children in 2 threads DROPS Alpaca
DROPS Baby 19-16 |
|
|
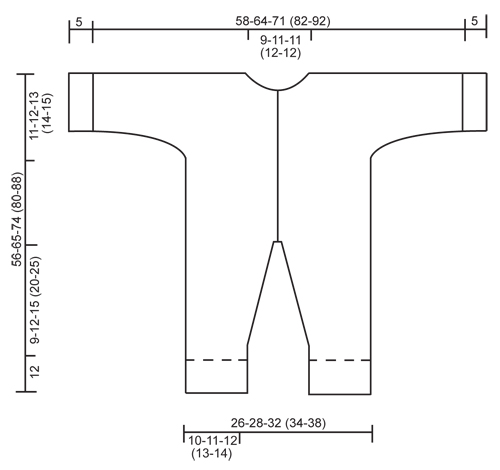
SEED ST: Row 1: * K1, P1 *, repeat from *-*. Row 2: K over P and P over K. Repeat row 2. GARTER ST (back and forth on needle): K all rows. BUTTONHOLES: Make buttonholes on right front band. 1 BUTTONHOLE = K tog 3rd and 4th st from mid front and make 1 YO. Make buttonholes when piece measures a total of: SIZE 1/3 MONTHS: 23, 30, 37, 44, 51 cm / 9", 11¾", 14½", 17¼", 20". SIZE 6/9 MONTHS: 28, 36, 44, 52, 60 cm / 11", 14¼", 17¼", 20½", 23⅝". SIZE 12/18 MONTHS: 31, 38, 46, 53, 61, 68 cm / 12¼", 15", 18", 21", 24", 26¾". SIZE 2 YEARS: 34, 42, 50, 58, 66, 74 cm / 13⅜", 16½", 19¾", 22¾", 26", 29⅛". SIZE 3/4 YEARS: 39, 48, 56, 65, 73, 82 cm / 15¼", 19", 22", 25½", 28¾", 32¼" ---------------------------------------------------------- ---------------------------------------------------------- LEG: Worked in the round on double pointed needles. LOOSELY cast on 34-36-40 (44-48) sts on double pointed needles size 4.5 mm / US 7 with 2 threads white. K 1 round and continue in SEED ST – see above. When piece measures 12 cm / 4¾" change to double pointed needles size 5 mm / US 8 and 2 threads red and continue in stockinette st. Insert a marker at beg of round = inside of leg. REMEMBER THE GAUGE! When piece measures 14 cm / 5½" inc 1 st each side of marker, and repeat the inc on every 2-2-3 (4-5) round a total of 7-8-9 (9-10) times = 48-52-58 (62-68) sts. When piece measures 21-24-27 (32-37) cm / 8¼"-9½"-10⅝" (12½"-14½") bind off 4 sts at the inside of leg (= 2 sts each side of marker) = 44-48-54 (58-64) sts. Put piece aside and knit the other leg in the same way. BODY: Slip both legs on the same circular needle size 5 mm / US 8 with the inside of legs towards each other = 88-96-108 (116-128) sts. Now continue back and forth on circular needle from mid front as follows (first row = RS): Cast on 3 new sts on needle, K all sts on row and cast on 3 new sts at the end of row = 94-102-114 (122-134) sts. Insert a marker 25-27-30 (32-35) sts in from each side (= 44-48-54 (58-64) sts between markers on back piece). Continue in stockinette st with 5 sts each side towards mid front in garter st (= front bands). AT THE SAME TIME when piece measures 23-28-31 (34-39) cm / 9"-11"-12¼" (13⅜"-15¼") make buttonholes on right front band – SEE ABOVE! When piece measures 45-53-61 (66-73) cm / 17¾"-21"-24" (26"-28¾") divide the piece by the 2 markers and complete front and back pieces separately. BACK PIECE: = 44-48-54 (58-64) sts. Continue in stockinette st, AT THE SAME TIME cast on new sts at the end of every row each side for sleeves: 3 sts 2-1-3 (1-2) times, 5 sts 1-2-1 (2-2) times, 7 sts 1-1-1 (2-2) times and then 9-10-12 (14-16) sts 1 time = 98-108-120 (140-156) sts on needle. When piece measures 55-64-73 (79-87) cm / 21⅝"-25¼"-28¾" (31"-34¼") bind off the middle 16-18-18 (20-20) sts for neck and complete each shoulder/sleeve separately. Work 2 rows stockinette st on the remaining 41-45-51 (60-68) sts and bind off LOOSELY. LEFT FRONT PIECE: = 25-27-30 (32-35) sts. Continue in stockinette st with the 5 front band sts in garter st as before, AT THE SAME TIME cast on new sts at the end of every row towards the side for sleeve as described for back piece = 52-57-63 (73-81) sts. When piece measures 52-61-69 (75-83) cm / 20½"-24"-27⅛" (29½"-32¾") bind off 5-6-6 (7-7) sts towards mid front for neck and bind off to shape the neckline at the beg of every row from mid front: 2 sts 2 times and 1 st 2 times = 41-45-51 (60-68) sts left on needle for shoulder/sleeve. Continue until piece measures 56-65-74 (80-88) cm / 22"-25½"-29⅛" (31½"-34⅝") and bind off LOOSELY. RIGHT FRONT PIECE: Like left front piece, but mirrored – remember buttonholes on front band. ASSEMBLY: Sew upper arm seams, edge to edge in outer loops of sts. Place right front band over left front band and sew tog at the bottom of body piece. Sew under arm seams, edge to edge in outer loops of sts. Sew on buttons. CUFF: Pick up 32-36-36 (40-40) sts on double pointed needles size 4.5 mm / US 7 with 2 threads white round sleeve edge. Work seed st in the round until cuff measures 5 cm / 2" and bind off LOOSELY with K over P and P over K. Repeat round the other sleeve edge. Fold sleeve and leg edges towards RS. HOOD: Pick up approx 40 to 50 sts from RS round neck on circular needle size 5 mm / US 8 with 2 threads red – beg after the 5 front band sts on right front piece and finish before the 5 front band sts on left front piece. Work stockinette st back and forth on needle, AT THE SAME TIME on second row (= from RS) inc evenly to 66-70-74 (78-82) sts. Continue until hood measures 21-23-25 (27-28) cm / 8¼"-9"-9¾" (10⅝"-11") and bind off. Sew hood tog at the top in outer loops of sts. Now work border round the opening of hood as follows: Pick up approx 81-89-97 (105-109) sts from RS along the opening of hood on needle size 4.5 mm / US 7 with 2 threads white. Work seed st back and forth on needle until border measures 6 cm / 2⅜" and bind off LOOSELY with K over P and P over K. Fold border double towards RS and sew border to the 5 garter sts each side. Make a white pompom with a diameter of approx 4-5 cm / 1½"-2" and attach to the top of hood. |
|
|
|
Have you finished this pattern?Tag your pictures with #dropspattern #myfirstchristmasonesie or submit them to the #dropsfan gallery. Do you need help with this pattern?You'll find 22 tutorial videos, a Comments/Questions area and more by visiting the pattern on garnstudio.com. © 1982-2025 DROPS Design A/S. We reserve all rights. This document, including all its sub-sections, has copyrights. Read more about what you can do with our patterns at the bottom of each pattern on our site. |


With over 40 years in knitting and crochet design, DROPS Design offers one of the most extensive collections of free patterns on the internet - translated to 17 languages. As of today we count 314 catalogs and 11822 patterns - 11812 of which are translated into English (US/in).
We work hard to bring you the best knitting and crochet have to offer, inspiration and advice as well as great quality yarns at incredible prices! Would you like to use our patterns for other than personal use? You can read what you are allowed to do in the Copyright text at the bottom of all our patterns. Happy crafting!
Post a comment to pattern DROPS Baby 19-16
We would love to hear what you have to say about this pattern!
If you want to leave a question, please make sure you select the correct category in the form below, to speed up the answering process. Required fields are marked *.