Comments / Questions (27)
![]() Susanna wrote:
Susanna wrote:
There is a mistake in the instructions for the side increases. It says to start them for the back at 5cm and for the sides at 4cm. I checked the original pattern as suggested and it has both starting at 4cm, which makes much more sense.
14.02.2023 - 03:17DROPS Design answered:
Dear Susanna, thanks for noticing, pattern will be edited. Happy knitting!
14.02.2023 - 14:13
![]() Ia wrote:
Ia wrote:
Hej När jag skall sticka axlarna/på bakstycket och minska maskor mot halsringningen skall jag då sticka en axel åt gången? Dvs sätta maskorna på den ena axeln på en hjälpsticka eller tråd under tiden jag stickar den andra. Hälsnngar Ia
06.01.2023 - 14:00DROPS Design answered:
Hej Ia, ja det stemmer, når du lukket de midterste masker af strikker du hver axel hver for sig :)
10.01.2023 - 11:56
![]() Sylvie PERRIER wrote:
Sylvie PERRIER wrote:
Bonsoir, Je ne comprends pas les diminutions des emmanchures. Faut-il diminuer après 5 mailles de chaque rang? Et si oui quel est l'intérêt et fait-il faire cela aussi sur les manches? Merci de votre réponse.
12.03.2018 - 22:18DROPS Design answered:
Bonjour Mme Perrier, on rabat pour les emmanchures 1 x 5 mailles de chaque côté (= pour le dos on rabat ces mailles en début de rang sur l'endroit + sur l'envers = des 2 côtés, pour les devants, ces mailles sont rabattues uniquement côté emmanchure). Pour les manches, on commence à rabattre pour l'arrondi des manches par 1 x 3 m de chaque côté. Bon tricot!
13.03.2018 - 09:39
![]() Moira wrote:
Moira wrote:
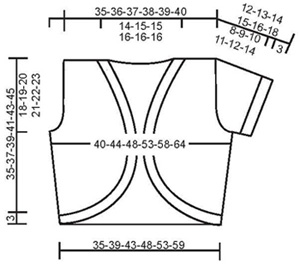
When choosing a size to knit, should we go by the measurements given in the drawn diagram or the written finished measurements? For example, if I read the diagram correctly it suggests that the largest size measures 64" at the bust, but the written instructions say that the same size is 50 3/8" at the bust. Thanks in advance!
18.04.2017 - 09:58DROPS Design answered:
Dear Moira, measurements in chart are taken flat from side to side in cm - you can convert into inches here. Happy knitting!
18.04.2017 - 11:38Catherine Edwards wrote:
When you reach the armhole are you suppose to make a 5 stitch garter stitch border on each side? In the main instructions the only mention of garter stitch is one stitch at each side for the seam but the Bind off (for the armhole) instructions make it sound like you're supposed to knit the first 5 stitches each side in garter stitch. Please clarify. Thanks.
26.03.2016 - 01:28DROPS Design answered:
Dear Mrs Edwards, there is only 1 st in garter st on each side, bind off for armhole should be done inside K5 (ie 5 sts in stocking st not in garter st, pattern will be updated asap). Thank you. Best regards!
29.03.2016 - 08:58
![]() Reinagel wrote:
Reinagel wrote:
Bonjour et merci pour la réponse. Modèle boléro 95-17 A quel usage doit servir le crocher drops n° 5 ?
20.04.2015 - 16:37DROPS Design answered:
Bonjour Mme Reinagel, effectivement, le crochet n'est pas utilisé et a été supprimé. Merci. Bon tricot!
20.04.2015 - 18:02
![]() Chris wrote:
Chris wrote:
Enjoying the pattern, but I'm wondering if I should bind off 10 stitches on the sleeve armhole before staring on the bind off 3, 2, 1 Is the pattern correct?
05.08.2014 - 23:49DROPS Design answered:
Dear Chris, pattern is correct that way, you start sleeve cap binding off 3 sts 1 time ... Happy knitting!
06.08.2014 - 10:24
![]() Alexandra Thurl wrote:
Alexandra Thurl wrote:
Hallo Liebes Drops-Team, vielen Dank für die schnelle und genaue Antwort!!
10.05.2012 - 18:00
![]() Alexandra Thurl wrote:
Alexandra Thurl wrote:
Was bedeutet bei Bolero Drops Nr.95-17 Maschen für die Rundung des Vorderteils "am Schluss jeder Reihe gegen die Mitte zunehmen"? Heißt das, dass man am Schluss der reihe oder in der Mitte zunehmen soll? Der Begriff "gegen die Mitte" ist etwas irreführend. Und wo soll ich genau den Markierungsfaden einziehen, gleich nach der 1.Masche oder in der Mitte vorne?
09.05.2012 - 12:51DROPS Design answered:
Man nimmt am Schluss der Reihe zu (also gegen die Mitte der Arbeit, nicht in der Mitte der Reihe). Der Markierungsfaden wird neben der 1. Masche eingezogen. Die Anleitung wurde zum besseren Verständnis etwas überarbeitet.
10.05.2012 - 07:57
![]() Dorothea Winter wrote:
Dorothea Winter wrote:
Ich kann nicht verstehen, wo bei Drops Nr. 95-17 Bolero Jacke die Maschen am Vorderteil für die Rundung zugenommen werden. Ist es in der Mitte oder am Ende der Reihe? Vielen Dank im voraus und herzliche Grüße Dorothea Winter
17.04.2012 - 21:16DROPS Design answered:
Am Schluss jeder R. gegen die Mitte.
18.04.2012 - 10:02
Gypsy Ballad |
|
|
|
|
DROPS Bolero cardigan in Alpaca.
DROPS 95-17 |
|
|
Knitting Gauge: 23 sts x 30 rows on needles size 3.5 mm / US 4 with Alpaca in stockinette sts = 10 x 10 cm / 4" x 4". Bind off (for the armhole): Bind off inside K5 sts. All bind off’s should be done from the right side. Bind off as follows after 5 sts: Slip 1 st. as if to knit, K1 psso. Bind off as follows before the 5 sts: K2 tog. Rib: *K2, P2*, repeat from *-*. Back piece: Cast on 82-92-100-112-124-138 sts (includes 1 seam sts each side – all seam sts are knitted in garter st throughout) on needles size 3.5 mm / US 4 with Alpaca. Work in stockinette sts with a seam st in garter st each side. When the piece measures 4 cm / 1½" inc. 1 st each side on every 2-2-2-2.5-2.5-2.5 cm / ¾"-¾"-¾"-⅞"-⅞"-⅞" a total of 6 times = 94-104-112-124-136-150 sts. When the piece measures 17-18-19-20-21-22 cm / 6¾"-7"-7½"-8"-8¼"-8¾" bind off each side for armhole: 5-7-8-10-13-17 sts 1 time. Continue to bind off 1 st for armhole on every 4th row – see bind off tips – 2-4-5-8-10-12 times = 80-82-86-88-90-92 sts. When the piece measures 33-35-37-39-41-43 cm / 13"-13¾"-14½"-15¼"-16⅛"-17" bind off the mid 28-30-30-32-32-32 sts for neck and work each side separately. Continue to bind off at each neck side on every other row 1 st 2 times = 24-24-26-26-27-28 sts left for shoulder. Bind off when the piece measures 35-37-39-41-43-45 cm / 13¾"-14½"-15¼"-16⅛"-17"-17¾". Left front: Cast on 22-22-25-26-28-30 sts (includes 1 seam st at the side) on needles size 3.5 mm / US 4 with Alpaca. Please read all of the next section before continuing! Insert a marker inside the outermost st mid front. Continue in stockinette sts – at the same time inc for the rounded edge mid front as follows: Cast on new sts on every other row (i.e. at the end of every row towards mid front) 3 sts 3-4-4-5-5-6 times, 2 sts 2-3-4-5-7-8 times and 1 st 9-9-8-8-8-8 times – after the last inc. insert a marker inside the outermost st mid front. Increases at side: At the same time when the piece measures 4 cm / 1½" inc. at the side as done for the back piece. After all inc. are complete there are 50-55-59-65-71-78 sts on needle. Neck shaping: When the piece measures 17-17-18-19-20-21 cm / 6¾"-6¾"-7"-7½"-8"-8¼" bind off for neck mid front. Bind off on every 4th row: 1 st 3-3-4-4-5-5 times, on every other row: 1 st 13-13-12-12-11-11 times and then on every 4th row again: 1 st 3-4-4-5-5-5 times. Armholes: At the same time when the piece measures 17-18-19-20-21-22 cm / 6¾"-7"-7½"-8"-8¼"-8¾" bind off for armhole as done for the back piece. When all dec for the neck and armhole are complete there are 24-24-26-26-27-28 sts left for shoulder. Bind off when the piece measures 35-37-39-41-43-45 cm / 13¾"-14½"-15¼"-16⅛"-17"-17¾". Right front: Work as left front, but reverse. Sleeve: Cast on 70-74-78-86-90-94 sts (includes 1 seam st each side) on 2 needles size 3.5 mm / US 4 with Vivaldi (use both needles to ensure the edge becomes stretchy). Remove 1 needle and work 4 rows stockinette sts (= rolling edge). Change to Alpaca and continue in Rib with a seam st in garter st each side. When the rib measures 3 cm / 1⅛" knit 2 rows of garter sts and then continue in stockinette sts. At the same time after the 2 rows of garter sts bind off for sleeve cap each side on every other row as follows: 3 sts 1 time, 2 sts 3-3-4-4-4-5 times and 1 st 4-4-6-6-7-8 times. Continue to bind off 2 sts each side until the piece measures 11-12-13-14-15-17 cm / 4⅜"-4¾"-5⅛"-5½"-6"-6¾". Then bind off each side 3 sts 1 time. Bind off the remaining sts when the piece measures 12-13-14-15-16-18 cm / 4¾"-5⅛"-5½"-6"-6¼"-7". Assembly: Sew the shoulders. Sew in the sleeves and then sew the sides and the sleeve together. Rib: pick up approx 344-368-384-416-440-464 sts (divisible by 4) along the whole edge on circular needles size 3.5 mm / US 4 with Alpaca (begin mid back) – Note: Make sure to pick up enough sts (28-28-30-30-32-32 sts) between the markers on both front pieces so that the rib doesn't become too tight. Work rounds as follows: P 1 round, K 1 round and continue in rib. When the rib measures 3 cm / 1⅛" change to Vivaldi. Work 4 rounds of stockinette sts and bind off loosely. To ensure the edge doesn't become too tight make a yo after every 8th st while binding off (knit and bind off the yo's as sts). The cardigan may be held together with a pin, a kilt pin or a brooch. |
|

|
|
Have you finished this pattern?Tag your pictures with #dropspattern or submit them to the #dropsfan gallery. Do you need help with this pattern?You'll find 21 tutorial videos, a Comments/Questions area and more by visiting the pattern on garnstudio.com. © 1982-2025 DROPS Design A/S. We reserve all rights. This document, including all its sub-sections, has copyrights. Read more about what you can do with our patterns at the bottom of each pattern on our site. |


Post a comment to pattern DROPS 95-17
We would love to hear what you have to say about this pattern!
If you want to leave a question, please make sure you select the correct category in the form below, to speed up the answering process. Required fields are marked *.