
Popular categories
Looking for a yarn?


|
|||||||||||||||||||
DROPS 95-18 |
|||||||||||||||||||
|
|
|||||||||||||||||||
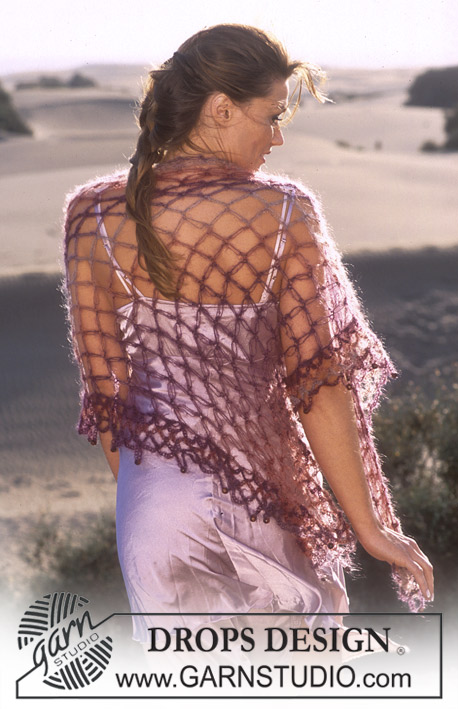
DROPS Long jacket with belt in Muskat and Vivaldi
DROPS 95-18 |
|||||||||||||||||||
|
Knitting gauge: 14 sts x 17 rows with 1 thread of Muskat and 1 thread of Vivaldi on needle size 7 mm = US 10,75 = 10 x 10 cm = 4" x 4" Garter stitch: Knit all rows Pattern: See diagram M.1 and M.2. Diagram is seen from the right side. Decreasing tips (applies to neckline): Decrease within all garter sts on front piece from the right side. Dec as follows after garter sts: slip 1 st as if to knit, K1, psso. Dec as follows before garter sts: K2 tog. Measuring tips: The front bands will be slightly tighter than the jacket because of the garter sts. Therefore make all measurements mid front when front bands are slightly stretched. Back piece: Cast on 73-79-87-93-101 sts (inclusive of 1 edge st each side, edge sts are knitted in garter st throughout) using both needles size 7 mm = US 10,75 with 1 thread Muskat and 1 thread Vivaldi (= double thread). Remove 1 needle and knit 4 rows garter st (1st row = right side). Now knit as follows from the right side: 1 edge st, 0-3-0-3-0 stockinette sts, M.1A (= 3 sts), M.1B over the next 56-56-70-70-84 sts, M1.C (=12 sts), 0-3-0-3-0 stockinette sts and 1 edge st. Continue like this until you have knitted 1 repeat of M.1. Now continue in stockinette st, at the same time adjusting number of sts to 74-80-88-94-102 on first row. When piece measures 17 cm = 6¾", dec 1 st each side on every 9-9-9-10-10 cm = 3½"-3½"-3½"-4"-4" a total of 5 times = 64-70-78-84-92 sts. When piece measures 63-64-65-66-67 cm = 24¾"-25¼"-25½"-26"-26⅜" dec for armhole each side on every other row as follows: 3 sts 1-1-1-2-2 times, 2 sts 1-2-3-3-4 times and 1 st 2-2-3-2-3 = 50-52-54-56-58 sts. When piece measures 80-82-84-86-88 cm = 31½"-32¼"-33"-33⅞"-34⅝" bind off the middle 14-14-14-16-16 sts for neck. Dec 1 st at neckline on next row = 17-18-19-19-20 sts left on each shoulder. Bind off when piece measures 82-84-86-88-90 cm = 32¼"-33"-33⅞"-34⅝"-35½". Right Front: Cast on 43-46-49-57-57 sts (inclusive of 1 edge st at side and 12 front band sts towards middle front) using both needles size 7 mm = US 10,75 with 1 thread Muskat and 1 thread Vivaldi (= double thread). Remove 1 needle and knit 4 rows garter st (1st row = right side). Now knit as follows from the right side: 12 front band sts in garter st, M.1A (= 3 sts), M.1B over the next 14-14-24-28-28 sts, M1.C (=12 sts), 0-3-6-0-0 stockinette sts and 1 edge st. Continue like this until you have knitted 1 repeat of M.1 (front band in garter st until finished measurements). Now knit next row as follows from the right side: 12 front band sts, 1 stockinette st, M.1D (= 3 sts), and stockinette st over the remaining 15-18-21-29-29 sts. Continue in pattern like this, at the same time adjusting number of sts on 2nd row after M.1 to 45-48-52-55-59 (do not dec/inc over the outermost 28 sts towards mid front). Read all of the following section before knitting it! Decreases at side: When piece measures 17 cm = 6¾" dec at side as described for back piece = 40-43-47-50-54 sts. Collar: when piece measures 56-57-59-60-62 cm = 22"-22½"-23¼"-23⅝"-24⅜" inc for collar within the outermost garter st towards mid front. Inc 1 st on every other row a total of 15 times by making a yo and knitting yo into back of st on next row. Neckline: At the same time when piece measures 58-59-61-62-64 cm = 22¾"-23¼"-24"-24⅜"-25¼" dec 1 st for neck – see Decreasing tips above – on every 4th row a total of 8-8-8-9-9 times. Armhole: At the same time when piece measures 63-64-65-66-67 cm = 24¾"-25¼"-25½"-26"-26⅜" dec for armhole as described for back piece – at the same time finish M.1 (adjust after a full repeat) and continue in stockinette st. Front band/collar: At the same time after M.1 increase the garter st part of the front band/collar by knitting an additional st in garter towards the side on every 4th row a total of 6-6-6-6-7 times. NB! Do not increase but replace a stockinette st with a garter st. After all increases and decreases have been made for armhole and neckline there are 40-41-42-42-43 sts on needle (i.e. 33-33-33-33-34 garter sts and 7-8-9-9-9 stockinette sts). When piece measures 82-84-86-88-90 cm = 32¼"-33"-33⅞"-34⅝"-35½" bind off the outermost 17-18-19-19-20 sts for shoulder = 23 garter sts left on needle. Collar: Continue in garter st over the remaining 23 sts as follows: *2 rows garter st over all sts, 2 rows garter st over only the 15 sts towards mid front*, repeat from *-* until collar measures 5.5-5.5-5.5-6.5-6.5 cm = 2⅛"-2⅛"-2⅛"-2½"-2½" on the inner side (it will measures approx 11-11-11-13-13 cm = 4⅜"-4⅜"-4⅜"-5⅛"-5⅛" on the outer side) Left front piece: As right front piece, but mirrored. Sleeve: Loosely cast on 35-35-37-39-41 sts using both needles size 7 mm = US 10,75 with 1 thread Muskat and 1 thread Vivaldi (= double thread). Remove 1 needle and knit 4 rows garter st (1st row = right side). Now knit as follows from the right side: 10-10-11-12-13 sts in stockinette st, M.2 (= 15 sts) and 10-10-11-12-13 sts in stockinette st. Continue in pattern like this until you reach sleeve cap. Now discontinue M.2 – adjust after 1 full repeat of M.2 but do not knit the last row in pattern – and finish the piece in stockinette st. Increases: At the same time, when sleeve measures 15 cm = 6", inc 1 st each side on every 5.-3.5-3.5-3.-2.5 cm = 2"-1¼"-1¼"-1⅛"-1" a total of 7-9-9-10-11 times = 49-53-55-59-63 sts – knit the new sts in stockinette st. Sleeve cap: when piece measures 48-47-46-44-43 cm = 19"-18½"-18"-17¼"-17" bind off for sleeve cap each side on every other row as follows: 3 sts 1 time, 2 sts 2-2-2-3-3 times, 1 st 1-2-3-4-5 times, and then 2 sts each side until piece measures 56 cm = 22", now dec 3 sts each side and bind off remaining sts when sleeve measures 56-57-57-57-57 cm = 22"-22½"-22½"-22½"-22½". Assembly: Sew shoulder seams. Sew together collar mid back and sew collar to back piece. Set in sleeves. Sew sleeve and side seams within 1 edge st. Crochet border: Use crochet hook size 8 mm = US L/11 and Snow and crochet as follows: 1 sc in first st, *1 ch, skip approx 2 cm = ¾", 1 sc in next st*, repeat from *-*. NB! The border should be even and not wavy. Belt: Cast on 10 sts using needle size 7 mm = US 10,75 with 1 thread Muskat and 1 thread Vivaldi and knit as follows from the right side: 2 garter st, K2, P2, K2, 2 garter st. Continue like this and bind off when belt measures approx 120-150 cm = 47¼"-59". |
|||||||||||||||||||
Diagram explanations |
|||||||||||||||||||
|
|||||||||||||||||||

|
|||||||||||||||||||
|
Have you made this or any other of our designs? Tag your pictures in social media with #dropsdesign so we can see them! Do you need help with this pattern?You'll find tutorial videos, a Comments/Questions area and more by visiting the pattern on garnstudio.com. © 1982-2024 DROPS Design A/S. We reserve all rights. This document, including all its sub-sections, has copyrights. Read more about what you can do with our patterns at the bottom of each pattern on our site. |
|||||||||||||||||||


With over 40 years in knitting and crochet design, DROPS Design offers one of the most extensive collections of free patterns on the internet - translated to 17 languages. As of today we count 304 catalogs and 11422 patterns - 11417 of which are translated into English (US/in).
We work hard to bring you the best knitting and crochet have to offer, inspiration and advice as well as great quality yarns at incredible prices! Would you like to use our patterns for other than personal use? You can read what you are allowed to do in the Copyright text at the bottom of all our patterns. Happy crafting!
Comments / Questions (11)
Buenas tardes, mi duda es si en el delantero,después de la fila LD q viene especificada, cómo debo seguir,? En las indicaciones dice q seguir de la misma manera,a qué se refiere exactamente?? Sigo con el patrón M1???muchas gracias,un saludo
06.10.2022 - 17:58DROPS Design answered:
Hola Isa, sí, tienes que seguir con el patrón M.1, siguiendo la división de puntos especificado en la primera fila (donde se reparte M.1 y punto jersey).
07.10.2022 - 00:17Nice fall lool
30.07.2019 - 06:58Rhonda wrote:
Is there a size chart for this pattern?
14.12.2015 - 16:08DROPS Design answered:
Dear Rhonda, you will find a measurement chart at the bottom of the pattern, compare the measurement with a similar garment you have and like the size to find out the matching size. Read more about this here. Happy knitting!
15.12.2015 - 08:40Kuvassa näyttää, että neule on tehty langasta joka vaihtaa väriä matkalla. Vivaldi-langoista ei kuitenkaan löydy sellaista lankaa. Mitä lankaa mallissa on käytetty ja mistä sitä saa. Tahtoisin ihan justiinsa tuollaisen...
24.09.2015 - 15:27DROPS Design answered:
Neuleeseen on käytetty Vivaldi Special lankaa, joka valitettavasti ei enää kuulu valikoimaan. Voit yrittää etsiä kyseistä lankaa esim. huutonetistä.
12.10.2015 - 16:10Merci pour ces renseignements. Si j'ai bien compris dans le dos il n'y a qu'une bande de dessin dans le bas et le reste est tout en jersey.
19.08.2015 - 11:19DROPS Design answered:
Bonjour Mme Biou, c'est exact. Bon tricot!
19.08.2015 - 14:18Je pense qu'il y a des erreurs dans les explications de ce modèle de veste 95-18. Pour le dos je ne vois pas les diminutions sur les côtés. On dit de continuer en jersey endroit, ou et à quel moment? Il faut rajouter une maille à quel moment ? Le diagramme M1E, je ne vois pas dans les explications où on l'utilise. Merci de me répondre avec de meilleur explication
18.08.2015 - 16:33DROPS Design answered:
Bonjour Mme Biou, effectivement, différentes informations manquaient, après vérification, tout devrait être correct maintenant. Merci, bon tricot!
18.08.2015 - 18:57wrote:
dejligt med trøjer der ikke er så korte
11.01.2006 - 16:50Jättesnygg. Fint mönster också.
04.01.2006 - 16:06wrote:
SKØNT :D
22.12.2005 - 18:45Mailinglisten wrote:
mmmysig!
13.12.2005 - 09:57