
Looking for a yarn?


Comments / Questions (19)
![]() Susi wrote:
Susi wrote:
Frage noch einmal nach, siehe meinen Kommentar unten. Bin sicher, daß hier die Größenangaben verschoben sind. Größe L ist eigentlich M, dann stimmen die Maße. Sonst ist es viel zu breit. Bitte nochmal überprüfen, das Shirt beginnt mit XS und nicht mit S, daher könnte es eine Verschiebung der Größen gegeben haben.
01.07.2025 - 12:31DROPS Design answered:
Liebe Susi, die Maßnahmen stimmen hier, der Pullover ist nur etwas "oversized", aber wie immer können Sie Ihre Größe direkt aus der Maßskizze prüfen und so wählen - hier lesen Sie mehr. Viel Spaß beim Stricken!
01.07.2025 - 13:32
![]() Anne wrote:
Anne wrote:
Hei! Ang ERMER: «Strikk glattstrikk og striper (…) til ermet måler 11-10-9-7-7-6 cm fra delingen»; skal det være motsatt, dvs strikk til 6-7-7-9-10-11 cm fra delingen (under ermet)? Jeg strikker str XS og tenker ermet blir for langt om det strikkes 11 cm; 6 cm virker riktigere?
03.06.2025 - 09:22DROPS Design answered:
Hei Anne. Nei, det er riktig slik det står. Men ønsker du ermet kortere kan du fint stoppe etter ønsket mål. Og det som er det fine med å strikke overfra og ned, du kan prøve underveis og få akkurrat den lengden du ønsker :) mvh DROPS Design
10.06.2025 - 10:35
![]() Carmen Martínez wrote:
Carmen Martínez wrote:
Gràcies x patrons.
02.06.2025 - 07:37
![]() Carina wrote:
Carina wrote:
Guten Abend! Ich komme mit der Schulter nicht zurecht. Es sollen 20 Maschen aus der Schräge aufgenommen werden, ich habe aber nur 10 Maschen. Aber insgesamt die 82 Maschen,die ich haben soll. Viele Grüße
18.05.2025 - 20:19DROPS Design answered:
Liebe Carina, beim Rückenteil haben Sie 20 Reihen gestrickt (bis Sie 82 Maschen bekommen), dann wird man 1 Masche in jeder dieser 20 Reihe auffassen. Schauen Sie mal dieses Video oder diese Lektion, hier zeigen wir, wie man Vorderteile für solche Modellen strickt. Viel Spaß beim Stricken!
19.05.2025 - 08:46
![]() Anneli Aronsson wrote:
Anneli Aronsson wrote:
Hej! Jag undrar om jag kan få mönstret i pappersform, hemskickat? Jag har ingen skrivare hemma, och vill gärna sticka denna fina topp! Hälsingar Anneli Aronsson Södra Läget 110 13768 Jordbro
30.04.2025 - 11:15DROPS Design answered:
Hej Anneli, vi kan inte skicka mönster! Biblioteket kan skriva ut och butiken där du köper DROPS Garn kan också hjälpa dig :)
30.04.2025 - 11:22
![]() Katriina wrote:
Katriina wrote:
Hei! Millä laskutavalla näihin lukumääriin päästään: Kummassakin hihassa on yhteensä 13-14-16-17-18-19 lisäyskerrosta? Itselläni on puikoilla koko xs ja lisäyskerroksia tarvitaan huomattavasti enemmän kuin 13 oikeaan kokonaissilmukkamäärään pääsemiseksi.
19.04.2025 - 10:45DROPS Design answered:
Hei, teemme korjauksen tähän ohjeeseen. Työhön lisätään aluksi silmukoita vain hihojen kohdalla, myöhemmin lisätään silmukoita myös etukappaleen ja takakappaleen kohdalla. Kun yhdistät työn suljetuksi neuleeksi, työssä on 208 silmukkaa. Tee hihojen lisäykset (= lisää 4 silmukkaa) 5 kertaa = 228 silmukkaa. Tee sitten lisäykset hihoissa ja etukappaleessa/takakappaleessa (= lisää 8 silmukkaa) 11 kertaa (työhön lisätään yhteensä 88 silmukkaa). Nyt työssä on 316 silmukkaa. Kummassakin hihassa on nyt 18 lisäyskerrosta.
24.04.2025 - 12:40
![]() Susi wrote:
Susi wrote:
Bin sicher, daß hier die Größenangaben verschoben sind. Größe L ist eigentlich M, dann stimmen die Maße. Sonst ist es viel zu breit. Bitte nochmal überprüfen, das Shirt beginnt mit XS und nicht mit S, daher könnte es eine Verschiebung der Größen gegeben haben.
16.04.2025 - 09:55
![]() Leticia Antonio wrote:
Leticia Antonio wrote:
Hi, do i start changing the colour with the last 2 stitches just before the left sleeve? and then it says "to make it as invisible as possible, the beginning of the round is moved", is this because of the increase on both sides of the 2 stitches? and starting the colour change is always from the last 2 stitches before the left sleeve? thanks in advance.
12.04.2025 - 10:26DROPS Design answered:
Dear Leticia, you will start the stripes as indicated in the text, by moving the start of the round to 2 stitches before the left sleeve. This is not due to the increases, only to ensure that the colour change is not too noticeable, because the start of the round will be in a less visible part of the garment. The colour change will now always be in this new beginning of the round (that is, you only displaced the beginning of the round the very first time; from now on you will change colours for the stripes right here). Happy knitting!
13.04.2025 - 23:43
![]() Anna wrote:
Anna wrote:
Dzien dobry, Mam pytanie, ponieważ zamiast 24 oczek na rękaw wyszło mi 28 przez co w rezultacie mam w rozmiarze L zamiast 174 oczka 182 ,czy mogę dalej pracowac z taką ilością? Czy coś powinnam zmienić?
07.04.2025 - 11:54DROPS Design answered:
Pani Aniu, liczba oczek na przód i tył się zgadza, a na rękawy jest większa. Gdzieś tam zostało dodane za dużo oczek. Można je zamknąć, równomiernie przerabiając 2 oczka razem na prawo 4 razy na każdym rękawie. Druga opcja: zdjąć oczka na żyłką pomocniczą/nitkę i przymierzyć, może taki rękaw będzie ok. 3-cia opcja - zawsze można spruć kawałek, ale nie wiem czy to będzie konieczne. Powodzenia!
07.04.2025 - 13:08
![]() Michaela wrote:
Michaela wrote:
Ist es möglich die Schnitte genauer zu beschriften? Ich vermisse die Höhe der Schulterschrägung und die Tiefe des Halsausschnittes.
07.04.2025 - 10:01DROPS Design answered:
Liebe Michaela, weitere Angaben haben wir nicht - beide Schulter beim Vorderteil wird nach 9 cm + 4 Reihen zusammengestrickt - einige cm kommen noch zum Halsausschnitt für Rückenteil - Mehr können Sie unter Tab Video/Lektion schauen. Sollte aber Ihre Maschenprobe stimmen, dann bekommen Sie ein ähnliches Ergebnis wie im Foto. Viel Spaß beim Stricken!
07.04.2025 - 14:53
|
|
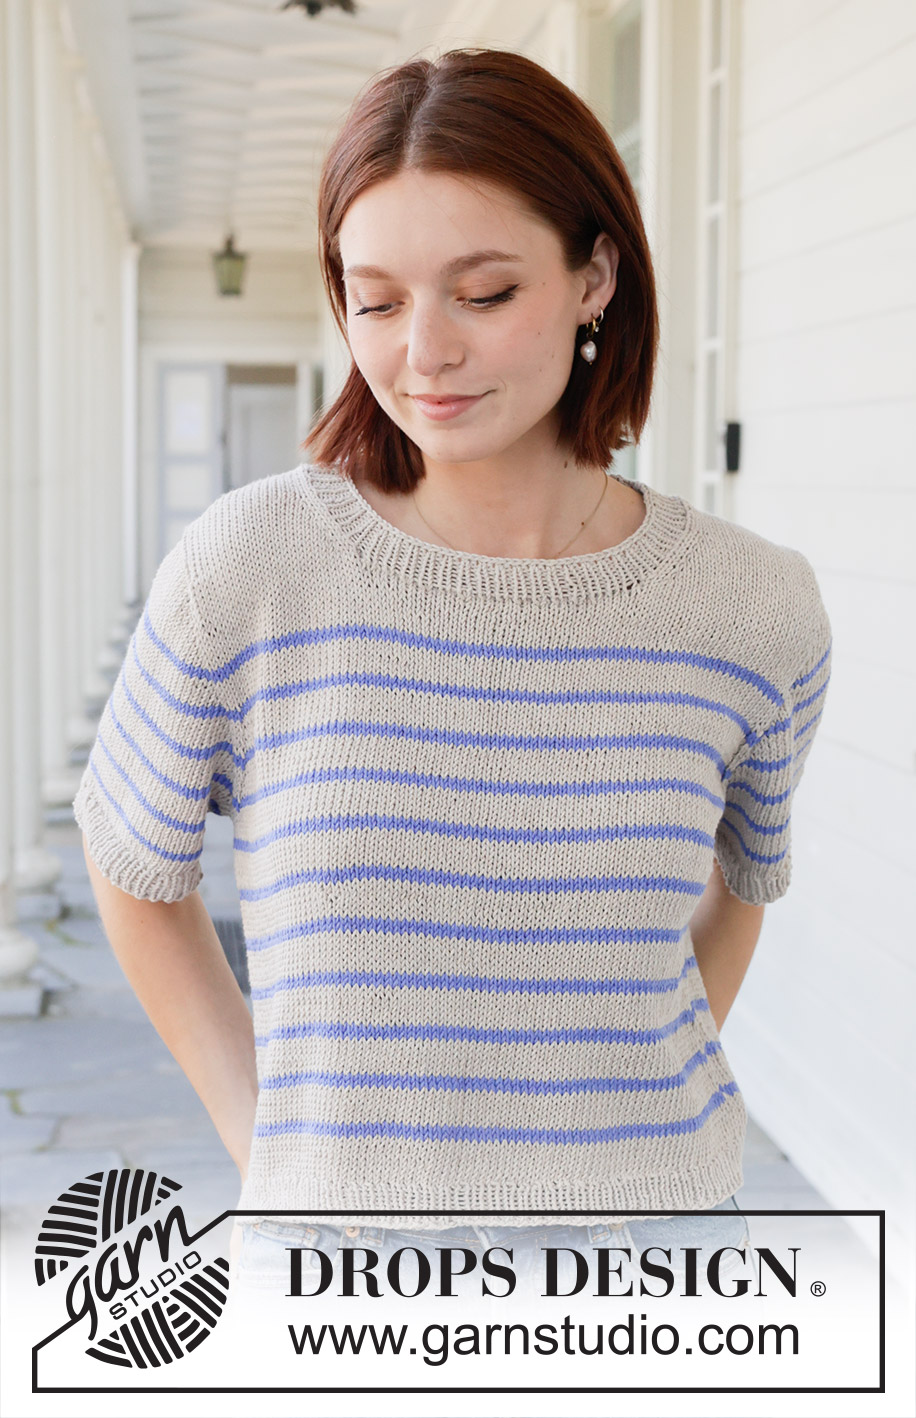
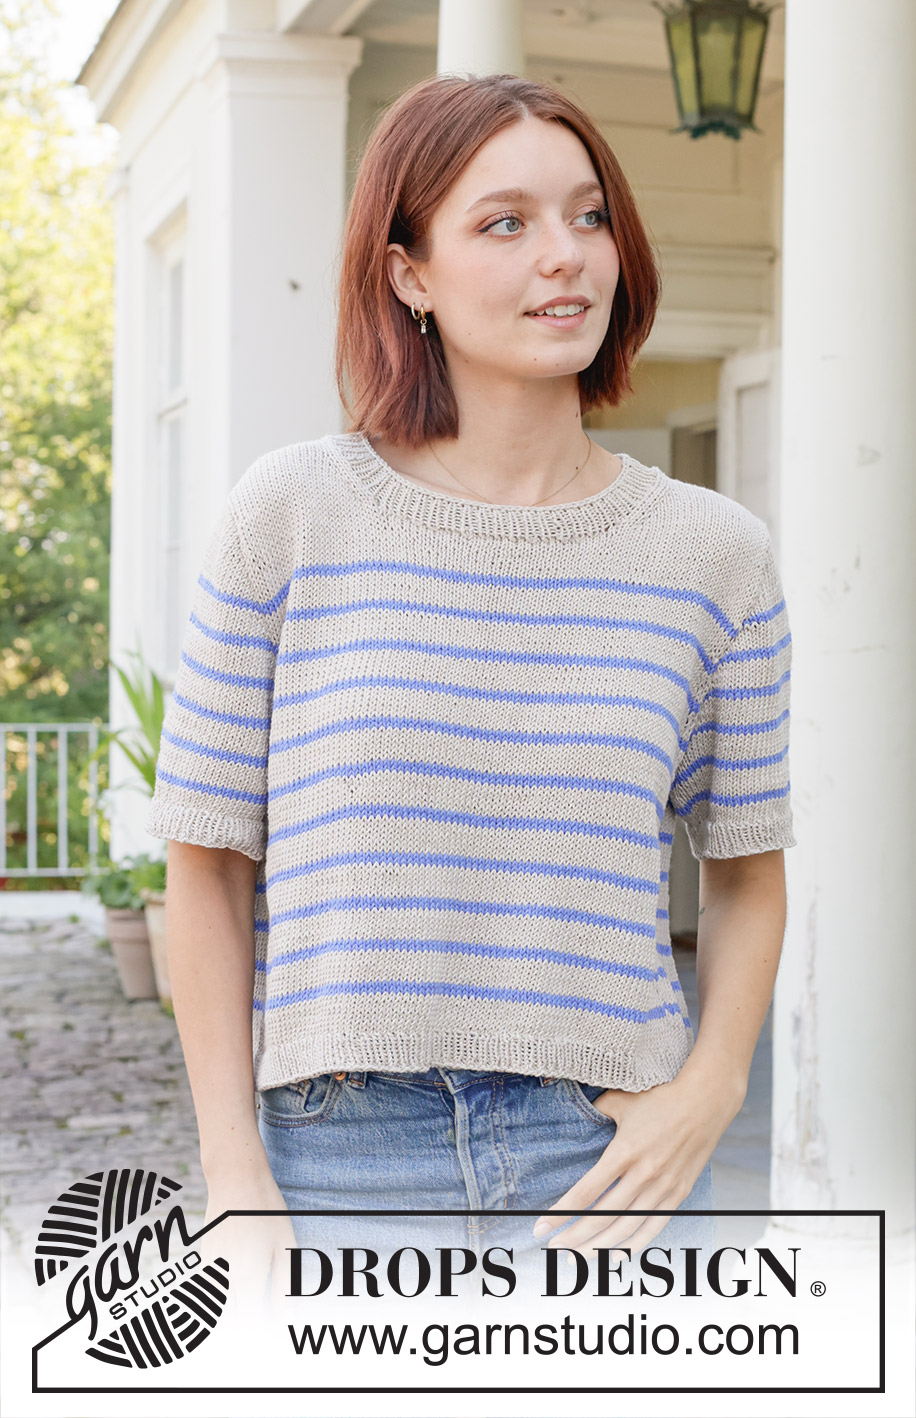
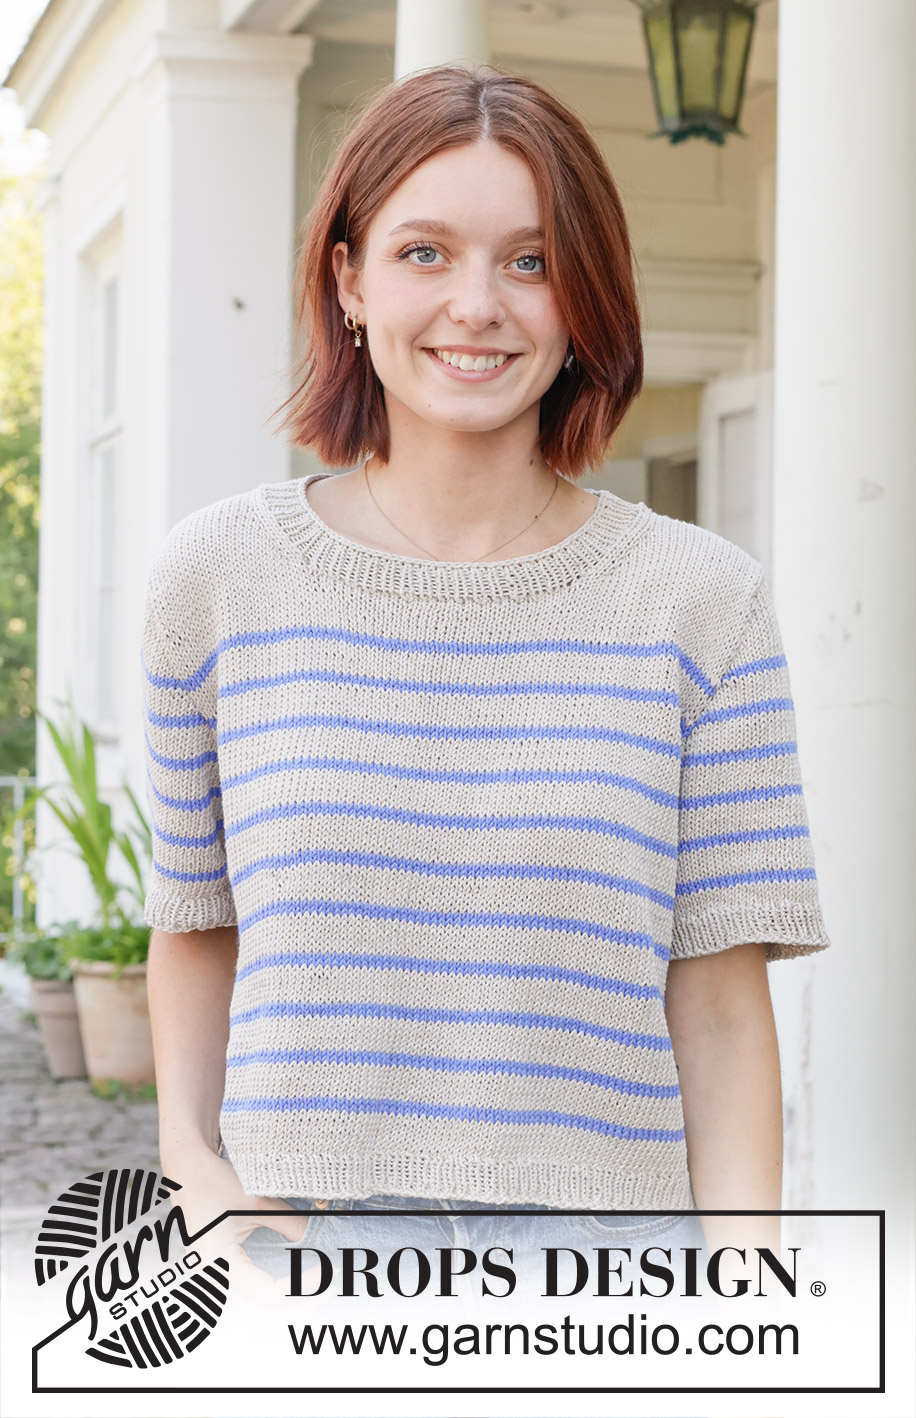
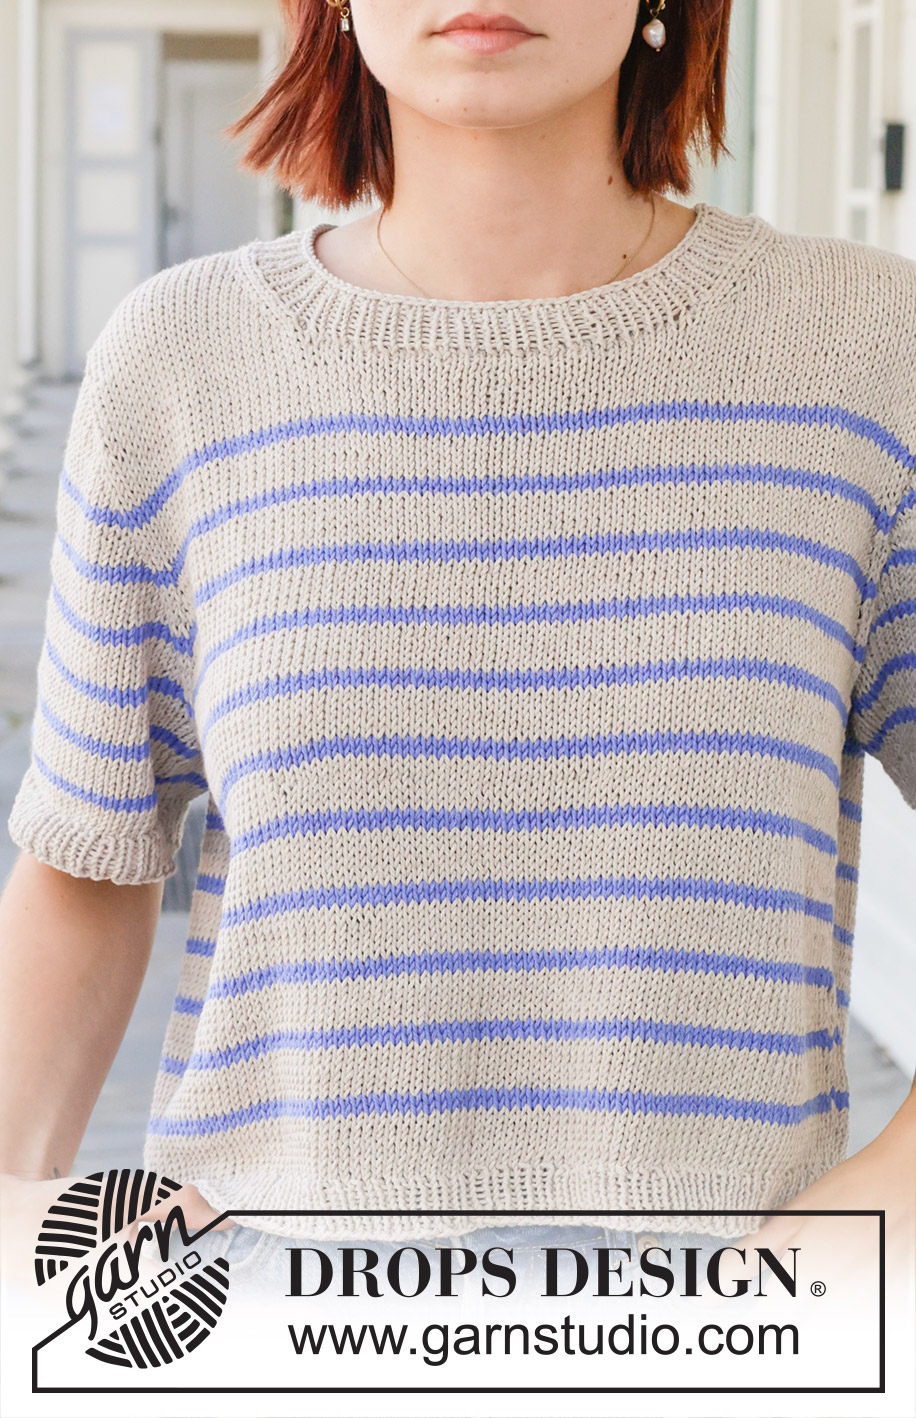
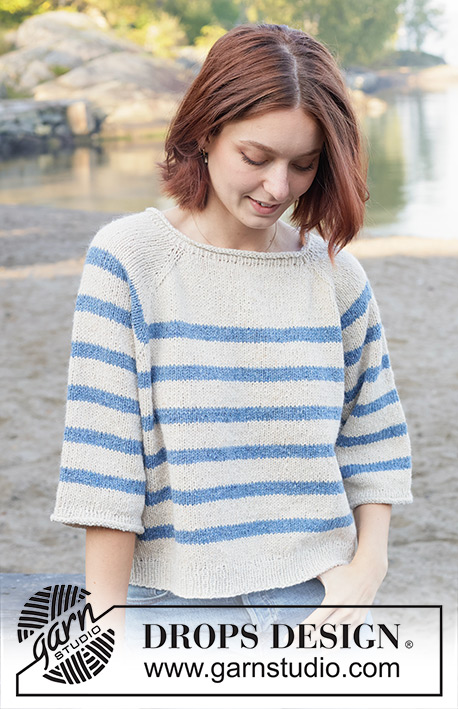
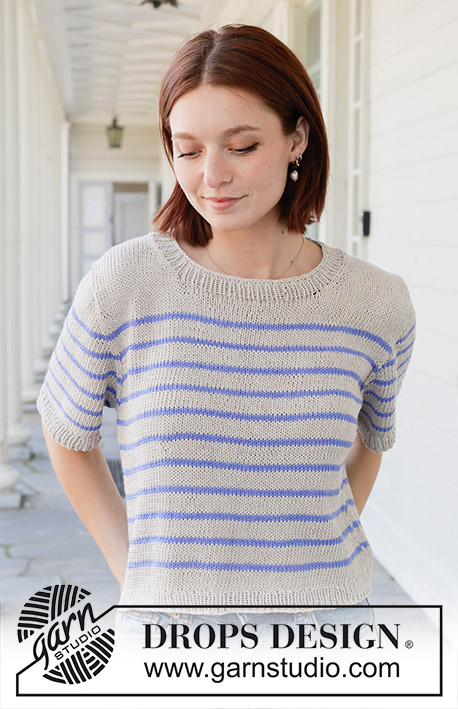
Nautical Nights Top#nauticalnightstop |
|
 |
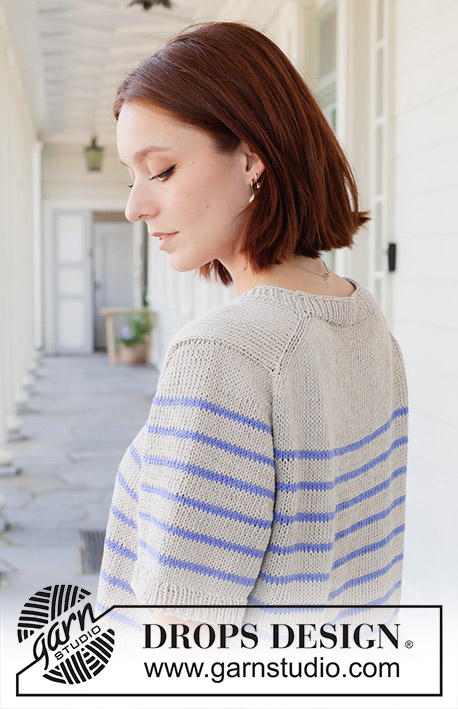 |
Knitted sweater in DROPS Cotton Light or DROPS Daisy. Piece is knitted top down with stripes, European yoke and short sleeves. Size XS – XXL.
DROPS 259-2 |
|
|
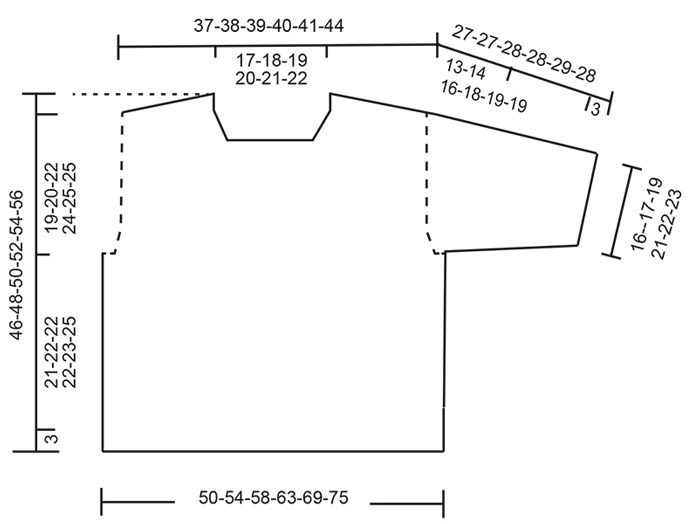
---------------------------------------------------------- EXPLANATION FOR THE PATTERN: ---------------------------------------------------------- INCREASE TIP-1: INCREASE 1 STITCH TOWARDS THE LEFT - from right side: Use left needle to pick up yarn between 2 stitches from row below, pick up yarn from the front and knit stitch in back loop of stitch. INCREASE 1 STITCH TOWARDS THE RIGHT - from right side: Use left needle to pick up yarn between 2 stitches from row below, pick up yarn from the back and knit stitch in front loop of stitch. INCREASE TIP-2: INCREASE 1 STITCH TOWARDS THE LEFT - from wrong side: Use left needle to pick up yarn between 2 stitches from row below, pick up yarn from the back and purl stitch in front loop of stitch. INCREASE 1 STITCH TOWARDS THE RIGHT - from wrong side: Use left needle to pick up yarn between 2 stitches from row below, pick up yarn from the front and purl stitch in back loop of stitch. STRIPES: Work as follows: 6 rounds with color light beige / color marzipan, 2 rounds with color blue bonnet / color cobalt blue. KNITTING TIP (applies to stripes when working in the round): To get a nicer transition at the beginning and end of round when working stripes, work as follows: Switch to new color and work 1 round. Work first stitch on next round as follows: Lift the stitch under first stitch on left needle (lift the stitch in back loop) and slip this stitch on left needle. Then knit this stitch together with next stitch on left needle. This way the transition will be less visible. SLEEVE TIP: When picking up stitches mid under sleeve, there will be a small hole in the transition between stitches on body and sleeves. The holes can be closed by picking up the strand between two stitches - work this strand twisted together with the first stitch between body and sleeve so that the holes closes. ---------------------------------------------------------- START THE PIECE HERE: ---------------------------------------------------------- SWEATER - SHORT OVERVIEW OF THE PIECE: In this pattern needles of different length have been used, begin with fitting length for number of stitches and switch as needed. First work piece back and forth on circular needle. Begin by casting on stitches in the back of neck. Then work back piece downwards while AT THE SAME TIME increasing in each side of piece until number of stitches for shoulder width is reached. Back piece has a slight diagonal shoulder. Now put back piece aside and work the beginning of front piece. Front piece is first worked in 2 parts. Begin by picking up stitches along one shoulder from back piece, work and increase towards the neck. Repeat on the other shoulder. Now pick up stitches along the sides on front pieces, and slip stitches from back piece back on needle. Work yoke back and forth until all increases for neck are done. Cast on new stitches for neck mid front and work in the round over all stitches. Increase stitches for yoke. First increase on sleeves only, then increase on both sleeves and front/back pieces. When yoke is done, divide piece for body and sleeves. Work body downwards in the round on circular needle while putting the sleeves aside. Then work sleeves downwards in the round on needle. Finish by picking up stitches around the neck and work a neck edge in the round. BACK PIECE: Work piece back and forth on circular needle. Cast on 38-40-42-44-46-48 stitches on circular needle size 4 MM = US 6 with DROPS Cotton Light color light beige or DROPS Daisy in color marzipan. ROW 1 (= wrong side): Purl all stitches. ROW 2 (= right side): Read INCREASE TIP-1 and knit 3, increase 1 stitch towards the left, knit until 3 stitches remain, increase 1 stitch towards the right, knit 3. ROW 3 (= wrong side): Read INCREASE TIP-2 and purl 3, increase 1 stitch towards the left, purl until 3 stitches remain, increase 1 stitch towards the right, purl 3. Remember to follow the knitting gauge! AFTER 3RD ROW: Work 2nd and 3rd ROW 10-10-10-10-10-11 times in total (= 20-20-20-20-20-22 rows have been worked), after increase there are = 78-80-82-84-86-92 stitches on needle. Cut the yarn, slip stitches on a thread or an stitch holder. RIGHT SHOULDER: Find right shoulder on back piece as follows: Place back piece flat with right side up, place back piece so that stitches on thread/stitch holder is towards you, right side of piece = right shoulder. Now pick up stitches along right diagonal shoulder on back piece - begin from right side at the armhole and pick up stitches in towards the neck as follows, use color light beige/color marzipan: Pick up 1 stitch in every worked row inside outermost stitch = 20-20-20-20-20-22 stitches. All length measurements on front piece are done from pick up edge. Work in stockinette stitch ( work first row as follows from wrong side). When piece measures 9 cm = 3½", increase stitches towards the neck as follows: ROW 1 (= right side): Work until 3 stitches remain, increase towards the right, knit 3 – remember INCREASE TIP-1. ROW 2 (= wrong side): Purl all stitches. Work 1st and 2nd ROW 2 times in total (= 4 rows have been worked) = 22-22-22-22-22-24 stitches. At the end of last row from wrong side, purl the last 2 stitches together = 21-21-21-21-21-23 stitches. Cut the yarn, slip stitches on a thread or stitch holder, now work left front piece along the left shoulder as explained below. LEFT SHOULDER: Pick up stitches along left diagonal shoulder on back piece - begin from right side at the neck and pick up stitches out towards armhole as follows, use color light beige/color marzipan: Pick up 1 stitch in every worked row inside outermost stitch = 20-20-20-20-20-22 stitches. All length measurements on front piece are done from pick up edge. Work in stockinette stitch ( work first row as follows from wrong side). When piece measures 9 cm = 3½", increase stitches towards the neck as follows: ROW 1 (= right side): Remember INCREASE TIP-1 and knit 3, increase 1 stitch towards the left, work the rest of row. ROW 2 (= wrong side): Purl all stitches. Work 1st and 2nd ROW 2 times in total (= 4 rows have been worked) = 22-22-22-22-22-24 stitches. At the beginning of last row from wrong side, purl the first 2 stitches twisted together = 21-21-21-21-21-23 stitches. Then slip front pieces and back piece together, and pick up stitches for sleeve cap, work as explained below. ROW 1: Work from right side with stitches from left front piece: knit 3, increase towards the left, knit the remaining stitches on left front piece, insert 1 marker here, pick up 24 stitches along the side of left front piece (= stitches for sleeve, stitches picked up inside outermost stitch), insert 1 marker, knit the first 2 stitches from back piece together ( = 1 stitch decreased), knit until 2 stitches remain on back piece, slip 1 stitch of the needle, knit 1, pass slipped stitch over (= 1 stitch decreased), insert 1 marker, pick up 24 stitches along the side on right front piece (= stitches for sleeve, pick up stitches inside outermost stitch), insert 1 marker, slip stitches from right front piece back on left needle, knit until 3 stitches remain, increase towards the right, work the last 3 stitches = 168-170-172-174-176-186 stitches. ROW 2: Purl all stitches. ROW 3: Knit 3, increase towards the left, knit until first marker, move marker on to right needle, increase towards the left, knit 24, increase towards the right, move marker on to right needle, knit until next marker, move marker on to right needle, increase towards the left, knit 24, increase towards the right, move marker on to right needle, knit until 3 stitches remain, increase towards the right, knit 3 = 174-176-178-180-182-192 stitches. Increases towards mid front are now done. ROW 4: Purl all stitches. ROW 5: Knit until first marker, move marker on to right needle, increase towards the left, knit 26, increase towards the right, move marker on to right needle, knit until next marker, move marker on to right needle, increase towards the left, knit 26, increase towards the right, move marker on to right needle, knit the rest of row, then cast on 30-32-34-36-38-40 new stitches for neck at the end of row = 208-212-216-220-224-236 stitches on needle. Now work piece in the round - NOTE - work also stripes, read section about stripes below. ROUND 1: Knit all stitches. ROUND 2: Knit all stitches and increase 1 stitch in each side of each sleeve as before – remember INCREASE TIP-1, number of stitches on each sleeve increase, number of stitches on front piece and back piece stays the same. Work these 2 rounds 5-4-5-5-2-1 time (you have increased 7-6-7-7-4-3 times in total on sleeves = 38-36-38-38-32-30 stitches on each sleeve and 76-78-80-82-84-90 stitches on front piece/back piece) = 228-228-236-240-232-240 stitches. Knit 1 round. STRIPES: When piece measures 3 cm = 1⅛" from where stitches were cast on mid front for neck, begin STRIPES - read explanation above. NOTE! Beginning of round is now in the left side of neck at the front, but to make the color change as invisible as possible, the beginning of round is moved. Thus work until 2 stitches before sleeve begins before working stripes, beginning of round is now before the last 2 stitches on front piece. Read KNITTING TIP. Work next round as follows: ROUND 1: Increase towards the right, knit 2 (= the last 2 stitches on front piece), move marker on to right needle, increase towards the left, knit the 38-36-38-38-32-30 stitches on sleeve, increase towards the right, move marker on to right needle, knit 2, increase towards the left, knit 72-74-76-78-80-86 stitches on back piece, increase towards the right, knit 2, move marker on to right needle, increase towards the left, knit the 38-36-38-38-32-30 stitches on sleeve, increase towards the right, knit 2, increase towards the left, work the rest of round (=2 stitches increased in every transition between body and sleeve = 8 stitches increased in total). ROUND 2: Knit all stitches. Repeat these 2 rounds until you have increased 18-19-22-25-26-28 times on both body and sleeves. You have increased 13-14-16-17-18-19 times in total on sleeves = 316-332-356-384-408-440 stitches. Piece now measures approx. 13-14-16-18-19-19 cm = 5⅛"-5½"-6¼"-7"-7½"-7½" measured in the middle of sleeve from where stitches were knitted up. When the sweater is folded double at the shoulder, piece measures approx. 19-20-22-24-25-25 cm = 7½"-8"-8¾"-9½"-9¾"-9¾" at the edge along the armhole. Work 2 stitches, round now begins between front piece and left sleeve. Now divide yoke for body and sleeves. DIVIDING FOR BODY AND SLEEVES: AT THE SAME TIME as next round is worked divide yoke for body and sleeves as follows: Slip the first 60-62-68-74-76-80 stitches on a thread for sleeve, cast on 8-10-12-14-16-18 new stitches on needle (= in the side mid under sleeve), knit the next 98-104-110-118-128-140 stitches (= back piece), slip the next 60-62-68-74-76-80 stitches on a thread for sleeve, cast on 8-10-12-14-16-18 new stitches on needle (= in the side mid under sleeve), knit the last 98-104-110-118-128-140 stitches (= front piece). Finish body and sleeves separately. BODY: = 212-228-244-264-288-316 stitches. Work in stockinette stitch and stripes in the round until piece measures 21-22-22-22-23-25 cm = 8¼"-8¾"-8¾"-8¾"-9"-9¾", measured from where new stitches were cast on under sleeve, finish with at least 6 rounds with color light beige/color marzipan. Switch to circular needles size 3 MM = US 2.5, work rib (= knit 1/purl 1) while AT THE SAME TIME increasing 22-22-24-26-28-32 stitches evenly on 1st round = 234-250-268-290-316-348 stitches. When rib measures 3 cm = 1⅛" bind off. Sweater measures approx. 46-48-50-52-54-56 cm = 18"-19"-19¾"-20½"-21¼"-22". SLEEVES: Slip 60-62-68-74-76-80 sleeve stitches from one thread on to circular needle size 4 MM = US 6 and pick in addition up 1 stitch in each of the 8-10-12-14-16-18 stitches cast on under sleeve - read SLEEVE TIP = 68-72-80-88-92-98 stitches. Work stockinette stitch and stripes in the round on needle until sleeve measures 11-10-9-7-7-6 cm = 4⅜"-4"-3½"-2¾"-2¾"-2⅜" from division, finish with at least 6 rounds with color light beige/color marzipan. Switch to double pointed needles size 3 MM = US 2.5 and work rib (= knit 1/purl 1) while AT THE SAME TIME increasing 6-8-8-8-10-10 stitches evenly on 1st round = 74-80-88-96-102-108 stitches. When rib measures 3 cm = 1⅛" bind off. Sleeve measures approx. 27-27-28-28-29-28 cm = 10⅝"-10⅝"-11"-11"-11⅜"-11" from shoulder. NECK EDGE: Begin from right side at one shoulder line and pick up approx. 104 to 126 stitches around the neck on circular needle size 3 MM = US 2.5 with color light beige/color marzipan. Work rib (= knit 1/purl 1) for 3 cm = 1⅛". Bind off by knitting. |
|
|
|
Have you finished this pattern?Tag your pictures with #dropspattern #nauticalnightstop or submit them to the #dropsfan gallery. Do you need help with this pattern?You'll find 29 tutorial videos, a Comments/Questions area and more by visiting the pattern on garnstudio.com. © 1982-2025 DROPS Design A/S. We reserve all rights. This document, including all its sub-sections, has copyrights. Read more about what you can do with our patterns at the bottom of each pattern on our site. |
|


With over 40 years in knitting and crochet design, DROPS Design offers one of the most extensive collections of free patterns on the internet - translated to 17 languages. As of today we count 314 catalogs and 11822 patterns - 11812 of which are translated into English (US/in).
We work hard to bring you the best knitting and crochet have to offer, inspiration and advice as well as great quality yarns at incredible prices! Would you like to use our patterns for other than personal use? You can read what you are allowed to do in the Copyright text at the bottom of all our patterns. Happy crafting!
Post a comment to pattern DROPS 259-2
We would love to hear what you have to say about this pattern!
If you want to leave a question, please make sure you select the correct category in the form below, to speed up the answering process. Required fields are marked *.