
Popular categories
Looking for a yarn?


Comments / Questions (15)
![]() Celine wrote:
Celine wrote:
Bonjour. Joli modèle. J'ai une question, le pull étant en construction circulaire, comment fait on pour faire suivre les fils et les avoir dispo au début du motif coloré du tour suivant (et non à sa fin). Merci.
11.01.2025 - 00:03DROPS Design answered:
Bonjour Céline, faites suivre le fil en le croisant à intervalles réguliers (évitez de croiser les fils aux mêmes endroit en hauteur) quand il y a trop de mailles pour laissez le fil courir derrière - sinon tricotez comme tous les rangs sur l'endroit de cette vidéo (méthode anglaise/américaine - vous trouverez la même technique avec la méthode continentale sous l'onglet vidéos ici ou bien sous l'autre vidéo sur sa page ). Bon tricot!
13.01.2025 - 08:40
![]() Berit wrote:
Berit wrote:
Er vild med mønsteret, men vil gerne strikke den som bluse i tyndere garn, pind 3, str. M Jeg synes ikke at kunne finde en anden opskrift med det mønster, så hvordan regner man det om?
28.09.2024 - 22:57DROPS Design answered:
Hej Berit, vi har desværre ikke mulighed for at regne mønsteret om. Men du kan eventuelt følge en bluse med rundt bærestykke til pind 3 og følge mønsteret men med flere rapporter :)
10.10.2024 - 14:53
![]() Vivi Rasmussrn wrote:
Vivi Rasmussrn wrote:
Hej jeg er ved st strikke denne model i xxl og har købt 2ngl har i hver mønsterfarve [som der står i opskriften] men nu er jeg færdig med mønsteret og har ikke engang brugt 1ngl i hver farve. Hvad har jeg gjort forkert? Skal den strikkes i dobbelt garn? Jeg strikker med pinde nr. 6.
11.03.2024 - 14:39DROPS Design answered:
Hei Vivi. Den skal strikkes med 1 tråd DROPS Melody. Er strikkefastheten og målene du ser på målskissen overholdt? Er det i alle møsterfargene du kun har brukt 1 nøste? mvh DROPS Design
18.03.2024 - 13:11
![]() Birgit Dirksen wrote:
Birgit Dirksen wrote:
Jeg har fulgt mønstret og derved taget 4 nye masker ud under ærmet i hver side. Begynder mønstret herefter i hvidt garn på den første m af de to nye m i hver side, eller strikkes de i det gule garn, Bliver spidsen i mønstret forskudt 2 m i forhold til det strikket mønster? Vh. Birgit Dirksen.
27.03.2023 - 18:35DROPS Design answered:
Hej Birgit, Mønsteret skal stemme over mønsteret så langt det går, de masker som ikke går op strikkes i natur :)
12.04.2023 - 14:57
![]() Sylvia wrote:
Sylvia wrote:
Die Maschenprobe: Mit welcher Nadelstärke sollte die denn gestrickt sein: 6 oder 4.5? Danke.
18.01.2023 - 20:53DROPS Design answered:
Liebe Silvia, die Maschenprobe wird mit die grösseren Nadeln, die Nr 6 - gestrickt. Viel Spaß beim stricken!
19.01.2023 - 10:44
![]() Miz wrote:
Miz wrote:
Bonjour Sous la manche en rajoutant des mailles, le diagramme A1 n’est plus respecté. Comment faut il faire ? Merci !
17.12.2022 - 19:49DROPS Design answered:
Bonjour Mme Miz, tricotez autant de mailles que possible en suivant le motif en début de rang et en fin de rang, autrement dit, en commençant au milieu sous la manche, calculez d'après la 1ère maille de A.1 comment tricoter les nouvelles mailles montées sous la manche et tricotez jusqu'au marqueur sur l'autre côté, puis reprenez l'autre moitié de l'ouvrage. Vous ferez de même pour les manches (il y aura une démarcation car le motif ne tombe pas juste). Bon tricot!
19.12.2022 - 09:09
![]() Manetsch wrote:
Manetsch wrote:
Sind die Massangaben für die Aermel korrekt? Es kann doch nicht sein, dass für kleinste Grösse der Aermel viel länger ist als für die grösste Grösse. Ich stricke Grösse S.
25.11.2022 - 21:07DROPS Design answered:
Liebe Frau Manetsch, doch schon, denn die Passe ist länger in die grösseren Größen; aber gerne vergleichen Sie die Maßen von einem ähnlichen Pullover, den Sie gerne tragen und vor Bündchen Pullover anziehen um die Länge zu prüfen; so können Sie auch die Ärmellänge genauso anpassen. Viel Spaß beim stricken!
28.11.2022 - 08:48
![]() Andreea wrote:
Andreea wrote:
Hi, Thanks for the usefull answers received till now:) When starting working the body from the undersleaves, since pattern is not matching under the arms, how it will look from the side? When dividing i'm allready starting the last colour in the patern, off white in your model here. is it ok?
02.11.2022 - 19:01DROPS Design answered:
Dear Andrea, work as many stitches as you can in the pattern towards the side, ie until mid under sleeve, then start again working pattern so that it fits the 2nd half of piece - the pattern won't fit mid under sleeve, as if there were a seam. Happy knitting!
03.11.2022 - 09:43
![]() Pia wrote:
Pia wrote:
Hvor meget garn skal jeg bruge, hvis jeg vil strikke blusen ensfarvet og findes der andre garntyper der kan bruges?
17.09.2022 - 18:01DROPS Design answered:
Hei Pia. Vi har desverre ikke modellen lengre, slik at vi får veid den. Men tipper du vil trenge 250 gram til str S, 300 gram til str. M og L, 350 gram til str. Xl og XXL og 400 gram til str. str. XXXL. Du kan prøve å strikke den med 2 tråder DROPS Brushed Alpaca Silk eller 2 tråder DROPS Sky. Eller 3 tråder DROPS Kid-Silk. Men husk å strikke en prøvelapp for å få den oppgitte strikkefastheten. mvh DROPS Design
19.09.2022 - 12:00
![]() Mirjam wrote:
Mirjam wrote:
Mijn werk is nu 18 cm vanaf de markeerdraad. Ben net begonnen met de 1e toer waarin de kleur vanille wordt aangehecht. Op de foto lijkt vanille pas veel later te beginnen, nadat de steken voor de mouwen apart zijn gezet. Het lijkt dus alsof mijn patroon veel korter uitvalt dan op de foto. Als dit zo is, moet ik straks veel meer wit aan de onderkant breien en ik het evenwicht uit het patroon. Doe ik iets niet goed?
22.08.2022 - 18:41DROPS Design answered:
Het werk wordt gescheiden voor het lijf en de mouwen vlak nadat de laatste meerdering in A.1 is gemaakt. Die maak je dus vlak nadat je begonnen bent met vanille. Deze kleur loopt dus na de scheiding verder. Maar je zou dus al meer lengte moeten hebben. Klopt je stekenverhouding in de hoogte wel met de stekenverhouding die aangegeven is in het patroon?
23.08.2022 - 19:17
|
|||||||||||||||||||
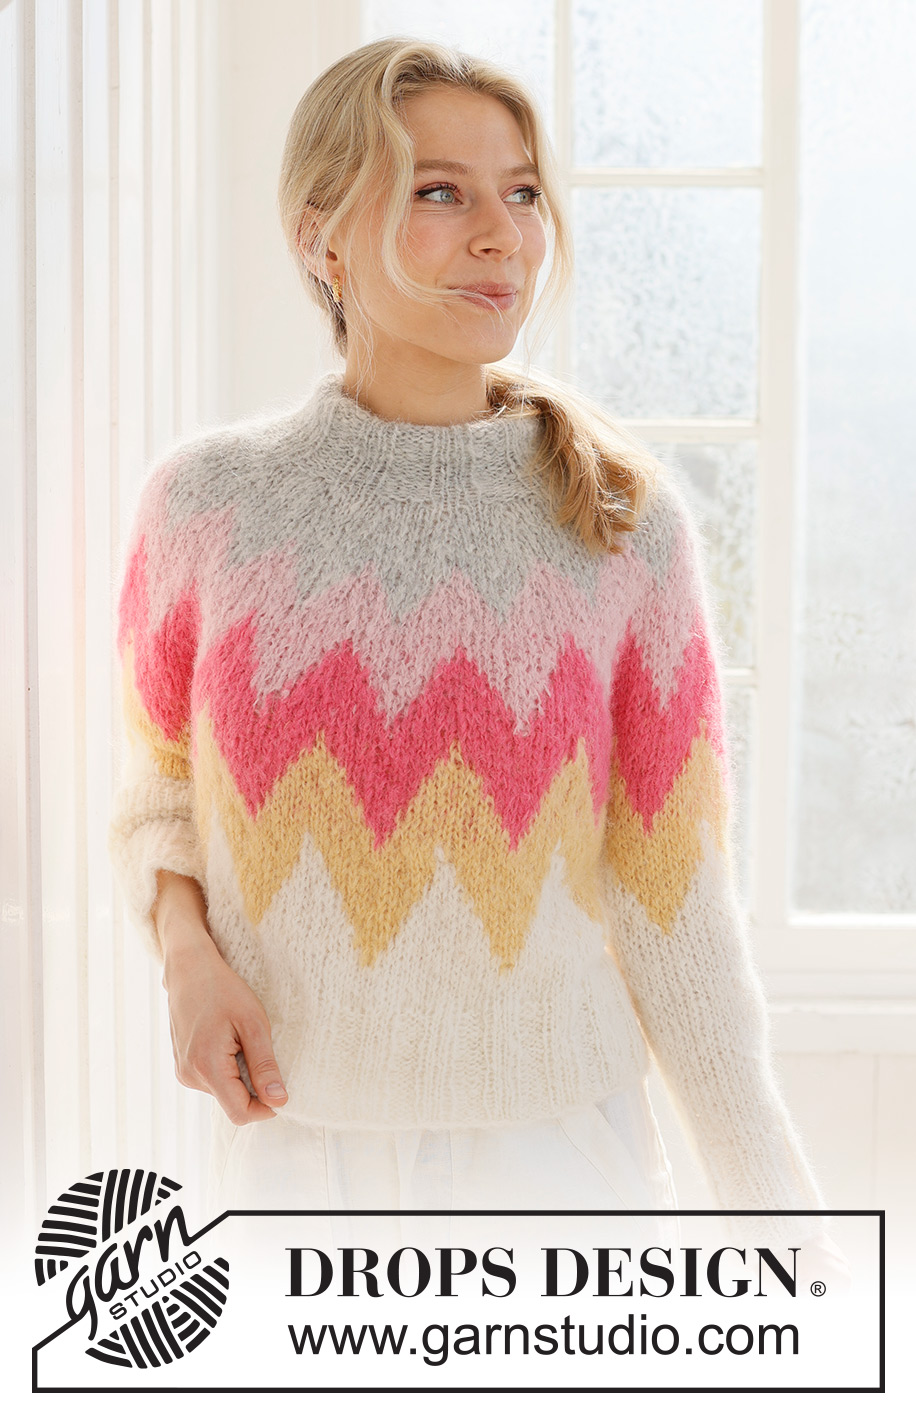
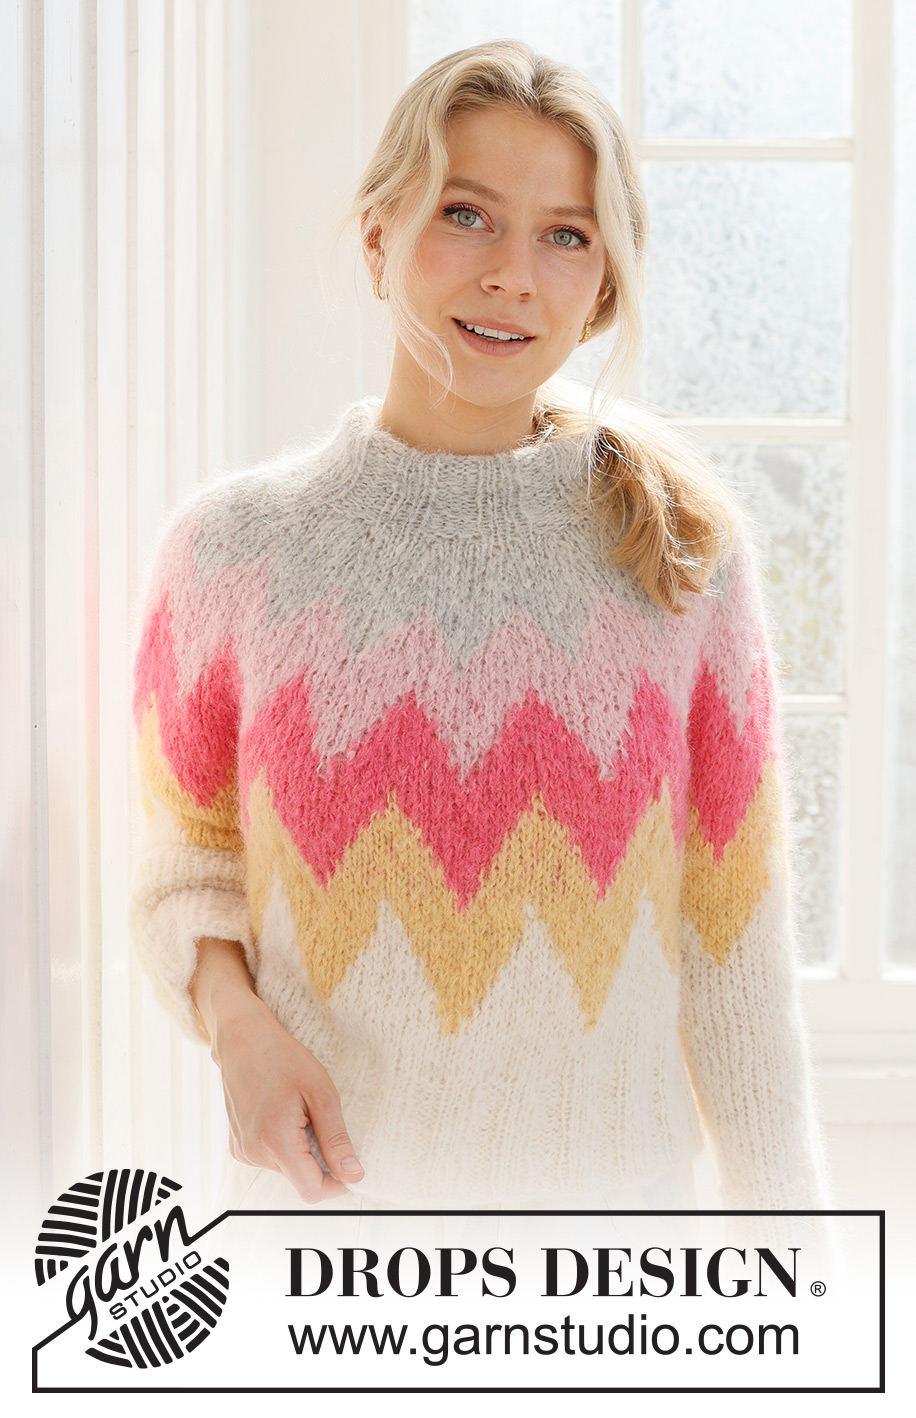
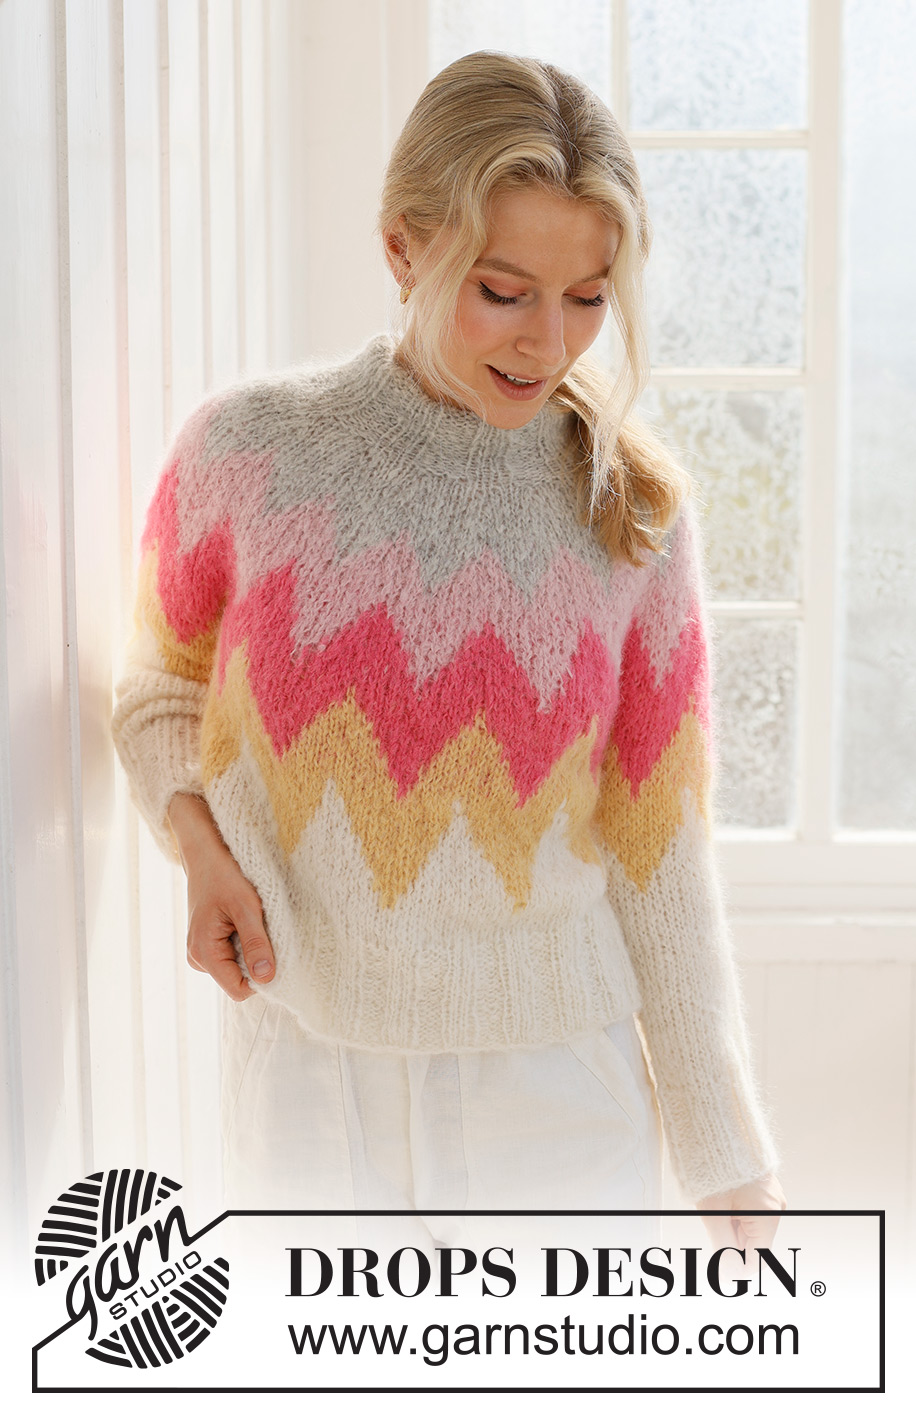
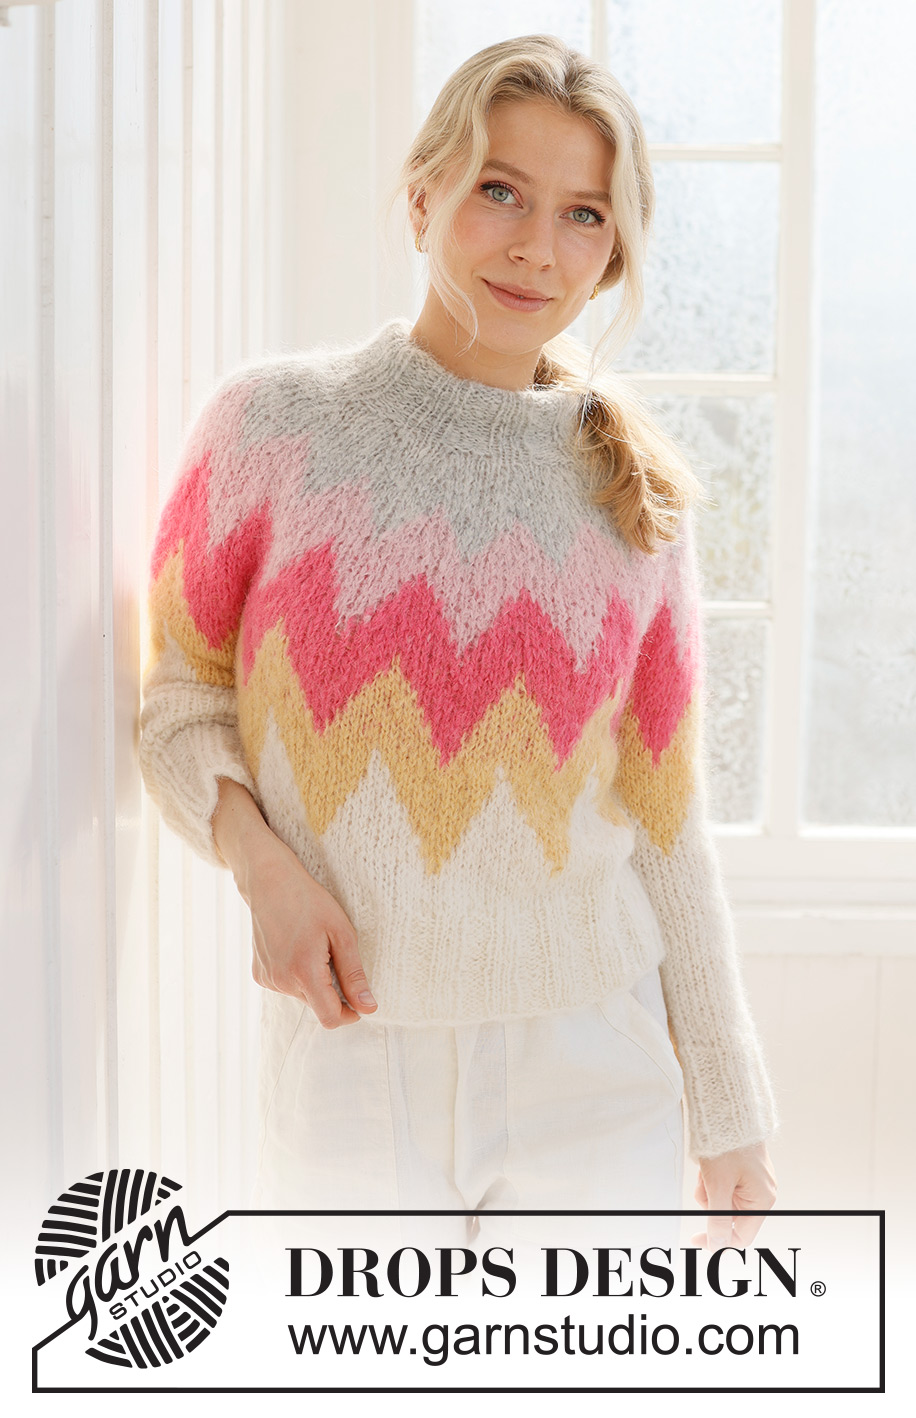
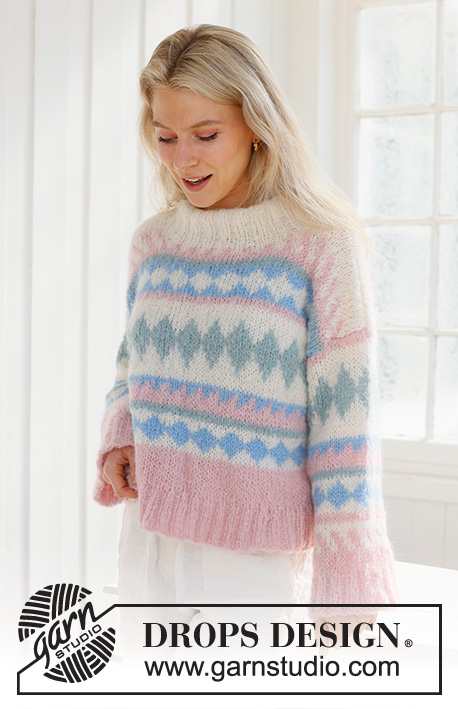
Pink Lemonade Sweater#pinklemonadesweater |
|||||||||||||||||||
 |
 |
||||||||||||||||||
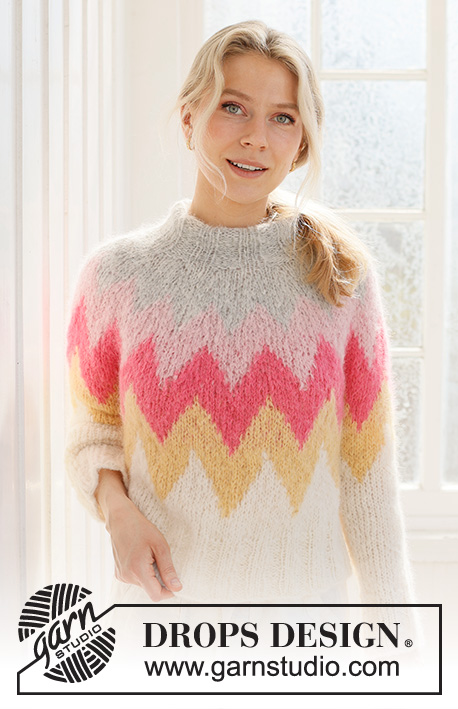
Knitted sweater in DROPS Melody. The piece is worked top down, with multi-colored pattern, round yoke and double neck. Sizes S - XXXL.
DROPS 231-56 |
|||||||||||||||||||
|
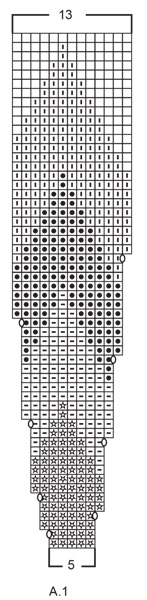
------------------------------------------------------- EXPLANATIONS FOR THE PATTERN: ------------------------------------------------------- PATTERN: See diagram A.1. The pattern is worked in stockinette stitch. KNITTING TIP: To avoid the knitting gauge becoming tight when working pattern it is important that the strands at the back are not tight. Use a size larger needle when working pattern if this is a problem. DECREASE TIP (mid-under sleeves): Work until there are 3 stitches left before the marker, knit 2 together, knit 2 (marker sits between these 2 stitches), slip 1 stitch as if to knit, knit 1 and pass the slipped stitch over the knitted stitch (2 stitches decreased). ------------------------------------------------------- START THE PIECE HERE: ------------------------------------------------------- SWEATER - SHORT OVERVIEW OF THE PIECE: The neck and yoke are worked in the round with circular needle, top down. The yoke is divided for the body and sleeves and the body is continued in the round. The sleeves are worked in the round with double pointed needles/short circular needle. DOUBLE NECK: Cast on 72-72-72-78-84-84 stitches with color pearl grey DROPS Melody, using a short 4.5 MM = US 7 and a short 6 MM = US 10 circular needle held together. Pull out the needle size 6 MM = US 10 and continue with size 4.5 MM = US 7 (this makes the cast-on edge elastic). Work rib in the round (knit 3, purl 3) for 14 cm = 5½". Fold the neck double to the inside – work the next round of rib as before, working every other stitch together with every other stitch on the cast-on edge. Insert 1 marker in the middle of the round (mid-front); the yoke is measured from this marker! YOKE: Change to circular needle size 6 MM = US 10. Knit 1 round where you increase 8-8-18-12-26-26 stitches evenly spaced = 80-80-90-90-110-110 stitches. Knit 0-1-3-3-3-4 rounds with color pearl grey. Then work A.1 over all stitches – read KNITTING TIP! Increase as shown in the diagram. REMEMBER THE KNITTING GAUGE! Continue A.1 until the yoke measures 22-24-26-28-30-32 cm = 8¾"-9½"-10¼"-11"-11¾"-12½" from the marker. The final increase has been worked and there are 208-208-234-234-286-286 stitches. Now divide for the body and sleeves – NOTE: A.1 is continued on the body and sleeves. Work A.1 as before over the first 39-39-39-39-52-52 stitches (approx. half back piece), place the next 39-39-39-39-52-52 stitches on a thread for the sleeve, cast on 4-10-10-10-8-12 stitches (in side under sleeve), work A.1 as before over the next 65-65-78-78-91-91 stitches (front piece), place the next 39-39-39-39-52-52 stitches on a thread for the sleeve, cast on 4-10-10-10-8-12 stitches (in side under sleeve), work pattern as before over the last 26-26-39-39-39-39 stitches on the back piece. Cut the strand. The body and sleeves are finished separately. BODY: = 138-150-176-176-198-206 stitches. Start the round in the middle of the 4-10-10-10-8-12 stitches under the sleeve and continue A.1 in the round – the pattern will not fit under the sleeves; continue it as far as it will go. When A.1 has been completed, continue with stockinette stitch and color off white until the body measures 17 cm = 6¾" from the division. Knit 1 round where you increase 6-6-10-10-6-10 stitches evenly spaced = 144-156-186-186-204-216 stitches. Change to circular needle size 4.5 MM = US 7. Work rib (knit 3, purl 3) for 10 cm = 4". Bind off with knit over knit and purl over purl. The sweater measures approx. 52-54-56-58-60-62 cm = 20½"-21¼"-22"-22¾"-23⅝"-24⅜" from the shoulder. SLEEVES: Place the 39-39-39-39-52-52 stitches from the thread on the one side of the piece on double pointed needles/short circular needle size 6 MM = US 10 and knit up 1 stitch in each of the 4-10-10-10-8-12 stitches cast on under the sleeve = 43-49-49-49-60-64 stitches. Insert a marker in the middle of the new stitches under the sleeve. Allow the marker to follow your work onwards; it is used when decreasing under the sleeve. Start at the marker and continue A.1 in the round – it will not fit under the sleeve. When A.1 is finished, continue with stockinette stitch and color off white. AT THE SAME TIME when the sleeve measures 3-3-3-4-4-4 cm = 1⅛"-1⅛"-1⅛"-1½"-1½"-1½", decrease 2 stitches mid-under the sleeve – read DECREASE TIP. Decrease like this every 12-6-6-7-4-3 cm = 4¾"-2⅜"-2⅜"-2¾"-1½"-1⅛" a total of 3-5-5-4-6-7 times = 37-39-39-41-48-50 stitches. Work until the sleeve measures 33-32-31-29-27-26 cm = 13"-12½"-12¼"-11⅜"-10⅝"-10¼". Knit 1 round where you adjust the number of stitches to 36-36-42-42-48-52 stitches. Change to double pointed needles size 4.5 MM = US 7. Work rib (knit 3, purl 3) for 10 cm = 4". Bind off with knit over knit and purl over purl. The sleeve measures approx. 43-42-41-39-37-26 cm = 17"-16½"-16⅛"-15¼"-14½"-10¼". Work the other sleeve in the same way. |
|||||||||||||||||||
Diagram explanations |
|||||||||||||||||||
|
|||||||||||||||||||
|
|||||||||||||||||||

|
|||||||||||||||||||
Have you finished this pattern?Tag your pictures with #dropspattern #pinklemonadesweater or submit them to the #dropsfan gallery. Do you need help with this pattern?You'll find 26 tutorial videos, a Comments/Questions area and more by visiting the pattern on garnstudio.com. © 1982-2025 DROPS Design A/S. We reserve all rights. This document, including all its sub-sections, has copyrights. Read more about what you can do with our patterns at the bottom of each pattern on our site. |
|||||||||||||||||||


With over 40 years in knitting and crochet design, DROPS Design offers one of the most extensive collections of free patterns on the internet - translated to 17 languages. As of today we count 314 catalogs and 11822 patterns - 11812 of which are translated into English (US/in).
We work hard to bring you the best knitting and crochet have to offer, inspiration and advice as well as great quality yarns at incredible prices! Would you like to use our patterns for other than personal use? You can read what you are allowed to do in the Copyright text at the bottom of all our patterns. Happy crafting!
Post a comment to pattern DROPS 231-56
We would love to hear what you have to say about this pattern!
If you want to leave a question, please make sure you select the correct category in the form below, to speed up the answering process. Required fields are marked *.