
Looking for a yarn?


Comments / Questions (35)
![]() Odile wrote:
Odile wrote:
Bonjour, Merci pour ce modèle. Je ne comprends pas ce que veulent dire les chiffres placés au dessus des diagrammes : le 6 au dessus du A2, le 3 au dessus du A3, le 6 en dessous du A4, le 9 ai dessus du A4, le 6 en dessous du A5 et le 7 au dessus du A5. Pouvez vous m'expliquer ? D'avance merci pour votre réponse Odile
08.07.2025 - 21:00DROPS Design answered:
Bonjour Odile, c'est le nombre de mailles a la fin du diagramme. Bon tricot!
09.07.2025 - 08:07
![]() Ann wrote:
Ann wrote:
Hej! Stickar Bellflowerdress st 1/3. Kommit till fram- och bakstycke. ”På nästa varv ökas det 1 maska före varje markör - läs ÖKNINGSTIPS” På ÖKNINGSTIPS står det ”det ökas växelvis före och efter varje markör” Min fråga är Ökar jag både före och efter markörerna på varv 1 och varv 4 osv eller Ökar jag bara före markören på varv 1, efter markören på varv 4, före markören på varv 8 osv? Tacksam för hjälp med mönstret!
06.07.2025 - 11:46DROPS Design answered:
Hej Ann. På varv 1 ökar du före alla markörer (= 8 maskor ökade på ett varv) och på varv 4 ökar du efter alla markörer (= 8 maskor ökade på ett varv) osv. Mvh DROPS Design
07.07.2025 - 14:49
![]() Kim Heffernan wrote:
Kim Heffernan wrote:
Hello, how do I cast in the 4 stitches under the arm thread?
15.04.2025 - 08:15DROPS Design answered:
Hello Kim Heffernan! Please look at videos and lessons for tutorials and tips on top of the pattern. How to cast on new stitches at side of work Happy knitting!
15.04.2025 - 15:47
![]() Naila wrote:
Naila wrote:
Altså jeg strikker som vanlig men setter inn merke etter de tre første maskene rett etter de jeg har felt på stolpen?
10.04.2025 - 09:29DROPS Design answered:
Hei Naila, Ja, det er riktig, omgangen begynner 3 masker etter de felte maskene og du strikker rundt. God fornøyelse!
10.04.2025 - 10:03
![]() Naila wrote:
Naila wrote:
Hei. Hvordan forskyver jeg omgangen med 3 masker?
09.04.2025 - 18:06DROPS Design answered:
Hej Naila, du flytter bare mærket, så du tæller fra midt bagpå når du skal dele arbejdet :)
10.04.2025 - 08:56
![]() Erla Erlingsdottir wrote:
Erla Erlingsdottir wrote:
Hi, in A when you work 3 stitches in the same stitch, it does not specify if the yarn over is knitted twisted or not on next round?
14.12.2024 - 03:54DROPS Design answered:
Dear Erla, the yarn over is not knitted twisted, there should be a hole left. Here is a video explanation on how to work these stitches: https://www.garnstudio.com/video.php?id=1639&lang=en. Happy knitting!
15.12.2024 - 22:50
![]() Katarina wrote:
Katarina wrote:
Lagt upp halskantens 95 m (st 2 år). Är det första varvet man stickar från rätsidan?
03.12.2024 - 15:46DROPS Design answered:
Hej Katarina, du bestemmer selv hvilken side du vil have som retside (tror de fleste lader den første pind være fra vrangen) :)
06.12.2024 - 14:11
![]() Erla Erlingsdottir wrote:
Erla Erlingsdottir wrote:
I'm so confused on the start using A1 and A2. On the wrong side am I also doing A1 then AT after the 5 garter stitches?
27.11.2024 - 05:26DROPS Design answered:
Hi Erla, When working back from the wrong side, the pattern is worked in reverse, reading the diagrams from left to right: 5 garter stitches, then repeat row 2 in A.2 (from left to right) the correct number of times for your size, work row 2 in A.1 (from left to right) and 5 garter stitches. Hope this helps and happy knitting!
27.11.2024 - 06:48
![]() Marisa Blanc wrote:
Marisa Blanc wrote:
Pour l’empiècementbde la robe : Je dois tricoter 5 mailles au point mousse, À.1, répéter 24 fois À.2 et terminer par 5 mailles au point mousse. Je ne comprends pas ce que cela veut dire. Merci pour votre réponse. Marisa Blanc
01.11.2024 - 18:39DROPS Design answered:
Bonjour Mme Blanc, tricotez (sur l'endroit): 5 m. point mousse (- à l'endroit), tricotez ensuite la maille du diagramme A.1 (- 1 m jersey), répétez ensuite 24 fois les 4 mailles du diagramme A.2 (on augmente 1 maille au 1er rang) et terminez par 5 m point mousse; sur l'envers, tricotez 5 m point mousse (à l'endroit), répétez les diagramme A.2 en lisant de gauche à droite et terminez par A.1 (1 m envers) et 5 m point mousse. Bon tricot!
04.11.2024 - 07:39
![]() Paula wrote:
Paula wrote:
Voiko alpacka langan vaihtaa Merino extra fine lankaan (50g = 105g) Bellflower dress-ohjeeseen
31.10.2024 - 11:49DROPS Design answered:
Hei, DROPS Merino Extra Fine -lanka on Alpaca-lankaa paksumpi lanka, joten et voi vaihtaa kyseiseen lankaan. Voit kuitenkin käyttää vaihtoehtona jonkun muun lankaryhmään A kuuluvan langan, esim. DROPS Baby Merino.
31.10.2024 - 16:35
|
||||||||||||||||||||||||||||
Bellflower Dress#bellflowerdress |
||||||||||||||||||||||||||||
 |
 |
|||||||||||||||||||||||||||
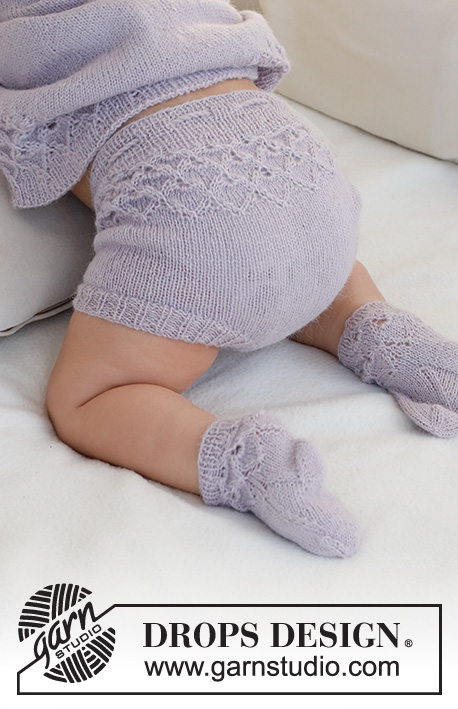
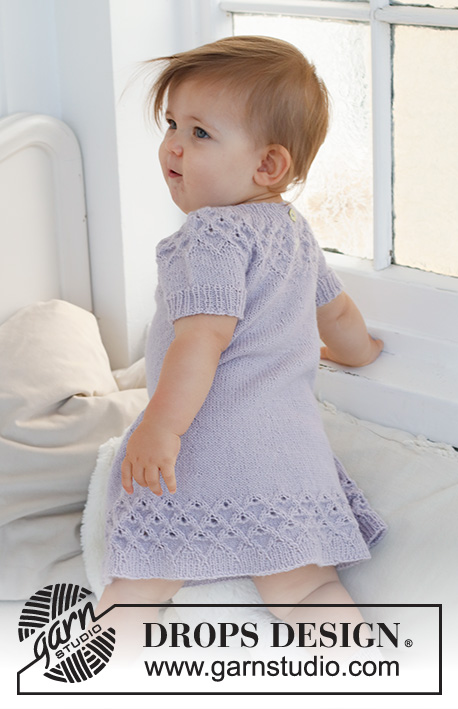
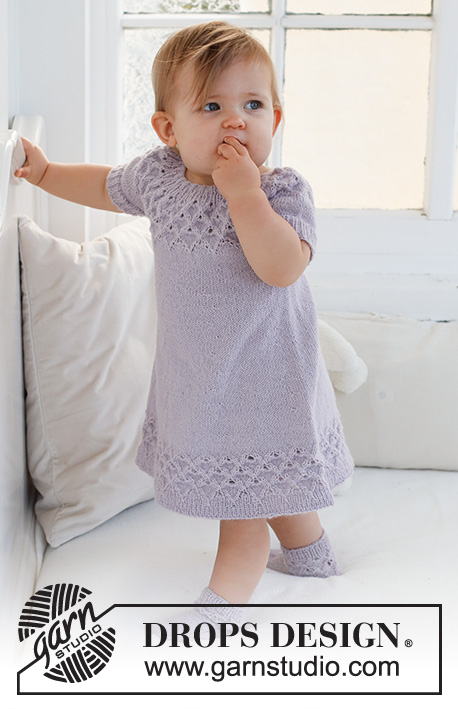
Knitted dress for babies and children in DROPS Alpaca. The piece is worked top down, with round yoke and lace pattern. Sizes 0 - 4 years.
DROPS Baby 43-11 |
||||||||||||||||||||||||||||
|
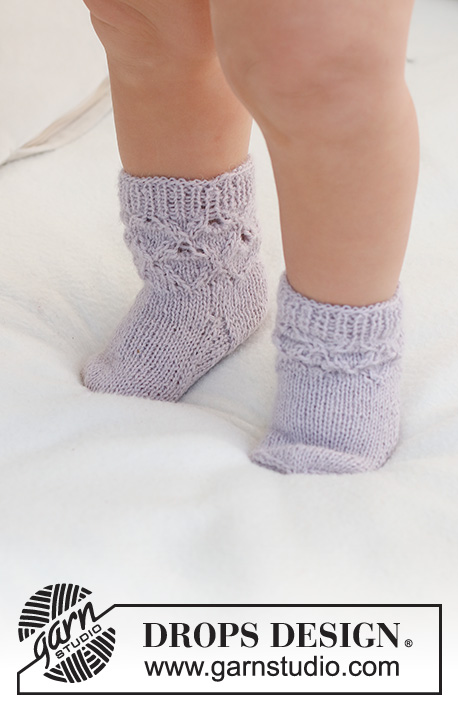
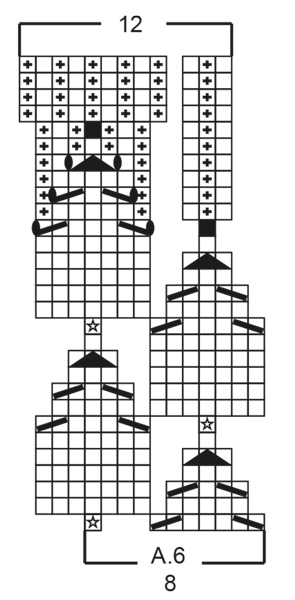
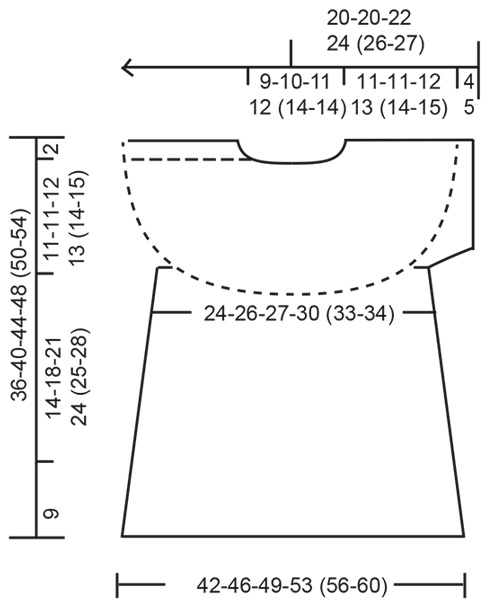
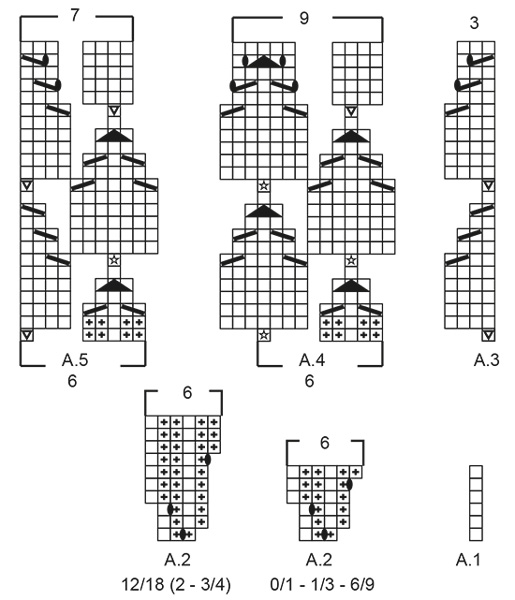
------------------------------------------------------- EXPLANATIONS FOR THE PATTERN: ------------------------------------------------------- RIDGE/GARTER STITCH (worked back and forth): Knit all rows. 1 ridge = knit 2 rows. PATTERN: See diagrams A.1 to A.6. Choose diagram for your size. The diagrams show all rows in the pattern from the right side. INCREASE TIP (for skirt): Increase alternately before and after each marker (i.e. the first increase is before each marker, the second after each marker, etc.). INCREASE 1 STITCH BEFORE EACH MARKER: Work until there is 1 stitch left before the marker, make 1 yarn over. INCREASE 1 STITCH AFTER EACH MARKER: Work to the marker, make 1 yarn over. On the next round knit the yarn overs twisted to avoid holes. Then work the new stitches in stockinette stitch. BUTTONHOLES: Work the buttonholes on the left band (when the garment is worn). Work from the right side inside 1 stitch as follows: Knit 1, knit 2 together, make 1 yarn over. On the next row (wrong side), knit the yarn over to leave a hole. The first buttonhole is worked when the piece measures 1½-2 cm = ½"-¾". The second buttonhole when the piece measures 5-6 cm = 2"-2⅜". ------------------------------------------------------- START THE PIECE HERE: ------------------------------------------------------- DRESS – SHORT OVERVIEW OF THE PIECE: The piece is worked top down, back and forth until the split is finished mid-back. Then you continue in the round. The yoke is divided for the skirt and sleeve-edges and the skirt is continued in the round. The sleeve edges are worked in the round with double pointed needles. NECK: Cast on 71-77-83-89 (95-95) stitches with circular needle size 2.5 MM = US 1.5 and DROPS Alpaca. Work 5 stitches in GARTER STITCH – read description above, * knit 1, purl 2 *, work from *-* until there are 6 stitches left, knit 1 and 5 stitches in garter stitch. Work this rib back and forth for 1 cm = ⅜". Change to circular needle size 3 MM = US 2.5. YOKE: Work the next row from the right side as follows: 5 stitches in garter stitch, A.1, work A.2 20-22-24-26 (28-28) times and 5 stitches in garter stitch. Work the BUTTONHOLES – read description above. When A.1 and A.2 have been worked in height there are 131-143-155-167 (179-179) stitches. The piece measures approx. 3-3-3-4-4-4 cm = 1⅛"-1⅛"-1⅛"-1½"-1½"-1½". Continue with pattern as follows: 5 stitches in garter stitch, A.3, work A.4 19-21-23-25 (27-27) times, A.5 and 5 stitches in garter stitch. REMEMBER THE KNITTING GAUGE! On the last row in A.3 to A.5 increase 0-0-0-0 (0-10) stitches evenly spaced. When A.3 to A.5 have been worked in height there are 191-209-227-245 (263-273) stitches. The piece measures approx. 10-10-10-12-12-12 cm = 4"-4"-4"-4¾"-4¾"-4¾". On the next row from the right side, bind off the first 5 stitches and knit to the end of the row = 186-204-222-240 (258-268) stitches. Continue with stockinette stitch in the round. Move the start of the round 3 stitches so it is mid-back. When the piece measures 11-11-12-13 (14-15) cm = 4⅜"-4⅜"-4¾"-5⅛" (5½"-6"), divide for the skirt and sleeves as follows: Knit 26-29-30-34 (37-39), place the next 40-44-50-52 (54-56) stitches on a thread for the sleeve, cast on 4 stitches under the sleeve, knit 53-58-61-68 (75-78), place the next 40-44-50-52 (54-56) stitches on a thread for the sleeve, cast on 4 stitches under the sleeve, knit the last 27-29-31-34 (38-39) stitches. SKIRT: = 114-124-130-144 (158-164) stitches. Continue with stockinette stitch in the round for a further 3 cm = 1⅛". Insert 8 markers as follows: Knit 7-7-8-9 (10-10), insert 1 marker, * knit 14-15-16-18 (19-20), insert 1 marker, knit 14-16-16-18 (20-21), insert 1 marker *, work from *-* 2 more times, knit 15-16-17-18 (20-20), insert 1 marker and knit 8-8-9-9 (11-11). Allow the markers to follow your work onwards. On the next round increase 1 stitch before each marker – read INCREASE TIP! Increase like this every 4th-4th-5th-5th (6th-6th) round a total of 9-10-11-12 (12-13) times = 186-204-218-240 (254-268) stitches. When the skirt measures 14-18-21-24 (25-28) cm = 5½"-7"-8¼"-9½" (9¾"-11") from the division, knit 1 round where you increase 6-4-6-0 (2-4) stitches evenly spaced = 192-208-224-240 (256-272) stitches. Then work A.6 on the round. When A.6 is finished there are 288-312-336-360 (384-408) stitches. Bind off with knit. The dress measures approx. 36-40-44-48 (50-54) cm = 14¼"-15¾"-17¼"-19" (19¾"-21¼") from the shoulder down. SLEEVE-EDGES: Place the 40-44-50-52 (54-56) stitches from the thread on one side of the piece on double pointed needles size 3 MM = US 2.5 and knit up 1 stitch in each of the 4 stitches cast on under the sleeve = 44-48-54-56 (58-60) stitches. Work stockinette stitch in the round for 1-1-1-2-2-2 cm = ⅜"-⅜"-⅜"-¾"-¾"-¾". Knit 1 round where you increase 4-3-3-4 (5-6) stitches evenly spaced = 48-51-57-60 (63-66) stitches. Change to double pointed needles size 2.5 MM = US 1.5. Work rib (knit 1, purl 2). Bind off with knit when the sleeve-edge measures 4-4-4-5-5-5 cm = 1½"-1½"-1½"-2"-2"-2". Work the other sleeve-edge in the same way. ASSEMBLY: Lay the right band (the bind-off band) under the left band and sew down. Sew the buttons onto the right band. |
||||||||||||||||||||||||||||
Diagram explanations |
||||||||||||||||||||||||||||
|
||||||||||||||||||||||||||||
|
||||||||||||||||||||||||||||
|
||||||||||||||||||||||||||||
|
||||||||||||||||||||||||||||
Have you finished this pattern?Tag your pictures with #dropspattern #bellflowerdress or submit them to the #dropsfan gallery. Do you need help with this pattern?You'll find 29 tutorial videos, a Comments/Questions area and more by visiting the pattern on garnstudio.com. © 1982-2025 DROPS Design A/S. We reserve all rights. This document, including all its sub-sections, has copyrights. Read more about what you can do with our patterns at the bottom of each pattern on our site. |
||||||||||||||||||||||||||||


With over 40 years in knitting and crochet design, DROPS Design offers one of the most extensive collections of free patterns on the internet - translated to 17 languages. As of today we count 314 catalogs and 11821 patterns - 11811 of which are translated into English (US/in).
We work hard to bring you the best knitting and crochet have to offer, inspiration and advice as well as great quality yarns at incredible prices! Would you like to use our patterns for other than personal use? You can read what you are allowed to do in the Copyright text at the bottom of all our patterns. Happy crafting!
Post a comment to pattern DROPS Baby 43-11
We would love to hear what you have to say about this pattern!
If you want to leave a question, please make sure you select the correct category in the form below, to speed up the answering process. Required fields are marked *.