
Looking for a yarn?


Comments / Questions (17)
![]() Roussignol wrote:
Roussignol wrote:
Bonjour,Je fais ce pull et en comparaison du plan il y a une erreur au niveau des mesures à partir des emmanchures : sur le descriptif du devant il est noté 42-44-45-47-48-50 alors qu'il devrait être noté 50-52-54-56-58-60 exemple si on ajoute 9+32+18 c'est bien 50 et non 42. Bien à vous
11.06.2024 - 08:53DROPS Design answered:
Bonjour Mme Roussignol, les 42-44-45-47-48-50 cm de hauteur totale du devant correspondent à la hauteur de l'encolure, la hauteur totale du devant sera de 50-52-54-56-58-60 cm une fois les épaules terminées; même hauteur qu'indiqué dans le schéma. Ou bien ai-je mal compris votre question?
12.06.2024 - 07:54
![]() Märta wrote:
Märta wrote:
Hej! De 92-110 maskor som ska plockas upp för halskanten, är det inklusive eller exklusive de maskor som lagts att vila på tråd från att man har stickat framstycket? :)
07.10.2023 - 17:15DROPS Design answered:
Hei Märta De 92-110 er inkludert maskene fra tråden. mvh DROPS Design
16.10.2023 - 13:42
![]() Pernille wrote:
Pernille wrote:
Hej. Jeg stillede et spørgsmål tidligere, men jeg tror ikke helt jeg forstod svaret…😅 Når der bliver færre og færre masker ved ærmerne (når jeg tager ind hver 5,5cm) Skal jeg så reducere antallet af masker der strikkes ret på hver side af mønstret? Så istedet for at strikke 20 masker i retstrik på hver side af mønsteret, skal jeg så strikke 19,18,17 osv? I takt med at jeg tager ind? Jeg håber I kan hjælpe. Mvh. Pernille
26.09.2022 - 20:09DROPS Design answered:
Hej Pernille, du fortsætter med diagrammet og når du tager ind under ærmet, så tager du kun ind i de glatstrikkede masker :)
27.09.2022 - 09:12
![]() Pernille wrote:
Pernille wrote:
Hej. Jeg er kommet igang med ærmerne, men jeg er lidt i tvivl om hvordan jeg fortsætter mønsteret når jeg også er gået igang med at tage ind for hver 5,5 cm? Når jeg tager ind, er der jo ikke længere masker nok til at køre 20m ret, 14+7m mønster og 20 m. Ret… skal jeg nedsætte antallet af masker, der strikkes i ret på hver side af mønsteret? Jeg håber mit spørgsmål giver mening😊 Mvh. Pernille
25.09.2022 - 22:12DROPS Design answered:
Hei Pernille. Ja, det vil bli færre masker når du feller under ermene og hullmønster vil forsvinne. Bare påse at ikke hullmønstrene forskyver seg (slik at hullmønstrene blir rett ovenfor hverandre), men kommer i midten/ovenfor hverandre. mvh DROPS Design
26.09.2022 - 12:01
![]() Marie-Louise wrote:
Marie-Louise wrote:
Tak for svar, men jeg er stadig forvirret ☺️ Hvad gør jeg på mønsteret, dér hvor jeg normalt strikker vrang? Skal jeg gøre noget specielt fra retsiden for at få det til at se rigtigt ud? Når jeg strikker rundt, kommer jeg aldrig om på vrangsiden ☺️
04.05.2022 - 10:12DROPS Design answered:
Hele ærmet strikkes i glatstrik, det vil sige at du strikker ret på hver pind når du strikker rundt - så den pind (hver 2.pind) som du før strikkede vrang, strikker du nu ret fra retsiden :)
04.05.2022 - 10:31
![]() Marie-Louise wrote:
Marie-Louise wrote:
Jeg skal til at igang med ærmet på 231-28, og jeg forstår ikke hvordan den skal strikkes med mønsteret. Der strikkes rundt på strømpepinde, og mønsteret strikkes oppefra og ned. Strikkes der fra ret- eller vrang siden? Jeg kan simpelthen ikke lure det 🙈 håber I kan hjælpe.
03.05.2022 - 20:19DROPS Design answered:
Hej Marie-Louise, ja du strikker ret fra retsiden og følger diagrammet på nøjagtig samme måde som for & bagstykke. God fornøjelse!
04.05.2022 - 10:09
![]() Lena Manske wrote:
Lena Manske wrote:
Hallo, ich habe eine Frage. Bin beim Vorderteil. In der Anleitung steht, dass ich die Maschen für den Halsausschnitt stilllegen soll. Muss ich sie stilllegen oder abketten? Ich finde nichts, wo sie wieder aufgenommen werden. Vielen Dank für eine Antwort.
26.04.2022 - 22:31DROPS Design answered:
Liebe Frau Manske, diese Maschen werden stillgelegt, wenn Sie dann später die Halsblende stricken, dann fassen Sie die Maschen rund den Hals - einschließlich diese stillgelegten Maschen . Viel Spaß beim stricken!
27.04.2022 - 08:20
![]() Soile Halm wrote:
Soile Halm wrote:
Löytyykö dropsilta s-kokoisen naisen ainaoikein puseron ilmaisohje?
09.04.2022 - 12:29DROPS Design answered:
Hei, katso esim. seuraavat ohjeet: DROPS 179-19, 168-17, 155-7, 148-36 tai DROPS Extra 0-1139.
04.05.2022 - 17:20
![]() Jytte Genath wrote:
Jytte Genath wrote:
Der står at jeg skal begynde med 1 kantmaske og 6 masker glatstrikning, er det 6 pinde glatstrikning der menes ??? Derefter strikkes der mønster over de næste 70 masker ? Det passer ikke med maskeantallet strikker str. medium efter indtagning er der 91 m på pinden. Håber meget i kan hjælpe mig. Mvh Jytte
30.03.2022 - 16:27
![]() Jytte Genath wrote:
Jytte Genath wrote:
Er igang med at strikke sweater 231-28 og skal igang med hulmønstret, men kan ikke helt forstå forklaringen, håber i kan løse opgaven for mig. Jeg har strikket andre trøjer af samme type, måske der er en fejl i opskriften. Vh Jytte
28.03.2022 - 16:19DROPS Design answered:
Hej Jytte. Det ser inte ut som det är något fel. Vilken del är det du har problem med? Mvh DROPS Design
30.03.2022 - 14:56
|
||||||||||||||||||||||
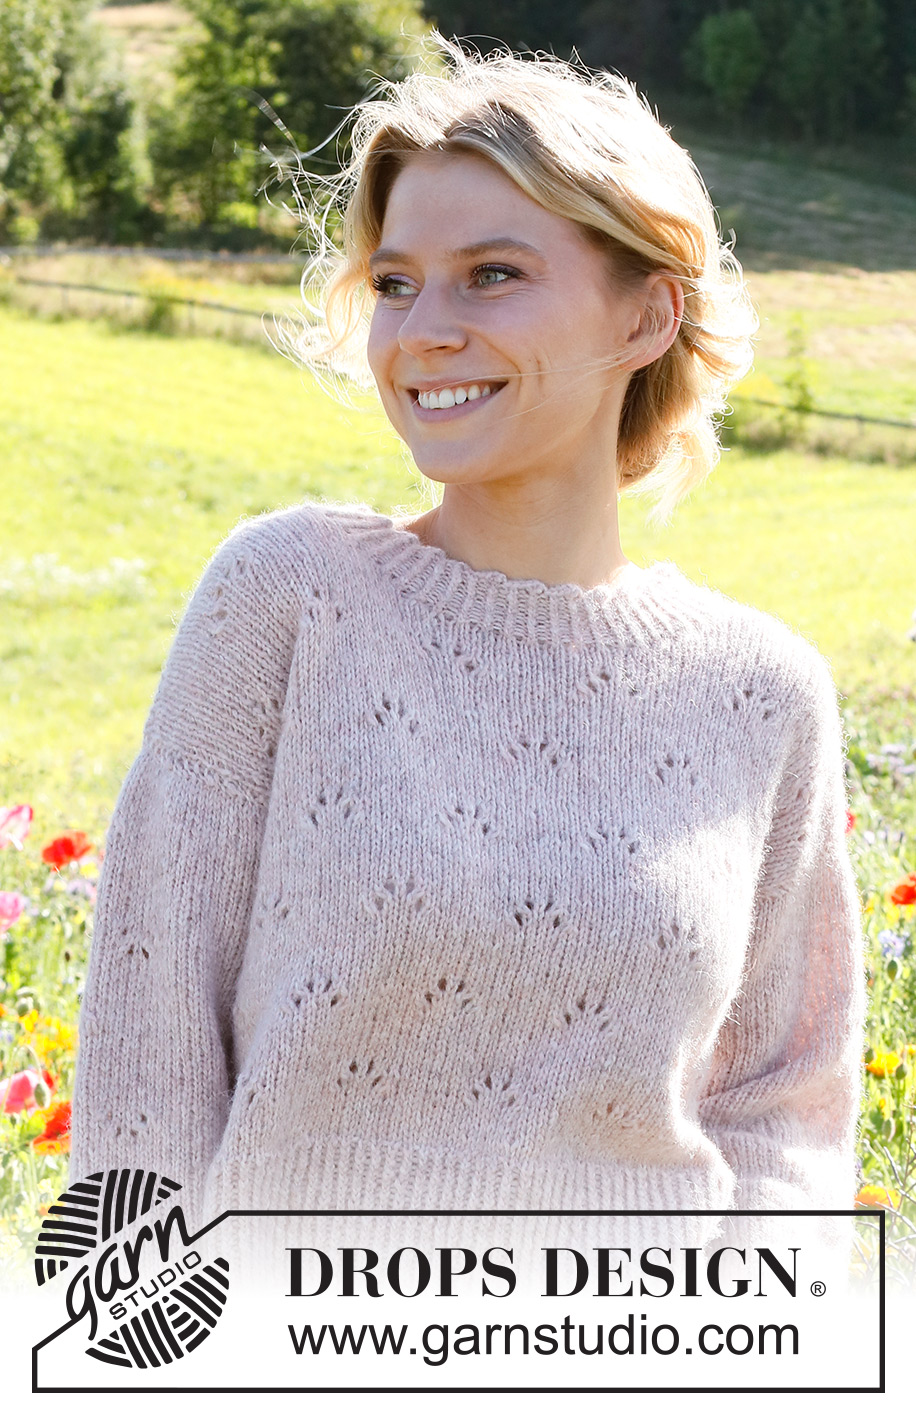
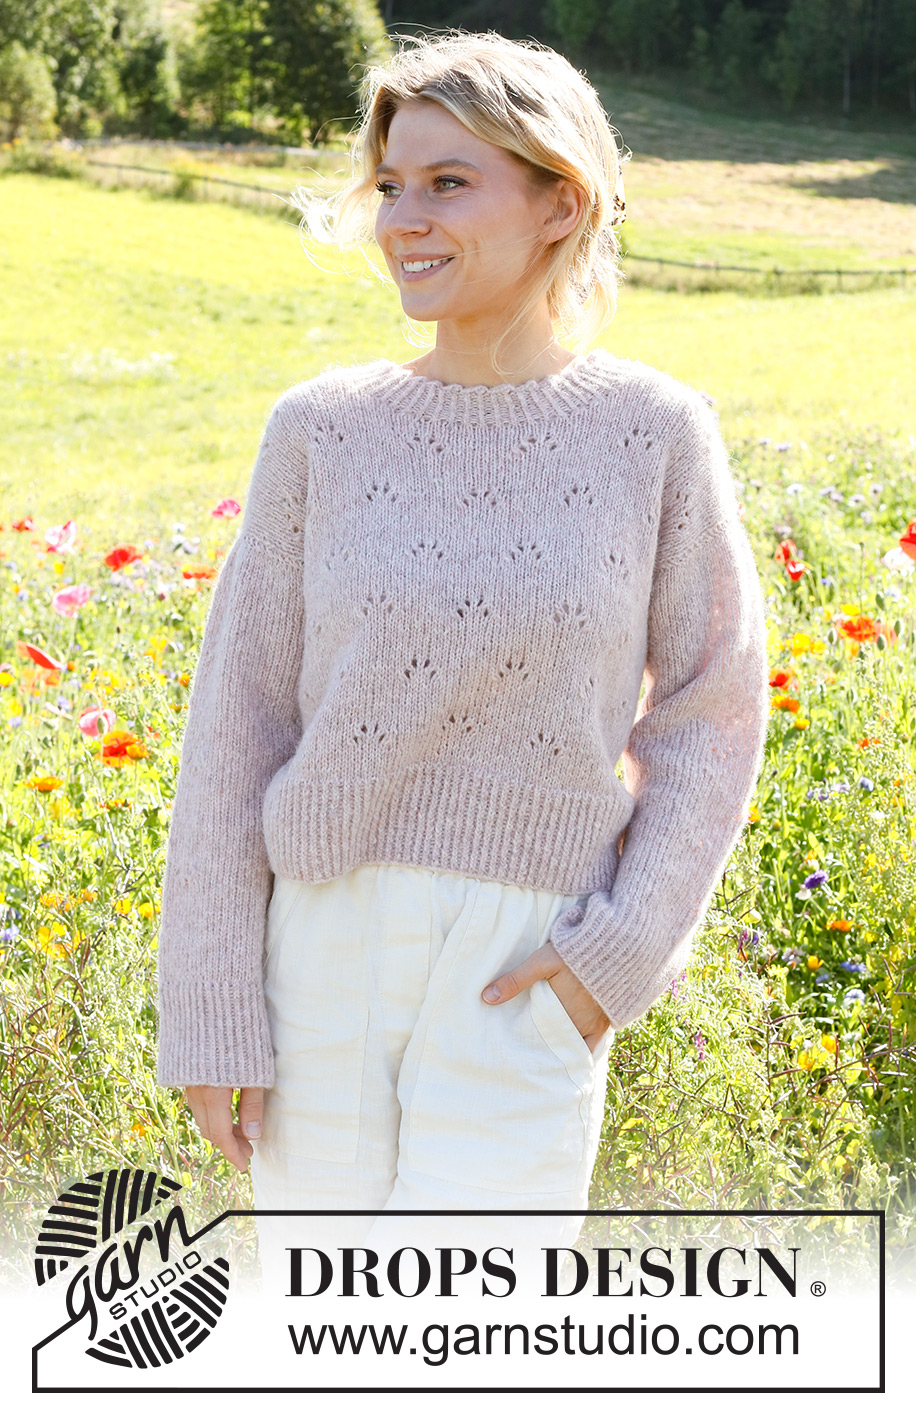
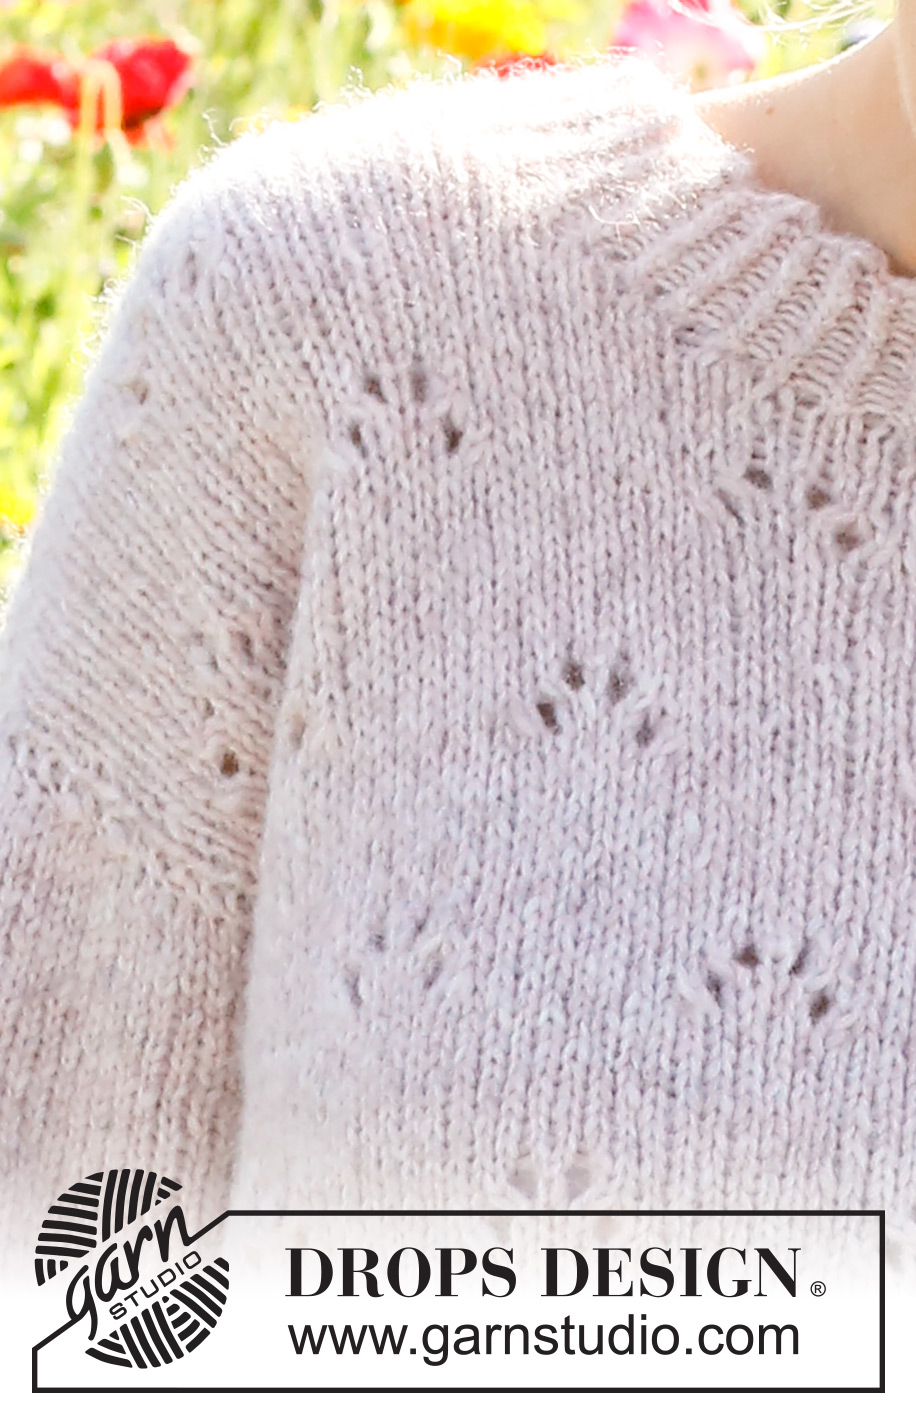
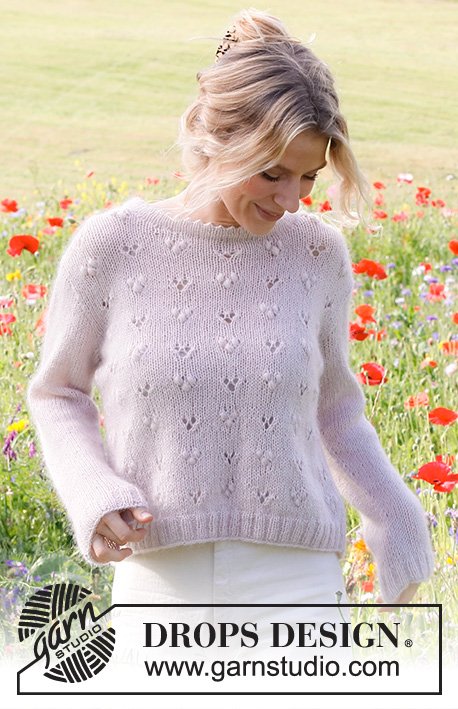
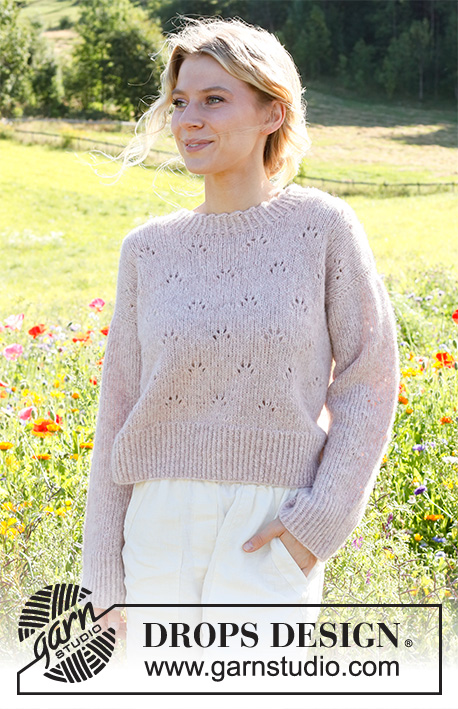
Sweetness Imprint Sweater#sweetnessimprintsweater |
||||||||||||||||||||||
 |
 |
|||||||||||||||||||||
Knitted sweater in DROPS Air. The piece is worked bottom up, with lace pattern and picot-edge. Sizes S - XXXL.
DROPS 231-28 |
||||||||||||||||||||||
|
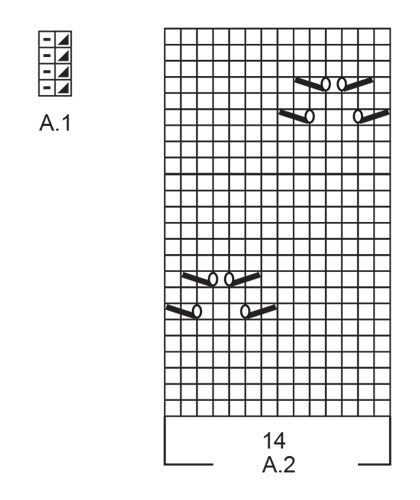
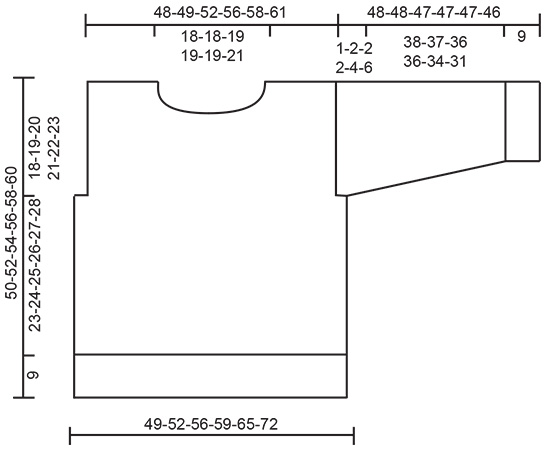
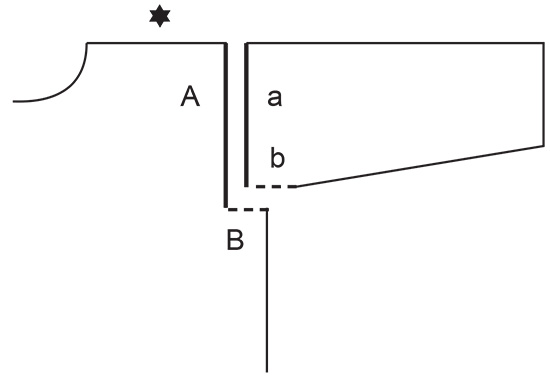
------------------------------------------------------- EXPLANATIONS FOR THE PATTERN: ------------------------------------------------------- RIDGE/GARTER STITCH (worked back and forth): Knit all rows. 1 ridge = knit 2 rows. PATTERN: See diagrams A.1 and A.2. The diagrams show all rows in the pattern from the right side. DECREASE/INCREASE TIP (evenly spaced): To work out how to decrease/increase evenly, count the total number of stitches on needle (e.g. 104 stitches), minus the edge stitches (e.g. 2 stitches) and divide by number of decreases/increases to be made (e.g. 19) = 5.3. In this example, decrease by knitting together approx. each 4th and 5th stitch. Do not decrease the edge stitches. When increasing, make 1 yarn over after approx. each 5th stitch. On the next round purl the yarn overs twisted to avoid holes. DECREASE TIP (for sleeves): Decrease 1 stitch on either side of the marker as follows: Work until there are 3 stitches left before the marker, knit 2 together, knit 2 (marker sits between these 2 stitches), slip 1 stitch as if to knit, knit 1 and pass the slipped stitch over the knitted stitch (2 stitches decreased). PICOT: Knit 1, * insert the right needle between the next 2 stitches (not through the stitches) on the left needle, make 1 yarn over on the right needle, pull the yarn over through the stitches and place it on the left needle *, work from *-* a total of 3 times (= 3 yarn overs on left needle), knit and bind off 7 stitches (= 1st stitch on right needle + 3 yarn overs + 3 stitches). Work from *-* and bind off 7 stitches in the same way along the whole edge. Cut the strand and pull it through the last stitch. Fasten the strand. BINDING-OFF TIP: To avoid the bind-off edge being tight you can bind off with a larger size needle. If the edge is still tight, make 1 yarn over after approx. each 4th stitch at the same time as binding off; the yarn overs are bind off as normal stitches. ------------------------------------------------------- START THE PIECE HERE: ------------------------------------------------------- SWEATER – SHORT OVERVIEW OF THE PIECE: The front and back pieces are worked separately, back and forth and bottom up. The sleeves are started back and forth, then worked in the round, top down. The piece is assembled and the neck is worked in the round to finish, with a picot-edge. FRONT PIECE: Cast on 104-112-120-126-140-154 stitches (including 1 edge stitch on each side) with circular needle size 4 MM = US 6 and DROPS Air. Work rib as follows: 1 edge stitch in GARTER STITCH – read description above, A.1 until there is 1 stitch left and 1 edge stitch in garter stitch. Continue back and forth like this for 9 cm = 3½" – adjust so the next row is from the right side. Knit 1 row where you decrease 19-21-23-23-27-29 stitches evenly spaced – read DECREASE/INCREASE TIP = 85-91-97-103-113-125 stitches. Change to circular needle size 5 MM = US 8. Purl 1 row with 1 edge stitch in garter stitch on each side. Work pattern as follows: 1 edge stitch in garter stitch, 3-6-9-5-10-16 stitches in stockinette stitch, A.2 over the next 70-70-70-84-84-84 stitches (= 5-5-5-6-6-6 repeats of 14 stitches), work the first 7 stitches in A.2, 3-6-9-5-10-16 stitches in stockinette stitch and 1 edge stitch in garter stitch. Continue this pattern until the piece measures 32-33-34-35-36-37 cm = 12½"-13"-13⅜"-13¾"-14¼"-14½". REMEMBER THE KNITTING GAUGE! At the beginning of the next 2 rows bind off 2-4-4-4-7-11 stitches for the armholes = 81-83-89-95-99-103 stitches. Continue the pattern as before over the middle 77-77-77-91-91-91 stitches, with 1 edge stitch in garter stitch on each side and stockinette stitch over the other 1-2-5-1-3-5 stitches on each side. Work until the piece measures 42-44-45-47-48-50 cm = 16½"-17¼"-17¾"-18½"-19"-19¾", adjusting so you have worked at least 2 rows of stockinette stitch after a whole lace pattern before starting the neck. Continue with stockinette stitch and 1 edge stitch in garter stitch on each side. Place the middle 15-15-17-17-17-19 stitches on a thread for the neck and finish each shoulder separately. Bind off on each row from the neck as follows: 2 stitches 3 times and 1 stitch 2 times = 25-26-28-31-33-34 stitches on the shoulder. Continue working until the piece measures 50-52-54-56-58-60 cm = 19¾"-20½"-21¼"-22"-22¾"-23⅝". Bind off. Work the other shoulder in the same way. BACK PIECE: Cast on and work in the same way as the front until the back piece measures 47-49-51-53-55-57 cm = 18½"-19¼"-20"-21"-21⅝"-22½", adjusting so you have worked at least 2 rows of stockinette stitch after a whole lace pattern before starting the neck. Continue with stockinette stitch and 1 edge stitch in garter stitch on each side. Bind off the middle 29-29-31-31-31-33 stitches for the neck and finish each shoulder separately. On the next row from the neck bind off 1 stitch = 25-26-28-31-33-34 stitches on the shoulder. Continue working until the piece measures 50-52-54-56-58-60 cm = 19¾"-20½"-21¼"-22"-22¾"-23⅝". Bind off. Work the other shoulder in the same way. SLEEVES: The sleeves are worked top down. Cast on 61-65-69-71-75-79 stitches with circular needle size 5 MM = US 8 and DROPS Air. Work stockinette stitch back and forth for 1-2-2-2-4-6 cm = ⅜"-¾"-¾"-¾"-1½"-2⅜". Then continue in the round as follows: Insert 1 marker at the beginning of the round. Allow the marker to follow your work onwards; it is used when decreasing under the sleeve. Change to double pointed needles size 5 MM = US 8 and work pattern in the round as follows: 20-22-24-25-27-29 stitches in stockinette stitch, A.2 over the next 14 stitches, work the first 7 stitches in A.2 (so the pattern is symmetrical) and 20-22-24-25-27-29 stitches in stockinette stitch. When the sleeve measures 3-4-4-4-6-8 cm = 1⅛"-1½"-1½"-1½"-2⅜"-3⅛" from the cast-on edge, decrease 1 stitch on each side of the marker – read DECREASE TIP-2. Decrease like this every 5½-4-3½-3½-3-2 cm = 2⅛"-1½"-1¼"-1¼"-1⅛"-¾" a total of 6-7-8-8-9-11 times = 49-51-53-55-57-57 stitches. Continue working until the sleeve measures 39-39-38-38-38-37 cm = 15¼"-15¼"-15"-15"-15"-14½", adjusting so you have worked at least 2 rows of stockinette stitch after a whole lace pattern before starting the rib. Knit 1 round where you increase 11-13-13-13-13-13 stitches evenly spaced = 60-64-66-68-70-70 stitches. Change to double pointed needles size 4 MM = US 6. Work A.1 in the round for 9 cm = 3½". Bind off with knit over twisted-knit and purl over purl – read BINDING-OFF TIP. The sleeve measures 48-48-47-47-47-46 cm = 19"-19"-18½"-18½"-18½"-18". Work the other sleeve in the same way. ASSEMBLY: Sew the shoulder seams – start on the outside and work towards the neck. Sew the sleeve cap to the armhole and sew the split to the bottom of the armhole – see sketch. Sew the side seams inside the 1 edge stitch. NECK: Start on one shoulder and knit up 92 to 110 stitches inside 1 edge stitch around the neck, with short circular needle size 4 MM = US 6 and DROPS Air. The number of stitches should be divisible by 4. Work A.1 in the round for 4 cm = 1½". Bind off with PICOT – read description above. |
||||||||||||||||||||||
Diagram explanations |
||||||||||||||||||||||
|
||||||||||||||||||||||
|
||||||||||||||||||||||
|
||||||||||||||||||||||
|
||||||||||||||||||||||
Have you finished this pattern?Tag your pictures with #dropspattern #sweetnessimprintsweater or submit them to the #dropsfan gallery. Do you need help with this pattern?You'll find 31 tutorial videos, a Comments/Questions area and more by visiting the pattern on garnstudio.com. © 1982-2025 DROPS Design A/S. We reserve all rights. This document, including all its sub-sections, has copyrights. Read more about what you can do with our patterns at the bottom of each pattern on our site. |
||||||||||||||||||||||


With over 40 years in knitting and crochet design, DROPS Design offers one of the most extensive collections of free patterns on the internet - translated to 17 languages. As of today we count 314 catalogs and 11822 patterns - 11812 of which are translated into English (US/in).
We work hard to bring you the best knitting and crochet have to offer, inspiration and advice as well as great quality yarns at incredible prices! Would you like to use our patterns for other than personal use? You can read what you are allowed to do in the Copyright text at the bottom of all our patterns. Happy crafting!
Post a comment to pattern DROPS 231-28
We would love to hear what you have to say about this pattern!
If you want to leave a question, please make sure you select the correct category in the form below, to speed up the answering process. Required fields are marked *.