
Looking for a yarn?


Comments / Questions (100)
![]() Alida wrote:
Alida wrote:
Hi! I cannot find the place where I can see how many balls of yarn I should buy...Perhaps I just do not know where to look?
25.06.2025 - 10:18DROPS Design answered:
Dear Alida, you will find the total amount of yarn required for each size at the top of the page, under tab "Pattern"; so that you need for example in S: 150 g DROPS Sky/50 g a ball = 3 balls DROPS Sky in size S. Happy knitting!
25.06.2025 - 15:48
![]() Cheryl Ierardi wrote:
Cheryl Ierardi wrote:
Thank you!
05.05.2025 - 01:50
![]() Cheryl Newman-Ierardi wrote:
Cheryl Newman-Ierardi wrote:
Hello. I’m making XL working on front v neck. “Then decrease inside 2 stitches, decreasing 1 stitch on each side 8-11-14-16-21-27 times = 70-stitches. V-NECK: At the same time when the piece measures 36-start to decrease for the V-neck” I’ve reached 36 cm but not the 70 stitches Should I continue decreasing until 70 stitches even though the length will increase? Thank you
04.05.2025 - 18:44DROPS Design answered:
Dear Cheryl, the V-neck is worked "at the same time" as we decrease. So we will start working the V-neck before we finish the decreases. That means that yes, you will continue with the decreases as you continue working the V-neck. You will still decrease for the armholes as neccessary while you work each shoulder. Happy knitting!
04.05.2025 - 22:25
![]() Chantal GALLÉ wrote:
Chantal GALLÉ wrote:
Y a t il un tuto spécifique pour explication du col car je ne comprends pas la dernière partie .‘\\r\\nMerci
21.04.2025 - 17:34DROPS Design answered:
Bonjour Mme Gallé, le col se tricote en allers et retours à partir du bas de l'encolure du devant droit (quand on porte le pull), quand le col est terminé, on place le côté du col du devant gauche sous le côté du col du devant droit et on coud le long des bords pour maintenir ce col - peut-être que la dernière photo pourrait vous aider à visualiser comment faire. Bon tricot!
22.04.2025 - 16:29
![]() Sandrine Chambonniere wrote:
Sandrine Chambonniere wrote:
Tres joli modèle j'aime beaucoup merci bonne journée
28.03.2025 - 05:40
![]() CatCeb wrote:
CatCeb wrote:
Bonjour, J'ai l'impression qu'il y a une erreur pour ce qui est de l'assemblage. Je crois qu'on devrait lire "Coudre entre elles les mailles rabattues des EPAULES"... Merci pour tous ces beaux modèles. Bonne continuation à toute l'équipe Cordialement Cathy C.
18.03.2025 - 13:33DROPS Design answered:
Bonjour Cathy et merci pour votre retour, vous avez tout à fait raison, correction faite! Bonne continuation!
18.03.2025 - 16:48
![]() Ann Barbieri wrote:
Ann Barbieri wrote:
I’m making this in a L. I have many questions! don’t understand the directions for decreasing the armholes and v-neck. Specifically, “Then decrease inside 2 stitches”. What does “inside mean? Should I decrease at the marker 14 times? But then it says “start to decrease for the v-neck”. Isn’t that what I was doing? So confusing! Is the decreasing done on the knit side only or both sides? I’m very disappointed with this pattern. The instructions are so confusing!
28.02.2025 - 19:27DROPS Design answered:
Dear Ann, the decreases for the armholes are worked as indicated in DECREASE TIP-2 (for armholes), you decrease right before or right after the 2 final/ initial stitches, (at the beginning or end of the row). These are the armhole decreases, since these decreases are worked in the sides, where the armholes are located, not in the center, where the neck is). Decrease on 14 rows (1 stitch at the beginning of the row, 1 stitch at the end of the row). Then, when you reach 56 cm you decrease for the V-neck; first you cast off the center stitches then you cast off stitches on rows that start next to the middle cast off stitches, which is a different side for each shoulder. Happy knitting!
02.03.2025 - 20:10
![]() Axelle wrote:
Axelle wrote:
Bonjour, Je ne vois pas où est indiqué le nombre de pelotes en fonction de taille. Merci d'avance.
09.02.2025 - 23:35DROPS Design answered:
Bonjour Axelle, la quantité est indiqué pour chaque taille, au poids, dans l'en-tête, ainsi, il faut, en taille S par exemple, 150 g DROPS Sky / 50 g la pelote = 3 pelotes DROPS Sky. Bon tricot!
10.02.2025 - 11:52
![]() Toni Tanderup wrote:
Toni Tanderup wrote:
Jeg er færdig med ribben og nu begyndt på glatstrik på ryggen. Men på fotoet synes jeg bestemt det ser ud som retstrik? Hvad er rigtigt? Mvh. Toni
23.01.2025 - 23:56DROPS Design answered:
Hei Toni. Både bakstykket og forstykket strikkes i glattstrikk. Kun kantmaskene som strikkes i retstrik. mvh DROPS Design
27.01.2025 - 09:40
![]() Hennebicq wrote:
Hennebicq wrote:
Bonjour je me lance pour la 1ere fois en aiguille circulaire et je constate que ce modele tres joli est fait en deux parties dos puis devant. Je pensais que le travail en circulaire consistait à monter la totalite des points dos plus devant et de tricoter en rond. Or ce n est pas le cas. Puis je suivre les instructions avec des aiguilles droites dans ce cas. Merci infiniment pour votre reponse. Bonne annee à vous
07.01.2025 - 11:40DROPS Design answered:
Bonjour Mme Hennebicq, pour ce modèle, on tricote le devant et le dos séparément, en allers et retours sur aiguille circulaire pour avoir suffisamment de place pour y loger toutes les mailles, vous pouvez donc tout à fait les tricoter sur aiguilles droites. Vous pourrez utiliser l'aiguille circulaire pour tricoter le col, car même s'il se tricote également en allers et retours, l'aiguille circulaire donnera la flexibilité requise pour tricoter tout autour de l'encolure. Retrouvez plus d'infos sur les aiguilles circulaires ici. Bon tricot!
07.01.2025 - 13:46
|
|
Audrey Vest#audreyvest |
|
 |
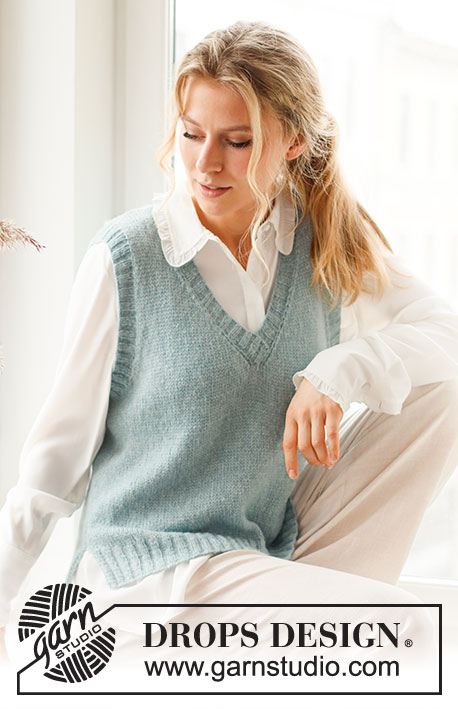 |
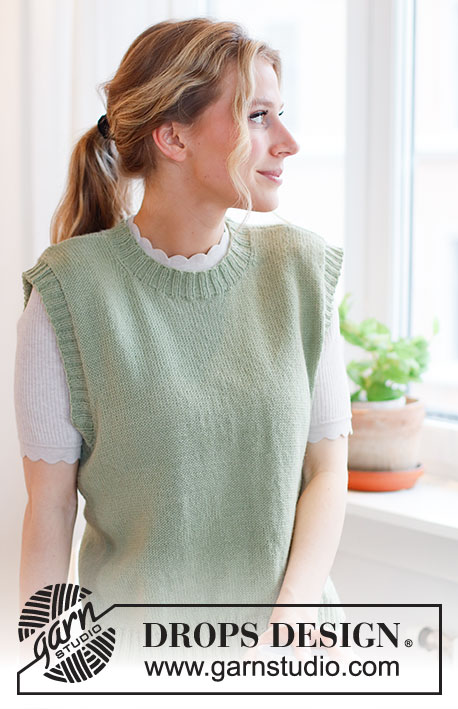
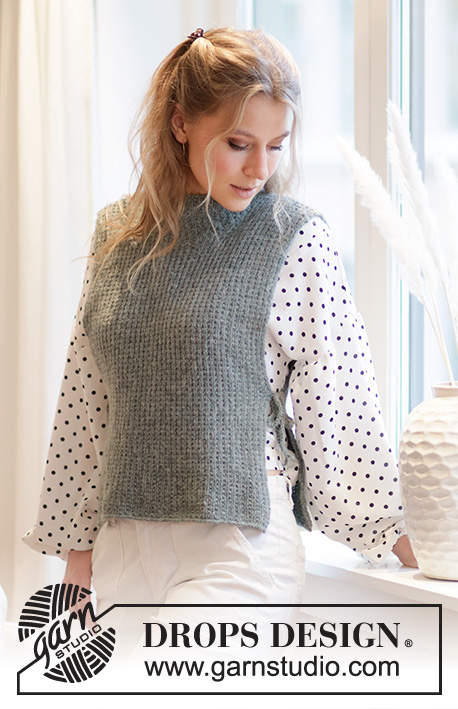
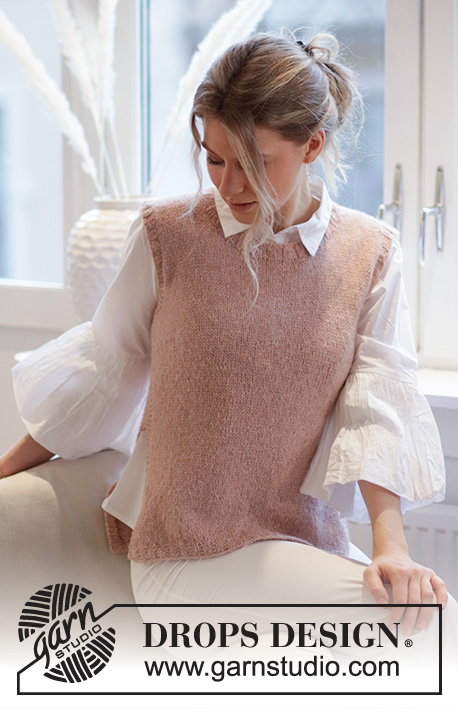
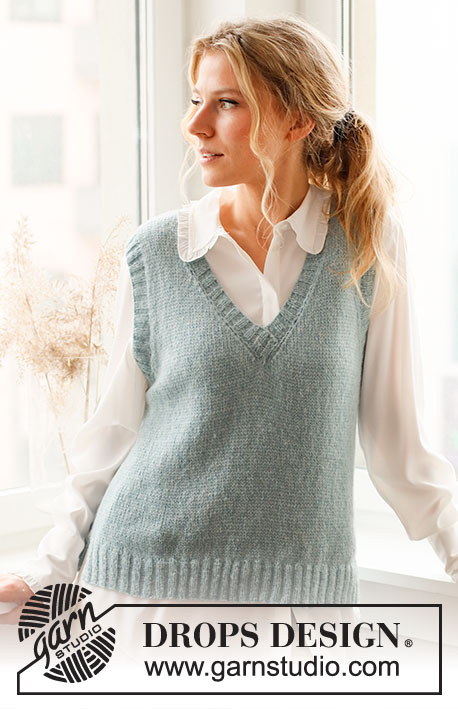
Knitted vest in DROPS Sky. The piece is worked in stockinette stitch with ribbed edges, V-neck and split in the sides. Sizes S - XXXL.
DROPS 220-43 |
|
|
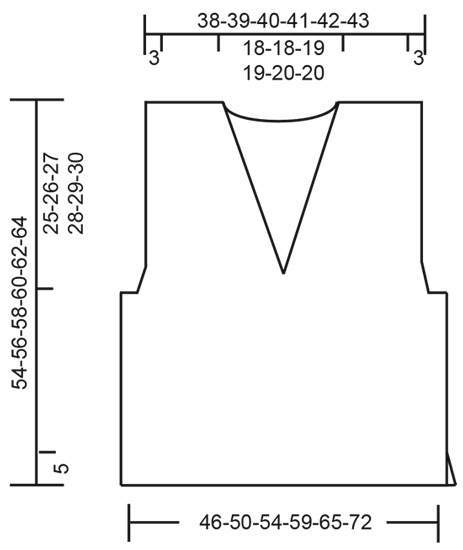
------------------------------------------------------- EXPLANATIONS FOR THE PATTERN: ------------------------------------------------------- RIDGE/GARTER STITCH (worked back and forth): Knit all rows. 1 ridge in height = Knit 2 rows. DECREASE TIP (evenly spaced): To work out how to decrease evenly, count the total number of stitches on the needle (e.g. 118 stitches) and divide by the number of decreases to be made (e.g. 24) = 4.9. In this example, decrease by knitting together approx. each 4th and 5th stitch. DECREASE TIP-2 (for armholes): Decrease on the inside of 2 stitches. All decreases are worked from the right side. Decrease as follows at the beginning of the row: Knit 2, slip 1 stitch as if to knit, knit 1 and pass the slipped stitch over the knitted stitch. Decrease as follows at the end of the row: Work until there are 4 stitches left, knit 2 together and knit the last 2 stitches. ------------------------------------------------------- START THE PIECE HERE: ------------------------------------------------------- VEST – SHORT OVERVIEW OF THE PIECE: The piece is worked back and forth, in sections and sewn together to finish. The V-neck and armhole edges are worked in the round to finish. BACK PIECE: Cast on 118-130-138-150-166-182 stitches with circular needle size 3.5 MM = US 4 and Sky. Purl 1 row (= wrong side). Then work the next row from the right side as follows: 2 edge stitches in GARTER STITCH – read description above, * knit 2, purl 2 *, work from *-* until there are 4 stitches left, knit 2 and finish with 2 edge stitches in garter stitch. Continue this rib for 6 cm = 2⅜". Knit 1 row from the wrong side then knit 1 row from the right side where you decrease 24-28-28-30-34-36 stitches evenly spaced – read DECREASE TIP = 94-102-110-120-132-146 stitches. Change to circular needle size 4.5 MM = US 7. Work stockinette stitch back and forth, with 1 edge stitch in garter stitch on each side. REMEMBER THE KNITTING GAUGE! When the piece measures 29-30-31-32-33-34 cm = 11⅜"-11¾"-12¼"-12½"-13"-13⅜", bind off for the armholes at the beginning of each row as follows: Bind off 3 stitches 1 time, then 2 stitches 2-2-2-3-3-3 times on each side. Then decrease inside 2 stitches, decreasing 1 stitch on each side 8-11-14-16-21-27 times – read DECREASE TIP-2 = 64-66-68-70-72-74 stitches. Continue with stockinette stitch. When the piece measures 52-54-56-58-60-62 cm = 20½"-21¼"-22"-22¾"-23⅝"-24⅜", bind off the middle 34-34-36-36-38-38 stitches for the neck and each shoulder is finished separately. Bind off 1 stitch on the next row from the neck = 14-15-15-16-16-17 stitches on the shoulder. Continue working stockinette stitch until the piece measures 54-56-58-60-62-64 cm = 21¼"-22"-22¾"-23⅝"-24⅜"-25¼" (25-26-27-28-29-30 cm = 9¾"-10¼"-10⅝"-11"-11⅜"-11¾" from the bottom of the armhole). Bind off with knit from the right side (making sure the bind-off edge is not tight). Work the other shoulder in the same way. FRONT PIECE: Cast on 118-130-138-150-166-182 stitches with circular needle size 3.5 MM = US 4 and Sky. Purl 1 row (= wrong side). Then work the next row from the right side as follows: 2 edge stitches in garter stitch, * knit 2, purl 2 *, work from *-* until there are 4 stitches left, knit 2 and finish with 2 edge stitches in garter stitch. Continue this rib for 6 cm = 2⅜". Knit 1 row from the wrong side then knit 1 row from the right side where you decrease 24-28-28-30-34-36 stitches evenly spaced = 94-102-110-120-132-146 stitches. Change to circular needle size 4.5 MM = US 7. Work stockinette stitch back and forth with 1 edge stitch in garter stitch on each side until the piece measures 29-30-31-32-33-34 cm = 11⅜"-11¾"-12¼"-12½"-13"-13⅜". Insert 1 marker in the middle of the row, with 47-51-55-60-66-73 stitches on each side (this marker is used when working the V-neck). READ THE WHOLE OF THE NEXT SECTION BEFORE CONTINUING! Continue with stockinette stitch and bind off for the armholes at the beginning of each row as follows: 3 stitches 1 time, then 2 stitches 2-2-2-3-3-3 times on each side. Then decrease inside 2 stitches, decreasing 1 stitch on each side 8-11-14-16-21-27 times = 64-66-68-70-72-74 stitches. V-NECK: At the same time when the piece measures 31-33-34-36-37-39 cm = 12¼"-13"-13⅜"-14¼"-14½"-15¼" start to decrease for the V-neck. Start from the right side and work as before until there are 3 stitches left before the marker, knit 2 together and work 1 edge stitch in garter stitch. Place the remaining stitches on a thread without working them. Each shoulder is finished separately; do not cut the strand. The left shoulder is continued from here, working back from the wrong side. LEFT SHOULDER (front piece): Continue with stockinette stitch and 1 edge stitch in garter stitch towards the neck, decreasing inside this edge stitch at the end of each row from the right side. Decrease every 2nd row 17-17-18-18-19-19 more times (a total of 18-18-19-19-20-20 decreases, decrease by knitting 2 together, the first decrease was made when the front piece was divided) = 14-15-15-16-16-17 stitches on the shoulder. Continue with stockinette stitch and 1 edge stitch in garter stitch towards the neck until the piece measures a total of 54-56-58-60-62-64 cm = 21¼"-22"-22¾"-23⅝"-24⅜"-25¼". Bind off with knit from the right side. RIGHT SHOULDER (front piece): Place the stitches from the thread back on the needle. Continue with stockinette stitch and 1 edge stitch in garter stitch towards the neck (the first row is worked from the right side), decreasing for the neck inside the edge stitch at the beginning of each row from the right side. Decrease every 2nd row (slipping 1 stitch, knitting 1 and passing the slipped stitch over the knitted stitch) a total of 18-18-19-19-20-20 times = 14-15-15-16-16-17 stitches left on the shoulder. NOTE! The first decrease is on the first row worked). Continue with stockinette stitch and 1 edge stitch in garter stitch towards the neck until the piece measures a total of 54-56-58-60-62-64 cm = 21¼"-22"-22¾"-23⅝"-24⅜"-25¼". Bind off with knit from the right side. ASSEMBLY: Sew the shoulder seams with grafting stitches, inside the bind-off edges. Start under the armholes and sew the side seams inside the 1 edge stitch – leave approx. 6 cm = 2⅜" open for the split on each side. NECK: Start from the right side, at the bottom of the V-neck using short circular needle size 3.5 MM = US 4 and knit up 168 to 184 stitches (number of stitches must be divisible by 4 and the stitches are knitted up inside the 1 edge stitch), first along the right side, then around the back of the neck and down the left side. Work the first row from the wrong side as follows; 1 edge stitch in garter stitch, * purl 2, knit 2 *, work from *-* until there are 3 stitches left, purl 2 and finish with 1 edge stitch in garter stitch. Work this rib back and forth for 3 cm = 1⅛". Bind off with knit over knit and purl over purl. At the bottom of the V-neck, mid-front, lay the right side over the left side and sew down neatly in the outermost stitch on the neck-edge. Repeat in the same way on the inside of the neck, so the left side is sewn onto the right side. ARMHOLE-EDGE: Start from the right side by the side seam under the armhole. Using short circular needle size 3.5 MM = US 4, knit up 124 to 152 stitches around the armhole (number of stitches must be divisible by 4). Work rib in the round (knit 2, purl 2) for 3 cm = 1⅛". Bind off with knit over knit and purl over purl. Work the other armhole in the same way. |
|
|
|
Have you finished this pattern?Tag your pictures with #dropspattern #audreyvest or submit them to the #dropsfan gallery. Do you need help with this pattern?You'll find 27 tutorial videos, a Comments/Questions area and more by visiting the pattern on garnstudio.com. © 1982-2025 DROPS Design A/S. We reserve all rights. This document, including all its sub-sections, has copyrights. Read more about what you can do with our patterns at the bottom of each pattern on our site. |
|


With over 40 years in knitting and crochet design, DROPS Design offers one of the most extensive collections of free patterns on the internet - translated to 17 languages. As of today we count 314 catalogs and 11822 patterns - 11812 of which are translated into English (US/in).
We work hard to bring you the best knitting and crochet have to offer, inspiration and advice as well as great quality yarns at incredible prices! Would you like to use our patterns for other than personal use? You can read what you are allowed to do in the Copyright text at the bottom of all our patterns. Happy crafting!
Post a comment to pattern DROPS 220-43
We would love to hear what you have to say about this pattern!
If you want to leave a question, please make sure you select the correct category in the form below, to speed up the answering process. Required fields are marked *.