
Looking for a yarn?


Comments / Questions (7)
![]() Helene Eliasson wrote:
Helene Eliasson wrote:
Hej. Får inte måttet på ärmen att stämma. Min blir för smal i omkrets. Strl S: har 52 m på stickan. Med masktäth 16m/10cm får jag det till 32 cm i omkrets totalt. Ärmen ser mycket vidare ut på bilden o på måtten på skissen står det 18 + 4 cm på framstycket så alltså blir det x2=44cm omkr. Vad är det jag missar?? Med vänlig hälsning, Helene
10.10.2023 - 20:14DROPS Design answered:
Hej Helene, det kan være at det er en større størrelse som modellen har på, da vil det være flere masker fra raglanudtagningen. Du kan lægge op flere masker under ærmet og få et par cm til :)
17.10.2023 - 13:24
![]() Camilla Lindvall wrote:
Camilla Lindvall wrote:
Jag anser att antalet maskor på framstycket inte stämmer i storlek M. Jag får 5 m över efter att ha följt instruktionen om 20 m och 5 rapporter plus 2 för att börja och sluta lika. Ökade till 24 och 6 vilket ju ger följdeffekter senare i mönstret. Maskantalet för ärmar och bakstycke stämmer däremot. Mvh Camilla
03.07.2023 - 13:32
![]() Isabelle Gravier Calleau wrote:
Isabelle Gravier Calleau wrote:
Bonjour, puis-je changer de fil et utiliser la laine Népal seule pour réaliser ce modèle ? Merci
23.11.2022 - 11:04DROPS Design answered:
Bonjour Mme Gravier Calleau, tout à fait, vous pouvez utiliser Nepal (laine du groupe C) au lieu de 2 fils du groupe A (Alpaca et Kid-Silk ici); cette leçon explique comment calculer la quantité correspondante. Bon tricot!
23.11.2022 - 15:44
![]() Elena wrote:
Elena wrote:
Bonjour, et merci pour vos modèles. Ma question porte sur l’étape M, L et Xxl qui détaille la mise en place du motif A2. Lorsque l’on a fini le devant et le premier raglan, doit-on continuer pour la manche le motif A2 là où il s’était arrêté, a c’est à dire qu’il s’est fini avec 2 mailles envers avant le raglan, on doit commencer la manche avec 2 mailles endroit? Ou bien doit-on recommencer le motif A2 au début de la manche avec 2 mailles envers? Par avance merci.
26.03.2022 - 06:19DROPS Design answered:
Bonjour Elena, au 1er rang de A.2 (1ère augmentation du raglan), vous recommencez A.2 au début de chaque pièce/partie, autrement dit, vous tricotez les 8-12-12 mailles de la manche en répétant 2-3-3 fois les 4 mailles de A.2 (en commençant par 2 m env au 1er rang). Vous tricotez les augmentations de chaque pièce en suivant sa maille suivante/précédente pour élargir A.2 sur chaque pièce, le point fantaisie ne tombera pas juste car vous avez 2 mailles jersey entre chaque A.2/chaque pièce (= raglans). Bon tricot!
28.03.2022 - 08:29
![]() Helene wrote:
Helene wrote:
Er der ikke en fejl i antal af nøgler/g for Kid-Silk Jeg skal strikke i str. L og opskriften siger 350 g Alpaca som vil udgøre 1.169 m. Hvor Kid/Silk 150 g kun bliver 630 m. Med venlig hilsen Helene
19.05.2021 - 19:02DROPS Design answered:
Hej Helene. Det är kun 25 g per nystan i DROPS Kid-Silk. Du har alltså 6 nystan Kid-Silk vilket blir 6 x 210 m = 1260 m. Mvh DROPS Design
20.05.2021 - 09:16
![]() Hilde wrote:
Hilde wrote:
Jeg skal strikke størrelse M. Får ikke maskeantallet til å stemme med oppskriften. Det står at det skal økes til 124 masker. Når man skal strikke mønster etter inndeling blir dette 130 masker. 5+24+12+48+12+24+5 =130
12.05.2021 - 08:28DROPS Design answered:
Hej Hilde, i stykket med M,L og XXL skal du følge den første størrelse som modsvarer M. 5+20+2+2+8+2+2+40+2+2+8+2+2+20+2+5 = 124 +8 nye = 132 masker efter første pind med raglanudtagning
12.05.2021 - 10:55
![]() Emma wrote:
Emma wrote:
Maskantalet efter ökningar stämmer inte. 92 + 14 är inte 116. Ska ökningarna vara fler eller antalet maskor från start vara 102 istället för 92?
28.03.2021 - 18:24DROPS Design answered:
Hei Emma. Om du tenker på økningene i halskanten i str. M så stemmer det som står i oppskriften. Legg opp 92 masker. Når vrangborden er ferdig, strikkes det 1 pinne rett fra retten der det økes 24 masker jevnt fordelt = 92+24 = 116 masker. mvh DROPS design
12.04.2021 - 15:13
|
|||||||
Lavender Sprinkles Jacket#lavendersprinklesjacket |
|||||||
 |
 |
||||||
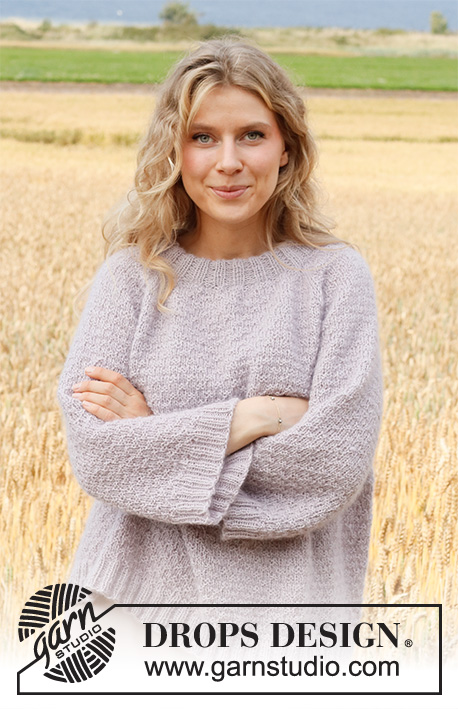
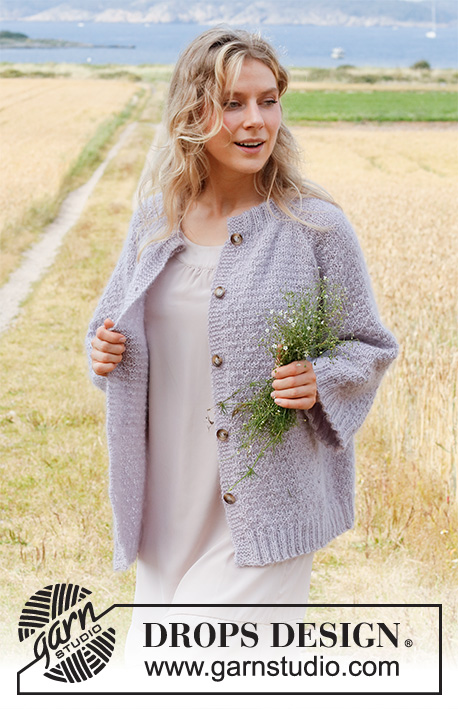
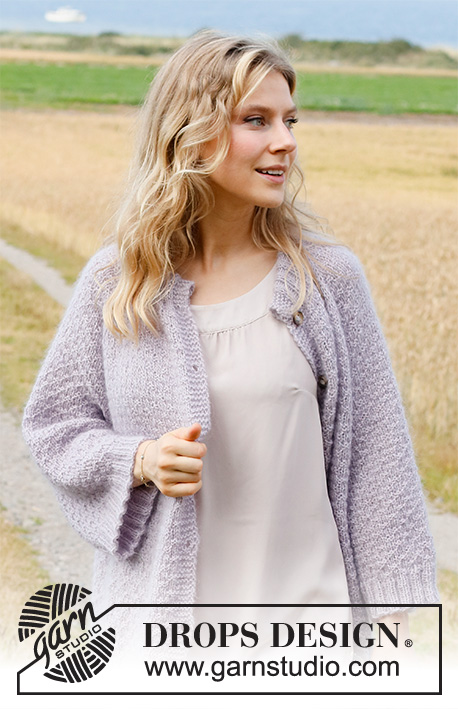
Knitted jacket in DROPS Alpaca and DROPS Kid-Silk. The piece is worked top down, with raglan, double neck, textured pattern and ¾-length sleeves. Sizes XS - XXL.
DROPS 222-11 |
|||||||
|
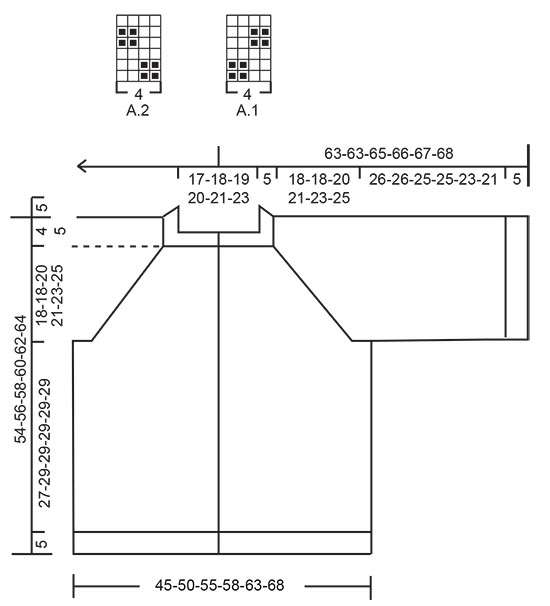
------------------------------------------------------- EXPLANATIONS FOR THE PATTERN: ------------------------------------------------------- RIDGE/GARTER STITCH (worked back and forth): Knit all rows. 1 ridge in height = Knit 2 rows. PATTERN: See diagrams A.1 and A.2. The diagrams show all rows in the pattern from the right side. INCREASE TIP-1 (evenly spaced): To work out how to increase evenly, count the total number of stitches on the needle (e.g. 88 stitches) minus bands (e.g. 10 stitches) and divide the remaining stitches by the number of increases to be made (e.g. 12) = 6.5. In this example, increase by making 1 yarn over after alternately each 6th and 7th stitch. Do not increase on bands. On the next row work the yarn overs twisted to avoid holes. RAGLAN: All increases are worked from the right side! Increase 1 stitch on each side of the marker threads, in the transitions between sleeves and body as follows (= 8 stitches increased on the row): Work until there is 1 stitch left before the marker thread, make 1 yarn over, knit 2 (the marker thread sits between these 2 stitches), work 1 yarn over. On the next row (wrong side) work the yarn overs twisted to avoid holes. The new stitches are worked into A.1/A.2. NOTE: 1 stitch on each side of all the marker threads is worked in stockinette stitch until the yoke is finished. BUTTONHOLES: Work buttonholes on the right band (when the garment is worn). Work from the right side when there are 3 stitches left on the row as follows: Make 1 yarn over, knit 2 together and knit 1. On the next row (wrong side), knit the yarn over to leave a hole. The first buttonhole is worked when the neck is finished. The other 4-4-5-5-5-5 buttonholes are then worked with approx. 9-9-8-8½-9-9 cm = 3½"-3½"-3⅛"-81/8"-3½"-3½" between each one. BINDING-OFF TIP: To avoid the bind-off edge being tight you can bind off with a larger size needle. If the edge is still tight, make 1 yarn over after approx. each 4th stitch at the same time as binding off; the yarn overs are bind off as normal stitches. ------------------------------------------------------- START THE PIECE HERE: ------------------------------------------------------- JACKET – SHORT OVERVIEW OF THE PIECE. The neck and yoke are worked back and forth with circular needle, from mid front and top down. The yoke is divided for body and sleeves and the body continued back and forth with circular needle. The sleeves are worked in the round with double pointed needles/short circular needle, top down. The whole garment is worked with 1 strand of each quality. NECK: Cast on 88-92-96-100-104-108 stitches (including 5 band stitches on each side towards the mid-front) with circular needle size 4.5 MM = US 7 and 1 strand Alpaca and 1 strand Kid-Silk (= 2 strands). Purl 1 row (= wrong side). The next row is worked as follows from the right side: 5 band stitches in GARTER STITCH – read description above, * knit 2, purl 2 *, work from *-* until there are 7 stitches left on the row, knit 2 and finish with 5 band stitches in garter stitch. Continue this rib for 11 cm = 4⅜". When the rib is finished, knit 1 row from the right side where you increase 12-24-28-32-36-40 stitches evenly spaced – read INCREASE TIP and remember the BUTTONHOLES on the right band – read description above = 100-116-124-132-140-148 stitches. Purl 1 row from the wrong side (yarn overs purled twisted and bands worked in garter stitch). Insert 1 marker after the band at the beginning of the row. The yoke is measured from this marker! YOKE: Change to circular needle size 5.5 MM = US 9. Insert 4 marker threads (without working the stitches) as described below – these threads are used when increasing to raglan: Count 22-26-28-28-30-32 stitches (= front piece), insert 1 marker thread before the next stitch, count 12-12-12-16-16-16 stitches (= sleeve), insert 1 marker thread before the next stitch, count 32-40-44-44-48-52 stitches (= back piece), insert 1 marker thread before the next stitch, count 12-12-12-16-16-16 stitches (= sleeve), insert 1 marker thread before the next stitch. There are 22-26-28-28-30-32 stitches left after the last marker thread (= front piece). The first row is worked as follows from the right side: XS, S and XL: 5 band stitches in garter stitch, work A.1 over the next 16-20-24 stitches (= 4-5-6 repeats of 4 stitches), increase to RAGLAN on each side of the marker thread – read description above (remember that 1 stitch on each side of all marker threads is worked in stockinette stitch), work A.2 over the next 8-8-12 stitches (= 2-2-3 repeats of 4 stitches), work the first 2 stitches in A.2 so the pattern is symmetrical on the sleeve, increase to raglan on each side of the marker thread, work A.2 over the next 28-36-44 stitches (= 7-9-11 repeats of 4 stitches), work the first 2 stitches in A.2 so the pattern is symmetrical on the back piece, increase to raglan on each side of the marker thread, work A.2 over the next 8-8-12 stitches, work the first 2 stitches in A.2, increase to raglan on each side of the marker thread, work A.2 over the next 16-20-24 stitches and finish with 5 band stitches in garter stitch (= 8 stitches increased). Go to ALL SIZES! M, L and XXL: 5 band stitches in garter stitch, work A.2 over the next 20-20-24 stitches (= 5-5-6 repeats of 4 stitches), work the first 2 stitches in A.2 so the pattern is symmetrical on the front piece, increase to RAGLAN on each side of the marker thread – read description above (remember that 1 stitch on each side of all marker threads is worked in stockinette stitch), work A.2 over the next 8-12-12 stitches (= 2-3-3 repeats of 4 stitches), work the first 2 stitches in A.2 so the pattern is symmetrical on the sleeve, increase to raglan on each side of the marker thread, work A.2 over the next 40-40-48 stitches (= 10-10-12 repeats of 4 stitches), work the first 2 stitches in A.2 so the pattern is symmetrical on the back piece, increase to raglan on each side of the marker thread, work A.2 over the next 8-12-12 stitches, work the first 2 stitches in A.2, increase to raglan on each side of the marker thread, work A.2 over the next 20-20-24 stitches, work the first 2 stitches in A.2 and finish with 5 band stitches in garter stitch (= 8 stitches increased). Go to ALL SIZES! ALL SIZES: Continue this pattern back and forth and increase to raglan on each side of all 4 marker threads every 2nd row (each row from the right side) a total of 16-16-16-20-20-24 times (including the first round described above). After the last increase there are 228-244-252-292-300-340 stitches on the needle. Continue working without further increases until the piece measures 18-18-20-21-23-25 cm = 7"-7"-8"-8¼"-9"-9¾" from the marker on the neck. Now divide the yoke for the body and sleeves as follows: Work as before over the first 38-42-44-48-50-56 stitches (= front piece), place the next 44-44-44-56-56-64 stitches on a thread for the sleeve, cast on 8-8-12-8-12-8 stitches (= in side under sleeve), work as before over the next 64-72-76-84-88-100 stitches (= back piece), place the next 44-44-44-56-56-64 stitches on a thread for the sleeve, cast on 8-8-12-8-12-8 stitches (= in side under sleeve), work as before over the last 38-42-44-48-50-56 stitches (= front piece). Body and sleeves are finished separately. THE PIECE IS NOW MEASURED FROM HERE. BODY: = 156-172-188-196-212-228 stitches. Continue A.1/A.2 back and forth as before over all stitches, with 5 band stitches in garter stitch on each side. Work until the piece measures 27-29-29-29-29-29 cm = 10⅝"-11⅜"-11⅜"-11⅜"-11⅜"-11⅜" from the division. There is approx. 5 cm = 2" left to finished length; try the jacket on and work to desired length. To avoid the rib being tight, knit 1 row where you increase 32-36-40-40-44-48 stitches evenly spaced = 188-208-228-236-256-276 stitches. Change to circular needle size 4.5 MM = US 7. The next row is worked as follows from the wrong side: 5 band stitches in garter stitch, * purl 2, knit 2 *, work from *-* until there are 7 stitches left on the row, purl 2 and 5 band stitches in garter stitch. Continue this rib for 5 cm = 2". Bind off with garter stitch over garter stitch, knit over knit and purl over purl – read BINDING-OFF TIP! The jacket measures approx. 54-56-58-60-62-64 cm = 21¼"-22"-22¾"-23⅝"-24⅜"-25¼" from the shoulder down. SLEEVES: Place the 44-44-44-56-56-64 stitches from the thread on the one side of the piece on double pointed needles/short circular needle size 5.5 MM = US 9 and knit up 1 stitch in each of the 8-8-12-8-12-8 stitches cast on under the sleeve = 52-52-56-64-68-72 stitches. Continue A.2 in the round over all stitches until the sleeve measures 26-26-25-25-23-21 cm = 10¼"-10¼"-9¾"-9¾"-9"-8¼" from the division. There is approx. 5 cm = 2" left to finished length; try the jacket on and work to desired length. Knit 1 round where you increase 12 stitches evenly in all sizes = 64-64-68-76-80-84 stitches. Change to short circular needle/double pointed needles size 4.5 MM = US 7 and work rib in the round (knit 2, purl 2) for 5 cm = 2". Bind off with knit over knit and purl over purl – remember BINDING-OFF TIP! Work the other sleeve in the same way. ASSEMBLY: Fold the neck double to the inside and sew down. To avoid the neck being tight and rolling outwards, it is important that the seam is elastic. Sew the openings at the top of the bands with small, neat stitches. Sew the buttons onto the left band. |
|||||||
Diagram explanations |
|||||||
|
|||||||
|
|||||||
Have you finished this pattern?Tag your pictures with #dropspattern #lavendersprinklesjacket or submit them to the #dropsfan gallery. Do you need help with this pattern?You'll find 26 tutorial videos, a Comments/Questions area and more by visiting the pattern on garnstudio.com. © 1982-2025 DROPS Design A/S. We reserve all rights. This document, including all its sub-sections, has copyrights. Read more about what you can do with our patterns at the bottom of each pattern on our site. |
|||||||


With over 40 years in knitting and crochet design, DROPS Design offers one of the most extensive collections of free patterns on the internet - translated to 17 languages. As of today we count 314 catalogs and 11822 patterns - 11812 of which are translated into English (US/in).
We work hard to bring you the best knitting and crochet have to offer, inspiration and advice as well as great quality yarns at incredible prices! Would you like to use our patterns for other than personal use? You can read what you are allowed to do in the Copyright text at the bottom of all our patterns. Happy crafting!
Post a comment to pattern DROPS 222-11
We would love to hear what you have to say about this pattern!
If you want to leave a question, please make sure you select the correct category in the form below, to speed up the answering process. Required fields are marked *.