
Popular categories
Looking for a yarn?


Comments / Questions (54)
![]() Ulla wrote:
Ulla wrote:
Der står i opskriften, at der skal tages ud eks. til ærmerne på hver 2. omgang. Men hvad er en omgang i denne sammenhæng? En ret - og en vrangpind, så det faktisk er udtagning på hver 4. pind (hver 2. retpind)?
03.04.2026 - 20:45
![]() Laetitia wrote:
Laetitia wrote:
Bonjour, comment les mailles augmentées avant et après le marqueur sont-elles travaillées pour la suite du tricot ? En jersey où reprennent-elles le motif A3 pour les devants ? Merci beaucoup !
02.04.2026 - 13:41DROPS Design answered:
Bonjour Laetitia, quand on tricote les augmentations de l'empiècement, celles des devants et du dos doivent être incorporées dans le point fantaisie A.3. Bon tricot!
07.04.2026 - 17:05
![]() June wrote:
June wrote:
When doing the 222-26 pattern and your doing the A3 diagram when going across and increasing stitches do I just keep doing the first three stitches
19.03.2026 - 16:55DROPS Design answered:
Hi June, You don't say which size you are working, but if we take size S as an example, on the first front piece you work 4 repeats of A.3 across 28 stitches (each repeat of A.3 is 7 stitches), then you work the first 3 stitches in A.3 so the pattern is symmetrical. Then you work the back piece. Regards, Drops Team.
20.03.2026 - 05:45
![]() June wrote:
June wrote:
When doing the white water jacket 222-26 and increasing stitches it says do these stitches in A3 so do I just keep going across or do I keep doing the first three stitches. Thank you
06.02.2026 - 16:42
![]() June wrote:
June wrote:
I’m trying to do the 222-26 white water jacket I don’t think I’m reading A1 right. When I start A1 with 15 stitches am I going straight acrosss from right and repeating that row till 15 stitches are done?
29.01.2026 - 17:32DROPS Design answered:
Hi June, correct. Happy knitting!
29.01.2026 - 17:43
![]() Neuville Kopp Claire wrote:
Neuville Kopp Claire wrote:
Bonjour, je suis perdue dans le nombre de maille au niveau de l'empiècement j'ai 4 m de trop au total (même en faisant le compte selon vos instructions) et ensuite si pour les manches ont fait en taille S 7X4 m d'aug, on arrive pas à 64 m. Merci de bien me donner les nbres de m pour la taille S Merci de m'aider car je ne sais pas comment faire. Claire Neuville Kopp
28.07.2025 - 09:44DROPS Design answered:
Bonjour Mme Neuville Kopp, au moment de la division, les 3 premières mailles et les 3 dernières mailles de chaque manche sont attribuées aux devants/dos, ainsi, les 70 m des manches - 6 (2 x 3 m) = restent 64 pour les manches. Vous aviez 36 m pour les devants + 1 m avec le marqueur + 3 m de la manche = 40 m pour les devants. Bon tricot!
29.07.2025 - 08:51
![]() Signe wrote:
Signe wrote:
Hei, får ikke maskeantallet i str S til å gå opp. Skal har strikket begge sadelskuldrene ferdig og skal sette alle masker på samme pinne. Men jeg får 2 masker for lite. Ift mønster kommer jeg frem til dette maske antallet: 16+1+36+2+1=56, men skal være 58, hva har jeg gjort feil? Sadelskulder er 21 masker
01.05.2025 - 13:15DROPS Design answered:
Hej Signe, Du har 21 masker fra sadelskulderen, tager 37 masker ud i de 18 (af de 21) masker = 55 + de 3 (sidste af de 21) = 58 masker
06.05.2025 - 14:53
![]() Lis Pedersen wrote:
Lis Pedersen wrote:
Jeg skal i gang med denne trøje. Jeg har ikke prøvet så meget hulstrikning før. Men som jeg læser det, skal diagrammerne strikkes nedefra og op - altså man starter nederst i højre hjørne. Når trøjen nu strikkes oppefra og ned - hvad så? Måske skal jeg ikke tænke så meget over det - men bare følge opskriften nøje? vh Lis
31.01.2025 - 11:09DROPS Design answered:
Hei Lis. Når du strikker etter diagram, starter du alltid nederst til høyre, uansett om man strikker et plagg ovenfra og ned eller nedenfra og opp (om ikke annet er beskrevet i oppskriften du strikker etter). Diagrammet skal være tilpasset hvordan oppskriften er skrevet :) Les godt igjennom oppskriften før du starter og se gjerne på video som er lagt til oppskriften. Denne oppskriften har også en hjelpevideo som viser: Hvordan strikke sadelskulder med puffermer - frem og tilbake. mvh DROPS Design
03.02.2025 - 14:12
![]() Helle Hermann wrote:
Helle Hermann wrote:
Jeg er nået til bærestykket.forstår ikke instruksen. "Sæt en mærketråd efter forkanten i begyndelsen af pinden midt foran" forkant er det lig med kantmasker? Hvor er pinden midt foran? Er det forstykket? Vh helle
29.12.2024 - 19:49DROPS Design answered:
Hei Helle. Forkant er de 5 maskene du har strikket i retstrik (i begge sider). Pinnen midt foran er på forstykket. mvh DROPS Design
07.01.2025 - 07:35
![]() Jorun Hunnes wrote:
Jorun Hunnes wrote:
Jeg strikker str XL. På ermeøkning skal det økes 9 ganger. På bærestykkeøkning skal det økes 7 ganger. Skal jeg gjøre ferdig økningen på ermene før jeg øker på bærestykket? Eller gjøres økningene samtidig?
17.09.2024 - 16:50DROPS Design answered:
Hei Jorun. Det økes samtidig. mvh DROPS Design
19.09.2024 - 09:22
|
|||||||||||||||||||
White Water Jacket#whitewaterjacket |
|||||||||||||||||||
 |
 |
||||||||||||||||||
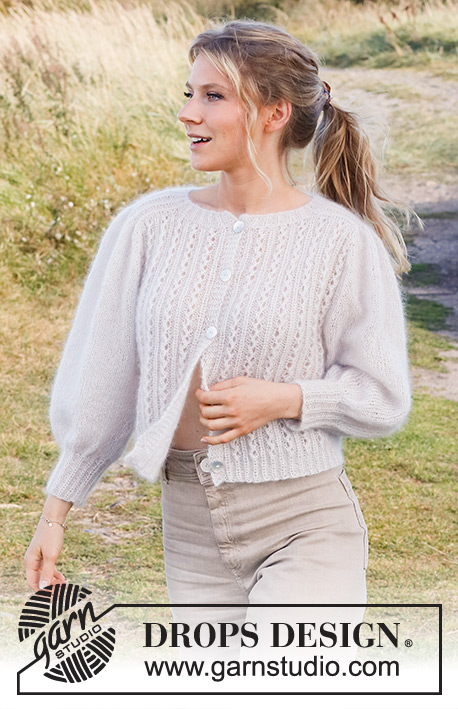
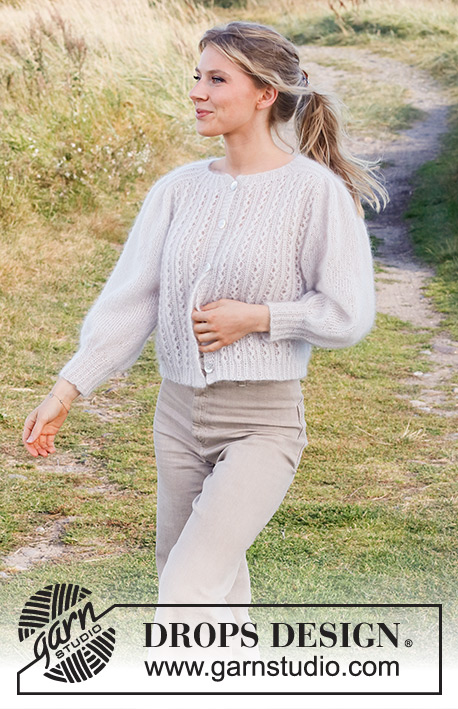
Knitted jacket in 2 strands DROPS Kid-Silk. Piece is knitted top down with round saddle shoulders, lace pattern and pouffe sleeves. Size: S - XXXL
DROPS 222-26 |
|||||||||||||||||||
|
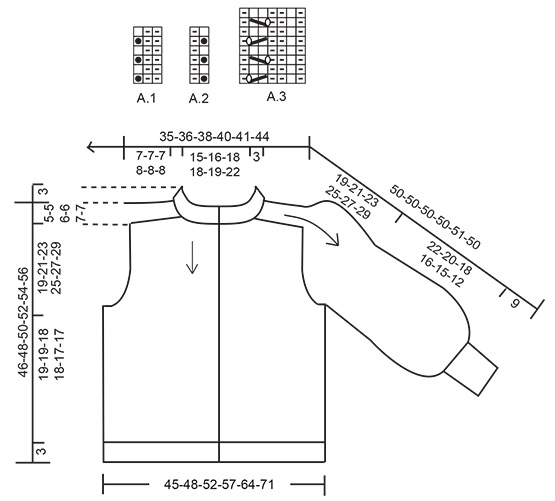
------------------------------------------------------- EXPLANATION FOR THE PATTERN: ------------------------------------------------------- GARTER STITCH (back and forth): Knit all rows. 1 ridge vertically = knit 2 rows. PATTERN: See diagrams A.1 to A.3. Diagrams show all rows in pattern seen from the right side. INCREASE/DECREASE TIP (evenly): To calculate how to increase/decrease evenly, count the stitches to be increased/decreased (e.g. 17 stitches), and divide by stitches of increases/decreases to be done (e.g. 5) = 3.4. In this example increase by making 1 yarn over after alternately approx. every 3rd and 4th stitch. On next row work yarn overs twisted to avoid holes If decreasing knit in this example alternately approx. every 2nd and 3rd stitch and every 3rd and 4th stitch together. INCREASE TIP-1: All increases are done from the right side. Increase 1 stitch by making 1 yarn over. On next row (from wrong side) purl yarn over twisted to avoid holes. INCREASE TIP-2 FROM RIGHT SIDE: BEFORE MARKER: The stitch is twisted towards the right. Use left needle to pick up thread between 2 stitches from row below, pick up thread from behind and knit stitch in front loop. AFTER MARKER: The stitch is twisted towards the left. Use left needle to pick up thread between 2 stitches from row below, pick up thread from front and knit stitch in back loop. BUTTONHOLES: Decrease for buttonholes on right band (when garment is worn). Decrease from right side when 3 stitches remain on row as follows: Make 1 yarn over, knit the next 2 stitches together, knit last stitch. On next row (wrong side) knit the yarn over to make a hole. Decrease first buttonhole when rib in neck measures approx. 3 cm. Then cast off the next 4-4-5-5-5-5 buttonholes approx. 9½-10-8-8½-9-9 cm apart. CAST-OFF TIP: To avoid a tight cast-off edge you may use a larger needle size. If this also is too tight, work a 1 yarn over after approx. 3rd or every 6th stitch while casting off (cast off yarn overs as regular stitches). ------------------------------------------------------- START THE PIECE HERE: ------------------------------------------------------- JACKET - SHORT OVERVIEW OF THE PIECE: Worked top down. Work neck edge back and forth from mid front. Then work shoulders back and forth separately. Then slip all stitches on to same circular needle, at the same time pick up stitches along the saddle shoulders. Then work yoke back and forth from mid front, at the same time increase for sleeves and yoke. Now divide yoke for body and sleeves. Work body back and forth on circular needle, top down. Work sleeves in the round on double pointed needles/short circular needle, top down. NECK EDGE: Cast on 96-102-106-106-110-122 stitches (including 5 band stitches in each side towards mid front) on circular needle size 3 mm with 2 strands Kid-Silk. Purl 1 row (= wrong side). Work next row as follows from right side: Work 5 band stitches in GARTER STITCH – read explanation above, work A.1 over the next 12-15-15-15-15-18 stitches, work the first 2 stitches in A.1, insert 1 marker here (= in transition between front piece and left saddle shoulder), work A.2 over the next 13-13-15-15-17-17 stitches, insert 1 marker here (= in transition between left saddle shoulder and back piece), work A.1 over the next 30-30-30-30-30-36 stitches, work the first 2 stitches in A.1, insert 1 marker here (= in transition between back piece and right saddle shoulder), work A.2 over the next 13-13-15-15-17-17 stitches, insert 1 marker here (= in transition between right saddle shoulder and right front piece), work A.1 over the next 12-15-15-15-15-18 stitches, work the first 2 stitches in A.1, 5 band stitches in garter stitch. Continue back and forth like this. When rib measures 3 cm, cut the yarn. Now divide the piece for front pieces, back piece and saddle shoulders. Slip the first and last 19-22-22-22-22-25 stitches on separate stitch holders (= front piece), skip the next 13-13-15-15-17-17 stitches in each side (= shoulder stitches), slip the middle 32-32-32-32-32-38 stitches on a stitch holder (= back piece). Now work saddle shoulder separately. SADDLE SHOULDERS: = 13-13-15-15-17-17 stitches. Work back and forth over shoulder stitches in one side on circular needle size 3 mm, as follows: Cast on 1 stitch on row (= edge stitch), work the 13-13-15-15-17-17 stitches in pattern as before, at the same time increase all 1 purl stitch to 2 purl stitches – read INCREASE TIP-1 (= 6-6-7-7-8-8 stitches increased), cast on 1 stitch at the end of row (= edge stitch) = 21-21-24-24-27-27 stitches. Now work pattern (1 English rib stitch, purl 2) back and forth until piece measures 7-7-7-8-8-8 cm from where all 1 purl stitches were increased to 2 purl stitches, adjust so that last row is worked from wrong side. Slip stitches on a stitch holder. Work the other saddle shoulder the same way. Now work front pieces, back piece and shoulder stitch on to same circular needle size 5 mm, at the same time pick up stitches along the sides on saddle shoulders. Work as follows from RS: 5 band stitches in garter stitch, knit over the next 14-17-17-17-17-20 stitches and increase at the same time 1-5-5-8-8-12 stitches evenly – read INCREASE/DECREASE TIP (= 15-22-22-25-25-32 stitches), pick up 16-16-16-20-20-20 stitches inside edge stitch along the side on saddle shoulder, knit 1 * knit 1 in front and back loop of next stitch, make 1 yarn over *, work from *-* a total of 18-18-21-21-24-24 times, knit 1 in front and back loop of stitch, knit 1 (= 37-37-43-43-49-49 stitches increased to = 58-58-67-67-76-76 stitches on the saddle shoulder), pick up 16-16-16-20-20-20 stitches inside edge stitch along the other side of saddle shoulder, knit over the 32-32-32-32-32-38 stitches on back piece and increase at the same time 9-9-9-15-15-9 stitches evenly (= 41-41-41-47-47-47 stitches), pick up 16-16-16-20-20-20 stitches inside edge stitch along the side on saddle shoulder, knit 1 * knit 1 in front and back loop of next stitch, make 1 yarn over *, work from *-* a total of 18-18-21-21-24-24 times, knit 1 in front and back loop of stitch, knit 1 (= 37-37-43-43-49-49 stitches increased to = 58-58-67-67-76-76 stitches on the saddle shoulder), pick up 16-16-16-20-20-20 stitches inside edge stitch along the other side of saddle shoulder, knit over the next 14-17-17-17-17-20 stitches and increase at the same time 1-5-5-8-8-12 stitches evenly (= 15-22-22-25-25-32 stitches), 5 band stitches in garter stitch. Remember BUTTONHOLES on right band - read explanation above. There are now 261-275-293-321-339-353 stitches on needle. Purl 1 row from wrong side (band stitches in garter stitches as before). YOKE: Insert a marker thread after band at the beginning of stitches mid front - NOW MEASURE PIECE FROM HERE! Now work pattern and 4 markers in the piece as follows: 1st marker: Work 5 band stitches in garter stitch, A.3 over the next 28-35-35-42-42-49 stitches, work the first 3 stitches in A.3, insert 1st marker in next stitch (= right front piece). 2nd marker: Work in stocking stitch over the next 56-56-65-65-74-74 stitches, insert 2nd marker in next stitch (= right sleeve). 3rd marker: Work A.3 over the next 70-70-70-84-84-84 stitches, work the first 3 stitches in A.3, insert 3rd marker in next stitch (= back piece). 4th marker: Work in stocking stitch over the next 56-56-65-65-74-74 stitches, insert 4th marker in next stitch (= left sleeve). Work A.3 over the next 28-35-35-42-42-49 stitches, work the first 3 stitches in A.3, 5 band stitches in garter stitch (= left front piece). Move these 4 markers upwards when working; increase at each of these markers. Continue back and forth with pattern like this (stitches with markers are worked in stocking stitch). AT THE SAME TIME on next row from right side the increase for SLEEVE INCREASE and YOKE INCREASE starts. Increase as explained below: SLEEVE INCREASE: Work in stocking stitch on sleeves. AT THE SAME TIME on next row from right side increase 4 stitches for sleeves as follows: Increase AFTER 1st and 3rd marker and increase BEFORE 2nd and 4th marker – read INCREASE TIP-2 (= 4 stitches increased). Increase stitches on sleeves, and work the increased stitches in stocking stitch. Increase like this every other round 7-10-7-9-6-8 times in total. YOKE INCREASE: Work pattern as before on front pieces and back piece. AT THE SAME TIME on next row from right side increase 4 stitches for yoke as follows: Increase BEFORE 1st and 3rd marker and increase AFTER 2nd and 4th marker – remember INCREASE TIP-2 (= 4 stitches increased). Increase on front pieces and back piece, and work the increased stitches in A.3. Increase like this every other round 0-7-7-7-14-21 times in total. When all increases are done there are 289-343-349-385-419-469 stitches on row. Work until piece measures 19-21-23-25-27-29 cm from marker after neck edge. Now divide piece for body and sleeves. Work next row as follows: Work the first 40-50-52-57-64-78 stitches as before (= front piece), slip the next 64-78-77-85-88-92 stitches on a stitch holder for sleeve, cast on 6-6-8-10-10-10 new stitches on row (= in the side under sleeve), work the next 81-87-91-101-115-129 stitches as before (= back piece), slip the next 64-78-77-85-88-92 stitches on a stitch holder for sleeve, cast on 6-6-8-10-10-10 new stitches on row (= in the side under sleeve), work the last 40-50-52-57-64-78 stitches as before (= front piece). Now finish body and sleeves separately. NOW MEASURE PIECE FROM HERE! BODY: = 173-199-211-235-263-305 stitches. Continue back and forth with pattern as before, but over the 14-6-12-10-10-10 stitches in each side (i.e. the 6-6-8-10-10-10 new stitches cast on + 4-0-2-0-0-0 stitches on each side of these stitches) work in stocking stitch. When piece measures 19-19-18-18-17-17 cm from division, next row from right side as follows: 5 band stitches in garter stitch, work A.3 as before over the next 31-45-45-52-59-73 stitches, but skip the yarn over in every repetition A.3 (decrease 1 stitch in every repetition A.3 = 4-6-6-7-8-10 stitches decreased), knit over the next 14-6-12-10-10-10 stitches and increase at the same time 4-3-6-5-5-5 stitches evenly, work pattern as before over the next 73-87-87-101-115-129 stitches but skip the yarn over in every repetition A.3 (decrease 1 stitch in each repetition A.3 = 10-12-12-14-16-18 stitches deceased), knit the next 14-6-12-10-10-10 stitches and increase at the same time 4-3-6-5-5-5 stitches evenly, work pattern as before over the next 31-45-45-52-59-73 stitches, but skip the yarn over in every repetition A.3 (decrease 1 stitch in every repetition A.3 = 4-6-6-7-8-10 stitches decreased), 5 band stitches in garter stitch = 163-181-199-217-241-277 stitches. Switch to circular needle size 3 mm. Now work rib as follows: 5 band stitches in garter stitch, work the last 2 stitches in A.1, then work A.1 until 6 stitches remain on row, work first stitch in A.1, 5 band stitches in garter stitch - English rib stitch in A.1 should fit knit stitches in A.3. Continue rib like this for 3 cm. Cast off with knit over garter stitches and English rib stitches and purl over purl - read CAST-OFF TIP. Jacket measures approx. 46-48-50-52-54-56 cm from shoulder and down. SLEEVES: Slip the 64-78-77-85-88-92 stitches from stitch holder in one side back on a short circular needle/double pointed needles size 5 mm. Pick in addition up 1 stitch in each of the 6-6-8-10-10-10 new stitches under sleeve = 70-84-85-95-98-102 stitches. Work in stocking stitch in the round. When piece measures 22-20-18-16-15-12 cm from division - try the jacket on and work until desired length (approx. 9 cm rib remain until finished measurements), decrease 28-42-40-47-47-51 stitches evenly = 42-42-45-48-51-51 stitches. Switch to double pointed needles size 3 mm. Work A.1 in the round for 9 cm. Cast off with knit over English rib stitches and purl over purl - read CAST-OFF TIP. Sleeve measures approx. 31-29-27-25-24-21 cm from division. Work the other sleeve the same way. ASSEMBLY: Sew the buttons on to left band. |
|||||||||||||||||||
Diagram explanations |
|||||||||||||||||||
|
|||||||||||||||||||
 |
|||||||||||||||||||
Have you finished this pattern?Tag your pictures with #dropspattern #whitewaterjacket or submit them to the #dropsfan gallery. Do you need help with this pattern?You'll find 36 tutorial videos, a Comments/Questions area and more by visiting the pattern on garnstudio.com. © 1982-2026 DROPS Design A/S. We reserve all rights. This document, including all its sub-sections, has copyrights. Read more about what you can do with our patterns at the bottom of each pattern on our site. |
|||||||||||||||||||


With over 40 years in knitting and crochet design, DROPS Design offers one of the most extensive collections of free patterns on the internet - translated to 17 languages. As of today we count 324 catalogues and 12290 patterns translated into English (UK/cm).
We work hard to bring you the best knitting and crochet have to offer, inspiration and advice as well as great quality yarns at incredible prices! Would you like to use our patterns for other than personal use? You can read what you are allowed to do in the Copyright text at the bottom of all our patterns. Happy crafting!
Post a comment to pattern DROPS 222-26
We would love to hear what you have to say about this pattern!
If you want to leave a question, please make sure you select the correct category in the form below, to speed up the answering process. Required fields are marked *.