
Looking for a yarn?


Comments / Questions (47)
![]() Viktoria wrote:
Viktoria wrote:
Hallo zusammen, in dem Teil, in dem die Marker für die Raglanzunahmen gesetzt werden sollen, komme ich nicht auf die korrekte Maschenzahl. Größe M = 53 Maschen auf der Nadel - 1 (Rand) - 9 (Vorderteil) - 29 (Rücken) - 9 (Vorderteil) - 1 (Rand) = 49 Es bleiben bei mir 4 Maschen über. Mache ich hier etwas falsch?
12.11.2024 - 16:21DROPS Design answered:
Liebe Viktoria, beachten Sie, daß die Markierungen jeweils in einer Masche (und nicht zwischen Maschen) eingesetzt werden, so haben Sie: 1+1+9+1+29+1+9+1+1= 53 Maschen. Viel Spaß beim Stricken!
13.11.2024 - 07:37
![]() Rose-Marie Nilsson wrote:
Rose-Marie Nilsson wrote:
Finns mönstret på svenska?
03.08.2024 - 14:42
![]() Irene Suihko wrote:
Irene Suihko wrote:
Hei, jätin kuvion eli mallineuleen tekemättä helmaan ja tein vain pelkkää patenttia. Vaikuttaako se jotenkin joustinneuleosion aloittamiseen? Yt. Irene
07.04.2024 - 14:30DROPS Design answered:
Hei, tämä ei vaikuta joustinneuleen aloittamiseen. Tee kuitenkin sivulisäykset ohjeen mukaisesti ennen kuin aloitat joustinneuleen.
08.04.2024 - 18:02
![]() Mia wrote:
Mia wrote:
Hei, når jeg strikker helpatent øker jeg med mange masker, hvordan skal jeg unngå det?
23.03.2024 - 08:43DROPS Design answered:
Hej Mia, husker du at strikket omslaget sammen med næste maske?
03.04.2024 - 14:19
![]() ÁNGELA GARCÍA ALARCÓN wrote:
ÁNGELA GARCÍA ALARCÓN wrote:
Pueden explicar con exactitud como se teje la zona de aumentos por el revés?. Gracias
12.03.2024 - 20:02DROPS Design answered:
Hola Ángela, puedes ver el siguiente vídeo sobre cómo trabajar este aumento: https://www.garnstudio.com/video.php?id=1332&lang=es
17.03.2024 - 21:09
![]() Lene Køhler wrote:
Lene Køhler wrote:
Hej. Jeg har desværre problemer med at læse jeres opskrift. Ved sætning af mærke 1+2+3+4 i starten af arbejdet står der, at der er 1 maske tilbage på pinden efter sidste mærke. Dette er ikke rigtigt. Jeg strikker en str. L. Endvidere fremgår det ikke tydeligt ( slet ikke), hvor raglanudtagningerne til ryggen skal være. Der er kun oplyst, hvor der skal være udtagninger til raglan på forstykket efter/ ved maske 9 ( går jeg ud fra). Jeg hører gerne fra Dem. Mvh Lene
06.03.2024 - 13:59
![]() Noémie wrote:
Noémie wrote:
Hei Drops Design, Jeg strikker full moon festival cardigan i minste størrelse. Derfor startet jeg med å legge opp 41 masker, dermed økte jeg jevnt fordelt over pinnen med 8 masker og har da 49 masker. Når jeg da begynner på helpatent 1. pinne ender jeg opp med 72 masker. Deretter fortsetter jeg med 2. og 3. pinne og ender fortsatt opp med 72 masker. Når jeg da skal sette markør på 9 + 25 + 9 + 2 + 4 har jeg 72-49=23 masker igjen. Hva gjør jeg feil?
18.02.2024 - 10:48
![]() Maria Venetsanou wrote:
Maria Venetsanou wrote:
Hello team i start it with 41 sts plus 8 sts = 49 1 marker 1 sts 2 marker 9sts 3marker 25 sts 4 marker 9 sts 1 sts edge total 45 sts i have 4 sts more what i make wrong ? can you help me? total
13.01.2024 - 22:00DROPS Design answered:
Dear Maria, at the start of the yoke, on row 3 of the English rib, you insert the markers inside stitches. So you have: edge stitch (=1), stitch with marker (= 1), 9 stitches, stitch with marker (= 1), 25 stitches, stitch with marker (= 1), 9 stitches, stitch with marker (= 1), edge stitch. So you have: 1+1+9+1+25+1+9+1+1 = 49 stitches. Happy knitting!
14.01.2024 - 13:33
![]() Maria Venetsanou wrote:
Maria Venetsanou wrote:
Hello team I start it .I put 41st and added 8 =49 For the markers 1 marker 1st 2 marker 9st 3marker 25 st 4 marker9 st Remain 1 std Total 45 sts remain 4 sts What i do wrong?
13.01.2024 - 00:46
![]() Nadya wrote:
Nadya wrote:
Hello, Could you please explain why does one need to increase stitches in the sides before knitting the ribbing. Thank you.
10.12.2023 - 00:24DROPS Design answered:
Dear Nadya, ribbing tends to pull the knitting in, we do these increases to avoid that. I hope this helps. Happy Knitting!
10.12.2023 - 21:30
|
||||||||||||||||
Full Moon Festival Jacket#fullmoonfestivaljacket |
||||||||||||||||
 |
 |
|||||||||||||||
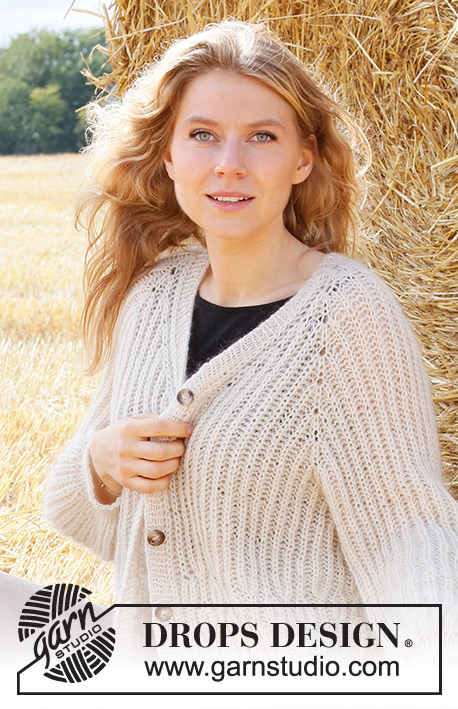
Knitted jacket in DROPS Air. The piece is worked top down with raglan, English rib and V-neck. Sizes XS - XXL.
DROPS 223-16 |
||||||||||||||||
|
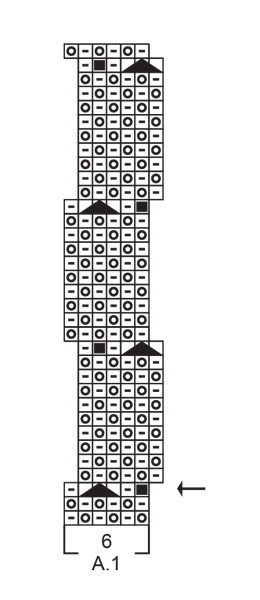
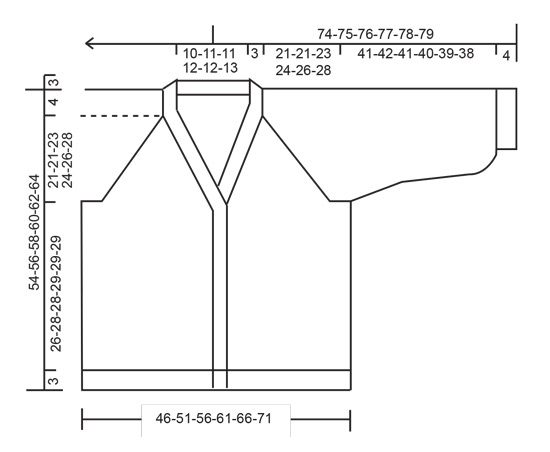
------------------------------------------------------- EXPLANATIONS FOR THE PATTERN: ------------------------------------------------------- RIDGE/GARTER STITCH (worked back and forth): Knit all rows. 1 ridge in height = Knit 2 rows. PATTERN: See diagram A.1. The diagram shows all rows in the pattern seen from the right side. INCREASE/DECREASE TIP (evenly spaced): To work out how to increase/decrease evenly, count the total number of stitches on the needle (e.g. 39 stitches), minus 1 edge stitch on each side and divide the remaining stitches by the number of increases/decreases to be made (e.g. 10) = 3.7. In this example, increase by making 1 yarn over after alternately each 3rd and 4th stitch, do not increase on the edge stitches. On the next row work the yarn overs twisted to avoid holes. When decreasing, knit together alternately each 2nd and 3rd and each 3rd and 4th stitch. ENGLISH RIB (back and forth – for the yoke and body): ROW 1 (right side): 1 stitch in garter stitch, * knit 1, 1 yarn over, slip 1 stitch as if to purl *, work from *-* until there are 2 stitches left, knit 1, 1 stitch in garter stitch. ROW 2 (wrong side): 1 stitch in garter stitch, * 1 yarn over, slip 1 stitch as if to purl, knit the yarn over and slipped stitch together *, work from *-* until there are 2 stitches left and finish with 1 yarn over, slip 1 stitch as if to purl, 1 stitch in garter stitch. ROW 3 (right side): 1 stitch in garter stitch, * knit the yarn over and slipped stitch together, 1 yarn over, slip 1 stitch as if to purl *, work from *-* until there is 1 yarn over and 2 stitches left, knit the yarn over and slipped stitch together, 1 stitch in garter stitch. Repeat rows 2 and 3 onwards. ENGLISH RIB (in the round – for the sleeves): ROUND 1: * Purl together the yarn over and slipped stitch, make 1 yarn over, slip 1 stitch as if to purl *, work from *-* to end of round. ROUND 2: *. Make 1 yarn over, slip 1 stitch as if to purl, knit together the yarn over and slipped stitch *, work from *-* to end of round Repeat rounds 1 and 2 onwards. RAGLAN: Increase 4 stitches in each marker-stitch (= 16 stitches increased on the round). All increases are worked on a row from the right side (i.e. row 3 in the English rib). Increase as follows in the marker-stitch: Knit together the yarn over and knitted stitch, but do not slip the stitch from the left needle, make 1 yarn over the right needle, knit the yarn over and knitted stitch together again, move the marker to this stitch (= mid-stitch), make 1 yarn over the right needle, knit the yarn over and knitted stitch together again (= 3 stitches and 2 yarn overs), slip the stitch and yarn over off the left needle. On the next row work the new stitches in English rib, but note that on this row after the increases, the knitted stitches in the increases are knitted without yarn overs because the yarn overs have not been made. The marker sits in the middle of the increased stitches (a knitted stitch). DECREASE TIP (for sleeves): Decrease 2 stitches on round 2 in the English rib as follows: Work until there are 2 stitches left before the marker-stitch (yarn overs not counted), slip the next stitch + yarn over as if to knit together, knit the next 2 stitches + yarn over together and pass the slipped stitch + yarn-over over these knitted together stitches (= 2 stitches decreased), move the marker to the next knitted stitch. BINDING-OFF TIP: To avoid the bind-off edge being tight you can bind off with a larger size needle. If the edge is still tight, make 1 yarn over after approx. each 4th stitch at the same time as binding off; the yarn overs are bind off as normal stitches. ------------------------------------------------------- START THE PIECE HERE: ------------------------------------------------------- JACKET – SHORT OVERVIEW OF THE PIECE. The yoke is worked back and forth with circular needle, from mid front and top down. The yoke is divided for body and sleeves and the body continued back and forth with circular needle. The sleeves are worked in the round with double pointed needles/short circular needle, top down. YOKE: Cast on 41-42-42-44-44-45 stitches with circular needle size 6 MM = US 10 and Air. Knit 1 row where you increase 8-7-11-9-9-12 stitches evenly spaced – read INCREASE/DECREASE TIP = 49-49-53-53-53-57 stitches. Insert a marker after 25-25-27-27-27-29 stitches; the yoke is measured from this marker! Work ENGLISH RIB – read description above. When row 3 has been completed, insert markers in all the transitions between body and sleeves as follows: Marker 1: Skip the first stitch (= edge stitch) and insert the marker in the next stitch. Marker 2: Skip the next 9 stitches, insert the marker in the next stitch. Marker 3: Skip the next 25-25-29-29-29-33 stitches, insert the marker in the next stitch. Marker 4: Skip the next 9 stitches, insert the marker in the next stitch. There is 1 stitch left after the last marker. Continue back and forth with English rib, AT THE SAME TIME increase to raglan and V-neck as described below: RAGLAN: On the next row from the right side (= row 3 in the pattern) start to increase to RAGLAN – read description above. Increase like this every 8th row a total of 6-7-8-9-10-11 times = 96-112-128-144-160-176 stitches increased. V-HALS: When the third increase to raglan is about to be worked, start to increase for the V-neck. Increase 2 stitches in the 4th stitch from the edge on each side (a knitted stitch in the English rib) as follows: Knit together the yarn over and knitted stitch, but do not slip them from the left needle, make 1 yarn over the right needle, knit together the yarn over and knitted stitch again (= 2 stitches + 1 yarn over), slip the stitch and yarn over from the left needle. Increase like this every 8th row a total of 6-7-7-8-8-8 times (= 12-14-14-16-16-16 stitches increased for the V-neck on each side). When all the increases to raglan and the V-neck are finished, there are 169-189-209-229-245-265 stitches. Continue working until the piece measures 21-21-23-24-26-28 cm = 8¼"-8¼"-9"-9½"-10¼"-11" from the marker. Now divide the yoke for the body and sleeves, on the next row from the wrong side, as follows: Work the first 26-30-32-36-38-40 stitches (= front piece), place the next 33-37-41-45-49-53 stitches on a thread for the sleeve, cast on 5-5-5-5-7-7 new stitches (= in side under sleeve), work the next 51-55-63-67-71-79 stitches (= back piece), place the next 33-37-41-45-49-53 stitches on a thread for the sleeve, cast on 5-5-5-5-7-7 new stitches (= in side under sleeve), work the last 26-30-32-36-38-40 stitches. Body and sleeves are finished separately. THE PIECE IS NOW MEASURED FROM HERE! BODY: = 113-125-137-149-161-173 stitches. Continue back and forth with English rib. When the piece measures 17-19-19-20-20-20 cm = 6¾"-7½"-7½"-8"-8"-8" from the division – adjust so the next row is from the right side, there is 12 cm = 4¾" to finished length; try the jacket on and work to desired length. Now work pattern as follows: 1 edge stitch in garter stitch, work 2 stitches in English rib as before, A.1 over the next 108-120-132-144-156-168 stitches (= 18-20-22-24-26-28 repeats of 6 stitches), finish with the last stitch of English rib and 1 edge stitch in garter stitch. Continue this pattern. When A.1 has been completed in height the piece measures 26-28-28-29-29-29 cm = 10¼"-11"-11"-11⅜"-11⅜"-11⅜" from the division. On the next row from the right side, increase stitches in the sides and insert 4 markers (which will be used when working rib) as follows: Front piece: 1 edge stitch in garter stitch, * knit together the yarn over and slipped stitch, purl 1 *, work from *-* over the next 14-16-18-20-22-22 stitches. Insert a marker here. Side of body: * Knit together the yarn over and slipped stitch, make 1 yarn over, purl 1*, work from *-* over the next 26-28-30-34-36-40 stitches (= 13-14-15-17-18-20 increased stitches), insert a marker here. Back piece: * Knit together the yarn over and slipped stitch, purl 1 *, work from *-* over the next 30-34-38-38-42-46 stitches. Insert a marker here. Side of body: * Knit together the yarn over and slipped stitch, make 1 yarn over, purl 1 *, work from *-* over the next 26-28-30-34-36-40 stitches (= 13-14-15-17-18-20 increased stitches), insert a marker here. Front piece: * Knit together the yarn over and slipped stitch, purl 1 *, work from *-* over the next 15-17-19-21-23-23 stitches, 1 edge stitch in garter stitch. There are 139-153-167-183-197-213 stitches on the needle. Change to circular needle size 4 MM = US 6 and work rib from the wrong side as follows: 1 edge stitch in garter stitch, (purl 1, knit 1) as far as the first marker, (purl 1, knit 2 – yarn overs knitted twisted to avoid holes) as far as the next marker, (purl 1, knit 1) as far as the next marker, (purl 1, knit 2 – yarn overs knitted twisted to avoid holes) as far as the next marker, (purl 1, knit 1) until there are 2 stitches left, purl 1 and 1 edge stitch in garter stitch. Continue back and forth, with knit over knit and purl over purl and with 1 edge stitch in garter stitch on each side until the rib measures 3 cm = 1⅛". Bind off with knit over knit and purl over purl – read BINDING-OFF TIP. The jacket measures approx. 54-56-58-60-62-64 cm = 21¼"-22"-22¾"-23⅝"-24⅜"-25¼" from the shoulder down. SLEEVES: Place the 33-37-41-45-49-53 stitches from the thread on the one side of the piece on short circular needle/double pointed needles size 6 MM = US 10 and cast on 5-5-5-5-7-7 new stitches on the needle (= mid under sleeve) = 38-42-46-50-56-60 stitches. Work ENGLISH RIB in the round – read explanation above (make sure to start at the correct round in pattern), round now starts with the 1st of the 5-5-5-5-7-7 new stitches that were cast on mid under sleeve. Sizes XS, S, M and L: go to ALL SIZES below. Sizes XL and XXL work as follows: Insert a marker in the middle stitch under the sleeve. Allow the marker to follow your work onwards; it is used when decreasing mid under the sleeve. When the sleeve measures 4 cm = 1½" from the division, decrease under the sleeve – read DECREASE TIP (= 2 stitches decreased). Decrease like this every 8th round a total of 2-2 times = 52-56 stitches. ALL SIZES: Continue working until the sleeve measures 41-42-41-40-39-38 cm = 16⅛"-16½"-16⅛"-15¾"-15¼"-15" from the division (shorter measurements in larger sizes due to longer yoke). There is 4 cm = 1½" to finished length, try the jacket on and work to desired length. The next round is worked as follows: * Knit together the yarn over and slipped stitch, purl 1 *, work from *-* to the end of the round. Change to double pointed needles size 4 MM = US 6 and knit 1 round where you decrease 0-2-4-8-8-10 stitches evenly spaced = 38-40-42-42-44-46 stitches. Work rib (knit 1, purl 1) for 4 cm = 1½". Bind off with knit over knit and purl over purl – remember BINDING-OFF TIP. The sleeve measures approx. 45-46-45-44-43-42 cm = 17¾"-18"-17¾"-17¼"-17"-16½" from the division. Work the other sleeve in the same way. BANDS: Insert 1 marker at the back of the neck; this is used when working out half the stitches on the band/neck. The bands are knitted up inside the 1 edge stitch on the front pieces and in the first row around the neck. Right band: Start at the bottom of the right front piece with circular needle size 4 MM = US 6 and Air. Knit up 119 to 149 stitches along the front piece as far as the marker at the back of the neck (number of stitches must be divisible by 2 + 1). It is important the band is not loose, with too many stitches, but it should not be tight either. The next row is worked as follows from the wrong side: 1 edge stitch in garter stitch, purl 1, (knit 1/purl 1) until there is 1 stitch left, 1 edge stitch in garter stitch. Continue this rib for 1 cm = ⅜". Now work 5-5-5-5-6-6 buttonholes. The bottom buttonhole should be 2 cm = ¾" from the bottom edge and the top buttonhole where the V-neck begins. The other 3-3-3-3-4-4 buttonholes are worked evenly between, with approx. 8 cm = 3⅛" between each one. 1 buttonhole = knit 2 together, make 1 yarn over. On the next row knit the yarn over to leave a hole. Continue the rib until it measures 3 cm = 1⅛". Loosely bind off with knit over knit and purl over purl – remember BINDING-OFF TIP. Left band: Start mid-back of the neck with circular needle size 4 MM = US 6 and Air. Knit up the same number of stitches as on the right band (number of stitches must be divisible by 2 + 1). The next row is worked as follows from the wrong side. 1 edge stitch in garter stitch, (knit 1, purl 1) until there are 2 stitches left, knit 1 and 1 edge stitch in garter stitch. Continue this rib for 3 cm = 1⅛" and bind off with knit over knit and purl over purl – remember BINDING-OFF TIP. ASSEMBLY: Sew the openings under the sleeves. Sew the buttons onto the left band. |
||||||||||||||||
Diagram explanations |
||||||||||||||||
|
||||||||||||||||
|
||||||||||||||||
|
||||||||||||||||
Have you finished this pattern?Tag your pictures with #dropspattern #fullmoonfestivaljacket or submit them to the #dropsfan gallery. Do you need help with this pattern?You'll find 30 tutorial videos, a Comments/Questions area and more by visiting the pattern on garnstudio.com. © 1982-2025 DROPS Design A/S. We reserve all rights. This document, including all its sub-sections, has copyrights. Read more about what you can do with our patterns at the bottom of each pattern on our site. |
||||||||||||||||


With over 40 years in knitting and crochet design, DROPS Design offers one of the most extensive collections of free patterns on the internet - translated to 17 languages. As of today we count 314 catalogs and 11822 patterns - 11812 of which are translated into English (US/in).
We work hard to bring you the best knitting and crochet have to offer, inspiration and advice as well as great quality yarns at incredible prices! Would you like to use our patterns for other than personal use? You can read what you are allowed to do in the Copyright text at the bottom of all our patterns. Happy crafting!
Post a comment to pattern DROPS 223-16
We would love to hear what you have to say about this pattern!
If you want to leave a question, please make sure you select the correct category in the form below, to speed up the answering process. Required fields are marked *.